
Leaderboard


Popular Content
Showing content with the highest reputation on 20/11/12 in all areas
-
Well here's my latest, the wonderful Tamiya 1/48 Spit Ia. This is actually my first finished build for sometime - new daughter and new job have meant I haven't had much time over the last year or two. Construction was a breeze, paints are all Humbrol enamels, decals were generally well-behaved although some slight silvering on one or two, weathering was a mixture of washes and pastels. Markings are for L1043 of 610(F) Sqn RAF at Biggin Hill in July 1940. Cheers, Tim4 points
-
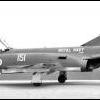
Finished this last week and thought I'd share the results, hope you don't mind. The kit is the recent Airfix release OOB finished with Humbrol gull grey and white with a wash of Flory/promodeler weathering wash(great stuff) to highlight the engraved detail I used the kit decals which for the most part worked well, the only issue were that the intake warning markings would not fit the intakes(so just used the 'Danger' center bit and used a matching red for the intake lip). Also the decals on the tops of the wings did not want to snuggle down over the vortex generators and required a little persuasion and touching up when dried. I have weathered the kit with some oil wash and streaking but the effect has been lost due to the bleaching effect of the camera flash. I still have to hang a couple of dumb bombs from the pylons, TER's with a pair of 250 pounders on each I think should look ok. Thanks for looking3 points
-
Just finished this over the weekend. I did do this along with a WIP thread (sorry, don't know how to do linky things but it's over there if you wish to view) which i quite enjoyed doing. Almost felt a bit more accountable when doing the WIP thread and i think just made me more patient with this build and calmed my "rushing at the end to get it finished" approach that i have always had. The kit? Well, as some people have said already it's not an amazing kit with not much detail, compared with the Revell kits anyway. But i think it does build up into a decent looking model when finished in my opinion. I did try a little rescribing on this one but my "talents" at this i think still do more harm than good. Also had a problem getting the wash to stick in some places but i am reasonably happy with the results. What i'm most satisfied with though is the paint job as for me it's probably the most challenging one i've undertaken and am really happy with the outcome. Even more so as i know i can probably do a better finish on something like this next time with the things i learnt whilst painting this one. For some reason this kit didn't come with any fuel tanks so i just left the wings bare and stuck with just having the bombs on the under side of the fuselage. I know this probably doesn't look right to some. Like i've said over on the WIP thread i did finish this kit about 5 years ago in the RAF scheme and was interested to see if i had improved my modelling at all. I would have to say that i have and i'm slowly paying a bit more attention to detail. Plus, i wouldn't have attempted the Saudi scheme 5 years ago. I put some pictures at the end of the old and the new build side by side to compare, don't really know if you can tell much from the pictuers. Anyway, enough waffle from me so here are the pics. Thanks for looking Stuart3 points
-
Hi everyone Finished this one the other day. Its Aero clubs fantastic ittle Rapide on 1/144. It is a small plastic sprew kit, a tiny decals sheet and even smaller etch set. It was only £10 from telford, i really did love making this, the smallest thing in my collecting. But i loved it!!!! It was my 1st time using etch and more than likley it will be the last, not very good with it. I screwed up most the pylons... But i really did enjoy it. Heres the photos. Here it is on its own. and a few size comparisons, all on 1/144. DC-3 A319 Concorde Sorry for the bad pictures.... Thanks Bradley2 points
-
Just finished this one over the weekend litterally for the ACTSMS Blitz Build. It is the old Hasegawa kit build more or less OOB. I only added the LEX fences. Decals are from a PD sheet. The kit decals were useless so I have to add a few more like slime lights, etc. I also found that the PD data stencils were all printed the light grey of the paint scheme so any placed on the lower fuselage disappeared into the paintwork. The scheme is for the 77SQN 50th Anniversary in 1992. Here are the finished pictures2 points
-
A great ciao from Italy, first time I post a model here on Britmodeler, I hope you enjoy my latest build. It's a 1/48 J35J Draken of the Swedish Air Force with addition of Aires cockpit and flaps. C&C are welcome Simon2 points
-
Hello, I'm back into modelling after a very very long break (30+ years). I started off with Tamiya M10 Tank Destroyer 1/48. It was quite hard to start again but I enjoyed every moment, from tutorials to building, painting and weathering. I'm going to publish some photos, please let me know what you think and what I could have done better. Thanks. Fabio2 points
-
Many thanks for the kind words! Hi JM, I used smoke coloured invisible thread which is a piece of cake to use and looks good to scale for my eyes. Hi HL-10,the fin flash is back to front deliberately. L1043 had her fin flash painted incorrectly.2 points
-
It's under consideration...2 points
-
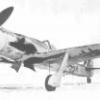
Since the recent - new - restoration of the RR PS853 ( thanks Rolls Royce !! ) and the forthcoming Airfix kit ( Thanks Aifix !!), I am happy to share with you some close ups of these two specimens. With and without cabin blower intake............ ( These views are extracted from original argentic vintage MoaP prints I have in my collection / copyright related ) FULL sets are visible at :http://s1025.photobucket.com/albums/y317/joanblaue/SPITFIRE/ cheers Olivier1 point
-
I built Tamiya's awesome 88 a few years ago. I added Eduard's etch set that includes a shield, ground spikes and load of other refinements. A Jordi turned barrel was also added. The figure are a mixture of Dragon, Tamiya and Verlinden parts. The base is a piece of foam board with model railway grass mat added. The long grass is from an old wall paper paste brush and the stream was made from layers of gloss varnish and Klear floor polish. Verlinden's German uniform badges decals were used and the figures, and gun were painted with Humbrol enamels. Thanks for looking.1 point
-
My second post - the Italeri 1/35th Schnellboot in Black Sea colour scheme hence the green deck and air-recognition stripes, based on research there is a plausible case for 2 boats in this scheme. Hope it passes muster , C&C always welcome1 point
-
Well i have'nt done a W.I.P for ages, so i thought i'd do one with my next project. The project in question is the classic Hasegawa FGR2 Phantom. I'm using the Eduard Colour etched cockpit set and some etched bits from hasegawa its self, and decals are from the Aeromaster range. Have'nt settled on a scheme yet, but think i want a camo machine, and i have markings for the following in camo:- 2sqn, 41sqn, 228OCU, and 111sqn. Anyway enough waffling, and off with the pictures of what ive started. First is the picture of the kit/box, and some of the after market bits being used, Now a start on the cockpit, i do like the Eduard set, really brings life the cockpit, First the front/pilots office, Then the rear/Navigator/WSO office, A few small bits on the side walls, well got a little more done over the weekend, and got the fuslage buttoned up, plus the nose and fin top on, A quick view of the pit fitted, Got quite abit more detail to add in this area, some from the Hasegawa etch set, and some scratch built bits. I'll add more as and when i can, i've got a few days off work so might get some more done this week. Thanks for having a look, and if anyones still interested i'll carry on :-)1 point
-
Hi all, this is my latest addition to my Vampire/Venom family; number 10 - Venom NF.2A night fighter version flown by No.219 squadron in 1956. Cheers Libor1 point
-
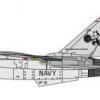
Hello all, Here is my recently finished 1/48 F-14 Tomcat built as a Tomcat F.1 for the 'What-if 2' group build. The build thread is here Parts used included Quickboost seats, Dr Pepper resin exhausts, Quickboost FOD inserts and aMaster brass Pitot tube. Decals are a mix of Hobbyboss, Model Alliance, Revell and others from the spares. Here is the background to the Tomcat F.1: Based on the D model Tomcat, the RAF ordered 46 new build jets from Grumman in 1993 for delivery from 1996 onwards. The jets were to supplement/replace the Tornado F.3 fleet and provide the RAF with the best interceptor available at the time. The F.1's were modified with a new communications suite, defensive aides and the ability to carry the AIM-120 AMRAAM missile. BAE systems wanted a monopoly on the jets to include installing new ejection seats, fire control system and radar warning receivers, but the MoD said no, and only allowed the minor modifications mentioned above to be added to the finished Grumman product. 56 Sqn was the first to receive the new jets and had its full compliment of 12 by early 1996. The squadron was deployed on Operation Northern Watch, Southern Watch and policed the skies over Kosovo along with her sister squadrons. In November 1999, one 56 Sqn jet successfully engaged and destroyed three Iraqi Air Force MIG-23's that had violated the Northern 'No Fly Zone' in Iraq with the potent AIM-54C+ Phoenix missile. Two were direct hits at a range of 85 miles, while it was believed the 3rd MIG crashed into the ground while trying the evade the Phoenix. Deliveries of the Tomcat F.1 were completed by 1998 and eventually equipped 3 frontline squadrons, two for QRA and one for operational deployment (although the jets were pooled for the latter). A single training/OCU was also established, with the crews regularly deploying to both 'Red Flag' at Nellis AFB and 'Top Gun' at NAS Fallon, both in Nevada USA. One aircaft was lost in a 'bird strike' flying out of RAF Coningsby. The crew ejected safely. 4 jets were rotated through 1345 Flight at RAF Mount Pleasant on a yearly basis. The QRA jets regularly intercepted Russian TU-95 Bears and TU-160 Blackjacks off the UK coast. And beside my RAF FGR.1 Tomcat I built for the Tomcat GB earlier this year: Comments welcome, thanks for looking. Dave1 point
-
I’ve been trying to make space for my latest project so am tidying up a few loose ends, this being one of them. Its Tamiya’s 1/48 scale M8 Greyhound built OOB apart from Hauler’s .50 update set. Really need to add some antenna's...! Enjoy…1 point
-
Crosskitted two AZ's - Mk.22/24 with Mk.XVIII fuselage.: Paints used: Alcohol based SGM, OG, DG, Sky Revel Acryl: Yellow ID strips.1 point
-
Here it is the long awaited Airfix 1/48 Spitfire XIVc, but no , I jest , it is in fact a conversion from the Mk XII. I've lengthened the nose ,added full span wing tips, enlarged fin and rudder and Griffon radiators, the rest is just Airfix. I've also reduced the depth of the rear fuselage by about 1-1.5 mm, but you honestly can't see any difference from the original. Prop is from Quickboost. Decals are from a Tally-Ho sheet and I've attempted to simulate the effect of recently removed invasion stripes by masking and applying weathering powders, [not sure if this works or not ]. Hope you like it Andrew1 point
-
Just finished the 1/72 F-94C from Emhar which I purchased at the IPMS Nationals,Telford some years back, not 100% pleased with the finish but I'm happy to have an F-94 in my collection, straight from the box, no extras and kit decals used, 84thFIS at Yuma Gunnery Meet in 1954. IMAG0906 by [email protected], on Flickr IMAG0908 by [email protected], on Flickr1 point
-
Welsh Models ; £40 compared to Authentic Airliners ; £39 at todays exchange rate makes the latter item great value for money. In my opinion, The Welsh kit is the rip off, but that's only my opinion. The decals are great but wasted on the kit. I'd rather spend a couple of extra quid for shipping and get another resin masterpiece. Chris.1 point
-
Super looking build, well done1 point
-
Hi, the V1 for me the father of the breed...of build em all...... Andy.1 point
-
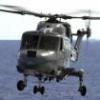
Ok been working on the under side had to remove section from the rear as antenna is fitted at the front on early cabs. Top panels will need a bit of filling to make them look nice. Front cowling opened up front intake vent. Opened rear cowling too1 point
-
Has a great 'Feel' to it. It's captured the character and style of that time, especially the way the pilot is looking back......1 point
-
Sure looks nice from here! You don't half do neat work using spray cans. Maybe I should take a better look at that as an option in 1/32, I tend to soldier on doing large areas with a 0.2mm airbrush Al1 point
-
I have both the Academy G6 and K4 in the stash both nice kits. The G6 has the Hartman markings.1 point
-
Very nice! It even comes with B&Q access ladder, lol1 point
-
Some more pix from last nights session, Flaps are now and weathered. The end is getting near. Dan1 point
-
Here is the first model I made after moving to Western Australia almost 7 years ago, built from box as a RAAF machine. Brush painted acrylics and some water colour to make it a little dirty. Took it down from the shelf to clean and managed to break a few parts off that needed re-glueing so you could argue I completed a model this weekend.......1 point
-
Fantastic job on this diorama. Plenty to study here. The figures are very well posed and realistic. Tis a Diorama to be proud of, nice one1 point
-
Little bit of an update.I managed to get it on its stand. The way the stand is designed means the models lean in to each other. The decal for the base arrived from the US too.1 point
-
Indeed it is. As the thread title says, this kit is an old friend. I can't afford to botch it up as that would feel like a betrayal.1 point
-
Thanks chaps, glad you like her. The air brakes and landing flaps are extended, honestly it is the easiest way to fit them on:-) Also, the details in the flap bays are excellent and pity to be hidden. The NF.3 is planned for the next year, the master patterns are done, so it'll obviously take some time until the kit hit the shelves, Cheers Libor1 point
-
nice work. as well as the other models you built. keep it up1 point
-
Yes, what is it with Hasegawa and the wing to fuselage fit? Not to get off on a tangent but for what they charge for their kits, this problem which seems to be endemic i.e. Spitfires, Thunderbolts just to mention a few, is a bit ridiculous. Overall I will take Tamiya for the vast majority of the kits available. I do have the Hasegawa/Revell Germany 109E and it is definitely Tamiya's inferior. I think in the case of Hasegawa there is a philosophy among modelers that because it is Japanese it must be superior. Like the old song goes, "it ain't necessarily so." Cheers1 point
-
I haven't used the humbrol but have tried the tamiya metalics and alclad. I just fancied trying this to see what its like really. Plus it cold out side and I don't want to spray smelly stuff inside the house!! Plus the wife moans when the compressor is chugging. This way I make some quiet, odorless progress without any "phwoor that stinks.." or "shhh. I can't hear what Ant and Dec are saying" Kev1 point
-
Very nice M10, Fabio! I've always liked the look of that AFV - I suppose it's that open-topped turret that gives it an interesting appearance. Regards, Jason1 point
-
Perhaps you could point us in the direction of such posts Graham, because its easier to get myths accepted than erased, especially when those "apologists" demonstrate an ability to work with such "lower quality" kits, while their critics don't.1 point
-
That's looking seriously nice, lovely work on the cockpit. It always seems a shame to close up something that is so beautifully painted. Nice photography too Chris1 point
-
Bill, post edited sccessfully. Al; HL-10; thanks for your help Stew1 point
-
Or visit the WHS reading library....1 point
-
1:48 Farman HF 20 - building a master for resin kit: http://scalemodels.ru/modules/forum/viewtopic_t_40569_start_320.html1 point
-
I'm still waiting in loads of sheets from my first order and have sent Alex a stroppy email and still not had an reply, not happy at all1 point
-
Have you used up your computer's quota of certain characters? Are you limited to using only a few keys on your keyboard? I have plenty of useful characters to spare, so here are some for you. Feel free to use them when you post here. ??????????????????????????????????????????????????????????? ppppppppppppllllllllllllleeeeeeeeeeeeaaaaaaaaaasssssssssssssseeeeeeeeeeeeee1 point
-
Plodding on.All of the large assembly work has now been done. Next up is a marathon sanding/filling task , although i have assembled it carefully so theres not alot of huge gaps. Everything will then be in grey primer before painting starts. Luckily mostly aerosol cans. Heres the external tank and boosters. The boosters are not attached yet. That aerosol can is a LARGE Halfords can. Heres the orbiter. It needs filling and sanding. It also needs the cockpit fitting and cargo doors adding.1 point
-
Here is a set of etched rudder peddles with working straps i made --------------> . . <-----------------1 point
-
Olá Vitor, Muito impressionante seu projeto. Eu estou lutando com um SHAR FA.2 1/48. Eu adoro Harriers! (sou brasileiro) Hello Vitor, Very impressive work! I'm struggling right now with a SHAR FA.2 1/48. I love Harriers!1 point
-
Lovely build Vitor.1 point
-
Hello phildagreek, thank you. Im glad you like it ;-) Hello goose, thank you :-) Well i have some but i dont have them all, some where lost in a house changing :-( fortunately some of the oldest escaped to the tragedy. But is really funny to look at them now. Thank you Simon :-) Well not always is possible to keep all of our stuff since we was born... there is lots of things that i already lost... from my toys i only kept the kits (well i think my toys where kits :-) :-) ;-) Hello jimbuna, thank you ;-) Hello Sean, thank you. Im glad you like it :-) Hello Spikelhund, thank you. You are right, a wonderful aircraft, the most beautiful british one. The light box works and it was very very cheap. Thank you all for you nice comments. Best regards Vitor Costa1 point
-
Hi well have finished this Pitroad kit of the Japanese Motorcycle and side car. You can have a Hvy MG mounted or windscreen. For a Diorama I am planning this type will be used. This figure is one that I can use,have some allready made. Hope you like.1 point


This leaderboard is set to London/GMT+01:00