
Leaderboard


.thumb.jpg.76f12b87ce9ca9929c9aabdcf8f9d2dd.jpg)
Popular Content
Showing content with the highest reputation on 17/11/12 in all areas
-
Hello all. I thought that, after being a member for a quite few years, it's about time I posted something. I've just finished this for a former 74 Sqn pilot and thought I'd like to share it with you all. Tamiya kit, obviously (not as good as it's been bigged up to be, in my view); Avionix (formerly Black Box) cockpit; Aires jet pipes; Flightpath Sidewinders and Houchin; some American company's gun, who's name escapes me; scratchbuilt ladder, chocks and one or two other little bits. Anyway, enough spiel, here are the pictures, if I can get it to work! Please feel free to criticise, as it's by no means perfect. Thanks for looking. Stew5 points
-
Good kit, not a great one, but done at last. Good looking machine. Build here if interested. http://www.britmodeller.com/forums/index.php?showtopic=69189&hl= Getting a case made, hence the routed edge of my base. Will add links to build thread etc later. Cheers all.2 points
-
Trumpeter JU-87 corrected and just finished in time for Telford Hi guys the title says it all really . It was built for Mai and will appear in the magazine in the future. Lots of items updated and corrected to get to what you see here. i will only post a couple of images as it is for the mag. Suffice to say i have just finished her in time for Telford. See you all there John2 points
-
Here's Airfix's newish Sabre with Pavla's resin interior, wheels and vac-formed canopy. The decals are from Leading Edge and it depicts a Sabre Mk. 5 as flown by the Golden Hawks in their first season, 1959. I made new wing fences and moved them inboard on the wings to their correct locations, and moved the drop tank pylons inboard as well. I also added a few vents and scoops to the fuselage where needed. The soft detail in the open ammo bay was carved away and new ammo boxes were made from sheet plastic. The Pavla wheels are a definite upgrade as is the interior. I did use the kit's windscreen over the Pavla part just because it fit better but I did use the Pavla canopy. -Dan2 points
-
My latest finished 'plane, Tamiya's Mustang, along with an earlier build, Tamiya's Zero. Both would have been active over Japan in 1945...... [ Thanks for looking, Dave2 points
-
Just finished. 1/48 Monogram A/B-26C converted to B-26K Nimrod. Second build of this aircraft type. Hope you like.2 points
-
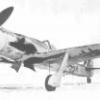
Hello, Just finished yesterday and started in august, with big breaks ! Nice model, pretty fine fitting for a short run kit, and a lot of post painting efforts to represent a battered bird in North Africa. Thanks for looking ! BTW Acrylics, inks, pencils, chalks, for painting/wethearing.1 point
-
I've have the good fortune to shoot of the Blue Angels team at MCAS Miramar, NAF El Centro, and NAS Lemoore over the recent seasons. Below is a compilation of (I think) the better images in the order they would appear in the airshow routine (were I able to shoot from multiple locations in the same performance). EDIT - Sequence of images re-arranged in sequence with names added. Critiques and especially advice are absolutely welcome! Morning Light At Rest* Fat Albert Launch@ Fat Albert Fat Albert Pass* Fat Albert Overhead@ Fat Albert Getting Down# Fat Albert 2 Man-up Anticipation Narration All ready*1 point
-
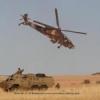
Crossing the reef at the lagoon inlet, Second Element, 19th Regiment (Heavy Reconnaissance) - the much feared Stormwalkers on patrol detachment from Star Destroyer Eradicator during extended anti-piracy operations. With a service life quite different from the Assault AT-AT's which conducted the brief attack on the Rebel Base on Hoth, these Walkers display the very considerable scarring of long-term reconnaissance service. One in particular having been brutally flayed by a four-day hypersonic sandstorm. Base model is the F-Toys pre-painted AT-AT which stands roughly six inches tall. Whilst the replica is arguably the best of all plastic AT AT's which have been available, the main fault is the very stiff pose that assembly without modification obviates. The model can be encouraged to shed its constituent parts at which point the modeller can give all the articulation that a superior model needs. It needs a wee bit of filler and additional detail - not much, but the effort is worth it. Whilst it was released some years ago, they can still be found quite readily on Ebay. http://www.ebay.co.u...984.m1423.l2649 This was my first attempt at the hairspray weathering technique and I was really quite impressed. The dark undercoat is Halford's Vauxhall Hazel Brown, with a bit of overspray splashing with rust red primer. Then hairspray, a coat of mid-grey primer, hairspray again, then overcoated with Humbrol 64 aerosol. After paint chipping etc, the models were then finished off with varying degrees of Tamiya weathering pastels. The base is Trumpeter No. TU09808 http://www.hannants....product/TU09808 The base was given a sheet of kitchen aluminium foil over which I dabbed irregular and semi-transparent blotches of mid blue and green. The sea base is from bathroom translucent sealant The first layer comprised two full tubes of sealant mixed with a couple of thimble-fulls of Inscribe 'Deep Teal'. Whip it all in as if you were making dough and upon reaching a consistent colour, just paste it over the base in a thick buttered layer. Then the models were placed into the soft sealant. It took only an hour for that initial layer to solidify, so the wave patterns, spray and surges could be built up with the second layer shortly after. (This diorama base was started midday sunday 26 August - it was complete as seen by 9pm...). It was topped off with a wee bit of drybrushing with enamel white, which proved about as easy as drybrushing a melting ice-cream... The second layer was coloured more thinly with blue and green food colouring - just a few drops of each - and the paler surging patches had a few drops of tamiya matt white mixed into this thinner-coloured paste. The upper layer needed only around half a further tube of sealant. It remains pliable for shaping for a goodly amount of time, attaches to the under-layer of silicone without complaint and whilst its dextrous qualities for the modeller are very compliant, the shape it is given is immediately and permanently retained - it's a dream to work with. (Naturally, however, it reeks with a very strong, pungent acrid vent-off. If you have sensitive eyes and\or breathing, then I'd recommend you work it outdoors...) The translucent nature of the silicone means that its diorama transparency is very satisfying and when sunlight falls on the base, it gives a very pleasing glowing cerulean blue shimmer, aided by light reflecting back from the aluminium foil on the underside. Hence it will translate nicely to most forms of maritime diorama - with an added bonus that ships with little below the plimsoll line need not be waterlined. Perhaps another important thing I need to mention is that I've never tried this silicone rubber technique before. This was a first, Armed with a few kitchen spatulas and discarded toothbrushes and cafe coffee stirrers (thanks, MacDonalds...), these effects are an absolute doddle to achieve. However, with the material venting off, I won't be closing the display case lid for some weeks, just in case the vapours damage the transparent case itself. I could be wrong, but I'd rather err on the safe side there.1 point
-
Convair F-102A (Case X) 1:72 Meng Models The Convair F-102 Delta Dagger was borne out of a US Air Force requirement, issued in 1950, for a supersonic fighter aircraft capable of intercepting and shooting down Soviet bombers. Convair’s design utilised a radical tailless delta wing. This configuration was tested by Convair on the experimental XF-92, which also led to the development of the somewhat larger B-58 Hustler. Always ahead of its time (the prototype flew for the first time just eight years after the end of the Second World War), the aircraft suffered a number of setbacks, not least of which was the inability of the prototype the break the sound barrier – an essential requirement as far as the US Air Force was concerned – due to high levels of transonic drag. Convair’s design team went back to the drawing board, lengthening the fuselage by 4ft and reshaping it around the recently discovered ‘area rule’ principle. The engine intakes and vertical tail were also enlarged and an uprated version of the Pratt and Whitney J75 engine was fitted. The redesigned aircraft broke the sound barrier on its second flight on 21st December 1954 and went into full scale production soon afterwards. Production of the F-102A continued until 1958, by which time 889 Delta Daggers had been produced. The aircraft was well liked by its pilots and continued in service with both the Air Force and Air National Guard until the 1970s. The F-102 saw active service during the Vietnam War, during which fifteen aircraft were lost to a combination of ground fire and accidents. Just one aircraft was lost in aerial combat, shot down by a MiG-21 while escorting a B-52 raid. Later in the 1970s, hundreds of F-102As were converted to pilotless target drones. Ex-US Air Force F-102s were also sold to both Greece and Turkey, serving with each nations air force until 1979. Meng’s new F-102A caused quite a stir when it was first announced earlier this year. The Chinese company’s first two aircraft kits were both Japanese paper projects, so it was a surprise to find that this promising new company had chosen to tackle a subject like the Deuce. Having said that, the F-102A is in many ways a perfect choice for Meng. The aircraft has been overlooked by other mainstream manufacturers, leaving the rather elderly Hasegawa offering as the only game in town in 1:72 scale. The kit is presented in a reasonably sturdy top-opening box, the lid of which is adorned with an attractive painting of an F-102 climbing to intercept a Soviet Tu-95 Bear bomber. The box has a satin, rather than gloss finish, which gives it a plush, upmarket feel. Inside are six sprues of grey plastic, a single clear sprue, a large decal sheet and a full-colour instruction manual. Each of the sprues is individually wrapped in plastic for added protection. The mouldings are clean and crisp and the immediate impression is of a high quality product worthy of the likes of Hasegawa or Eduard. The plastic has a smooth, glossy finish and the engraved panel lines are nice and delicate. There is subtle recessed rivet and fastener detail is places too. The cockpit is made up of a tub, with side consoles and rudder pedals moulded in place. The controls and dials on the instrument panel and side consoles are picked out with fine moulded detail. Meng have provided a decal for the instrument panel as well, but the decision as to whether to use it or not is up to you. The Weber ejection seat is made up of three parts and looks like a pretty good representation of the real thing. Overall the cockpit is very good, but you might want to add a little more visual interest with some photo etched harnesses before fixing the canopy in place. The cockpit sits on top of the nose gear bay, which itself features some nice structural details and hydraulic lines. Before you can close up the fuselage, you will need to assemble and paint the rearmost part of the engine. This is made up of the rear turbine face, a full-length exhaust, afterburner flame holder and the nozzle itself. Once the fuselage halves are together, construction moves on to the wings. The lower wing is moulded as a single span, with separate parts for the upper surfaces of the port and starboard wings. The internal weapons bay also fits into the lower wing. This part will need to be used in order to add structural rigidity, whether you intend to finish the model with the weapons bay open or not. The wing tips are moulded as separate pieces and are provided on a suspiciously small sprue along with the elevators, which suggests that a Case XX wing version will be offered in the future. The main landing gear bay has to be fixed in place before you join the wings to the fuselage, and it is just as well detailed as the nose gear bay. The engine intakes are each made up of two parts and, although nicely moulded, represent something of a weak point for the kit. This is because there is no intake trunking, so you can see straight through into the empty fuselage interior. I’ll be blanking mine off with plastic card when I build it. In contrast, the tail-mounted airbrake is a beautifully detailed feature which simply begs to be finished in the open position. The internal weapons bay can be finished with the doors open or closed. If you choose to finish the model with the doors in the closed position, then a one-piece door is provided, saving you from having to fiddle about trying to line up all four doors by eye. If you wish to finish the kit with the doors open, then you have a choice of using either retracted or extended missile launch pylons as both are supplied. A comprehensive weapons load is provided in the form of six AIM-4C and six AIM-4D Falcon air-to-air missiles. These are nicely moulded, and whichever you choose, you’ll have six left over for the spares box. A pair of 815 litre drop tanks are provided too. The undercarriage is nicely detailed without being overly complex. The gear doors are beautifully detailed inside and out too. The clear parts are just that; superbly thin and clear. The canopy can be posed in the open position too, and a separate hinge mechanism is provided for the latter option. Meng Model have been pretty generous with the decal options in this kit. The decal sheet provides a choice of three aircraft: F-102A of the 431st Fighter Interception Squadron, 1962. This aircraft is finished in Aircraft Gray with a red flash on the vertical stabiliser; F-102A of the 327th Fighter Interception Squadron, 1958. This aircraft is also finished in Aircraft Gray with a white and red vertical stabiliser; and F-102A of the 497th Fighter Interceptor Squadron, 1970. This aircraft is finished in the South East Asia scheme of Green (FS34102), Dark Green (FS34079) and Dark Tan (FS30219) over Camouflage Grey (FS36622). Each option is illustrated with a four-view full-colour profile as well as a detailed illustrations of the AIM-4 missiles, drop tanks and pylons. The decals look nicely printed. They appear to be reasonably thin but the colours are nice and bold. They have quite a matt finish, so I’d recommend applying them over a gloss surface and using a decal setting solution, particularly on the larger decals for the vertical tail. Conclusion If you’ve been waiting all these years for a state of the art, accurate kit of the F-102, then your patience has finally been rewarded. Meng have delivered a kit that ticks all these boxes and more. The engraved panel lines are nice and restrained and the detail in areas such as the undercarriage bays and airbrake assemblies is up there with the best. The kit appears to be accurate in outline, and the pinched contours of the fuselage look pretty good too. A quick tape together of the wings and fuselage has revealed no major fit issues either. Overall, Meng have produced a nicely detailed kit which doesn’t compromise on buildability. I’ll certainly be building mine soon. Highly recommended. Review sample courtesy of1 point
-
Hi All, Thanks to all for the comments re the CF "Freedom Fighter". Carrying on with some 72nd builds its the Italeri F-100F "Super Sabre" a lovely little kit that makes up into a good replica of this twin seat classic. Brian.1 point
-
- This model in 48 Scale was built for the S M W 2010 and was seen on the S I G Battle of Britain stand .The model is from Classic Airframe1 point
-
Italeri's nice Mustang kit, bought as a two for one deal off E-bay about a year back. Started at this time last year, stalled over the Christmas holidays and the cause of me not doing any modelling for over six months. It was nearly finished when I went back to work, and sat and stared at me, but I just couldn't get around to putting the final bits together. Finally completed a couple of weeks ago and the last of my inflight displays when it should of been the first. Built straight from the box, brush painted using Humbrol enamels and kit decals,( except for the yellow stripes). Stand made from brass rod and base from a 1/43 model car. Shown as a Mustang of the U.S.A.A.F; 154th Recon Sq. Tunisia 1943. A nice and simple build and glad it's done,although the canopy is still not glued permanately, all comments welcome, Sean1 point
-
Built out of box using kit decals, which performed rather well for an old kit, Hummbrol paints as usual, with a pilot from the Hasegawa pilot set Displayed inflight, using using thin brass rod and a base from a 1/43 Ferrari model, as all other models are static and a change was due, so this was the first " to fly', so to speak. Lovely kit to build, love to get more as there are so many different good looking schemes for this plane. And my favourite picture All comments welcome Sean1 point
-
Thanks Al, that was nearly funny. I used to like you. Just because the Green Eyed Monster has been sitting on your shoulder since club night (when your F15 got thrashed, as I recall; can't think what thrashed it!), there's no need to use my lack of prolific-ness (is that a word?) against me. All of the above should have humerous emoticons added by the way, as it's tongue-in-cheek, but I can't work out how to do it. Seriously Al, I can see now why you like your "big grey jets" - they do look mighty impressive when finished. Just a shame I've got nowhere to put them, so I'll be sticking to 1/48th. And it'll save me a fortune in paint - won't need a 2.5 litre can of Dulux! Ithengyaw1 point
-
Time for your meds, luv.1 point
-
Sean, Your F-100 Super SABRE is SLEEK, STYLISH, SEXY and looks very streamlined with its elegant lines. Liking the striped colorful nose art and the lightning dart is very effective.. STUNNING ...SUPERB finish, BRAVO ...1 point
-
I remember Trevor Snowden telling a friend & I the year the TSR2 was announced that one of their next releases was shown on the box art. This led us to think they were either doing a 1/72 Lightning tub or a cloud, as those were the only things apart from the TSR2 in the painting! To the best of my knowledge they haven't released either of those things yet....!!! Keef1 point
-
Thanks for the comments guys. It turned out better than I expected, although I'm still not overjoyed with it - two months ago it was about to go ballistic with assistance from my left boot! Andrew, it's ironic that you should ask if I had to make any changes to represent a Brit Toom. Aside from the bit I'll get to in a minute, all I did was move the white anti-collision light on the spine aft a couple of centimetres and scratchbuild the ladder, Brit style chocks and the intake blanks, which I forgot to mention earlier. I had a fair few issues with the kit, not least of which was the supposed method of construction. On the whole, I expected better from Tamiya (and for the price!), but nothing was insurmountable when I put a bit of thought into it. Now, the bit I've really got the hump about is the rear fuselage, where the jet pipes fit. Every time I've seen this model finished I've been surprised to see a relatively large gap between the pipes and the fuselage, which shouldn't be there. No problem, I thought, the Aires pipes will rectify that. However, they didn't. At first, I thought that Aires had just based their pipes on the "inaccurate" Tamiya ones so, intrigued, I reached for the most accurate plans I have (FGR2) and overlaid the upper fuselage. Doing this, I have established that Tamiya and Aires have got the jet pipe diameter about right, but Tamiya seems to have got the rear fuselage wrong, as the width of this part of the fuselage is - wait for it - the same as a British Phantom. Oo-er, Missus. The bad thing with that is that you either have to narrow the fuselage at that point, or alter the construction method to push the pipes outboard and hope that no-one notices (I chose the latter, easiest option!). I think I got away with it Pike. The good news is that it makes my planned FGR2 conversion ALOT easier!! Anyway; enough of my whingeing. It's finally finished and, for the most part, I'm fairly pleased with it. The REALLY good news is that, as it's going to a Phantom driver, he has no clue what the outside of his cab looked like, so he'll love it! And yes, I have already told him that. He just shrugged. Thanks again for the kind comments chaps. They might encourage me to make more than one model every five years!! Stew1 point
-
We were known to have hit some Dams sometime in WWII! Cheers, Brian1 point
-
Recently Airfix have re-tooled good internationally selling WWII kits in 1/72, ie Spitfire, Zero, Mustang etc. So following this train of thought, what about an FW190, Thunderbolt, Me262 etc for 2013? John1 point
-
Excellent! Enjoy... Spence Thank you - very kind!1 point
-
I'll take that as a compliment! - It's 1/350, around 300mm long. Here's a shot with a universal unit of measurement included:1 point
-
A couple of close ups Finally, a couple of photos of the model dropped into the base that will eventually also have HMS Hermes and HMS Broadsword as well: If anyone doubts the extreme weathering, here is my main inspiration - from Wikipedia:1 point
-
1 point
-
My copy arrived today I'm saving it to read during the mind numbing banality that is the X-Factor, a quick glance though was extremely promising so I'm looking forward to reading it. Wez1 point
-
I'll examine the real thing on Tuesday - keep watching1 point
-
Truely awesome, hope my Hawk 200 turns out half as good1 point
-
Thanks for those Links. They are exactly what I was after. I have found that this foil I am using is quite robust. If you overlap it you can almost sand it thin enough not to notice. Awesome for complex surfaces where one sheet would tear. Also depending on what you use to buff it you can change its appearance completely. On the pics I posted I used the steel ARM of a bulldog clip. Which gives a highly polished effect. A eraser gives a slightly matt effect. Green pan scouring pad gives a brushed aluminium look. And a lead pencil makes it quite dark. Still playing. Kev1 point
-
I don't build much in 1/72, but I was quite impressed with the Revell/Germany reboxing of the Hasegawa B-25J (solid nose) that I built some years ago. Also, a modeling buddy in my club recently built the Airfix Swordfish. He thought it was a great kit, and the model looked really good. Pip1 point
-
Hi all, Monograms old F-14 built with the addition of microscale decals. Brian1 point
-
Just love this. remember seeing bloodhounds during my visits to RAF bases when I was an air cadet.1 point
-
Eduard F6F-3/5 Hellcats and CyberHobby F6F-5N Hellcat Nightfighter, Airfix Swordfish.1 point
-
No, it is the fairly normal contrast between the highly polished metal and the paint on the fabric.1 point
-
I always thought the Rafale was the most elegant modern aircraft around, those lines are just lovely! Great build and painting!1 point
-
Cheers Ls, much appreciated. Keep watching, I'm still working on the diorama where it's going to live, I'll start sticking up photo's when it starts to look like something other than spilled plaster!1 point
-
Looks nice, but didn't the Frecce Tricolori use the special pointy nosed G-91 PAN?1 point
-
Smoke ON, Ready, BREAK! Back-lit* Father & son's day in the park Solos low pass Solos over the neighborhood Tuck-over roll Sneak-pass This is cool, Dad!* Awaiting their return Blue Angel & Snowbirds Taxi-in Scanning the crowd Pivot Turn SMILE Boss! March Back@ Heads in Hornets* Plane Captain's Attention1 point
-
Diamond Pass# Diamond Overhead Fortus@ Diamond Dirty Loop@ Solo 5 Double Farvel@ In the stack* BUUURN-ERS!* Diamond & Fat Albert Left Echelon@ Solos Pass Low Flat Break@ Planform@ Delta* Delta over 7 High Alpha*1 point
-
Comm cart with Centennial Emblem Parade Rest Business End# Chocks Pulled On the run Smoke On@ Taxi out* PEACE! Hand Salute1 point
-
Great stuff and kudos for getting variations in light and tone in an overall black scheme. Very hard to do.1 point
-
Fantastic!! Really like the way the black came out!1 point
-
They haven't done for the last thousand or so years when I've filled them in & asked for a new 72nd EE Lightning...!!!1 point
-
Ok her Hull has received her Camo Scheme so now I can start on the Flightdeck. More to come soon.....Cheers mark1 point
-
very nicely finished like both of these well done Glenn.....1 point
-
Those were the days, when combat aircraft could be dolled-up like fairground rides, ans still look deadly...1 point
-
LW do some Russian pilot figures that could be used to liven things up a little http://www.plasticsoldierreview.com/Review.aspx?id=3801 point
-
Looks like I'm first to finish again!!! How embarrassing! Any how here goes. Canadair built CF-104D of 417 squadron at Cold Lake, Alberta, Canada. 1/72nd kit by Revell with unbulged main gear doors swapped from the Hasegawa kit. ( the one with the missing sprue!!!) Decals from the Hasegawa CF-104G single seat kit with the serials/last three from Mike Grant decals set fro the CF-5. The 417 badge on the intakes were from the Leading Edge set of the recent T-33 sheet which I completed recently too. Alclad again, appliance white(wing tops) light grey wing undersides and the red tailplane as seen on Canadian based 104s.1 point
-
Warrior MCV 1:35 Academy Operation Desert Sabre, Iraq1 point
-
What it says on the tin really. The plastic used by Hippo is brittle and, on small parts, flys into pieces at the slightest excuse. I have spent as much time this afternoon mending bits that have broken on the undercarriage as replacing the undercarriage mudguards! I mean. come on Hippo, I know these things were fragile in real life, but get real, we don't want scale fragility as well!! Use some decent plastic!! If I had paid full whack for this kit (£70) I would be feeling decidedly ripped off by now. Parts that break as soon as you look at them, no bombs or racks, no etched cooling jackets for the guns, propellers that don't fit their cutouts and a decal sheet that is pure fantasy. And another thing, had I not spent a small fortune on extras for this kit, it would most likely have been heading for the dustbin this afternoon. Sorry guys rant over: for now. Here is the relevant picture. I'm leaving the thing alone for tonight and having a drink or four. Thanks for looking Martin von Very Unhappy Bunny1 point


.thumb.JPG.3498f40362ff13ebfc4b2e45abbd545e.JPG)

This leaderboard is set to London/GMT+01:00