
Leaderboard
.thumb.jpg.d17ff607fc7e89ed057e63fcb6f2a888.jpg)


Popular Content
Showing content with the highest reputation on 13/11/12 in all areas
-
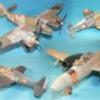
Hi, all... this is a Classic British kit box art diorama, built for our CBK stand at SMW this year. Now the wraps are safely off, I can post her up without spoiling the surprise! This is where it all started, with Brian Knights brilliant art work on a Revell UK boxing of the B-26, found in a charity shop for £3. In keeping with the overall theme of the display, I was hooked by the box-art as soon as I saw it, and snapped it up, just as we used to on a Saturday morning when we were kids... I knew I was going to need some smaller Marauders, and some even smaller ships and landing craft... Flak Bait's wingman would be the Academy 1/144 kit, and the smaller one in the background would be a Scotia Grendel 1/300 scale wargaming model. The fleet turned out to be Hallmark 1/1250 wargaming "coastal forces" from Magister Militum aka navigatorminiatures.com Then I got started thinking about the perspective. There's a lot of aircraft "in your face", but not very much land down below. I needed to "force" the perspective in a kind of cone, so that I didn't have to build too much background. I thought around this for quite a while, an eventually came up with the idea of building the base in a flared flower pot... I cut the pot with a hot knife, which was the hardest task of this whole build!. The base is lined with lead flashing to give extra weight, then some expanded polystyrene to socket the stands into, and finally a flat sheet of foam core for the main surface. The beach is artists acrylics, dry brushed, the sea and sky were airbrushed with thinned acrylics. The sea was coated with PVA to make ripples, and the wavetops and wake dry brushed on. The clouds were just sponged on and oversprayed here and there with grey. This is the bit that people always get worried about with dioramas, but the whole thing took about an hour... The Academy B-26 was finished first: It's a lovely little kit. I scratched a bit of a cockpit, with "peg-doll" pilots, and made some props up using James Perrin's artwork, available on the CBK SIG pages of the UAMF forum. The teeny-tiny one was painted with Citadel colours. I went for a "toned down" look, since it is in the background. The base had some "fog of war" added, using cheap acrylic felt from Boyes, pulled up in tufts for the smoke and flame, and fine wire dipped in superglue and microballoons a few times for the watersplashes. And finally... This one is about as close as I can get to the actual box top... The flak burst are more felt strands, supported by very fine stainless steel rigging wire... ...a project I enjoyed very much! Now, normal service will be resumed as I go back to some shiny super cars... bestest, M.2 points
-
Hi everyone, just finished my 1/48 scale F-5A done as an aircraft of the South Vietnamese Air Force, Bien Hoa, 23rd Wing, 522sq (according to the instructions) Virtually all OOB, only additions include:some extra antenna on the fuselage spine, gun barrels from brass tube and some home made seat straps, I also made some new rear view mirrors as the kit ones went `ping` never to be seen again. Kit went together quite well despite its mutli part fuselage and the decals were great also I managed to choose the one with only one bit of P.E. (phew) hope you enjoy looking at.2 points
-
Thats it done...phew....not bad for only my 2nd model... RAF Mustang IV with DIY louvered intakes and `firewall` paint scheme. Ryben2 points
-
The problem for Spitfire fans is that while there are a lot of Spitfire kits on the market, the number of GOOD spitfire kits is not really high ! Because it's such an iconic subject, most companies have one in their catalogue but not all of them have done all the homework right so every time a new Spitfire is announced all the enthusiasts hope for a better kit of the subject. It should also be mentioned that some very important versions have not been served very well. This is for example the very first time the XIX has been kitted in 1/48 in plastic !2 points
-
The Decals for this model have been made by myself I have finally got arround to posting some finished pictures of this model here they are The modified engine intake to make it look more rounder Richard1 point
-
Last night I spent a good four hours in front of my spray booth. The victim was another of my adversary Skyhawks. This adversary Scooter is supposed to end up as TA-4F BuNo 156491 in these colours: http://a4skyhawk.org...Munzenmaier.jpg Decals are from Afterburner Decals, and the paint is FS16375, FS16251 and FS35237 (all from Xtracolor). SOP, i.e. pre-shading followed by all three colours free-hand. The last two colours acted perfectly so I don't have to touch up the demarcation lines. Jens1 point
-
Well.....we're done! 2nd model built after a 20 year 'gap'! Few 'muck ups' but I know where I went wrong & now know how to get over it for the next one (J.T.'s Tech 3 Yamaha). Let me know what you think guys & all comments & thoughts listenened too. Oh yes, we know about the wheels!!! Lol ATB............1 point
-
Hi everyone - here's the newest model off the workbench, Hasegawa's reworked F-15E. This kit at last deals with some of the irritating issues associated with the earlier releases (which were no more than a prototype dressed up as a Strike Eagle...) and as such builds up into a very fine model. This one has a superdetailed cockpit, Quickboost seats, an updated weapons fit that include new AMRAAM pylons and connectors, as well as Aires jet pipes. The full story of this model will appear in a future edition of Model Airplane Monthly. I hope that you like it! Spence1 point
-
Haven't posted for some time. Apologise for the poor photos, but here's my latest. The model depicts an aircraft belonging to 457th, 301st TFW, Carswell AFB, Texas (circa 1983). This aircraft, 66-8714, was credited with downing a North Vietnamese MIG-21 on February 5th, 1968. As was common throughout this unit, ‘714’ carried artwork on its intakes – In this case, Raider of the 301st TFW · Hasegawa F-4D Phantom (Egypt I edition) · Scratch work cockpit details, including LORAN rear instrument panel · KMC Martin Baker Mk.7 (USAF) seats · Re-scribed panel lines · Hasegawa Pave Spike laser designator · Eduard remove before flag tags · Two Mikes intake covers · Xtracolour paint Decals were from various sources – the intake artwork was custom made regards Andrew1 point
-
Getting models finished lately has been like pulling teeth. Full of much bad language and somewhat unsatisying. Still, since I'm in "time but no money" mode at present (as opposed to "money but no time" when I'm working) I have to keep on with the production line. This is a part of the series of Furies and Sabres I've been doing over the last year or so. I completed a Siga FJ-1 in July and am following it with this Emhar kit. These are reputed to be ex-Matchbox kits that were in motion when the company finally collapsed. They live up to that description pretty well. Some sanding and fiddling will be required to improve fit. I used Xtradecal X72-037 for markings. They depict the CATG of VA-214 as based on the USS Hornet in 1958. I think I rather rushed this one a bit and therefore it isn't one of the better ones. Still, there are many dark corners in my display cases that can accomodate a model like this one. At least it is built, right? This is completed model #413 (#38 for the year), finished in October of 2012. More details, as always, on the 72 Land blog.1 point
-
Hi all, Monograms old F-14 built with the addition of microscale decals. Brian1 point
-
Hi all, Just put the finishing touches on this, first time I have put anything up for inspection for a while, had a bit of time out from building, but got on and finished this at the weekend. Its the Revell boxing of the old Monogram kit, so not a lot in the way of recessed detail on the kit, its built OOB and I actually enjoyed this. I couldn't bring myself to attempt a re-scribe as with my skill level it would just end up looking worse lol, but may bag myself a cheap Airfix GR3 or SHAR and have a go on that. cheers Simon1 point
-
I did virtually the same thing Nick, cheap brush to Iwata with about a month and never looked back! You'll have great fun with it, happy brushing! Rick.1 point
-
Just an update.... Managed to have a quick play with my new 'brush, shot some Tamiya paint thinned 50% with Tamiya thinners at about 20psi - worked a treat! I'm very very happy with my new purchase, the difference between it and the cheap single action ebay special is remarkable!1 point
-
Looking good, Col. I'm watching with interest! Cheers, Bill1 point
-
Nice work on the weathering, particularly the exhausts Mike.1 point
-
My understanding is that the F-X programme which spawned the F-15 also effectively spawned the MiG-29 and Su-27 in response. Although the F-15 design does pre-date the MiG-29, the MiG has more in common with the Northrop YF-17 (which became the F/A-18) than the F-15. Both the MiG-29 and Su-27 are more sophisticated aerodynamic designs, being integral airframes with the engines slung beneath in spaced pods, more like the F-14. Basically, the Soviet aerodynamics laboratory which tested and refined both designs was drawing on western design philosophy, but in developing these, came up with their own unique solutions to the challenges of producing a 4th generation fighter. This is my opinion, other opinions may vary, and you are welcome to draw your own conclusions!!1 point
-
Nice start on the Gustav, Sean! I've always liked the Croatian markings. I have a Junkers W.34 with the Croatian markings. This should like quite smart when finished. Regards, Jason1 point
-
I think it's because the moulds started life as a SHAR 1. Trevir1 point
-
This looks good, there's one of these in my stash, at the very bottom I think, keep going!1 point
-
A great looking 'Grizzly Bear' (nickname used by allied intelligence) and far better than the one I built years ago.1 point
-
Good work so far, especially on rescribing. One point, is the airbrake the shorter SHAR one? I seem to recall it being longer on GR.1 and 3's. Trevor1 point
-
It looks nice but do you have substantive proof Hobbyboss copied Revels kit? Julien1 point
-
Oh, as in The Rutles being bigger than Rod Stewart... could be. Heck, maybe they'll do a F2H Banshee and make the colonials happy? bob1 point
-
Great Job1 point
-
Blog updated for readers of Cold War Aircraft Modeller! Hi everyone - now that the first edition of Cold War Aircraft Modeller is on sale, I have taken time to finally update my Blog and make it more in keeping with the look and feel of the magazine. I will be regularly updating it and using it to announce all of my plans, ordering information, upcoming features and the like. If anyone is interested in seeing what I am up to (or if you have already bought a copy of Issue One), please click the 'follow' button on my blog and it will give you all of the information you will ever need - especially when it comes to future issues. This will be the best way of keeping you the reader up to date on the current issue and the next one, which will be ready to go in the New Year. Once you've done that, you can add the page to your favourites and simply open each day for updates. Also, if anyone else needs information on the new magazine or would like to order a copy, please send them over and they can grab the details that they need to get in touch. Thanks a lot!!! Here's the link: http://workbenchmini...blogspot.co.uk/ Spence1 point
-
That's the hatch to the Starboard boat bay.1 point
-
Well 32nd sky shadow is available from flightpath , http://www.djparkins.com/acatalog/1_32nd_Post_War_RAF.html - a whole £10 , and of course David's excellent Tornado upgrade set is also still availabe , any model of RAF Tornado you want - In addition the various Tornado Nose "lumps" are also all available from Relish models http://www.relishmodels.co.uk/1-32-aircraft/1-32-resin-detail-sets.html - Page 4, I've bought all the Relish pieces , and they are excellent -1 point
-
The Gresley A4 was...1 point
-
That is some great airbrush work Jens1 point
-
Hi Sean The colour that looks brownish is probably Brown-violet RLM 811 point
-
Very nice indeed!!1 point
-
Nice work !1 point
-
I vote for Humbrol 168 as well.1 point
-
LOL. Nah, it's not that bad! More like four clothes pegs: OK, let me describe the secret to getting these guys to fit properly. First, you can't just put the two halves together and glue. You've got some preliminary work to do. Test-fitting revealed that the width of the forward fuselage (near the intakes) was not the same for the top and bottom pieces. This is no doubt due to the sides moving towards one another after being taken out of the mould. The bottom of the fuselage was considerably narrower (2-3mm) than the top. This is the reason why you can't make the intakes fit to the lower fuselage. What a lot of people have done with the kit is to get the intake trunks to fit on the top and bottom of one side (port or starboard) and then they've got a HUGE mess on the other side, impossible to make it fit, and usually resulting in the top and bottom fuselage pieces "twisted" relative to each other. Here, I think, is a better way: Fit the intake trunks to the lower fuselage first. Make a temporary spreader (I used a 3mm diameter rod) of the correct length to push the fuselage sides out so that the intake trunks fit on both side. (You don't have to trim the bar off the front of the trunks like I did or cut the trunks into two; this is totally unnecessary.) I placed the spreader where the rear of the cockpit would normally be and I used superglue to get a quick bond between the intakes and the bottom fuselage. But don't take the spreader out yet, as the superglue is not strong enough and one side or the other will pop if you do. Instead, with the spreader still in place, use a strong epoxy to make a permanent bond. I put the epoxy on the inside of the fuselage where it meets the intake; I also put a lot in-between the intake trunks and the belly of the fuselage itself. Hey, and while you're at it, glue a bunch of fishing weights inside, too, as I'm quite sure that the Vicky will need it. (Sorry, I didn't take any photos of this part of the process. I hope I've explained it so you can understand it. If not, please ask!) Let the epoxy cure for a day or two and remove the spreader. The fuselage sides are now held apart by the bond with the intake trunks. Now when the top fuselage was test fit, I found the alignment to be reasonably good, and certainly nothing that some filler won't fix. I then attached the top fuselage in the "normal" fashion. You noticed the clothes pegs - these were necessary to get a good bond along the trailing edge of the fuselage. Oh, be sure you locate the cockpit and wheel wells inside the before you seal up the fuselage! So after all of this, I added some filler inside the intakes and along some of the seams, and along the splitter plate and sanded smooth. This was just a couple of hours work. Here is the result (bottom is up in these photos): While I was waiting for the epoxy to dry in the previous exercise, I took the opportunity to re-shape the tops of the tail fins. This is a subtle fix to the kit tail fins which are a bit too flat on top. In this photo, the re-shaped fin is on the left, the original on the right. The area that I worked on was the top at the front of the fin. By the way, the flat airfoil shaped pieces that fit inside the fuselage where the wing fold mechanism would go, along with similar parts that go into the outer wing assemblies, are absolutely required to maintain the correct thickness. This ensures that the match between outer wing and fuselage will be good. More to come - so far, the kit is not living up to its reputation as nearly impossible to build. I know what you're saying - "you're not done yet." But I've built worse! Cheers, Bill1 point
-
Ive been cursed by Quarky's bad luck with Federation Starships. Upon drilling the hole for the brass tubing stand the ship suffered from a catastrophic structural integrity failure. It almost split completely in half... Its been fixed up and ive used some miliput to secure the tubing in the correct position, crude I know Two 3mm Superbright orange LEDs are secured for the forward torpedo launchers, wired up and then surrounded with insulation tape and aluminium tape to keep the light away from the main deflector. Ive also made another 'light trap' from cardboard and aluminium tape again. The deflector panel is then attached, and the LEDs look like this: For the main reflector I used a 5mm Superbright LED, filed flat to have a wider spread of light. I also made a light trap again from card and aluminium tape like so: And this is the result: Take care guys1 point
-
This is very good news ! Not unexpected in a sense, as IIRC someone in Airfix had said they planned on doing most variants in both 1/48 and 1/72. Now a nice thing to do would be to scale down this kit and replace the inaccurate 1/72 kit... but for now I'm happy enough to see a new 1/48 kit. Of course the crosskitting possibilities are plenty and building a PR.XI or a XIV becomes easy and not too expensive by using parts from the ICM kits while the 21can be done with parts from the airfix 22/24. I'm not sure however if I'd bother much with these conversions: new versions might appear from Airfix before I manage to finish any of these !!!1 point
-
Hey Sheriff, show us yer badge!1 point
-
I missed it at Telford dave, damn. Gorgeous1 point
-
Hello everyboby, here you are my latest built,the DASSAULT OURAGAN in the "Patrouille de France" (french acrobatic team) in 1956. This is the Valom kit (not so bad) it is more difficult to built than the Heller one! My son (11 years) bult is 2nd kit and it is the fisrt one he used spray...it is the Heller kit of the ouragan in israel scheme. @+ Thierry1 point
-
Thanks Col, it's a good kit, and with acrylic paints you can make good progress in a day of effort. The gloss coat is drying right now, Wednesday should see me laying down some decals. Dan1 point
-
Hi guys, the build begins..HORRIDO!!!......... basic pit built up.. great detail, to me its got the edge over Eduards E's.. Andy.1 point
-
1000 Thanks Jens1 point
-
I would try lacquer thinner. If your airbrush has some rubber O rings, it is better to remove them first, they do not like being soaked in lacquer thinner. best, Christian.1 point
-
Jens is correct - the Testors airbrush thinner works well also. Regards, Jason1 point
-
Thanks Dave. Well I wouldn't call it a pig. Maybe a piglet. I've built worse, and will do so again (Xkit and FM comes to my mind) There isn't such a thing as a un-buildable kit i reckon. Every kit can be built. It just takes different degrees of blood sweat and tears to get them together. But when taking on a short-run kit you know before that you're in for trouble. And I didn't expect this from a brand new kit from 2012. But when the A-version comes out I'll know better what to expect. Hopefully this will look like a F-35B when it's done. /Bosse1 point
-
Right made a start on the nose bands today And got a bit of the thunderbird masked and painted i just need to get the birds body/tail done, and the blue nose band. then it'll be time to sort the gear bays and mount the legs1 point
-
The main problem with the kit nozzles is that they are too long by about 6 mm, and the extend too far behind the hook fairing and the kink in the tail fin support booms. The Cutting Edge nozzles are cropped versions of the Tamiya parts (they even feature the same chamfered ends as the kit to make them look thinner). The Two Mikes nozzles look better, but personally I expect more of an improvement for £30... The Flightpath nozzles and exhausts...has anyone successfully managed to get these built up and made them look good? They seem awfully fiddly to say the least. I have the same kit in the stash for a rainy day or when Aires makes a set of exhausts. Jens1 point
-
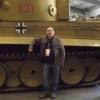
It was not so cold today)) Here are some more photos1 point
-
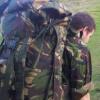
Maybe life isn't too short going to archive all your pics for a future conversion. Who am i kidding i will wait for the upgrade kit. Like the cockpit work the sa80's carbines are nice touch.1 point


This leaderboard is set to London/GMT+01:00