
Leaderboard


Popular Content
Showing content with the highest reputation on 09/11/12 in all areas
-
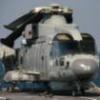
OOB apart from scratch built RBF's, blanks, dingy pack. Also added missing pitot under nose, Sea Skua boxes in cabin & cabling where needed. Decals from Xtradecals. Hope you like, comments welcome!! Dave3 points
-
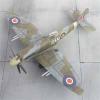
Ok, to show that I do build things, this is making the most of some spare bits Dan3 points
-
Personally I couldn't give a fat rats what they bring out. You know why? Because they keep bring new stuff out that isnt a endless boring procession of boring as bat doo stuff thats been kitted a hundred squillionty times before (and whined about because its a MK2 and we all know everbody wanted a MK3) Out of all new Airfix stuff from the last few years I'm well pleased with the big Mossie, Vixen Cranberry and the TSR-2, lots of the other stuff doesnt do much for me but what the hell, something nice is bound to turn up sooner or later. Let somebody else have a turn. Airfix should be applauded for what they are doing, and if they make lots of moolah good luck to em, then they can release more goodies for us. And one of the really nice things about them is they are probably looking at this thread and giving some thought to all the suggestions.3 points
-
Don't remind me - I rashly signed on to do wonders with the old Testors 1/72 Spitfire Mk.22ish thing for Enzo's group build. Having done some early reconnaissance, I'm already regretting it even though the GB doesn't start for another 11 months. Enzo was quite correct - when I joined, he pointed out that, while some parts substitution is allowed, it might be contrary to the spirit of the GB simply to replace each part of the Testors kit with the corresponding part of the Airfix kit... John3 points
-
Hi there guys this is my entry for the vforce group build of the plane that im a proud member of. xm655 what a beast she is with her bigger 300 series engines and a joy to watch taxi such a shame she cant fly. here is my tribute to her made as if she could fly with 6 other vulcans. she was brush painted on the undersides and the camo. undersides hu166 and camo hu66 mixed with a dash of hu10 for a dark browny green. the medium sea grey is hu165 from a rattle can and has a nice blue hue to it that looks improved over there older tin offerings. the silver is revel aqua aluminium on the exausts and wonderfull stuff it is. many thanks for looking i hope you like her and look forward to comments good and bad. if you want to see her being built look in the group build section under vforce gb took me a week first model of the year and boy did i enjoy it. cheers rob Plus 5 other vulcans ,xh558, xh562, xh557, xm648, xl3912 points
-
FRS1 Sea Vespid, 041/R 890 NAS, HMS Queen Elizabeth Summer 2017 The story starts in 2010 when the British Government's Strategic Defence and Security Review recommended the installation of CATOBAR on the two new aircraft carriers being build by BAe Systems and VT Group, so that the more capable F-35C version of the Joint Strike Fighter could be used and to preserve cross-platform utilisation with the French and US Navies. BAe Systems calculated the projected costs of installing this system to be twice the estimates given in the Defence Review. This projected cost was rejected by ministers and BAe Systems told to stop taking the piddle and just do it. (This is of course a complete fantasy, but one can wish!). Fast forward to 2014 - the cost of conversion to CATOBAR ends up being a fraction of the cost BAe Systems quoted and senior management in the company are hauled into court to face charges of attempting to defraud the taxpayer (see I told you it was a fantasy!). The problem now is the F-35 programme is vastly overdue. Problems getting the F 35B STOVL version working in a safe and reliable manner have pushed back the development of the carrier version, which has seen its own share of problems due to the short distance between the main landing gear and the rear of the aircraft. With only 2 years left before HMS Queen Elizabeth is launched, it has no combat aircraft to fly from its deck. The Ministry of Defence suddenly discovers a long dormant stain of common sense (yet more fantasy!) and decides that in order to not look like total idiots and have aircraft carriers with nothing to fly from them, promptly leases some F/A 18 Super Hornets to use as a temporary stop-gap. Sadly, their common sense ran out and they allowed British Aerospace to persuade them that these new planes needed to be "upgraded" to work with the "new systems" on HMS QE. Thus in 2015, BAe took delivery of the first tranch of FA-18 E's and promptly stored them in a hanger. The costs of the "upgrade" escalated until eventually some VPs of BAe were lined up against a wall and shot. Subsequent progress was rapid and cost effective. The aircraft were re-designated the FRS-1 Sea Vespid and eventually started flying in 2016. Of course HMS QE was also delayed and was not ready for launch in 2016, but finally in the Summer of 2017 the first aircraft in the newly reconstituted 890 NAS arrived on board and HMS Queen Elizabeth undertook her maiden voyage... Click Here for larger version Click Here for larger version Click Here for larger version Click Here for larger version Click Here for larger version Click Here for larger version Build thread here: http://www.britmodel...topic=234927285 I really enjoyed this build - it wasn't overly complicated and didn't give me any headaches - was a nice change from previous build where I've made things difficult for myself1 point
-
Actually, I was thinking of using the title, 'So, What's sailing past your dog'? Taken yesterday, some pics of the Kyoto Express, one of the Columbo Class, as per the Revell 1\700 kit. Final pic here is of a different vessel from the previous day. Interesting phot in its own right when you look at the Supertanker in front...1 point
-
Hi mates, For my next project I've decided to build the rather unruly MPM/Xtrakit 1:72 Sea Vixen. After all of the bad reviews and general harassment this kit has received, one might be tempted to ask: Has Uncle Navy Bird lost the last tendrils of his sanity? Has he no other plastic to glue? Well, I can state rather emphatically why I'm building this kit: Because it is there. So, much like the earnest explorer planning his assault on Everest, we must first take stock of our raw materials (and in the case of this kit we do mean raw): In addition to the kit, the keen observer will notice a beautiful Model Alliance sheet of transfers, some Eduard painted photoetch, and a Pavla nose cone replacement, given away by its slightly darker shade of grey. The especially keen observer will notice the pinion tanks for the FAW.2 Sea Vixen, while the kit is clearly marked FAW.1. The boom extensions are required since I wish to replicate this rather colourful version, XS587, during her days as a ... I don't know, target tug perhaps (methinks that's what TT stands for)? Here is the decal sheet instructions for this scheme: Lovely, isn't she? Thanks to a very generous fellow Britmodeller who sent me the boom extensions, it looks like we have enough to start with. (I've already determined that the black stripes on the bottom of the fuselage are shown at the wrong angle on the artwork, so we'll correct that if we live long enough to get to the painting stage. More on that later.) I should also note that I have a brand new tube of putty, just waiting to be opened when I start assembly. It's a big tube (0.45kg), but it's a big job. Since the initial photography session, I've acquired the FAA Models resin correction kit which will help greatly on the hot end of this bird. Another interesting aspect of this kit is that includes its own resin aftermarket parts, including the two ejection seats. The odd part of this is that the bang seats are for dwarfs. What scale are these things? The pilot wouldn't be able to see over the instrument panel! Here we see the kit seats on the left, a pair of seats from PJ Productions in the center, and two seats left over from a CMR kit on the right. They're all supposed to be 1:72 scale Martin Baker Mark 4 seats (different versions), but only the CMR seats look the correct size. I also have the seats that came with the FAA set, and they're the same size as the PJ seats. Such decisions. Reminds me of the old line that when a man has one watch, he knows what time it is. When he has two, he's never quite sure. So that's my plan. You can help me by pointing out the known inaccuracies of the kit - no wait, that will take down Mike's servers. So don't do that, just talk me out of this!! Cheers, Bill1 point
-
Hi Just thought id upload a few pics of some of my weathered/converted locos. Comments Welcome.1 point
-
Finished some time ago, after a very long and exhausting build! Academy Su-27 UB Flanker Quickboost nosecone!!! Neomega cockpit, Linden Hill decals "Flankers on Patrol", various missiles, Modified Dream Model + Aires exhausts Here you are: Cool and realisticly looking exhausts.... (Aries are too small, Dream Model too big... so I ,odified both sets to make one pair of nozzles) Hope you like it! One last photo: Cheers, Werner1 point
-
Fresh from the modelling table at the weekend, the Italeri Hawk, built to represent a Series 127 of the Australian Airforce. The kit is very nice, pretty straight forward to build and nicely detailed. The instructions give you the choice of a demonstrator or a Aussie Hawk, although research is needed for proper markings on the Oz bird. Registration should start A27-, unfortunately, I have nothing in the spares to match this. Anyhow, pictures, This shot shows the closest reg. no's I had, and will be replaced when they're available. The national markings are also too dark,(they should be lo-vis), but came with the kit, and shall also be changed when possible. Built straight from the box and painted by brush using Humbrol enamels. Pilots donated by Airfix, and the stand by a 1/43 Ferrari with brass square tubing from a craft shop. All comments welcome Sean1 point
-
hi guys I don't know how many of you have seen this, but I just came across it while researching something totally different. This has to be one of the coolest 1/144 models I have ever seen. Have a look at this: How awesome is that?! MH1 point
-
Hello everyone Well, first of all i would like to claim myself a beginner. This is my second kit after a pause of 12 or so years (i remember almost nothing from those times except some details have to be painted before glueing). I mean i'm still learning. This is actually the first time i used putty, extensive sanding and a bit of weathering. Here i should stop whining. Basically it is built out of the box except for that it's a conversion of the A340 bloody 'Wiener Philarmoniker' (for some reason noone chooses to build SAS scheme). The Trents are from the Braz models. This was also the first time i worked with resin hence one of my major mistakes - the engine inlets of the trents are quite decently tilted, while mine are upright. The choice of the gear up attitude was obvious as i have to hang the models to the ceiling. I was too scared to try making flaps down, besides main gear bogies are again decently tilted in flight. Oh, and another major mistake is a tricky fuselage color, too yellowish to me. Everything was spray-painted. The decal were from Revell plus a little help from the Draw decals. The weathering was done according to the a.net images which show the A330 SAS fleet surprisingly dirty. Here we go The next oncoming is a baby bus a Revell's A319 with Bearbus Germanwings scheme (i'm considering not to post work in progress as there are dozens already here) Thanks, Steve1 point
-
Right just before the "Great Spendathon" - wheel wells. Perfectly adequate on the kit - apart from, like most P51 models the well walls on the kit completely delineate the aperture, whereas in fact there should be an undercut on the curved portion. Also the front of each well is actually made form a lattice of aluminium spars so...I could get resin bays, but yadda - plastic card time!! Plastic card and strip just cut and glued. Make one for one well then copy it for the other. They are now nice and deep with proper undercuts. I need to finish the "roofs" for the narrow part sof the bays - but same principle plasticard and strip. I've left the kit UC leg attachment pints in there so they have a solid footing. Next step is some detailing with wire and more strip. Cheers Jonners1 point
-
Woo hoo. A Buchon. Excellent choice. Now who is going to do a Mule? Steve1 point
-
some preliminary photos of the beast finished! Finally! Still without stores, but more or less complete in empty configuration. He you are: canopy not fixed yet: hope you like it! critisim not only welcomed but encouraged!!1 point
-
Fantastic!!!! Look forward to seeing it at Telford.1 point
-
How tall are you Kevin? That one certainly went straight over your head.1 point
-
Ladder is by Monokio. You get 3 different types, 8 of each on the one piece of photo etching, only about 7 quid I think. Not sure how accurate it is to the tornado but they are beautifully made, very delicate. From hannants. Search "ladder" in 1:144.1 point
-
I'm in time to join this gb??? ciao Ale1 point
-
That's my intention. Aires cockpit. Scratch built rear fuselage interior. Vector resin engines. Quickboost exhausts and undercarriage bay doors. Com on, Airfix. You know you want to..1 point
-
Hi Chris, Awesome mate!!! that's a first class job everythings just first class you're justified to feel proud your best yet!....now I'm sticking to Armour Andy.1 point
-
Something with restrained panel lines, a nice thin canopy and no sink marks would be nice. Trubbie1 point
-
It wasn't the design office, it was the location, not much to enspire a designer! Mind you they did extol themselves with te Buccanneer! Dmitiri you may have all the reference that is available on this subject, sometime I think too much reference only serves to slow you down. Good luck with your build. Colin1 point
-
Wow, very nice and detailed. Great weatherig1 point
-
Well it's worked rather well Cheers1 point
-
Thats a great job on the painting, excellent work.1 point
-
That is perhaps a more comforting possibility than my own incompetence Don!!1 point
-
Sean, Watch you Recreating warbirds of past just makes ME Excited as I quite like historical jets being built. Gonna be enjoying this!1 point
-
Sean Your displays stands enhances the models as they look very professionally displayed. Very nice indeed.Your HAWK is MOST IMPRESSIVE ....and it is nice to see an Australian Air force Hawk .. She looks Pristine..FLAWLESS .. KUDOS!1 point
-
I ended up filing and sanding off a lot of the original 'detail' in the lower secondary hull. The level of detail was appauling and because of the mould the panel lines were very shallow. I started by sanding off the detail on the part sloping up to the fan tail. This was then replaced with some plastic card. The PE detail for the base of the aft intermix chamber is then glued on. For PE parts that have to be precisely placed, the method I found very useful was to place them in the correct place (well duh!) without glue at first, then use a strip of masking tape to hold them in place. You can then peel the masking tape back, apply the glue (i just used plain old super glue) and then when you rest the masking tape back down the parts should be in the correct place. A little bit of filler is applied, and bit of sanding here and there: Forward intermix chamber: I then work a little more on the panel lines, and filling. I also attach the underside cargo bay doors, and rear landing strut bay doors: Then the forward bay doors: And finally, a coat of grey primer is applied: It still needs a small bit of filling at the front and on the phaser array, but I will do this later on. The picture below shows where the hole for the brass tubing stand will be drilled, and also where the lower anti collision beacon will be: As far as I can tell from references, this lower light does not flash, so it will not be hooked up to the flasher circuit, and I may just use the light from the inside lights rather than an independant LED. Keep checking back, I light it up next EDIT: Just a quick addition. Lit up the aft torpedo launchers.The orange LEDs were a little bright so I used 390ohm resistors instead of the usual 270, this took the edge off the brightness. They are wired up in series, and then covered with some aluminium tape.1 point
-
That'll only work if you go nuts on the detail and corrections remember1 point
-
Very smart, if only we'd bought the bloody thing in the beginning......1 point
-
I lived there...3 Rutland Square (right hand edge of the frame) back in the late 50s / early 60s. Dad will have plonked a 15 squadron Victor onto the tarmac many a time!1 point
-
Great job, it's a shame there isn't a 1/32 scale version. Cheers Dennis1 point
-
That's a lovely looking Meteor! Nice paint job, and the weathering is very good as well1 point
-
Salutations again. I thought I would post some photos of Black Beauty and the F18e that I did to demonstrate the size of this thing. Even thought the F18 is quite big, this one has a bigger wingspan This also shows the length of it compared to the F18 Bigger. longer and wider. It must be a black thing! This is like comparing Mr.Holmes and Mr. Leslie. Both are very impressive for size. In the end, size matters. You can see quite clearly how tall the F117 is compared to the F18 A few updated shots of BB I must construct a suitable background for these shots as doing them outside also captures part of the backyard unfortunately. Thought I would chuck in some shots of the F18 whilst I am at it just for the hell of it. Until the next build. Regards, Monty1 point
-
Lord help us, he's doing ships now! Looks plain but very well painted. Al1 point
-
Cheers Col, just a teaser as to whats next.... Cheers Jonners1 point
-
Thanks chaps, afraid to say I've not touched her again even though the paint came for getting the roundels done, you're almost shaming me into getting her finished though.1 point
-
Thats only about half what my Eagle stash once was..... It was pushing the 140 mark at one point if i count the Revell/Tamiya 1/32 kits. But being made redundant at work forced a cull of that stash. However 2 years of being back at work has seen it creep up again.... Uhmm......my names Gary and i'm a Eagle Addict......LOL1 point
-
Well bring it on....added another 1/48 F-15 to the stash today.....that brings the stash total upto 62 Eagles.1 point


This leaderboard is set to London/GMT+01:00