
Leaderboard


Popular Content
Showing content with the highest reputation on 18/10/12 in all areas
-
Hello all I haven't posted anything here before but I thought I'd share this as my first. It's my MPM Lockheed Hudson Mk 1. Markings are for 233 Squadron, Leuchars 1940 and are from the Airframe Decals Coastal Command Pt.2 decal sheet. A few bits had yet to be added when the photos were taken (guns on nose and exhausts), and I hadn't put any aerial wire on it yet. Something that I've still to do. I built the Airfix kit in my teens and the MPM kit is better in terms of accuracy and detail, but it's not the easiest build, although I think the Airfix one would require as much amount of effort or even more to get similar results. The Boulton Paul turret for example is a huge improvement over the old Airfix one, as is the glazing. An Airfix AEC from the refuelling set also crept in for one shot. Anyway I hope you like.3 points
-
Very nice kit, built OOB with Eduard zoom accessories for seat belts and instrument panel. I built it in a week, i had a lot of fun building it and i can add to my collection this british Mustang! Paint with the Tamiya's new acrylic XF-81, XF-82, XF-83. Decals are from a Tauromodel's sheet. Hope you like it! ciao Ale3 points
-
1/48 Dragon (actually DML) Me262A-1 Nachtjager. Had to put the tail stand in. I didn't put enough weight in the nose. 1/48 Hasegawa P-38J Lightning Eduard Zoom Cockpit and Aeromaster decals 80th FG CBI 1/48 Accurate Miniatures F-6B Mustang OOB painted Invasion Stripes as if they had been partially scrubbed off. 1/48 Hasegawa P-47D converted to P-47M Aeromaster decals 56thFG 1/48 Hasegawa Ju87B-2 Stuka OOB 1/48 Hasegawa D3A1 VAL OOB LAST ONE!! 1/48 Accurate Miniatures P-51A Mustang OOB Thanks for looking JOHN2 points
-
This one is a relatively recent completion (2 years ago) - honest I have some nearing completion but this year has been a bit fraught (none actually completed at all so far ). I had a few issues with this one, particularly in fitting the floats and in the painting. I gather the markings are also a bit suspect as well. But, hey, it is nice and bright! As usual brush painted with Tamiya acrylics. Thanks for looking, and hopefully after the weekend I will have a new completion to show!2 points
-
Complimenti! Che bella! Amo Mustangs. hai fatto un lavoro impressionante ! E piuttosto una Bella Mustang. Bravo .. KUDOS.2 points
-
As the topic came up in another section, here is the 1/24 Speed Spitfire N.17 I built about two years ago. It has been a favourite aircraft subject of mine since I was a kid and saw a blurred picture and colour side drawing in the old Profile Publications, around 1970. I don't remember how many messy attempts I tried building in 1/72 with only those two pictures as reference back then, but quite a few they were. For some years now I thought about a 1/24 version, today when difficult things are much easier to achieve than they were for a young boy in 1970, and now when there is much more information available (but perhaps not all...). One day I happened to come home with Trumpeters MkVb, intended as a base. Actually before that I first got a four blade prop, think from a P51D, of which nothing more remains than a cut down base for plastic strips and filler. I'm certainly no expert on Spitfires (as those of you who have greater knowledge may see somewhere) but I studied all references I could find quite hard to find out everything I needed to backdate to go from a MkVb back to what would have been the base for the N.17, and then all things modified for it. Where I couldn't find definite answers I invented what seemed to work. There was a lot more to modify than I had expected. I know the blue colour would probably be considered too dark, but in my mind she was always a very dark blue machine and when I first loaded the airbrush with a brighter blue I didn't like what came out. And yes I have had some difficulties accepting that the line was probably silver and not gold as in the old Profile drawing I still have. If I would find myself in a position to commission a real Spitfire build today, this is what she would be like... Anyway, I hope you enjoy her. The few build shots that I have.1 point
-
Meng Model: http://www.meng-mode...x2ss.php?id=168 New 1/48th Messerschmitt Me.410B-2/U4 Hornisse by Meng (ref. LS-001) - on sale in October December 2012! Advertisement published in the German magazine Modellfan http://www.modellfan.de/ Source: http://www.master194...php?f=3&t=71577 And one day at LM and HE http://www.luckymode...em_no=MG-LS-001 http://www.hobbyeasy...jdiudpjiyu.html V.P.1 point
-
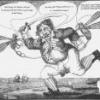
The Bavarian Knight oil on canvas Otto Kissenberth was one of three German aces to wear spectacles during the war, Bernet and Wintgens being the other two. Kissenberth most often flew an Albatros D.V with yellow and white Edelweiss painted on its fuselage. Credited with 20 victories his last was scored in a captured Sopwith Camel. Less than two weeks later, on the evening of 29 May 1918, he was seriously injured when he crashed the British fighter. He was awarded the Pour le Merit whilst recovering in hospital. Returning to duty later that year, he served as commanding officer of the Schliessheim flying school until the end of the war. In 1919, Kissenberth was killed in a climbing accident while mountaineering in the Bavarian Alps. Cheers, Terry1 point
-
News about our Exhaust nozzles for the Trumpeter 1:32 Flanker Su-27 you can see here. http://www.britmodel...topic=234926860 Now, I want to introduce a same items in 1/48 and 1/72 scale. All sets are identical and differ only in size of parts. Nozzles for Italeri Su-34 wider in diameter by 1 mm. So... new items is NS48030 - Su-27 in 1/48 for Academy/Eduard model kit NS72009 - Su27/27UB/33 - Hasegawa, Trumpeter model kit NS72015 - Su-34 Italeri model kit.1 point
-
So here we are, all done at last. What started as a bored at work afternoon daydream has turned into something quite snazzy. Built from different sized plastic tube, sheet and strip. Primed with halfords' finest, painted with alclad gunmetal, weathered with humbrol metalcote polished aluminium. Anyhoo, less words, more piccies!! Enjoy. Odd1 point
-
HMS Warspite Limited Edition Academy 1/350 History HMS Warspite was a Queen Elizabeth-class battleship of the Royal Navy. During World War II Warspite gained the nickname "The Grand Old Lady" after a comment made by Admiral Sir Andrew Cunningham in 1943. Warspite and the other vessels in her class were advocated by Admiral Sir John 'Jackie' Fisher, and Winston Churchill, then First Lord of the Admiralty. She served in both World War I and World War II, earning the most battle honours ever awarded to an individual ship in the Royal Navy, including the most awarded for actions in the Second World War. Upon her completion, Warspite displaced 33,410 tons. She was 639 ft 5 in (194.89 m), had a beam of 90 ft 6 in (27.58 m) and a draught of 30 ft 6 in (9.30 m). Her initial armament was 8 Mk I 15-inch/42 guns placed in four twin turrets, 14 single Mk XII 6-inch guns, two single 3-inch anti-aircraft guns and four single 3-pdr (47 mm) saluting guns. Along with that, she had 4 21-inch (530 mm) submerged torpedo tubes. The battleship was refitted at Portsmouth between 1934 and 1937 at an estimated cost of more than £2 million (equivalent to £641 million in 2008, using a share of GDP with her internal components being extensively modernised. The project replaced her propulsion machinery and installed six individual boiler rooms, with Admiralty three-drum boilers, in place of 24 Yarrow boilers; geared Parsons turbines were fitted in four new engine rooms and gearing rooms. This increased fuel efficiency, reducing fuel consumption from 41 tons per hour to 27 at almost 24 knots, and gave the warship 80,000 shp. The weight saving on the lighter machinery was used in increasing protection and armament changes. Deck armour improvements were similar to those in Malaya except the 1,100 tons of armour added covered the boiler rooms as well. The 6 inch guns had their protection reduced - four guns were removed as well in widening the forecastle - and the conning tower (200 tons weight) was removed. Four twin 4 inch guns and four octuple 2 pdr pom-poms were added for her A/A defences. The turrets were removed and altered to increase elevation of the guns. This gave them a further 6,000 yards of range - a maximum of 32,000 yd (29 km) with a 6crh shell. Deck armour was increased to 5 inches over the magazines and 3.5 inches over the machinery. Her superstructure was radically altered, allowing an aircraft hangar to be fitted. The fire control was also modernized to include the HACS MkIII AA fire control system and the Admiralty Fire Control Table Mk VII for surface fire control of the main armament. Throughout WWII Warspite served in most theatres of war, from Norway, to the Mediterranean, and in the Far East. She gained more battle honours of any ship in the Royal Navy and became a household name as "The Grand Old Lady". Although there were proposals to retain her as a museum ship, the Admiralty approved Warspite's scrapping in July 1946. On 19 April 1947, Warspite departed Portsmouth for scrapping at Faslane, on the River Clyde. On the way, she encountered a severe storm and the hawser of the tug Bustler parted, whilst the other tug Melinda III slipped her tow. In storm force conditions Warspite dropped one of her huge anchors in Mount's Bay, which did not hold, and the storm drove her onto Mount Mopus Ledge near Cudden Point. Later refloating herself she went hard aground a few yards away in Prussia Cove. Her skeleton crew of seven was saved by the Penlee Lifeboat W. & S. There were several attempts to refloat her but the hull was badly damaged and Warspite was partially scrapped where she lay. The Model This Limited Edition of 2500 comes in a very special box. The external sleeve is printed up as a White Ensign with the Warspite to the right at sea with turrets trained. The actual box lid is in full colour with the same picture as the outer sleeve, but this time the Warspite is in action with the guns are firing. On removing the box lid there is an inner lining with a picture of the completed model. The model depicts Warspite in her third iteration after the 1934 – 1937 modernisations with revised funnel and AA weaponry, plus a new hanger for Swordfish/Sea Fox floatplanes and later, Walrus amphibians. On finally getting into the box and viewing the contents, as with the standard edition released last year you are confronted with 8 sprues of greeny/bluey grey styrene, (unlike any colour I have come across in a model ship), plus a large display stand. Unlike the standard edition there is a large poly bag with all the goodies that make this kit very special. The new parts are a new wooden deck, two etch sheets, in addition to the etch cranes that are in both editions. The 15", 6" and 4" gun barrels are provided in turned brass, as are the big surprise, which is a full set of masts, yards and booms. The instructions come in the form of an A4 booklet which opens out to four pages wide. The instructions are very clear and concise with good parts placements. There is a separate parts guide page with the painting guide on the reverse. Unfortunately the painting guide is in black and white, whereas it would have been preferred to have a full colour guide as seen in other manufacturers' kits. There are two new instruction sheets of almost A3 size giving for the assemblies of all the etched and turned brass parts and there positioning on the model. They are full colour and are surprisingly clear and easy to read, with the exception of the of the foremast assembly. Due to the colours used and the small size the parts and their numbers are really difficult to read so it may be an idea to enlarge the instructions on a photocopier. The descriptions of the plastic parts are modified from my review of the basic kit which I reviewed from my own collection and are as follows:- Sprue A The hull comes in two parts, giving a full hull model. For those who like waterline models there is a moulded guide on the interior of the hull halves for you to cut along. In doing so you'll be amazed at how much of the ship was underwater. For both types of build four internal bulkheads are provided to keep the keep the hull rigid. The external detail is nicely moulded but for the detail mad modeller there is plenty of scope for adding extra. Sprue B The main deck comes in three parts, foredeck, centre section and quarterdeck, making the joins disappear will be quite a difficult job if it wasn't for the addition of the wooden decks in this edition. The mouldings themselves are very clean and free of flash with no moulding pips which can mar smaller parts. Also on the deck sprue the modeller is provided a ships nameplate, the hull internal bulkheads, four propeller shafts, the aft captains' walkway, (which is a little heavy in plastic and would be nice to replace it with etched brass). The last items are the forward breakwater and a number of 20mm AA guns tubs. Sprue C This sprue contains the boat/pom pom deck and hanger superstructures, aft superstructure plus the funnel with separate cap. Also included are three moulded anchor chains. Now while these look quite nice I would still probably replace them with metal ones. Sprue D This sprue contains the parts that make up the Queen Annes mansions, otherwise known as the bridge structure. Again all parts are cleanly moulded and look like they will make up a nice representation of this part of the ship. Sprue E x 2 These contain all the parts for the main armament, including turrets, barrels, with separate blast bags, , (giving the option of two positions of the barrels), rangefinders and AA gun tubs. The ships stand supports are also included, along with numerous smaller parts, such as more 20mm AA gun tubs, secondary armament gun shields, ships anchors, propellers, and finally the aircraft/boat handling cranes, the booms of which can be replaced with etched parts provided. Sprue F x 2 These contain the majority of miscellaneous parts such as the light AA weapons, including the prominent 4 x 8 barrelled pompoms and 20mm Oerlikons, with separate shields, 4.5 inch barrels for the secondary armament, liferafts, ships boats and finally the Walrus aircraft. Unfortunately the aircraft don't have the option of folded wings, therefore, unless modified; only one can be used. They are quite nice, but could do with some etched struts as the kit only gives the modeller a slab of plastic for between the wings. The ships boats are a little simplified, and again could do with some extra detail, but for most modellers they will suffice. Because of the duplication of the sprues there are a number of parts not used. Etch Sheet A contains all the ships railings, deck hatches, complete replacement catapult, ramps, (the kits parts will need to be removed first), and aircraft launch cradle. The Captains aft walkway is also replaced with etched parts from this sheet with the exception of the roof. The walkway itself is beautifully perforated and the guard rail really finely done with the distinctive diamond pattern very well represented, armoured doors replace the rather clunky kit parts. The Type 282 and 285 aerials, plus the RDF aerials look really well done. In addition to lots of smaller parts, such as vertical ladders, searchlight fronts, turret fittings, numerous mast fittings, armoured doors there are also replacement chain ways and hawse pipe plates, for which the kits moulded parts need to be removed before fitting. The Warspites name is provided in individual letters for positioning on the aft superstructure. Sheet B contains replacement parts for the ships boats, and whilst the Admirals barge and 45ft motor boats would have benefitted from have wooden decks instead of the etched decks provided. That said the decks are very nicely reproduced with fine planking. Some surgery is required to the boats superstructures as not all the plastic is replaced with brass, this shouldn't cause too much of a problem for even an intermediate modeller. Cabin tops, steering positions, hand rails, props and rudders are all provided as are the replacement boats cradles. The Walrus aircraft have new struts for the wings and engine, propeller, and if not on a launch trolley there is a manoeuvring trolley that can be used. There is still no option for folding the wings, but this shouldn't be too much of a problem to alter. The distinctive starfish platform on the foremast is made up of the main starfish shape and eight supports. On top of the starfish the radar lantern needs to be removed from the plastic part and fitted with the lantern top from this sheet. Whilst the main crane jibs are the same etched nickel as the basic kit, the rest of the plastic parts are replaced with brass which included the crane housing, interior, brass turned axis, turntable, hooks and cables. The funnel receives a new top, made up of individual parts giving a very nice 3D effect. The rest of the parts make up the inclined ladders, derrick supports, new radio compartment and its respective supports, the foredeck breakwater and casement deck breakwaters with their separate supports once again replace the kits parts. Turned brass parts As mentioned above, there are many turned brass parts in the special edition. The 15" gun barrels, 6" barrels and 4" barrels all replace the plastic kit parts. There are beautifully turned and make for a much more realistic look. The Pom Pom barrels are not included, but these can be bought from other manufacturers if the modeller wants to take the extra effort. The biggest surprise with this kit is the inclusion of turned parts for masts, booms, and derricks. Used with the etched parts these make up into models in their own right, and are extremely well detailed to the point they look like they could actually be used. Apart from the radar lantern, no kit parts are used in the mast builds and as such it would be recommended that soldering or epoxy resin be used for improved strength rather than CA glue which isn't very strong in shear. The only thing missing is some Jacobs ladders for the 30ft swinging boat booms, but that's a very minor and perhaps picky complaint when compared with what is provided. Decals There is a small decal sheet with several styles of White Ensign and Union flag, along with roundels and fin flashes for only one Walrus. The decals are well printed and in good register, whilst nicely opaque. There is also a small sheet of dry decals for the depth markings. Conclusion Academy should be commended for releasing this special edition of HMS Warspite. Whilst the basic model is very nice in its own right, but with the additions of the wooden deck, etch and turned brass it is lifted to another level of model and modelling. There is nothing that needs to be added from aftermarket companies other than some crew to man ship. When compared to the cost of the basic kit, plus all the aftermarket that are required for a museum quality model this edition is excellent value for money. I can't recommend this model highly enough, although I would add that it certainly isn't for a beginner and may prove difficult for even an intermediate modeller. But with patience and good technique this will build into a superb, prize winning model. Review sample courtesy of1 point
-
Librarian Turmiel almost didn't make it to the photo-shoot, due to an unfortunate cat-shiny thing encounter while his cloak was drying... I managed to rescue the paint job- mostly- but my moggies weren't very popular for a couple of days. Ah, well, teach me to leave stuff lying around after dark. I had some fun setting up the photo's, but I'm really struggling with just a couple of angle poise lamps. Has anyone used a light box/booth for snapping minis? Any thoughts on how much you have to invest to get a decent result? I've seen the mobile booth GW use; it looks the mutts nuts, but I reckon I've ridden motorcycles that cost less! Alternately, how about photographers lamps- are they worth the throw? Bearing in mind I'm on a pretty tight budget (yep, I am Scottish, why do you ask? ) Anyway, the little chap ended up looking like this after the combined assault from my brushes and the feline tag team: A wee play with lighting: I had a play with the editing software while I was patching up some of the damage the photos revealed... Any thoughts, comments, advice or general mickey taking welcome. Particularly with reference to macro photography!1 point
-
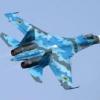
First try in Streaking camo, with the eye on the goal of making 30 off 'emm, using Pheon decals for JGII. Used Ed decals ( spare ones ) for this one, just a try out So, this was just a try out for the real thing, now I know ' bout the fiddly things I have to take care off ( wheelstruts and upperwing ), I already got 8 pcs of 'em, 22 to go1 point
-
Just finished my latest project, lovely kit but not without a few challenges, and so happy to finally have a Mk.21 in my collection, OOB as usual and the shiny look is because the varnish is still fresh! IMAG0816 by [email protected], on Flickr IMAG0821 by [email protected], on Flickr1 point
-
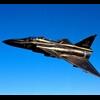
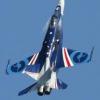
Hi all just finished the Academy F-14 Tomcat, when I purchased this my intention was to make it from the box, and paint it in the grey colour scheme, along with the sundowners decals. But having looked at so many in the same colour I wanted to do something totally different, so having found some images I went to work. The academy kit wasn’t to bad; I also used a detailed cockpit set from Aires, And the Aires engine detailed set. All paints are Vallejo model air paints, applied with an Aztek spray brush1 point
-
Lynx AH-7 Instrument Panel (for Airfix) 1:48 C-Lab Design This is a new company, actually a friend of mine by the name of Nick, who inhabits this very site under the nom de guerre "Nick". He decided that the Lynx could do with a new panel when he was building one on the forum here. C-Lab is a reference to his Chocolate Labradors, which he dotes on… bless! My review sample arrived in a simple white envelope, delivered by a funny looking chap by the name of Dan, Nick's unofficial PR man and another forum member. Inside was a page of A4 paper that contained the instructions for building and installing the panel. The small fret of Photo-Etch (PE) was taped to the back with a short length of 18mm Tamiya tape, so there's no danger of sticky residue on your PE. The panel has been patterned to fit perfectly in the recess within the instrument coaming, and if you install the instrument decals first, they will show through the holes etched into the panel. Simply paint the main panel first, then attach it to the decaled coaming with some Klear or similar gloss varnish. The instructions are comprehensive and give plenty of tips on how to achieve the best results, and even how to make some rather clever switches from styrene strip to decorate the panel with. The set also includes the ancillary panels and the centre console, which makes for a complete set. You can find a PDF copy of the instructions here. For pictures of the set in action see Nick's photos below, or have a look through the thread where it all began here. Conclusion As I said at the outset, Nick is a friend, so I'm bound to be seen as a little biased, but the results speak for themselves. If you just want a simple upgrade to the instrument panel and don't want to either wait or spend the money on the future Eduard sets, then this is for you. It's simple, well documented and works well with the existing decals. Highly recommended. Contact Nick on the forums for a set if you're interested. Review sample courtesy of C-Lab Design.1 point
-
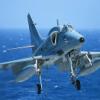
Hi folks, this is the result of our modelling weekend marathon that started on Friday 18.00 and finished on Sunday afternoon. I managed to almost finish the Airfix kit upgraded with Xtradecal Argentinian option and few items from the Freighdog set. Some small details asre missing on the pictures and I hope the real A-4 nuts will forgive for any mistakes / omissions I for sure made. Anyway, the main task to finish a kit over the weekend was accomplished :-) Cheers Libor1 point
-
Well, they are 'engones' coz they've gone haven't they1 point
-
Al, I loved the readers tips. The best one ever was the one about spraying Fabreeze on your woman before going down on her. I think I cried for about 2 days. Long live Buster Gonads !1 point
-
Thanks for that, I shall hopefully get around to this job sometime this weekend.1 point
-
It's a fantastic replica of this Hudson bomber ! It presents itself very well here and the Lockheed sure looks great in your images. Mike1 point
-
When the Yanks bury unwanted kit, they lime it, so it's useless. Evans is a tw*t and talks, or shouts, out his *rse. I heard his ramblings and cringed, as, I suspect, did many others!1 point
-
Ha! The real one looks more like a model than the model one! Great execution, I like your weathering too, very realistic.1 point
-
Ooops.. my mistake! I have seen pictures of NMF aircraft testflying at Saab and assumed that they were delivered like that.. My sincere appologies! (They did look good though..)1 point
-
Glad you like it. I think the drawings you refer to were of the "Phase 6" Vulcan - the one carrying the 6 Skybolt missiles? Anyway, it was a relatively straightforward build. I have all the wreckage so, I'll probably rebuild it into another variant!! I seem to remember a Boeing proposal for a "C" wing transport ( i e vertical stabilisers on the wingtips with inward pointing horizontal stabiliserson each tip). That would look dandy on a Vulcan!! Anyway, I've salvaged the bpmbs for hanging under the Victor (ooopsss - spoiler alert!!) Thinks - with the imminent demise of XH558s flying career, this would be a lovely opportunity for Messrs Airfix to REALLY do the old lady justice!1 point
-
Tom, As a basic rule of thumb there were no external differences between an E-3, E-4 or E-7 save that E-3s were primarily fitted from the outset with the earlier rounded style canopy & windscreen. This however could and frequently did get replaced with the heavier framed more angular canopy that was factory fitted beginning with the E-4 series. So in brief and basically: E-3 Rounded style canopy with 20mm MG/FF wing cannon. E-4 Angular canopy with 20mm MG/FFM wing cannon (identical to the MG/FF but with the ability to fire alternate ammunition) E-7 An E-3 or E-4 fitted with internal plumbing and an underfuselage rack to carry either a drop tank or, when operating in the Jabo role, a bomb. As far as armoured windscreens go, these were single items that could be fitted as and when required. HTH Dave1 point
-
Cheers again1 point
-
Very nice looking P-51! The camo and weathering look spot-on. One potential problem, though. From the photos it does look like you've assembled the prop so that it runs CCW as seen from the cockpit, like a RR Griffon. The Merlin rotated in the opposite direction… Kind regards, Joachim1 point
-
That's a beautiful model! I've always liked the Mustang in the RAF camo. The amount of weathering is just right as well. Nice!1 point
-
now that is eye-catching. a well worn unit - just as battered as I would imagine....1 point
-
Nice little Pony.1 point
-
Here she is in the real.1 point
-
Looks good. Tamiya models are always fantastic. Good job so far. Flemming1 point
-
Following this with the same keen interest I follow all your builds Al, the cockpit looks like you could just get in there and fly it off the bench, but one question: Do you really know what all those switches do?! Are you referring to me? Sorry to hear about the knee, what happened?! It wasn't after dancing on the tables in the nightclub where you got that resin was it?!1 point
-
Regardless of all the issues that one still turned out well. The fact it's a Sea Fury and in the less common low demarcation scheme helps bias my opinion of course but no denying you've done a grand job.1 point
-
well done very nice!1 point
-
Really enjoying some of the builds in this GB. Just a shame I don't have the time to join in having to try and finish a big Flanker before the 109GB starts. However, as the saying goes "here's one I prepared earlier" http://www.britmodeller.com/forums/index.php?showtopic=234908536&hl=whiffy1 point
-
Isn't that an optimistic climb angle for the York?1 point
-
That's lovely, well done1 point
-
Oooo, that's nice.1 point
-
mask on mask off1 point
-
I have my kit ready, the weekend free, Crabbies in the fridge and am writing the back story. LEDs and resistors in the post and then I'm good to go. Can't wait!1 point
-
Hanging on to my initial idea (Hellenic Air Force Typhoon, a few minor mods to distinguish it from early-block aircraft). Will probably adopt my usual strategy of panicking for a couple of months then starting the thing at 11.55 pm on 30th December...1 point
-
STUPENDOUS, STUNNINGLY GORGEOUS Sabre. EXEMPLARY workmanship. The silver finish is FLAWLESS. LOVED it....1 point
-
A beauty! I particularly like the metal finish!1 point
-
aboard, and a very nice first post in RFI1 point
-
The Vickers MkVIb was a major component of the desert force of General Richard O’Connor which won perhaps Britain’s most complete military victory of the war at Beda Fomm against the Italians as part of Operation Compass. The 1st RTR was part of the 7th Armoured Division which faced the Italian Army back in 1940 as the Italians advanced into Egypt and then built their fortified camps. The combination of the new kit from Vulcan and the Echelon Fine Details markings for the MkVIbs’ of 1st RTR was a sufficient stimulation to get this project started. Following regimental tradition all the names of the 1st battalion RTR began with the letter ‘A’ and ‘Agrippa’ can be seen on the book on Beda Fomm by Kenneth Macksey. The MkVIb certainly soldiered on in N. Africa to the end of 1941 as they can be seen in photographs of 32nd Army tank Brigade which broke out of Tobruk in December of 1941. The Vulcan kit is excellent value with a full working suspension system and link and length tracks. I chose to replace the locking nuts for the suspension spring arms with some from Grandt Line. As I was making in the kit and looked at photos it was clear that 1st RTR MkVIbs’ were adapted from their European brethren. Most notably sand shields must be added. Fortunately there are 1/35 drawings of the desert MkVIbs’ provided in the book by George Bradford on British WWII AFVs from which scratch made sand shields can be designed. In addition, a unique tool box on stilts must be scratch built for the port side. The lever and shovel are then moved to the starboard side under the exhaust pipe. On the rear a rack must be added for 3 x POW cans. I was unsure of the smoke dispensers on the turret sides so replaced the firing mechanisms with cut-back Lee-Enfield stocks from my spares. Fortunately, a period plan paint scheme for the Caunter camouflage for a mkVIb is provided in volume 2 of the books on British vehicle colours by Dick Taylor. To provide a lively scene and give a sense of scale I prepared some RTR figures from Miniart and Masterbox but using Hornet heads with markings from Archer. We normally associate North Africa with heat and short trousers, but Operation Compass started in November and went on through the winter when temperatures were more typically 7oC then 40oC! Their cap badges and the pyrene extinguisher placard are from Inside the Armour. Hope you like it? Andrew1 point
-
One of those, "I'll believe it when I see it…" things for me.1 point
-
The pilot:1 point
-
continuing... Fixing the bell-mouth... thanks Nick Greenal and Paulo Regini for the help!!! Cheers!1 point


This leaderboard is set to London/GMT+01:00