
Leaderboard


Popular Content
Showing content with the highest reputation on 13/10/12 in all areas
-
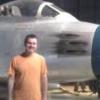
Good evening everyone.... This was one of my first goes at multi-media kit. I really like things are kinda off the beaten path. The FR-1 Fireball fit the bill. I "tried" to make it look like a Navy Demonstration Team called the "Firebirds". I like the story of a P-51 pilot having to do a double take because the prop on this plane was feathered and was running entirely on jet power. This kit faught me all of the way. I had what I thought would have been a ton of weight in the front. But alas it wasnt meant to be. Then I realized that I would use the tailhook for it to rest... Comments very much welcome. John2 points
-
Finished the ever elusive Tamiya LRDG. I think this is about the 3rd one that I've built since I was a kid. This one is done a tad bit different. Used Archer Transfers on the Guages and the placards within the cab. Used Tank Workshop resin tires. Which I think are basically cast resin copies of the the Tamiya vinyl ones. Which is ok, because over time, the vinyl ones crack. Enjoy and comments always welcome!!! Thanks guys!!!! John2 points
-
Bit more progress this week, since a 2 week break! No more painting yet but a finished set of weapons choice: GAU-8 Now complete, ready for the ALCLAD 2 setup: All aerials & Antenas on + The super Resin Gun Muzzle:-) Pylons all on, quite a bit of work and time needed there! For those who wanted an idea of scale? £1 coin. It doesn't really give a full appreciation of size IMO! I'll try to put another well known kit in view, maybe some pieces of the 1/32 Tamiya F-16, Trumpeter 1/32 A-7 or 1/32 Revell Ju-88. More to come, Weapon painting and the start of Camo Spraying......2 points
-
I've been hassling people over in the Modern Aircraft forum, so I ought to show what I've been doing! Due to my recent knee operation and the startlingly good recovery I've been making, I've had plenty of opportunity to build, so I'm aiming to finish this and a 1/32 MiG-29 before I have to go back to work! Firstly I must say BIG thank yous to people on this forum: Canberra Fan for the astonishingly generous donation of the kit and all the aftermarket bits! (Yes he really did!) Stephen on this forum who has lent me the Lock-On and Squadron Walk Around books for the F-15C, which have proved invaluable. Thanks! The build is from the Tamiya 1/32 kit, with copious aftermarket items including Black Box cockpit, Cutting Edge seamless intakes, Eduard exterior, masks and placard set. As usual, I started in the cockpit: Usual stuff here, enamels mostly with acrylics and wash for the panels - obviously I used the Eduard main instrument panel for the sharp detail it provides. The early Eagles had the very fetching metallic green-blue primer in the avionics bay, for which Xtracolour conveniently do an exact match (X159), although it takes a good 48 hours to dry!! All the detail is acrylic hand painted and Eduard placards. Unfortunately, I can't get any decent shots down the intakes, which actually look excellent (the kit parts leave a massive seam down both sides of the duct. The afterburner ducts have exactly the same problem but can be mostly hidden by painting the scorch effects). Should have a whole day to devote to this very nice kit, hopefully it will have reached the point of major assembly by this time tomorrow! By the way, if anyone does have any F-15C-style wheels from the Revell kit they'd like to swap for the Tamiya E-type ones, please drop me a line1 point
-
Started the famous and very large Trumpeter A-10A. Kit is quite old now, and very different from their newer releases. Trumoeter have moved away from their moving parts to concentrating on larger detail. At first i was a fan of dynamic model kits but have realised how much hassel they can be especially when it come to compromising on detail. Although i have to say the A-10A is a gem in this scale, even with it's multimedia atempts. Originally i was going to use the Verlinden cockpit set, which i had. Decided not to, as there was a lot of cutting and butchering to do to the A-10's Nose section. Also I was not too amazed by verlinden's casting quality. Not in comparison to todays quality like L'Arsenal for example. The resin casting for the engines is a nice touch but IMO could have easily been achieved with injection pieces. Also this would prohibit the need for 160+ grams of ballast required in the nose. I am going for some extra detail on this model: e.g. Brake lines and It's also going to involve the extra resin GAU-8 Gun nozzle. So there will be an external model of the famous gun itself alongside the finished aircraft. Progress so far: Size is becoming very noticable! The wings have a nice touch of moveable/sliding fowler flaps. Ejecor seat, might need some mods? more later...............1 point
-
But the kit keeps coming up in conversation, so if I did post it already, sorry If I didnt, here it is - one Otaki L1011 TriStar, handpainted some time ago now probably one of the rarest kits around now, which is a shame because it's also the best TriStar kit ever made. Apparently Otaki dumped the molds in Tokyo bay as a tax write-off or something. silly chaps!1 point
-
Great work so far Al, keep up the recovery. Stephen1 point
-
Evening Al, Great choice of subject, certainly makes a refreshing change from the -E That's a beautiful cockpit; are the decals part of the BB set? Same compliment can be paid to all the painting done so far! Interesting means of joining wings to fuselage - on the plus side, I guess they can't droop while gluing... Best of luck with the knee, but if I were you I'd keep the 'extraordinary recovery' under wraps while you cash in on the additional building time Tim1 point
-
Looks real big. Nice build so far. James1 point
-
any particular reason for having two in the speedjack scheme Brad?1 point
-
Thanks for the link. Loki, but i find this set of bombs a bit expensive! By the way, i've converted one and it's ready for the paint job. Thanks to everyone for your interest and advice.1 point
-
Right, I have a little progress to report: Both engine nacelles have been reduced and re-shaped, all panel lines filled, airelons removed, wings glued on and elevators kind of done - not yet glued on. I've been doing some painting too: I put braces between the bomb fins, filled the majority of panel lines (although maybe i shouldn't have filled the tanks' ones) and then played around with paint to see if i can achieve an effective weathered result. That's it for the moment; let's see if I can press on with this build over the weekend and post more progress....... Jon.1 point
-
Indeed I have. The fuselage is now together. The wing root fairings have been filled out with Milliput and I am now refining them to the desired shape. Not that you can see very well due to my abysmal photography skills! I'm considering sawing off the centreline intake and replacing it with a section of Phantom drop tank.1 point
-
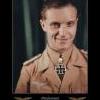
Ha ha my first German aircraft ever. Been working on this one behind the scenes just a little bit at a time to start building my RLM and mottling skills. Also tried a bit of post shading as well. This one is straight out of the box plus a nice little antenna cable made from EZ Line delivered from Mr Peter Jacksons company Wingnut Wings. I love how that stuff looks and apparently it doesn't loose it tension over time neither. I'll be the judge of that in two or three years time if I haven't decided to do a mock Battle of Britain scenario and take a BB gun to it!!! Not sure what paints I used on this one. I would have gone right ahead and used the Tamiya combinations if it hadn't been for a fellow member of my local hobby group who said try my paints which are RLM colours. He said they were decanted from the original bottles and thinned to an appropriate mix. Whatever they were, they sprayed down like silk. The only problem I had with this kit was the decals. The first decal I dipped in water, just broke apart then found the whole sheet appeared to be cracked up. No problem!!! Just sprayed two coats of Future on there and it saved the day. Pics time!!! Had to make a minor adjustment to the antenna cable to tension it up because according to a fellow modeller, the FW190 A had a retracting mechanism installed. He also found a photo of the exact aircraft I have build here which supported that theory as the cable was taught. More German WWII aircraft to come from me soon as I have in progress an Eduard 1:32 Bf 109 E-7 Trop which hopefully will be ready in time for November when myself and my local hobby club go on the road to participate in the annual Armistice in Cambridge show in New Zealand. I may enter this 190 into competition along with my VF-1 Wolfpack F-14A Tomcat.1 point
-
Nice looking build - but hasn't that already been done..? http://www.airliners.net/photo/USA---Marines/Boeing-AV-8B-Harrier/1640396/M/ Spence1 point
-
It would be great if she could be absorbed by the bbmf. Id much rather see the vulc pootling around the sky with the lanc as she's from a war of my generation (Im 30) and is a feat of British engineering and britishly different. Even tho she is just a plane she still brings a tear to the eye and eeks some of that long forgotten British pride out of me.1 point
-
Hi. I'm continuing paiting all doors and hatches. I discovered that the inside of the fuselage will be visible at the exhaust. So I better get some paint there also. I've stripped the paint from the bombbays and started to repaint them. Some sub assemblies are done. Rudders and elevators. But the seams on this will take some work to get done. Why can't they make parts that meets on a panelline? The engine with inlet is almost done. I've reckoned that this would be a simple and rather quick build. But with all the ejectorpinmarks and bad seams I guess it'll take some time. I'll be happy if I get this done before Christmas. To be continued... //Bosse1 point
-
i'll follow your build with interest, as mentioned above, the Navy should have pushed harder for a SHAR replacement, However I think the Crabs have someone on the inside in parliament, who pushes for what they want and sod everyone else! Colin on the Africa Station1 point
-
Cheers Ken. So what size should they be?1 point
-
Good grief it even comes with it's own phone !! Be interesting to see how it stacks up against some of the more recent Mossie offerings Paul. The site you mention sounds a worthy cause too. Good luck with the old beastie.1 point
-
Good start Al, a knee op eh ! An injury, no doubt gallantly sustained through you're requirement to grovel in the quest for info on the old beast !, a worthy war wound old fella. Glad to hear your recovering well, knees can be funny johnnies. The Black Box and Eduard sets certainly look the part. I was clearing out the loft recently due to the impending 'big push' and came across several part built models that I'd forgotten all about including an almost done 1/32nd Revell F15C, ( that was going to be a Bitburg bird too), I'm not sure but I may have the wheels banging about somewhere, I'll have a good look see and let you know...meanwhile carry on the good work..I'll expect it done by Friday...1 point
-
Help us Zvezda-wan Kenobi; you're our only hope!1 point
-
It's very sad, and I thought the spar was good for another 10-15 years of flying from speaking to them a few years ago. All it means is that I'm going to have to attend a lot of airshows next year1 point
-
What a shame. But it was something of a miracle she ever flew again - when the RAF gave up all those years ago we could never have predicted another six years' flying. She doesn't owe us anything, and I'm glad they did what they did for as long as they could. So what should he be paid? But even if he worked for nothing (why should he? would you?) that would still leave them £120,000 short for this job and no better off as to chances of success. Well, no - because the Vulcan charity exists only to fly the Vulcan. Spending the money on anything not connected with that would be unlawful. Anyone wanting to restore an F-104 will need to find their own money.1 point
-
Splat!:1 point
-
Enzo,, The Ferrari of classic Airliners..... Great choice, Good start.1 point
-
Just Another cool masterpiece from your workbench My Friend Pierre!!! A real pleasure to watch each of your works. The kit looks very nicely detailed and you did a magnificent job nightlightning all the present and detailing with a great touch the rest. Thank you very much for sharing1 point
-
The rest of the after market parts have finally arrived! Wolfpack Design's wheel bay set and their Vulcan update set: The largest bit of resin in the update set is a new tail cone, featuring very fine detail; The main undercarriage bays are beautifully detailed; A lot of chopping about of the kit is required; But the end result is worth the surgery; They also give you a very nice nose wheel bay, a great improvement all round, on the kit; Should be able to cement the body and wing all together very soon. Watch this space!1 point
-
I was lucky enough to see this ship in Capetown, it came in to bunker while dragging a semisubmersible rig from Korea to the North Sea, in Jan 1984. Most impressive. I had been lucky enough to get a look over the Wolraad Woltemade, Safmarines giant salvage tug just a few days previously. The term I used to describe them afterwards was commercial warships. As Seadog says form meeting function. Its no coincidence to my mind that several large salvage tugs of this era have been converted to luxury yachts. The ultimate expression of mine is bigger & more powerful than yours. Must get mine out of my stash one day, when I see this I get a relapse of my tugnutitis. Steve.1 point
-
Excellent photos of the real thing... Now where's the model??!!1 point
-
More... The real one... Cheers Pierre.1 point
-
Thanks Gents. Made a start last night by coating blue wings with Modelstrip. Gave it until this afternoon and the paint came off, no problem. Quite a few glue splodges revealed and attacked them with a mini-grinder. Then I realised my wing was warped. A dry fit suggested that all those years in the spares box had not done the old wings any good. The worst warpage was at the tips and was also the easiest to deal with. The end pieces were cut off and inserts fitted into the gaps. CA gel was applied and this was used when rejoining the tips to allow for manoeuvring time. The wings are straighter than they were and I'm going to live with the slight bend in the centre sections. Regards, Steve1 point
-
The base is about ready, back to shipbuilding next. The three hulls are just dropped in for now, I'll finish all three before the final fit. The flash is really bringing out the blue, it's more slate grey under natural lights. Playing at Flight Deck Officer was far too tempting, 4 of the Shars will be turned into GR3s, the Sea Kings will be a mix of HC4s and HAS5s. Might drop the Chinook and swap in a visiting Wessex.1 point
-
Ok, so I have cut out the bits I needed from the Canberra wings, namely the engines and I`ll now look forward to the hours of sanding down. Here`s a concept picture of the engines in place...... ..... and some of you will notice that this looks a lot like the Lanc jet testbed from days of old...... Well this was always going to be the basis for my build, but thats where it now ends and I will be changing areas of the fuselage. The premise of this design is a pressurised high altitude tactical heavy bomber. (Think Tallboys).1 point
-
Thanks Lex77, I'll probably just scratch a new one, when I get round to it. A wee update, some more work on the seats. Getting there but still some work to do. The rivets are from Archers Fine Transfers and are fantastic to work with. They're just like a normal decal. You select the pattern / size you want, cut to length and just apply like a normal decal. They might stray until you get a layer of Klear / varnish or primer over them and I can see I've lost three from one of the seats. No probs, they're good fun to work with. I started riveting on Saturday afternoon and was thoroughly enjoying myself and was perfectly happy until I became vaguely aware that the Wife was screaming at me and slapping my face. I came to and found that I'd riveted the bang seats... then the PC moniter... then half the panels on my car (1/1 scale Mondeo) and had now Tamiya taped my 8 year old daughter to a kitchen chair and was about to give her 1/35 scale ear studs. Rather absorbing little things these rivets. I suppose that makes me a true "Rivet Counter" now. Unfortunately the Wife has confiscated and banned the Archer rivets but my Brother in Law is going to get me some more and sneak them in to me. He's a fellow modeller and knows the score. Anyway, on to the pics. It's very difficult to take close ups of white plastic as the flash floods it too much so I'll try and get some daylight pics tomorrow.1 point
-
Pleased i didn't mistel this WOW1 point
-
It will be the post 2005 A-10C But in Camo colours/markings1 point
-
I've noticed that most scale model's of the A-10 get this wrong. I Fly a Challenger 605 amongst others at the moment and they have the Same PW-34 engines, identical phyiscally to the TF-34. The fan is quite set back from the nacelles, very noticable. More progress: Fuselage has gone together along with wing and tail section. Size is very clear now! Thought the F-15 was big: Few gaps to fill still....1 point
-
More progress: Realised Trumpeter got the instructions on the engine assembly wrong! The fan should go behind the raised ring on the engine nacelle, rather thena the front. otherwise the spacing will be to short. You want the fan inlet to look like this: And this is how it will turn out: Adds a good scale 6" which is pretty much correct.1 point


This leaderboard is set to London/GMT+01:00