
Leaderboard


Popular Content
Showing content with the highest reputation on 27/09/12 in all areas
-
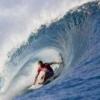
- Another aspect of the Stringbag - Tamyia 1/48 - Sorry for the plastic chip hidden on the port side next to the roundel3 points
-
This is the eduard kit built OOB except for the decals and an Aries exhaust. I still need to add a couple of small parts but I'm calling it finished. Painted with Lifecolor and Tamiya paints and the decals are from Kopro.2 points
-
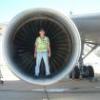
Hello, Here is my fifth UAV. This Platz model is very nice, very pleased to build. I Hope you will like it. All my finished photos are there : http://maquette72.free.fr/articles/2012_95_X47B/index95.php And the build is there : http://maquette72.free.fr/articles/2012_95_X47B/photos/img_1818.jpg You will see it at Cholet show (France) in october. Alain2 points
-
Hi all, picked this kit up for a bargain £4.99 (Front windscreen damage) from Mr model and added Two Bobs Decals. Apart from the damage it made up into a decent 105. Brian.1 point
-
Latest build finally finished, and a bleeding tricky one at that! This is my 1st attempt at airbrushing a camo scheme, so be gentle peeps!!1 point
-
Hi all, I`m fairly new here and don`t build many ships but I thought I`d show you my 1st maritime effort: Trumpy`s 1/350 Hornet I know it`s a B-25 short but I wasn`t buying another set just for one aircraft (you only got a couple with the kit) so I just pretend it`s being loaded and parked. Hope it looks ok to you.1 point
-
Greetings to all. I humbly offer my take on my latest British infatuation, the beautiful Great Western Air Ambulance. I fell in love with the color scheme when I came across some online photos, and knew I had to give it a try. I stretched the venerable Fujimi Bo105 PAH-1 to portray the longer Bo105CBS fuselage, then scratchbuilt the details in the aft/medical section based on photos from the invaluable UK Emergency Aviation website. A few of the excellent photos also provided imagery which I was able to use to create my own inkjet-printed decals. Thanks for looking!1 point
-
just spotted this on Hannants new arrivals carrying a £35 price tag.is it a brand new tool?, or a revell re-issue. thanks chris1 point
-
Finished this a little while ago, and only just getting around to taking photos The Airfix Spitfire, Someone else on here showed me what can be achieved on the panel lines by filling with Mr Surfacer 1000, then using a cotton bud dipped in X20 thinner, to rub it down all over, built to represent Al Deere's aircraft in which he was shot down, I replaced the prop with a Rotol unit from 3D, as this was what it was fitted with. I used Gunze lacquer paints for the uppersurface, and an ancient tin of Compucolor FS34533 (Eau de Nil) for the underside, as called for on the Southern Expo decal sheet. For the Camoflauge pattern I used the AML Spitfire paint masks A scheme, these are very easy to use and low tack, I have used the same A pattern twice now, so using a bit of care with the removal I think you could get quite few uses from them, I don't know how they would go if you don't use them for a while in between uses though, my two uses were only a day apart, but they certainly sped up the painting process, taking only about a half hour to attach.1 point
-
Hello im showing my Academy corsair in 1/72 scale, main painting colour used was Vallejo 898 dark sea blue . Thanks for looking.1 point
-
cracking mate1 point
-
Cracking job so far on what I know from experience is a kit with truly horrendous fit issues. I made the mistake of introducing half a dozen Air Cadets to this kit as an 'easy' first 1/48 kit for my Squadron's modelling project... If only I knew then what I know now! Looking forward to seeing how this turns out! Nik1 point
-
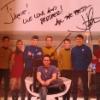
Excellent work! Following this as it is my next build after I complete the enterprise E (waiting for aztec decals from the USA...) . I also have the Voyager PE parts and also the DLM replacement deflector. As one of my favourite ST ships, I can't wait to start the Voyager build1 point
-
Nice. Very good painting work. I prefer the other one, but you've done an excellent job in both of them Congratulations again.1 point
-
That is gooooood. I love it. I have mine in Airfix 1/72. Yours it will inspire to me. Congratulations1 point
-
F-94C Starfire 1:48 Kitty Hawk The F-94 was originally developed by Lockheed to a USAF Specification to replace the F-61 Black Widow and the F-82 Twin Mustang. It was to be an all weather, day and night interceptor equipped with radar. For this Lockheed used their excellent P-80 / T-33 airframe as the base for the F-94. The initial design was designated F-94A, closely followed by the F-94B and first flew in 1949. The radar in the new F-94 was so secret that flights over enemy territory were prohibited, and the aircraft was pretty much kept back from Korea. The F-94C was an all rocket armament aircraft and differed so much from the earlier models that it was origianlly given the toally separate designation of F-97. However it was decided to treat it as a new version of the F-94, which frequently happend so that funding could be allocated as a design change rather than a "new" aircraft. In fact Lockheed pushed the F-94C with their own money as USAF interest was only lukewarm. It should be noted that only the F-94C was know as the "Starfire", and the first airframe was delivered in 1951. Original armament for the Starfire was an all rocket armament mounted in a ring around the nose radome. It was found in practice that firing these rockets in this position caused a considerable volume of rocket exhaust gas to be ingested by the engine, potentially causing a dangerous flame out. Two wing rocket pods were subsequently designed to remedy this, and the nose rockets were very rarely used from there on in. In addition to the rocket problems the Starfires had a less than stellar reputation in the USAF. Early airframes were plagued with engine problems, fuel leaks, and poor weather proofing which lead to the control system short circuiting when rain leaked in through the canopy! F-94C's were finally retired by the USAF in 1959 (though they had been trying for years), and the national Guard in 1960 as newer more capable aircraft came on stream. Lockheed produced 387 Stafires before production ceased. The Kit This is the first kit to be issued by Kitty hawk Models, a new startup in the modelling world. I must say it came a surprise to me that they would issue this kit of an early American Jet as a first kit, rather than something more mainstream. Hopefully this shows more of what may come from Kitty Hawk. While a bit of a surprise, it is very welcome that a company is giving this period in aviation some prominence for us modellers. Prior to this new kit the only F-94C models were the very old Revell Box scale kit and the almost as ancient Emhar kit in 1:72. The kit arrives in a glossy white box with an in-flight Starfire across the box top. While it's not the strongest model box I have, its certainly not the flimsiest either. The sprues are bagged up as are the clear parts in a separate bag, and another bag contains the Photoetched sheet and 3 ball bearings for nose weight (though these are not mentioned in the instructions or box contents). There are 4 sprues of a dark grey plastic which fill the box. The arrangement of parts is pretty standard; left & right fuselage, upper and lower wings. When you start to look at the parts you notice that the moulding quality looks very good indeed, and parts are thin but still strong. Panel lines on the kit are very restrained, in fact so restrained they could probably do with a scriber running along them, especially if you plan on brush-painting. The tailing edges to the flying surfaces are commendably thin, and I have 1:72 kits which are thicker than the trailing edges of this kit's wings! The detail on the parts is very good indeed, and for example, in the wheel well not only are all the stringers moulded but the rivets on them are as well. In the cockpit all instrument panels and side panels are represented by Photo-Etched (PE) parts. There are no plastic substitutes if you are one of those modellers who does not like PE. Though for some reason the pilots instrument panel is also given as a decal but the radar operators is not? PE seat belts are provided for the ejection seats, though only one shoulder strap is provided for each seat?? The PE sheet is covered both sides with a clear plastic layer, by taking off only the front this should stop parts pinging off to the carpet monster when cutting them off. You have the option of opening up the airbrakes under the front fuselage and rear side airbrakes, which is a nice touch and adds extra interest if you choose to pose them that way. If doing this then the parts are mix of injected plastic and photoetch which should look great when finished. The flaps can also be displayed in the down position (though the instructions do not show this), there are however, injector pin marks on the inside of the flaps which will be tricky to remove without damaging the detail, as they are inside the moulded in structure. It should be noted though, that when normally on the ground all of these were closed up unless maintenance was underway. A full engine exhaust and rear fan are provided which should supply enough detail in case anyone peers up there with a torch! Kitty Hawk have moulded in rocket openings into the nose ring, but these will only be visible if the modeller wishes to start cutting the nose rocket panels out (This again is not shown in the instructions). The wheels supplied in the kit are "weighted" but not overdone to the extent they look flat. Overall I am impressed by the excellent quality of the parts on the sprues. The canopy is supplied on a clear sprue as the main part & front screen and can be modelled open if you wish. In addition to these parts a weapons sight glass and nav lights are included. The canopy parts seem to be remarkably thin and clear, as evidenced in the photo above. Some real care will be needed when it comes to masking them though, as they are very fragile, and will crack or craze under too much pressure. The main canopy rails are normal injected plastic and need to be attached to the glazing with care, choosing your glue carefully to avoid fogging around the joint. PVA or GS-Hypo cement would be a sensible choice here. Instructions The instructions for the kit come in a nice compact A5 sized booklet. There is a colour page to the front with the same printing as the box art, which is accompanied by a colour decal placement diagram on the back page. A sprue layout is given followed by 19 constructions steps, which are easy to read and seem to flow fairly well. Paint callouts are given in Gunze colours with FS numbers where appropriate. Decals The Decal sheet gives the modeller the chance to model two different aircraft. Absolutely no information at all about these two aircraft is given on the instructions. However the two aircraft are as follows: 15623 - 354th Fighter Interceptor Squadron, Oxnard AFB, California 1953. This aircraft is now at The Pima Air & Space Museum, Arizona (As shown on the box art). 01054 - 60th Fighter Interceptor Squadron, Otis AFB, Massachusetts, late 1950's. An aircraft painted in these colours is displayed at The National Museum of The US Air Force in Dayton, Ohio. The decals are very glossy, in register and have dense colour. Carrier film is minimal and I cant see any reason they will not perform well. Conclusion This is a welcome kit for those who like 1950s aviation and want a modern tooling of this aircraft, or who want to build something slightly different from the usual. The kit engineering looks first class and it should build into a good looking model with some care. Here's looking forward to more exciting kits from Kitty Hawk. Review sample courtesy of and available from major hobby shops1 point
-
Stunning Chris!1 point
-
Interesting to see this type of work. Great picture quality and compositions.1 point
-
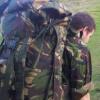
Rob, on ops armoured seats would always be fitted. As Dan quite rightly states, the GPMG/TOW combo was fitted initially for Bosnia. I can tell you the exact date because I flew the first aircraft fitted in such a config! Prior to Nov 95, we were still under the control of the UN with white Lynx AH7 with only the GPMG fitted to the left side (same side as the aircraft commander for gun control reasons). When NATO took over the operation, we painted the aircraft back to their usual green/grey and stuck a TOW boom on the right hand side (gun still on the left for gun control purposes) and could actively go out on aggressive ops to stop the naughty people shooting at us and the civilians (couldnt do that as UN due to the piddle poor ROE!). Surprised the Serbs quite a bit when we wouldnt run away when they started shooting at us and we would patrol with at least a pair of Lynx and fired back at them! They quickly realised we were fitted with TOW and weren't afraid to use them ;-). they became quite friendly towards us after that......1 point
-
Hello Gentlemen, here you are my latest one. The Trumpeter kit is not too bad even if not extremely detailed. Well it gave me the opportunity to practice with some scratch built improvement. Some good picture found on line helped me to add some cockpit and landing gear details. I was in doubt to buy some aftermarket stuff for flaps details, but then I decided to save money and use plasticard, brass wire etc. and do it myself. I'm not 100% satisfied, but as a first attempt it could be worse. The model has been painted with airrush using Tamiya acrylics and finished with Tamiya spray flat coating. Comments and suggestion for improvements are always welcome. Thanks for looking1 point
-
According to my sources, J34 was factory painted in "closest equvalent" to 325M (green) and 058M (blue-grey) at delivery, but was repainted over time at regular maintenance using the swedish colours. The difference wasn't that great plus that they got pretty weathered, so nearly anything goes. This 325/058 combination was in use between 1937 to 1972, so I guess we will see lots of interpretations in this GB!1 point
-
Thanks for the comments guys. The Buffmaster resin doesn't look the crispest, but i'm sure I can work round it! Dave1 point
-
Thanks Arkady and Firebird. @ Christer A.......hope you find a couple - good luck! Modified photo added:1 point
-
just like that....they always looked buggered!1 point
-
AFAIK the first one out of/off the molds was a non flying one done as proof of concept that has gone to Canada for static display. The next is the one that has just flown, then there is one for Glyn Powell who is the mastermind behind the whole concept & built the molds/jigs. He is restoring a T.43 which was the Aussie produced version of a T.3 & was once operated by the RNZAF. There is also one to be done for a UK concern. I believe I'm right when I say that Glyn Powell has said thats all he is good for, he is over 70 all said & done, but I'll be surprised if someone else doesn't pick up the baton as it were, maybe even Avspecs who've completed the build of this one. Steve1 point
-
Military In Scale(IMHO) was the best of all the modelling mags. It just was. I very much looked forward to it hitting the door mat.And would read perhaps 75% of the words in it every issue and it would be next to my chair for me to browse at will until it was replaced by the next one. For me a crying shame..A big and meaningful................... Uhhh!! As it happened I only had one months subby left so I opted for a back issue pre 2009 (I hope its not one I already have). So I save £40 a year or I take out yet another subscription.OR another kit. mmmmmmmmmm .The options are bountiful.1 point
-
Getting there slowly Impulse engines are drilled and filed out. The 'colgate light traps' are put into place, and the bulk head has been lined with some insulation tape to stop the blue light bleeding into the bussard collectors. A bit of glue and masking tape later, the fibre optics are trimmed down slightly. It ends up looking like this And the port side Im happy with the light distribution in the nacelle grills, and also the way the fibre optics have turned out. This is my first time using them too. They will be kept at this length until the painting has been finished, they will then be clipped down and sanded / polished. Im now turning my attention back to the windows and getting all of them filled in1 point
-
-I'm eager to see the first pics............1 point
-
Love it! There is just something about the Stringbag, she looks so hopelessly outdated for her time period, but she made so many great contributions to the war effort. Beautiful replica, you have something to be proud of. Cheers, Bill1 point
-
I have started one, the rear of the two halves of the cowls do not line up, engines need sanding to fit, panel lines on the wings do not line up top to bottom. That's as much as I've done, but hey it's modelling, you don't want it too easy do you?1 point
-
Looks very good Vitor. More pls!1 point
-
Hi Jon, As promised, here is a good image showing the under-wing louvred air vents located on either wing (outboard of the engines). These open when the engines are running on the ground, and close when in the air. The leading edge intake has a rotary shutter that is closed when on the ground, and opens when in the air.1 point
-
My choice is now settled. What If... Rolls-Royce abandoned development of the Griffon engine? Later Spitfires would have been powered by the Napier Sabre.1 point
-
Song often doesn't reply to thread he starts. Too busy ? Not fluent enough in English ? I don't know. It's funny. I have an old French (from the early 80s) article about how to correct 1/72 existing IIIE/O kits. Nothing much to do on the Heller kit, some work on the Frog kit...1 point
-
It will be the post 2005 A-10C But in Camo colours/markings1 point
-
Wow, just spotted this. Great stuff!1 point
-
DOH got it wrong again . Sorry Graham I'm rapidly losing the plot here . I think I should have said the Peanut (?) scheme, the one off scheme done in 3 shades of brown/yellow. Pete1 point
-
-Muy bien Señor......1 point
-
Enzo, I think that your next mission, should you decide to accept it, will be to start a "lets get Airfix to do a new tool, up to new Swordfish Standard. Bristol Beaufighter" thread. Preferably with enough alternative bits to do all the above. Steve.1 point
-
Again, brilliant work Chris! Lightwave's a little out of my meagre price range; I use DAZ Studio 4.5 for figures and posing (and Anders' models work quite nicely in it), then use Bryce 7.1, a great little landscape programme, for the final rendering. I've actually done some aviation art that I should probably post on my website. I wish I had the patience to do a decent Il-2 3-D model; there are some Il-2 models out there, but they have the wrong camouflage. I suppose if I had the patience, I'd learn Photoshop (or Gimp, which I have - more in my price range as it's free!) and add my own textures. Besides trying to find time for my two hobbies, 3-D art and plastic modelling, I suffer from another problem - I have no patience! Looking back, maybe these aren't the best hobbies to have chosen for someone's who's impatient, but there you have it. Best Regards, Jason1 point
-
What a beauty!!! A stunning example in fact. Great work!! Belle1 point
-
Love the work you did. The work on the avionic bays are great. Very similar to what I did with mine. Keep up the great work. I agree it was quite a good kit to build with very few problems.1 point
-
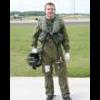
WHERE DID YOU GET THAT HELMET........???? Oh, my apologies, very nice Mirage IV, Steve1 point


.thumb.jpg.d17ff607fc7e89ed057e63fcb6f2a888.jpg)


This leaderboard is set to London/GMT+01:00