
Leaderboard
.thumb.jpg.d17ff607fc7e89ed057e63fcb6f2a888.jpg)

Popular Content
Showing content with the highest reputation on 25/09/12 in all areas
-
All new scratchbuilt wood with donor metalwork. Seven years work. Should fly this week. Ardmore New Zealand.2 points
-
Here`s my 1/48 Italeri B-25D that I`d previously built using the kit decals but that I wasn`t really happy with. Due to a nudge from a really nice guy on another site I took the plunge, stripped it down and redid it as Tondelayo from the 500th B.S, 345th B.G. Also took the opportunity to graft in the top nose glazing from the Monogram B-25J kit as to my eyes it looks better Redid the aerial layout to improve on my previous attempt closed the hatches and bomb bay doors and added spare Monogram guns to the rear window positions and finally a shot of my complete Air Apaches collection with one from each squadron, all other 3 Monogram/Revell B-25J`s Hope you enjoy2 points
-
Hi JB/Don. I visit, but I don't really have anything much to say. Maybe a few shots of the Saturn V might help the guys, though? No clue about how to model one- that's why I joined the site, I was kinda hoping for some tips! Trojan, you don't fancy doing a 'work in progress', do you?2 points
-
Revell 1/72 A400M ATLAS (I know the kit is called the A400M Grizzly, but as it has been named "ATLAS" at Fairford this year, that's how it will be tagged!!!!) Academy 1/48 Tomahawk IIb1 point
-
Straight from the box with the exception of the Swastica. Nice kit, no filler used. First semi successful use of Flory wash, I'm going to stick with it on my next kit, because I can see the value of it when its done right and I just need practice. I'm not sure of the colours as I don't usually build German WWII stuff, so its more of a "its looks right" build. Mark1 point
-
422 Sqn.1963,Hasegawa 1/32,OOB,all markings made with self made stincrls,no decals for these subjects back then.Model built and photographed in 1974. 8020961291 80209630851 point
-
Hmmm thanks guys, but I'm back to square 1 (or at least where I started this afternoon) The starboard wing leading edge didn't quite line up correctly, and adjusting the dihedral on the port wing had weakened the joint too much; so I've ripped the outer panels off and cleaned the glue off the mating surfaces. Tomorrow I'll drill & pin the joints as I can see them needing some extra strength during the rest of the construction.1 point
-
Nicely done, finished one a few weeks ago and I haven't seen a kit by a mainstream manufacturer that was so terrible for a long time, a real challenge of patience. I can only imagine the number of kids and adults who have been given the kit and given up, never to look at the hobby again. Yours, however, is a charm, can't wait to see it with the windscreen and window decals in place! Cheers Col'1 point
-
"Look into my eyes, not around them..." - there ARE no fit problems1 point
-
I picked this up a couple of months back at a local toy shop just to saee what it was like, and found I couldn't put it down unyil I'd finished it. It's totally out of the box, and painted with a combination of Gunze & Tamiya acrylics aopplied with my trusty Badger 100s. This is a great little kit and well worth the £6 I paid. I can see me building more of these. Karl1 point
-
Hi Pete, What do you need the earth yellow paint for? The Euro 1 (or Lizard) scheme comprises Gray FS 36081, Dark Green FS 34079 and Green FS 34092. Regards. Graham1 point
-
Here is an oldie that I did quite a few years ago but I thought you might like to see it, what with the new cyber Hobby kit available now in 1/72nd scale. This is one of my Hasegawa 1/48th Sea Kings, which has been converted to a Fleet Air Arm HC.4 `Junglie' using the excellent but pricey Flightpath conversion set. The decals came from the spares box as there was no suitable decal sheet available at the time, Hope you Like it, Tony O1 point
-
Thanks Ed, it means a lot coming from you. Hi Belle, yes, I used an Airbrush and lots of masking tape for the finish.1 point
-
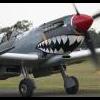
Hi everyone, Finished this this morning, been at this for a little while and rather ran out of steam/mojo towards the end It's the Hasegawa P-40e but I used montex masks to represent a Kittyhawk of 250 Squadron in 1942, first time using masks and had a few problems especially with the fuselage roundels. Also added an ultracast seat with British harness and a Rob Taurus Vac canopy was used for the sliding part of the canopy. Paints are Gunze, Tamiya, Citadel, Vallejo and the underside was a Tamiya mix which I then went back over lightly with Xtracrylics Azure. Some oils used to try and create a dusty look and Mig dark wash for some panel line work. A big thanks to Terry McGrady who gave me a lot of help with this, any errors of which I'm sure I've made plenty are all my own doing All comments very welcome and thanks for looking. Cheers...1 point
-
Dear Colleagues Here is my ICM LaGG-3 series 10 with a refueler from UM Models. Performance wise not much better than a Hurricane and having to battle the deadly Bf 109-F. Armed with one 23 mm cannon and a 12.7 mm machine gun, so similar in hitting power to the Friedrich in some respects. Hope you like it? Andrew1 point
-
Hi again, Definitely last one. i must say i like the way you post pics on this forum. works a treat. Ok picked this model up for £7 and i think it was an absolute bargain and a treat to build. Hope you like it. comments and crits always welcome. Thanks Simon1 point
-
Looking good. really must make a start on my RM sometime. Will have to clean the bench first though. Christof1 point
-
Good luck with your project Karen and happy modelling.... All the best, Brian.1 point
-
Hi Everyone, This is my first build post on here and i will post a few more in the next few days. comments and criticism is welcome. Cheers Ping1 point
-
Correctomundo. Marty...1 point
-
Very nice indeed, the hog is one of my favourite aircraft. I have both the Monogram and Ertl 1:48 kits in my stash. I was planning the Lizard(?) scheme on one but can't find any earth yellow paint. Pete1 point
-
Not to mention the incredible amount of ugliness such a monster would inflict on the general public1 point
-
Mmmmm. The more these fantastic Tamiya 109s are posted the harder it is to resist increasing the stash by one! Really fantastic. Stretched q-tip antenna though? Better than stretched sprue?1 point
-
8.8cm Pak-43 Waffenträger Self Propelled Gun 1:35 Trumpeter The Waffenträger was part of the Entwicklung series of Armoured Fighting Vehicles that were supposed to standardise the vehicles used by the German fighting forces toward the end of WWII. It was a self-propelled gun that was based on an extended Czech 38(D) chassis, and built at the Ardelt works in Eberwalde using a Krupps 88mm Pak 43. Like the rest of the Entwicklung series though, it was too late to see serious action in the closing days of the war, although one or two did actually manage to reach the battlefield if accounts are to be believed. One surving example can be found at the Kubinka museum in Russia, dressed in a rather garish camo pattern, although contemporary pictures seem to show a single dark colour. As mentioned, it was based on the almost ubiquitous 38(D) chassis that served the Germans throughout WWII in one form or another, with an armoured driving compartment at the front, while the rest of the chassis was given over to a flat base for the Pak 43 and crew. Clearly, it was not capable of carrying its operating crew, who would have had to follow it into action in another vehicle, and during battle they would be quite exposed to attack from the side as the gun shield doesn't provide much cover to fire coming from any direction other than the front. The gun shield was sharply angled though, which did provide extra effective thickness to the plate, although with a number of shells stored in a box attached to the inside of the shield, that might be moot if the shot detonated the rounds. The Kit The kit arrives in a standard Trumpeter box with a slight corrugated surface, and a nice painting of a Waffenträger in action, doing terrible things to T-34s that seem oblivious to their presence. Inside the box is an impressive array of parts, including ten sprues of sand coloured styrene, lower hull part, ten small brown sprues of track links, six sheets of Photo-Etch (PE) parts, a steel tube, a turned aluminium barrel, and a set of decals. The instruction booklet and separate colour painting guide finish off the package. When you consider that this kit retails for less than £30, that's quite a haul, and for most people, that will be sufficient for their needs. Construction starts naturally enough with the suspension units being attached to the hull, and here the pre-war heritage of the 38(D) shows through, with simple leaf-spring bogies each holding two wheels, with a total of eight road wheels in four pairs, two per side. These are a simple stamped construction and have hollow backs that mimic the real thing. The idler wheels are at the rear of the chassis and are paired to avoid slippage of the track, while the drive sprockets at the front are similarly paired and attach to a small final drive bulge. The completion of the wheels on this kit won't take long as a result, and the absence of rubber tyres due to the shortage of this strategic material during the final years of the war makes that task even easier. The tracks themselves are made up from individual links that are housed on ten small sprues that contain 23 links each. Each link has four attachment points, which will slow removal and clean-up, and there is a single recessed ejector pin mark in the inside-middle of each one. Whether you clean these up with a little putty, leave them and cover them with mud or leave them and hope no-one notices is entirely up to you, but filling and cleaning up 206 small links in total is a job for when you can safely disengage your brain. There is a rudimentary interior provided with the kit, although rudimentary is perhaps a little unkind. The basics are all there, including the driver's compartment with seat, pedals and controls, plus some details of the engine compartment that is visible from the side of the driver's position, with some levers and a representation of the engine cooling fans, which would have made the driver's seat heaven in the winter and hell in the summer. In the rear compartment under the gun deck, is stowage for the Pak-43's 88mm ammo, which is made up of three layers of four shells offset to fit within the available space. The shells are all moulded on four sprues that are a wide dog-bone shape, and contains eight full rounds, and eight spent rounds with a slide-moulded hollow neck to the cartridge casing. Each shell has a corresponding PE percussion cap that adds a little extra detail to the area, and saves you from having to fastidiously clean up one attachment point per shell. Of course each shell has one sprue gate to clean up on the side, and the obligatory seam to scrape away down each side, but the resulting shells will look good with a coat of brass paint on the cartridge end. When dealing with the upper hull, there is the option to cut off the moulded in styrene fenders and install a pair of more realistic PE fenders that are made up from quite a number of parts. This not only gives a more scale thickness to the area, but also a little more crisp detail that is difficult to represent in styrene. The angled ends of the fenders are also provided as PE, and would benefit from being soldered into place to add some strength. If you elect not to use these parts though, you can ignore this whole paragraph and leave the parts ensconced in the box for another day. The hull top drops onto the lower, and the large square hole in the top matches the crew cab, which is a separate part and drops on top, with the instrument panel and bulkhead detail inside. At the rear a large panel fills the remaining void, with two extra lift-out panels within to access the shell repository, plus a whole host of lifting and towing eyes festooning the rear, with a low crew step that would make retrieving the shells from the store easier. The access panels can be replaced by folded PE parts, which would look good if you felt like leaving them open and scratch building the rest of the internals. A thick armour plate attaches to the sloping glacis plate, and the exhaust loops round the back of the cab, exiting on the front of the starboard side. More lifting eyes attach to the front, as well as a large louvered panel for the cooling system, with a matching panel at the rear of the cab for throughput of cooling air. Running lights, jack block and more lifting eyes attach to the front, along with the huge single-part travel-lock for the long 88mm barrel. The final part is a folding bullet screen to the front of the driver's compartment, which is otherwise open to the elements come rain or shine. Building up the Pak-43 is a large part of the construction process of this kit, and care must be taken due to the choice of PE or styrene gun shield, mantlet and other parts. The first section deals with the mount, and then the breech is built up with all of the large cast and machined parts that make up the loading mechanism and breech block. The elevation rams simply slide inside eachother allowing the barrel to move freely after building (if you wish), whilst pivoting at the rear aft of the gunner's chair. A ready-ammo box is made up from a single large sheet of PE that is bent to shape, and six shells are placed inside with their PE firing caps. The next steps cover the creation of the realistic two-layer gun shield out of either PE parts, or the easier styrene alternative. Personally, I would go for the PE parts as they look more in-scale when completed, and if you aren't experienced with PE and make a hash of it, you've always got the styrene parts to back you up! The PE shroud has 30 tiny styrene spacers to add between the two layers, which I assume is to help reduce spalling from incoming small arms rounds, as the gap is too small to be of much use in the event of an RPG hit. Various styrene and PE fixtures attach inside the shroud, as well as the aforementioned ready-ammo box, although the styrene alternative shield has a lot of these moulded in. Joining of the shield with the breech is accomplished by mating all of the stand-off bars with their sockets on the shield, after which the barrel can be added. Here again you have the choice of a very nicely turned aluminium barrel with a brass tube extension piece, or a styrene barrel made from two halves, but whichever option you choose, you will need to make up the flash-hider from two halves and hide the seams well before painting. The Mantlet can either be made from styrene or PE, with the PE requiring a few bends and the addition of some small detail parts before it is complete. The Mantlet's position on the barrel is given from both side and front views in scrap diagrams underneath the construction step that deals with its fitment. The final task is to bring the two assemblies together and add one single piece to the rear of the attachment point. The painting and marking guide gives only one scheme, which is Dunkelgelb with schokoladebraun patches. The sky is the limit though, as proving that any particular scheme was or wasn't used will be tricky, unless you head straight for a more concept based camo scheme. To assist you with your deliberations and flights of fancy, a set of generic decals is included, which provides yellow and white kill bands for the barrel, plus two of each numeral in red with a white border from 0 to 9, and black balkenkreuz with white borders and the more simple white ones. A decal for the driver's instrument panel is also included to detail up the panel fitted during the build, which has a Panzer Grey background and two main instruments in white with black details and red danger warnings. The decals seem of good quality, are in register and the colour density seems good on the sheet. Paint call-outs are given in Trumpeter's usual Gunze, Vallejo, Model Master, Tamiya and Humbrol colours, which should make it possible to convert to just about any major paint brand. Conclusion If you like late war German tanks of the Entwicklung Waffe'46 genre, this is a great kit to add to your collection. Even if they are not usually to your taste the shape of the vehicle with its high angle of rake to the gun shield makes for an attractive and purposeful looking finished model, but once you see the level of detail in the box at such an attractive price point, it is quite a simple decision to make. Highly recommended. Review sample courtesy of1 point
-
Thanks lads.. Will, I masked the solar panel and cockpit glazing (and framework) and resprayed the rest. Basically everything that's blue-grey. Subtle paynes grey wash and a dry brush with the base colour followed.. Chris.. Way ahead of you Michael, for the price and scale, you can't go wrong with these TIEs..1 point


This leaderboard is set to London/GMT+01:00