
Leaderboard


Popular Content
Showing content with the highest reputation on 22/08/12 in all areas
-
Hi all, This is my latest build, and I have to say a really enjoyable one. I have heard bits about this kit, not good generally, but I found it ok if you can live with the raised detail. Cockpit is a mix of kit parts, Airwaves etch and Neomega seat (superb). Decals are from Xtradecal, painted with Revell aquacolour. Its painted to represent a GR1 of 54 Squadron XX729 RAF Coltishall 1991. Crit welcome! Now off on holiday for a break of work & modelling!! Cheers Simon1 point
-
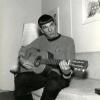
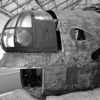
Hi, here is my latest - the Hasegawa Voyager with LVM Studios brass booms. This was a quick build as a break from the Atomic City Mercury. The model is a gem, but is not straightforward - you need to dry fit the various tubular assemblies to the main spacecraft bus before gluing each assembly, or there will be small misalignments (or some large ones in my case!) . It would also help to build it when not too tired... The LVM brass makes a massive difference, but I could not get the magnetometer boom to twist after soldering it. I'll try again with another one when I have time, and add the 2 cables that run up it. The stand is a temporary one. A fun model to build. Regards, Tim1 point
-
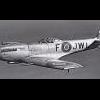
Hi All, A grey 'starfighter'. Brian1 point
-
I fancied building a Tornado and had this in the stash, how hard could it be? Best described as a blank canvas, this kit received a full rescribe, extensive scratchbuilding in the cockpit (including almost total rebuild of the seats), a couple of bays opened up, a bit of faffing about in the wheel bays, and flaps and slats dropped. Unusually I went for aftermarket decals, mainly because they were cheap, and found that they had to be individually cut from the sheet which was a bit unexpected. They are quite attractive but the stencils were comically bad, looking like they were done with a blunt felt tip; the kit stencils were crisp but silvered horribly no matter what I did. Overall it wasn't a complex build, just time consuming; as you would expect of an Airfix kit of this generation there was some warpage but nothing that couldn't be dealt with. Annoyingly I managed to cock up the finish coat which is rougher than I would have liked in places, but I was so fagged out by the whole thing by that point I let it go. RBF tags are by Bare Metal Foil co., FOD covers are scratchbuilt. The aircraft represented is supposed to be a GR1 but somehow an extra bump ended up under the nose; by the time I realised that it shouldn't be there it was too far along to remove without making a mess. The cockpit is also more representational than realistic; I'm not too fussy as long as it more or less looks like the real thing. What I got out of this build was confidence about scratchbuilding; it's good to have a go at something that you are unlikely to make any worse.1 point
-
Hi :-) My latest finished kit is F-111A Aadvark. Kit is Italeri. Again, out of box, only rescribed. It was my first SEA camouflage and it was fun thx !1 point
-
Do we have anything here (uk) that's an alternative and readily available ?1 point
-
This was from the Red Arrows boxing of the new tool Airfix kit built from box just dropped the flaps & made my own undercarrage doors to replace the in-accurate kit parts! Far from perfect but an improvement, least I think so! Model was sprayed with Halfords rattle can. Decals came from Model Alliance sheet 72105 Thanks for looking cheers Youth1 point
-
Managed to coax the Airfix wing onto the ICM wingroot with remarkably little effort, a bit of sanding of the ICM fuselage and it's not a bad fit at all. It will need a little filler at the trailing edge fairing as these don't match, but I'm hoping some Milliput worked in wet will cure this.1 point
-
Thats looking good, i cant belive how basic the kit is compared to the new Revell B-17G I am building now. I spent 2 hours today making and painting 4 engines and yours are already done!1 point
-
1 point
-
WEM Colourcoats (enamels) have some roundel colours in their range, they look the biz as well, here's a link. https://www.whiteensignmodels.com/c/RAFFleet+Air+Arm/128/1/ There are two roundel red colours, WEMCC ACRN27 RAF Roundel Red, and WEMCC ACRN22 RAF/FAA Red (Matt) the latter colour is probably the one that you want however I can remember quite a bit of debate on this subject, the Roundel Blue is WEMCC ACRN31 WW2 Roundel Blue. Cheers Dennis1 point
-
Really Nice Job `PB`, I attempted `Squirrely Bird ` a while back but it`s nowhere near yours.1 point
-
Great bird, but you've got to glue better the middle canopy frame...1 point
-
Very nice build mate, really like the nose art.1 point
-
Here it is at last! My refurbished Hasegawa/Frog Lightning F2A from the F6 kit. Depicting XN781/B at RAF Gutersloh ,1970. For those that recall in another thread (92 Squadron Lightning....) in WIP, I started to rework the model from one built around 1972/73. Welll its now done and here you go:...... The decals are mainly from various Xtradecal sets and the unit badge on the tail and nose checks are Modeldecal. Because up to now there hasn't been any pre dark green decals for a bare metal F2A as I wanted to depict. So it seems that because I did it my own way, Xtradecal are covering this version of 19 sqdn. in one of their next sets! Typical! The pitot is a needle of the right length. The jet exhausts are the only area I couldn't figure out what to do to improve it without going into too much surgery so decided it was left alone. The cockpit has had only a decent seat fitted from my spares box, the IFR probe is a left over from the Matchbox kit that is better than the FROG/ Hasegawa offering. Firestreaks from an Airfix Javelin 9! And coats of Alclad, silver decal blocks and coats of Klear for the final finishes. And I know I have missed of the arrester hook but on the lookout for one. Enjoy and any comments welcome.1 point
-
Having sorted out the rear fuselage, the next stage was to match it to the centre section. There was a lip, 2- 3mm between the two, where the join was both over and undersize as below: So, some bracing was temporarily fixed in the centre section to hold a closer match with the rear end, and then dunked in hot water to fix the shape. DON'T be tempted to use spring clamps to hold a shape while using hot water - I did this once and the clamps distorted the part as the heat softened it. If the part won't flex far enough or is liable to snap, I heat it in water and then use gentle pressure to alter the shape and while keeping the pressure on, dunk it in cold water to fix the shape. It may take a couple of goes to get it right, but gently does it. After joining the two, filling and sanding, I ended up with this1 point
-
Hi all! My Saiun 1st prototype in a hangar dio is finally over! Despite some difficulties in the end I finally finished the project and here I am to show you the pictures! Hope you like the result! All the best, Panagiotis.1 point
-
Started a business up so all my savings etc have been swallowed lol, Only just started to earn profit now so will get one as soon as I can Keep up the good work1 point
-
The air intakes were cemented to the nose section (vents to the underside), after a little sanding to get a close fit. The joints were filled with car body filler and sanded smooth. The only awkward bit was filling the small gap between the front of the intake lip and the fairings on the nose - it was such a small gap I used a toothpick to get the filler in. After sanding the joints, being careful to avoid the intake lip, the nose was sprayed with Upol hi build primer to show up any blemishes in the surface - I was pleased to see there were none! I don't do any scribing at this stage as there will stilll be issues to fix on joining the nose to the centre section. The nose is now ready to join but first, I'll sort out the back end. Now would be a good time to put the Spey compressors in place. They sit around 2" back from the lip of the intake. I'll scratch and insert the wheel well at some point...1 point
-
Can't say I'm a fan of airliners to be honest, unless it got RAF roundals and a grey or camouflage paint scheme..lol If there's another what if GB I may be pursuaded to do a A380 anti flah scheme bomber.... Oa maybe a RAF C5 Galaxy..... Or then again not lol....1 point
-
great 'D' I like the obvious contrast of the tail colour, it's quite stunning. The continuity of the Green makings make a lovely finish1 point
-
Had a play and it looks like it was a problem with file associations on my laptop, changed the settings and it works fine now in the database. Thanks for so promptly answering my questions and taking the time to reply on the forums - gives me a lot of confidence in the product .1 point
-
Excellent. I'm currently working on an N-Gauge model railway (won't be finished for ages), and my plan is to arrange a scene somewhere on the layout for some 1/144 aircraft. I picked up a 1/144 Tempest V a while back, and put it together one evening over a bottle of wine. Aside from the fact that it looked as though its creator had indeed been drinking, I did enjoy the challenge. I bought about half a dozen 1/144 aircraft kits (mainly Revell) to have a crack at a later date. I quite like the scale, as it goes. I was never one for the fiddly cockpit detail anyway.1 point
-
That is very, very cheap. The only way to source one cheaper would involve knowing where somebody lives who has one in their stash, a balaclava, torch and very good lock-picking skills.1 point
-
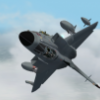
Very nice!! A fine-looking OOB build. As for Aeromater paints, it reminded me of this... Al1 point
-
Excellent Hornet !!1 point
-
The weathering looks good there. Be carefull to keep the right balance as too much may spoil the effect and I think you are pretty close to perfect at the moment.1 point
-
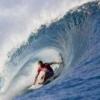
An interesting rendition of the Elephant graveyard. The elephant graveyard portrays the act of getting older and being put out to the pasture to graze. I especially like that you began telling the story by using dilapidated aircrafts to portray the elephants, incorporated a realistic pasture landscape with wild grasses and even added figures of sheep, sheepdog and sheep herder. Really a well thought out piece. Great work to you and Tomy!! Belle1 point
-
Superb my friend..... Brian1 point
-
Your attention to detail is really spot on through every part of your build. I especially like your idea of adding figures, water and waves for a more realistic approach. It was also a nice touch to have schwimmwagens floating in the water. A very well planned tribute. Congrats to you and Tomy for another wonderful build. Belle1 point
-
Wow, what a super build, so many things to like about it, not the least of which is the water & the method used to acheive this, really good tips & easy to see it works so well. Steve.1 point
-
Looks great - nicely weathered. The decals are sometimes not weathered at all, but you've got just the right look.1 point
-
That engine is pretty impressive. I'm regularly surprised by the amount of detail people manage to get into their builds and at first glance it's difficult to tell the scale - the 72's look like 48's and the 48's like 32's. Good stuff.1 point
-
Richard might tell you that they were easy, but not the case, fit is a problem but with care make a reasonable model. Nice going Richard and I like the figures. Some from other sources I see.1 point
-
Hi all, thanks for your nice words once again! I started the front end last weekend: Now i'm waiting for the Fujimi Garage Tools Set i ordered to complete the lower saloon. Stefan1 point
-
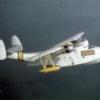
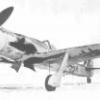
I know the reference pic is of W.Nr 110006 VH+EY and not the craft I am modelling but it shows the weathering pattern I am aiming for. Here is where I am now. Used a thinned bolt gun metallic and a black wash. Not 100% but in the right direction I hope. Any input is appreciated? If anyone's looking. Seem to have posted lots and nobody is out there?? Cheers for looking Kevin1 point
-
Here's one I made earlier: IIRC the colours were Vallejo Air 024 Khaki Brown and 012 Dark Green, cut back with a little white to add "scale effect", final finish being Humbrol's new matt acrylics sprays. On my next model I may try something different, but I do think lightening the colours does stop swamping smaller scales like 1/72 even if the final mixes are a tad off from my MAP swatches.1 point
-
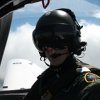
Hey Mike, the model is Superb and the photo work is wonderful!!! I really agree with Alpha Delta. Thank you very much for sharing.1 point
-
Tom, Stick with that scheme. I watched the documentary on the recovery that they made (I was less than 10 at the time) and it was one of the saddest things I'd seen in my life. Even now it puts a large lump in my throat - and even this post isn't being written in a rosy atmosphere! I can't think of a better way to commemorate it and the team who recovered it than applying its livery to your model. If you don't know the story of The Kee Bird, the documentary is entitled B29 Frozen in Time or alternatively Treasure of the Humboldt Glacier. Please take some time to watch it - it's a fantastic programme that's both informational and evocative. On that depressing note, keep going with this build - whatever you choose, it'll look great when it's done Tim1 point
-
Good build and stunning presentation Mike.1 point
-
Humbrol recently posted on their Facebook page that "We have reformulated No.30 Dark Green back to MAP 'Dark Green'." We'll see! John1 point
-
Yes, I feel there is a British predisposition against Clostermann. He gave his riposte to most of the accusations levelled against him in a memorable letter he sent to Fine Scale Modelling in 2001 or 2002, particularly on his praise for the bravery of Argentinian pilots (he met a few of them before the Falklands war as his son's trainees, IIRC) and his Croix de Guerre being mistaken for a DSO. He claimed 23 confirmed victories (11 on Spitfires, 12 on Tempests) and mentioned as such in the two citations he received, "no more, no less". Then again, how many victory claims by any "ace" did indeed withstand the scrutiny of a post-war accounting of losses from the other side? In the first edition of "Le Grand Cirque" , which came out in 1948, there was an evaluation by the Armée de l’Air in which his confirmed and probable kills amounted to 33. But at that time there was precious little reliable information on actual losses. The “sobering up” of victory claims by “aces” on all sides only happened after the 1970s – witness the wildly exaggerated scores of US Korean War pilots being drastically toned down in the past 20 years or so.1 point
-
Well, Clostermann's own claims regarding the number of kills that he scored don't appear to square with an objective assessment of the facts. That doesn't make him unique among fighter pilots - I happen to share my surname with a relatively obscure WW1 German ace (no relation, though) and did some research into his claims, comparing them with the fairly comprehensive records of allied losses. It turned out to be a bit of an eye-opener: out of 19 claims, I reckon six are soundly based and another half dozen might be described as not completely implausible. The rest are incredible, in the literal sense of the word. I read my dad's copy of "The Big Show" as a boy, and bought the unabridged version when it came out. It's a great book but it seems that it's a mixture of fact and fiction, in which Clostermann describes being present at events he never took part in. I've read somewhere that this is a recognised category of French literature but as that's a subject which I know absolutely nothing about, I can only mention it for what it may be worth! The book does pass very lightly indeed over the circumstances surrounding the death of Commandant Mouchotte and Clostermann's subsequent departure from 341 Sqn. Clostermann was (as he says) flying as Mouchotte's wingman. What he doesn't say is that other pilots on the squadron held him to blame for what happened. Finally, and this is just a personal opinion, I get the distinct feeling that there was a predisposition to dislike Clostermann among some of his British contemporaries. The foregoing no doubt helps to explain their dislike but I suspect the 'not one of us' factor also played a part. There was apparently a reunion long after the war (1990s?) which led to comments being made - not to his face, I believe - about Clostermann supposedly wearing the ribbon of the DSO, to which he wasn't entitled. He pointed out that the ribbon was in fact that of the Croix de Guerre, which he did hold and which, as he was a French national, took precedence over his other decorations.1 point
-
This is an area in which to be careful, as legal action has been taken against historians in France to protect Clostermann's reputation. However, there is no doubt that The Big Show exaggerates a number of aspects of his career, for example the shooting down of the recce Bf109 over Scapa, a flight in which he was not present. Other examples include the accounts of heavy losses to Tempests due to flak, and aircraft kills in the book that are not found in squadron records. This aspect of his work was noted, and disputed, before the Falklands War. He was a somewhat controversial figure in France, partly due to his postwar political career but also because in some quarters he was blamed for the loss of the highly-respected Rene Muchotte. Which is perhaps why he ended his career in RAF squadrons rather than the Free French units? What has to be borne in mind is that the work is not a minute recounting of the details of history: it is a "roman". A tale that tells what it was like, that gives the flavour and is told from the point of view of one man, even if that means putting him in action he really missed - note that he does not claim to have shot down the recce 109 himself, only that he was there. He was in the unit on Orkney. From this point of view it is like many books that were written immediately postwar or indeed wartime, although censorship played its part there. It is a great read, just don't take it all as gospel.1 point
-
I have heard it said, how should I put this, that Clo-Clo was a very good storyteller, not all of his claims seem to match up with actual losses. An all yellow Fw.190?, in the heat of battle pilots from all sides seem to have "seen" all manner of coloured Aircraft, you could put that down to the heat of the moment. He flew and done the job he had been trained for as did many thousands of others, bless 'em. As to his support of the Argentinian pilots during the Falklands War, they were brave men and we are all entitled to an opinion. As to whether the book "The Big Show" is fact, fiction or somewhere in between, what the hell it is a good read! Cheers Phil1 point
-
-I hab been very impressed by a diorama of a wrecked zero in the jungle I saw at Telford and I kept the idea in mind, it happened I had some left over parts of Su 15 Flagon after a kit bashing I had made to get an Su 9 and an Su 11 ( I'll show you them later ) these Trumpeter kits are too beautiful to be thrown, I saw photos of dismantelment of the former VVS so I went on with the idea of building a related scene. At first I thought using some blokes peering through the appertures of the fuselages but I didn't like this idea as I wanted something more "living" so I replaced them by sheeps (sheeps flocks are very often seen on WWII gass airfields photos) as there is a lot of grass on ground around the wrecks, sheeps means dogs and dogs means shepperd, so lets go...It requires 4 boxes of sheeps so I have now 3 shepperds out of work, and 6 dogs on duty on differents airfields...... -. The rectangulars and squared concrete parts are made of resin from an accessories maker " MARK 58 " conviniently weathered1 point
-
Cracking build/project! Why am I reminded of the Time Bandits film?? Iain1 point
-
That's very nice indeed, great detail.1 point
-
Really nice! How do you guys make these fantastic 1/72 models. Do you have Swiss Army knife attachments instead of fingers?1 point


.thumb.jpg.d17ff607fc7e89ed057e63fcb6f2a888.jpg)

.thumb.JPG.3498f40362ff13ebfc4b2e45abbd545e.JPG)


This leaderboard is set to London/GMT+01:00