

Neil
-
Posts
978 -
Joined
-
Days Won
1
3 Followers


Recent Profile Visitors
10,052 profile views


Neil's Achievements
")
Obsessed Member (4/9)
2.2k
Reputation
-
That's most of the little fiddly bits attached to the rolling chassis, I can now concentrate on the fairing, fuel tank, seat unit bodywork etc. As I mentioned before, I do rather like the battery which is now fixed to the right hand side of the frame, with it's 'Yuasa' manufacturer decal applied!
-
Aircraft certainly are the most numerous subject that I have built on these pages, although I have dabbled in this section of the forums a few times in the past with In Progress builds and such. Unfortunately when I built some of them I was using Photobucket as a free picture host, and they 'changed their rules' along the line and started charging for the hosting service and put awful 'watermarks' across everybody's pics, so unfortunately some of the pics in my earlier builds on here have those 'watermarks' on them. That is why I now use Flickr instead as a free pic host. Some of my earlier vehicle builds are: Hasegawa 1/24 Lamborghini Miura backdated and converted into the Miura used in the opening sequence of the 1969 film 'The Italian Job' Finished Miura pics. Tamiya 1/12 Suzuki RGV XR89 GP 'bike Tamiya 1/24 Mercedes CLK DTM 'Original Tiele' Aoshima 1/24 Lamborghini Huracan LP610-4 Finished Huracan pics
-
I would imagine the Chrome tape I used is for the stanchions is kind of similar to the Bare Metal stuff, certainly very effective for those components must say, and I will definately be using it again. 👍
-
There are three main dial faces in the instrument cluster, the temperature gauge, speedometer and rev counter. These dial faces are given as circular decals on the decal sheet (lower left in the above pic) and the temperature gauge (No.13) is fine, the speedometer (No.14) is also fine, however the rev counter (No.15) is rather awful unfortunately because the rev counter needle and numbers on the dial face should be a very noticeable bright green, sadly they are almost invisible and way too dark! I thought about making a replica on my printer but unfortunately it is not working at the moment, so instead remedied the situation in the pic below ............ ................ I managed to find some small bright green decals in my spares box, and cut up some very thin slivers of decal and carefully positioned them on the rev counter face after it had been applied to the instrument housing, to represent the needle and tiny numbers. Not a perfect answer but it looks passable, and I have also cut some tiny clear circles (next to the instrument housing in the pic) which will be fixed in place over the instruments to represent glass. Exhaust is finished with the tiny retaining springs now in place, the steering damper is painted and assembled, headlights finished, the indicators have had their clear lenses airbrushed in Tamiya Clear Orange, clear tail-light lens covered in Tamiya Clear Red, radiator airbrushed in Alclad Aluminiun with the matrix area given a wash of thinned Matt Black. The rear view mirrors have had their mirror faces covered in the same Chrome tape that I used on the fork legs, and the battery assembly has also been airbrushed and it's manufacturer-name decal has been applied which does look quite good I think, because it does now look like a miniature 'Yuasa' battery! Also in the pic are the sidestand, fuel tank filler cap, footrests, gear lever and brake lever. All of the components can now be fitted to the rolling chassis.
-
Exhaust system under way. Made a start on airbrushing and heat-staining the exhaust, both large end-cans are sprayed in Alclad Aluminium, and the pipes themselves were sprayed in Alclad Chrome before airbrushing certain areas in various Tamiya Clear colours.
-
I attended the fly-in at Old Buckenham airfield back in around 2013 or so, which was held in memory of Ken Wallis, and dozens of aotogyro's, light aircraft and various cars, military vehicles etc attended, there were alot of people there. Old Buckenham (and Reymeston Hall, where Ken Wallis lived) are not far from me. Little Nellie was there of course, but getting really good pics of her was a bit awkward with so many people around, not surprisingly she was a very popular attraction.
-
Thanks for the comments. Just out of interest, this is the self-adhesive Chrome tape I used on the fork stanchion sections, and I will definately use it again if I make any more 'bikes that need it. In fact they also produce a Gold Chrome tape aswell, which would be perfect to represent the stanchions on 'bikes that have the stanchion sections coated in Titanium Nitride, which gives that particular Gold Chrome appearance on the full size real 'bikes. Exhaust system is assembled with a few details added from narrow strips of tape, to represent the separate sections, and also added a few small lengths of rod (the tiny white bits sticking out) which will eventually be the locating points for the tiny retaining springs, which are at the bottom-right of the pic. I found these tiny springs in the spares box which were left over from a previous 'bike kit that had retaining springs on the exhaust tubes. The springs will be added once the exhaust is painted, and the locating points will then be trimmed down. The kit instructions indicate that the exhaust should be fitted on the model in separate sections, however, I found that the entire system can be assembled as one piece and with a bit of careful jiggling about it will fit onto the model if the rear wheel is removed first. The battery on the 916 (the black and white object in the bottom left of the pic) is located on the right hand side of the frame, but the rear face of it in the kit is an open rectangular hole, so I filled the hole in with a piece of plasticard, because if the fairing is left off for any reason for display purposes, the rear face of the battery is visible from the opposite side of the 'bike. The steering damper body and hydraulic rod are the two objects at the middle lower of the pic, and the rod is a piece of 0.9mm steel that I found which is perfect for representing the hydraulic rod on the steering damper, with the small connecting eye glued to the end of it. The steering damper rod is included in the kit, but is plastic of course, so substituting it for a real piece of tiny steel rod seemed a more effective way to represent it.
-
With the wheels in, and front mudguard in it's nice glossy Red.
- 21 replies
-
- 12
-

-

-
A couple of views of the engine and chassis assembly.
-
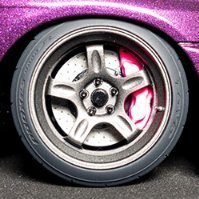
Assembly under way ........ Engine, gearbox, swing arm and rear shock all assembled and painted, airbrushed mainly using Alclad Aluminium and Metallic Grey for the main components. Main parts of the frame assembled too and airbrushed using Alclad Pale Burnt Metal, which a kind of Brownish Gold colour, which is not a bad match for the colour Ducati used on the frame and wheels. There are a couple of things that Tamiya have missed from the kit which I have added from bits of plastic rod etc, they are the rear brake fluid container (the small cylindrical White thing with the Black top which is fitted to the side of the frame) and also the hydraulic clutch actuating cylinder on the side of the engine case, which is the tiny White 'thingy' just in front of the engine drive sprocket. Wheels are assembled and sprayed, again using Alclad Pale Burnt Metal, and the disc outer rotors painted a Steel colour, and the disc centres were airbrushed in Alclad Pale Gold and then airbrushed with a very light coat of Tamiya Clear Yellow over the top, which gives a slightly anodised look. Handlebars, levers and swichgear all finished too, and fork yolks painted in Metallic Grey for the lower one, and Alclad Aluminium for the top yolk, with the moulded-on fork leg tops highlighted with Tamiya Clear Red and Clear Blue, to try and give a kind of anodised appearance for these parts, as on the full size 916 fork tops. Fork legs are in Alclad Aluminium and Metallic Grey, with the calipers airbrushed in Alclad Pale Gold, which gives a passable match for the Gold colour that Brembo use on their calipers. For the Chrome section of the fork legs, I usually use something like Alclad Chrome, however, I tried something different this time. I happened to be browsing online and purely by chance saw some self-adhesive Chrome tape, so ordered some. It has a very shiny realistic Chrome finish to it, is ultra-thin, sticky on the reverse face and ever so slightly stretchy, so I cut a suitable width from the roll of tape and wound it around the section on the forks which should be Chrome. I am quite pleased with the effect it gives, and will definitely use it again, and it could also be used on things like oleo strut/suspension legs etc on aircraft and such.
-
I filled the frame in on my 1/12 Suzuki RGV XR89 for the World Motorsport build on here, certainly improves things. I have a couple of the Hasegawa 1/12 GSXR 750 'G' kits, and I also used to own one of the full sized versions years ago, but the irony of it is that the early GSXR's had some frame sections made from cast alloy and some made from extruded box section alloy, and the cast sections only had three sides to them, those cast sections were not actually true four-sided box section members. I did hear stories from 'way back then' that some proddy racers used to try and 'discretely' weld in sheet alloy onto the missing side of the three-sided cast sections to try and stiffen the frame up!
-
I always fancied the idea of a V-twin, as a complete change from GSXR's, but unfortunately have never had the opportunity to ride one, would still like to actually! Maybe one of these days ...... As is quite often with many of the Tamiya kits, the inner halves of the front brake calipers are missing (always annoys me actually!) but fortunately I had some spare inner Brembo type halves which I cast in resin years ago for the World Motorsport Group Build back in 2008 here on BM, when I built a 1/12 Suzuki RGV XR89, thankfully that sorted out the missing inner front brake caliper parts. There is a large void in the underside of the single-sided swing arm, this was filled with scraps of plastic strip and superglue, then rubbed down. Both front discs are unfortunately missing the dowels/bobbins, that secure the steel outer rotors to the alloy carrier, from their inner faces, these were replicated by making some small discs 1.4mm in diameter punched out of some 0.25mm thick plastic sheet using a Waldron Punch & Die set. These are shown on one of the front disc's in the pic, and also decided to drill out the holes on the front and rear discs with a 0.6mm drill bit held in a pin vice. Started painting some bits too, and have done the chain links in Gold, just because I like it, I have always tended to fit Gold link chains to the bikes I have personally owned because I think they look good, no other reason! Regarding the wheels, there are single holes on each 'spoke' close to where they meet the wheel rim, and these go all the way through each spoke to the other side. In the kit these are just dimples on each side of all of the spokes, so I drilled them all through, however, the ones on the rear wheel do not match up both sides, so I filled the dimples in one side of the rear wheel with plastic rod and sanded them down, and then drilled those through also.
-
A bit of a departure from my usual aircraft subjects, here we have the 1/12 Tamiya kit of the Ducati 916, and when these 'bikes first came out back in the 90's (the real full size ones, that is) I always had a bit of a liking for them, such a great looking thing, and to be honest I always fancied owning one, although unfortunately I never managed that. I always owned things such as various GSXR's at the time, in fact I do still own and ride a GSXR 750 K2, and owning a big V-twin would of been quite a departure from a screaming high-revving inline four! Building this kit is something of a time-filler, as I am currently off work for several weeks because of an injury. To start with, all of the tacky 'chrome' plating will be removed from the relevant sprues, I just do not like it when manufacturers plate parts in this way, it is always self-defeating because seam lines and joins have to be removed and finished or smoothed, which always takes alot of the plating off in the process. To remove the plating, the relevant sprue was placed in a container of dilute bleach and left to soak for a few hours. After rinsing in clean water, all of the plating is thankfully removed and is now clean as a whistle, ready for use.
-
1/48 Sopwith Camel F1, with real wooden prop.
Neil replied to Neil's topic in Ready for Inspection - Aircraft
Hi Andy, long time no hear! Hope you are well, you still in the same occupation? I keep doing the odd model here and there, unfortunately not as often as I would like though, other stuff keeps getting in the way. However, I do want to build another 1/48 two-seat Jaguar (Coltishall based of course ......!) once I get my hands on the new Airfix T2/T4 release, to compliment my late T4 that I made a few years back. This time I intend to make one of the very early T2's with the Light Grey undersides, and Light Grey underwing pylons and lower halves of the drop tanks etc, and early style seats and such. I really liked that early scheme on the Jaguars, classic 1970's cammo style. Are you around Norfolk/Norwich at all these days? -
1/48 Sopwith Camel F1, with real wooden prop.
Neil replied to Neil's topic in Ready for Inspection - Aircraft
I ordered mine from Amazon (I am UK based) and was only about £7 for a pack of 15 different sheets, I was pleasantly surprised how many veneers were included actually! The pic below is the selection that I recieved, and each veneer was just over 300mm (approx 12") in overall length: Thanks for the comments everyone, much appreciated, as I mentioned I have wanted to try something like this for a little while, and turned out not to be too difficult either.

