Grant Posted May 1, 2007 Share Posted May 1, 2007 Hi Folks, Here is the first photo. Original Matchbox boxing (had to rip off the selophane to get at it!). I got the Aeroclub winch at Telford last year, so providing my spare decals are up to the job it will be a Royal Navy TT.20 target tug. Using the bit of wood in the middle of a nail file, I am finally getting the hang of this re-scribing lark. And the pounce wheel is leaving it's mark, though I still need practice at being accurate with that. Looking at the rest of the kit - I need a bigger tube of filler cheers Grant Link to comment Share on other sites More sharing options...
Mike Posted May 1, 2007 Share Posted May 1, 2007 You're a braver man than me Grant! Link to comment Share on other sites More sharing options...
Grant Posted May 2, 2007 Author Share Posted May 2, 2007 Not brave just Anyway, through the medium of fast drying acrylics and tamiya tape, here are simple the seats of an NF.11. It doesn't look like ejection seats in the TT.20 photos I have so I get to use the kits seats (not that you can see much through the canopy anyway.) I just for a glimpse of the magnitude of the seam filling to come, here is most of the bits taped together. The control column fouls the coming, and the rear instrument panel fouls the cockpit! But apart from that, it's not a bad rendition of a Meteor. I am going to have a problem with decals though. Need to source some numbers/letters or find out what the font is. At least, from the photos, the black and yellow underside banding looks different from a/c to a/c, giving me a bit of leeway. cheers Grant Link to comment Share on other sites More sharing options...
Mike Posted May 2, 2007 Share Posted May 2, 2007 Those are some serious trenches you've got to deal with there chap Link to comment Share on other sites More sharing options...
AntPhillips Posted May 3, 2007 Share Posted May 3, 2007 ModelArt did some decals for the HalFar, Malta based RN Meteors on one of their sheets, IIRC the underside colours were actually Flourescent Green and Black not Yellow and Black as on the RAF birds. I used to have the decals but sold my entire 1/72 stash last year, maybe someone has a set. Link to comment Share on other sites More sharing options...
Grant Posted May 3, 2007 Author Share Posted May 3, 2007 Hi Ant, I tried getting that decal set (72-002) from the ModelArt guys at Telford, but their back catalogue doesn't go back that far. Now I have remembered the sheet number I'll go and place an add in the wants. That is an interesting note about the colour. Thanks for the thought, I will check up on that. cheers Grant Link to comment Share on other sites More sharing options...
Gary West Posted May 3, 2007 Share Posted May 3, 2007 Those are some serious trenches you've got to deal with there chap Wow - the Somme springs to mind. Seems you have the edge Grant. If you can make her look half decent, you'd have done a remarkable job. Good luck with her. Link to comment Share on other sites More sharing options...
Grant Posted May 3, 2007 Author Share Posted May 3, 2007 Thanks Gary. After finshing a High Planes Beaufort recently, I am hopeful that the filling will go OK, although it will be a BMF over the putty . cheers Grant Link to comment Share on other sites More sharing options...
Gary West Posted May 3, 2007 Share Posted May 3, 2007 why not consider filling the gaps with styrene/plastic then instead? Link to comment Share on other sites More sharing options...
jenshb Posted May 4, 2007 Share Posted May 4, 2007 Or plastic strips and superglue? Milliput is your friend... Jens Link to comment Share on other sites More sharing options...
Grant Posted May 4, 2007 Author Share Posted May 4, 2007 Ah! Like mixing up some sprue shavings in glue and then filling the seems with the stuff. Giving a more consistent material to rub down and BMF over. Brilliant! I hadn't even considered that. Definitely worth a try. cheers Grant Link to comment Share on other sites More sharing options...
Guest Cop Posted May 5, 2007 Share Posted May 5, 2007 And I thought I had my work cut out with the Airfix Bucc. Those are some serious gaps. Nigel. Link to comment Share on other sites More sharing options...
theplasticsurgeon Posted May 6, 2007 Share Posted May 6, 2007 Trenches and gaps on this kit can be dealt with by Humbrol filler and liquid paper - I've just sent Grant a PM with photos of 2 Meteors I built in 2005/06, and one of them is silver. Link to comment Share on other sites More sharing options...
Gary West Posted May 6, 2007 Share Posted May 6, 2007 Trenches and gaps on this kit can be dealt with by Humbrol filler and liquid paper - I've just sent Grant a PM with photos of 2 Meteors I built in 2005/06, and one of them is silver. Silver paint may work but if Grant's using Alcad, possibly not? What you using Grant? Link to comment Share on other sites More sharing options...
Grant Posted May 6, 2007 Author Share Posted May 6, 2007 The plan is to use ALCLAD, resulting in an all black a/c ( ) before the metal and yellow goes on. So far the filling and rubbing down has gone OK The top deck sides just needed rubing down to get rid of a small lip. Left enough of a line so that I could re-scribe, as the split is along a panel line. Next I put some plastic into the rear slot, but that wasn't quite enough so I sliced bits from the sprue and mixed 'em with glue and slapped it on. Looks horrible doesn't it? Then much nail filing and wet'n'dry later I had a smooth, re-scribed fuselage. I have since put a coat of Halfords grey on it and, amazingly for me, didn't have to go back and tidy up anything. Slowly getting the hang of this modelling lark! Now to sort out the intake and exhaust fit, before I get to those awful top surface wing/fuselage joins. cheers Grant Link to comment Share on other sites More sharing options...
Grant Posted May 12, 2007 Author Share Posted May 12, 2007 OK, ready for some paint. The wing in front has 3 colours of ALCLAD and both sides of some foil. Next to the foil the ALCLAD doesn't look metalic at all! I am sure I could make a perfectly repectable 'metal' finish model with lots of differently coloured panels, but the foil looks real neat - lots of work - but very neat. I guess I'll get on with the bottom markings while I think about it. cheers Grant Link to comment Share on other sites More sharing options...
Gary West Posted May 12, 2007 Share Posted May 12, 2007 the foil looks real neat - lots of work - but very neat. Well you've still got 10 weeks or so! She's looking really good Grant in her primer. Good work on the gap filling btw Link to comment Share on other sites More sharing options...
Guest Drewe Posted May 12, 2007 Share Posted May 12, 2007 Grant, I'd be prepared to bet it wasn't NMF at all, but painted high speed silver. Just makes it a bit easier! Link to comment Share on other sites More sharing options...
thx6667 Posted May 12, 2007 Share Posted May 12, 2007 Go with Drewe's suggestion, BMF wasn't that common on Meteors, it was usually silver paint. Link to comment Share on other sites More sharing options...
Grant Posted May 12, 2007 Author Share Posted May 12, 2007 That's very interesting guys. I was just re-reading my sources and I had the thought that it was painted silver/aluminium rather than a BMF. Thanks for confirming it guys. That will save a lot of effort. Cheers Gary. The filling was straight forward in the end. It's begining to look the part now. Grant Link to comment Share on other sites More sharing options...
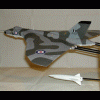
Grant Posted June 26, 2007 Author Share Posted June 26, 2007 Ok, long time no update, but progress has been made. Paint job done. I had the choice of painting topside or underside first. Chose the topside, but looking at it that was probably the wrong way round. Sad thing was the filler in that rear gap had shrunk considerably (see photo), so when I took all the tape off I still has filling rubbing and painting to do!! Here is the underside. The tank is supposed to be in BMF, see photo on page 102 of the SAM Meteor datafile. And finally tonight, my first attempt at using BMF for canopy framing. Needs practice, but not bad, even if I do say so myself. Now to make some decals! cheers Grant Link to comment Share on other sites More sharing options...
cmatthewbacon Posted June 26, 2007 Share Posted June 26, 2007 Just a thought to check, but you might want to take off the cannon stubs... my father in law flew TT.20s, and I made one for him from the very same kit, and I don't remember his photos, which I used as reference showing aircraft with cannons fitted... Good luck... looking forward to the final version, especially since I'm doing the same in 1/48, starting with an Aeroclub Vac... bestest, M. Link to comment Share on other sites More sharing options...
Grant Posted June 26, 2007 Author Share Posted June 26, 2007 Definitely canon stubs, with the inner ones faired over - what I am not sure about is the cartridge shutes. I have left mine on, but maybe that wasn't a good idea. The canon stubs can be clearly seen in the above mentioned photo. Thanks for the thought though. cheers Grant Link to comment Share on other sites More sharing options...
theplasticsurgeon Posted June 26, 2007 Share Posted June 26, 2007 And finally tonight, my first attempt at using BMF for canopy framing. Needs practice, but not bad, even if I do say so myself. Give yourself a pat on the back Grant - an EXCELLENT job on that canopy! Link to comment Share on other sites More sharing options...
Bennygman Posted June 27, 2007 Share Posted June 27, 2007 Great Work Grant. Having just read through your thread from beginning to end the transformation is quite amazing I love these silver jets, just something so 'right' about them. Got a couple of the meatboxes in the loft but I'm not sure if I'm man enough Steve. Link to comment Share on other sites More sharing options...

Recommended Posts