Lennyb72 Posted May 31, 2011 Share Posted May 31, 2011 Hi all, Just want to share with you a sub project I've started along side my 1/24 scale Mosquito. I started this kit because, to be frank, I was getting a bit cheesed off with getting rid of enjector pin marks over pretty much everything on the Mosquito and was desperate to but in some paint and detail time on something. If that makes sence. If not then give me a slap and tell me to pull myself together. The kit itself in my eyes a pretty good rendition of a Tornado and I hear most of you saying 'WHAT!!!!' but hey, this is completly out of my zone and I just fancied something different to get me going. I know the Hobbyboss kit is alot better than this on. ie, movable flaps, slats etc and other external work but from what I can see externaly this kit isn't too bad????????????????????????????????? Here's a quick run down of the kit. The panel lines seem to be good, not to thick and deep with no flash over any of the parts. Wheel wells are detailed but could use a bit of extra wiring etc and with me scratching my head out of my comfort zone there's not alot I can tell than that. So If anyone could give me some pointers it would be a great help but saying that I'm not a super detailer by any stretch but will have a go. The decals seem to be in good register and the colour looks good but they are on the think side. I gave my 12 year old daughter Flo the options and of course see went for the most colourful one!!!!! I must obey!!!!!!! Anyhoo here's some photos of my work so far. I do have some reference photos from an Airfix magazine of the F3 cockpit but little matches the photos to the model cockpit. Too many knobs and switches. Oh dear. I just painted it and waited to see what happened. What I did do was to drill out the instruments to see if it would give me a bit more depth to the panel (not sure if it has) There are no decals for the panels so I just went for it. So there you have so far. Hope you like what I've done thus far and I hope to make a bit more progress with the model along side the Mosquito. Comments and feedback are always welcome. All the best Lenny 1 Link to comment Share on other sites More sharing options...
Lennyb72 Posted May 31, 2011 Author Share Posted May 31, 2011 Just a quick question for you all. Is or do the Tornado F3's have Martin Baker Mk 10a ejection seats? Thinking of getting some aftermarket jobs for it. All the best Lenny Link to comment Share on other sites More sharing options...
Muzz Posted May 31, 2011 Share Posted May 31, 2011 Hi Lenny Nice start on the pit, I'm planning on getting a hold of one of these soon, I've got the Paragon resin parts ready to go. Which brings me onto your question, yes MB Mk10 seats, Paragon used to do them before they shut up shop, you may still find them in stock at modelsforsale or elsewhere (Hannants are sold out). Murray Link to comment Share on other sites More sharing options...
Lennyb72 Posted June 1, 2011 Author Share Posted June 1, 2011 Thanks Murray. I looked on the Hannants site and they do have a couple of sets from the Aires range but I'll have a look at modelsforsale first. Thanks fella Lenny Link to comment Share on other sites More sharing options...
Lennyb72 Posted June 1, 2011 Author Share Posted June 1, 2011 Hi LennyNice start on the pit, I'm planning on getting a hold of one of these soon, I've got the Paragon resin parts ready to go. Which brings me onto your question, yes MB Mk10 seats, Paragon used to do them before they shut up shop, you may still find them in stock at modelsforsale or elsewhere (Hannants are sold out). Murray Just checked modelsforsale and no joy. All gone. I'll check Hannants again for the Aires set. Cheers again Murray Lenny Link to comment Share on other sites More sharing options...
HOUSTON Posted June 1, 2011 Share Posted June 1, 2011 Lenny LOVE Tornados and I think this is going to be super ... Lookign forward to the build.. Woo hoo. HOUSTON Link to comment Share on other sites More sharing options...
Greased Lightning Posted June 1, 2011 Share Posted June 1, 2011 Nice work Lenny and a very topical subject! Link to comment Share on other sites More sharing options...
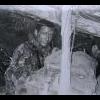
spike7451 Posted June 1, 2011 Share Posted June 1, 2011 Nice work Lenny,although the rear cockpit is different than on the one I built years ago,yours is a F3 Trainer,which I didn't think we had.The rear cockpit of the GR version looks like this; Cockpit should look like this; Link to comment Share on other sites More sharing options...
Lennyb72 Posted June 2, 2011 Author Share Posted June 2, 2011 Nice work Lenny,although the rear cockpit is different than on the one I built years ago,yours is a F3 Trainer,which I didn't think we had.The rear cockpit of the GR version looks like this; Cockpit should look like this; Cheers Spike fir the photos, they will help me out no end. Lenny Link to comment Share on other sites More sharing options...
Lennyb72 Posted June 2, 2011 Author Share Posted June 2, 2011 Hi all, Managed to get hold of a set of Mk 10's from Aires at the Hanants website. Never used resin before so better stock up on masks and what not. Hopefully I'll post some more in the next few days. All the best Lenny Link to comment Share on other sites More sharing options...
jacksdad Posted June 4, 2011 Share Posted June 4, 2011 Nice work on the cockpit. What scheme are you doing? Steve Link to comment Share on other sites More sharing options...
Lennyb72 Posted June 4, 2011 Author Share Posted June 4, 2011 Nice work on the cockpit.What scheme are you doing? Steve I'm doing the Italian job. I'm under orders from my daughter on this one. Mind you saying that I haven't seen many Tornado builds with those decals on. Just going to see what happens. Lenny Link to comment Share on other sites More sharing options...
Lennyb72 Posted June 6, 2011 Author Share Posted June 6, 2011 (edited) Edited June 6, 2011 by Lennyb72 Link to comment Share on other sites More sharing options...
Lennyb72 Posted June 6, 2011 Author Share Posted June 6, 2011 (edited) Hi all, I've managed to crack on a bit with the kit today, perks of being sick off work for a couple of days. Couldn't stand being in bed all day. Anyway I've managed to complete the office without too much trouble. There were a couple of gaps that needed a bit of styrene to plug the gap. ie. the bulkhead behind his seat and I had to raise his instrument panel slightly. No great worries. I gave the office a quick wash of promodeller (black) to get a bit of depth. I did order some aftermarket ejector seats from Hanants, the Aires Mk 10 seats came to day but I forgot to get a razor saw from the model shop last week so I'll have to weait to take it off the block when I get back into work never mind. I've never used resin before and I've been told the score about cutting and sanding so no worries on that front. I was really suprised with the amount of detail on the seats. Really impressed!!!!! That's about it for the day. I'll be back at my bench (living room) table tomorrow. All the best Lenny Edited June 6, 2011 by Lennyb72 Link to comment Share on other sites More sharing options...
Lennyb72 Posted June 7, 2011 Author Share Posted June 7, 2011 Hi all, Just a bit of an update on what I've manage to get through on me Tornado. I've finished off the front part of the fuselage and put in enough weight in the radome hopefully so it's not a tailsitter only time will tell but it fells weighty enough. Because when I put everything together without looking first there was a couple of gaps in the navigators kit so I covered those with a bit of plasty card Also I put some thin solder wire out of the back of some of the navi's equipment to add a bit of detail to the area. Next up was the main fuselage and tail fin. I did have some issues with fit here after I made several dry and test fits first but really it's nother that a bit of filler wont sort out. i also cut the rudder from the main fin and will angle it slightly to give it a bit of life at the rear. Please enjoy the rest of the photos and as always any comments and pointers are very welcome. Thanks for looking All the best Lenny Link to comment Share on other sites More sharing options...
Muzz Posted June 7, 2011 Share Posted June 7, 2011 Looking good Lenny. Like the cockpit, the Aires seats look the biz. Hope you kept some filler back for the air intakes Link to comment Share on other sites More sharing options...
Moofles Posted June 8, 2011 Share Posted June 8, 2011 thats looking mighty fine bud, is it me or are italeri kits getting better and better, just seems all the ones i have picked up recently have been of a high quality. Link to comment Share on other sites More sharing options...
jacksdad Posted June 8, 2011 Share Posted June 8, 2011 That looks like it's coming on a treat. Steve Link to comment Share on other sites More sharing options...
jimbuna Posted June 8, 2011 Share Posted June 8, 2011 Coming along nicely. Link to comment Share on other sites More sharing options...
Brian G Posted June 8, 2011 Share Posted June 8, 2011 It's looking good so far but, remember that the Tornado has 'Differential Tailplanes', which means the Tailerons give Roll Control (in concert with the Spoilers on each Mainplane), as well as Pitch Control, so they do not have to appear aligned - like a 'Normal' tailplane. Cheers, Brian Link to comment Share on other sites More sharing options...
HOUSTON Posted June 8, 2011 Share Posted June 8, 2011 :wow : speechless. Link to comment Share on other sites More sharing options...
Lennyb72 Posted June 8, 2011 Author Share Posted June 8, 2011 Looking good Lenny. Like the cockpit, the Aires seats look the biz. Hope you kept some filler back for the air intakes Bring it on..................... All the best Lenny Link to comment Share on other sites More sharing options...
Lennyb72 Posted June 8, 2011 Author Share Posted June 8, 2011 It's looking good so far but, remember that the Tornado has 'Differential Tailplanes', which means the Tailerons give Roll Control (in concert with the Spoilers on each Mainplane), as well as Pitch Control, so they do not have to appear aligned - like a 'Normal' tailplane.Cheers, Brian Cheers Brian I'll keep that in mind. I'm all for a bit of animation at the back. All the best Lenny Link to comment Share on other sites More sharing options...
Lennyb72 Posted June 8, 2011 Author Share Posted June 8, 2011 Hi all, Thank you for your comments, all very welcome. I've managed to sand down some areas and put on the front fuselage on. I should have a couple more photos on here tomorrow. Then its the intakes (can't wait) and the sticky outy bits. I've started on the ordinance and have made up the Skyflash missiles and Aim9's. I thought I'd have more trouble with this kit but to be honest it hasn't been that bad and I might do it again or go for the Hobbyboss one if I can get hold of one. All the best chaps Lenny Link to comment Share on other sites More sharing options...
Brian G Posted June 9, 2011 Share Posted June 9, 2011 Cheers Brian I'll keep that in mind. I'm all for a bit of animation at the back.All the best Lenny Lenny, I was looking through an old issue of a magazine which had a review of the Hobby Boss 1/48th Tornado and, after the little bit of realism I passed on to you I though it would be nice to rectify errors on this model. Where do I begin? Flight Controls: On the wing it shows the Spoilers 'out', and the Flaps and Slats 'out' (which, IIRC, should have the Kreuger Flaps deployed as well). Spoilers operate only as part of Roll Control, and work with the Differential Tailplanes, as per my previous note to you. Engines: The Auxiliary Intake Doors are deployed - these are 'suction' doors and would only open to allow a maximum flow of air to the engines - whilst they are running! The Thrust Reverse Buckets are shown deployed - these only deploy on touch-down (or during a Test of their operation). Rear Fuselage: The Air Brakes are shown deployed - these would automatically retract if the Thrust Reverse operates, as a obvious safety measure. Apart from these points, the kit does make up to a fair representation of the Tornado, (we never called the Tonkas in my day!), in fact this model shows one of the more obscure points that only (probably) a ex-Tornado guy, (like I am), would pick up on - he does show the green band on the in-flight refuelling probe! For those not into Tornado operations, the Nozzle of the probe is attached to the probe by a 'Weak Link' - a row of rivets, which allows the probe to shear-off if there is an issue during in-flight refuelling. (There is a Non-Return Valve, to prevent fuel leakage!). We wrapped green adhesive tape around these rivets, to allow an eye-ball check to be done on a turn around/after flight if there had been an excessive load during in-flight refuelling - which would be shown by movement of the tape! There, I've got that off my chest! Cheers, Brian 1 Link to comment Share on other sites More sharing options...

Recommended Posts
Create an account or sign in to comment
You need to be a member in order to leave a comment
Create an account
Sign up for a new account in our community. It's easy!
Register a new accountSign in
Already have an account? Sign in here.
Sign In Now