Grant Posted August 31, 2007 Share Posted August 31, 2007 OK finally got started. Here is the Dr1 kit from the Airfix 90years of fighters boxing. I have decided to 'busy up' the cockpit as the pilot may not end up in it. New floor added to cover that horrible centre seam. Side walls framed using plastrut and my daughters hair. rudder pedals are 1/24 NASCAR windscreen clips. Seat is an old Beaufort seat cut down with some littlecars mesh stuck to it to make it look like wicker. First resin copy is out of the mold and being painted up. cheers Grant Link to comment Share on other sites More sharing options...
perry Posted August 31, 2007 Share Posted August 31, 2007 Looking good Grant, nice detail on the cockpit walls especially! Is it 1/72? Link to comment Share on other sites More sharing options...
dylan the rabbit Posted August 31, 2007 Share Posted August 31, 2007 Nice work Grant, and welcome on board. Link to comment Share on other sites More sharing options...
T-Tango Posted August 31, 2007 Share Posted August 31, 2007 Nice work Grant, especially as it's 1/72. Link to comment Share on other sites More sharing options...
Grant Posted September 8, 2007 Author Share Posted September 8, 2007 Wandering through the local wood shop last weekend, I came across these packs of venner off cuts, £6 for a whole bunch of colours. Hmm, I thought, I feel a wooden propeller coming on. 5 strips of wood glued together to back a rough billet, then sanded it with paper and a Tescos nail file/board thingy. I reckon this will look just the job on the front. cheers Grant Link to comment Share on other sites More sharing options...
rdxtnt Posted September 8, 2007 Share Posted September 8, 2007 Nice intricate work there Grant Think you ought to let your daughter know about all those Roden Gotha's you've just bought though Link to comment Share on other sites More sharing options...
Grant Posted September 8, 2007 Author Share Posted September 8, 2007 Think you ought to let your daughter know about all those Roden Gotha's you've just bought though I am confused. I haven't bought any Gothas - that I am aware of. Though I have just got some Lycra thread to give that a go, as my daughter goes off to Uni. in a couple of weeks. cheers Grant Link to comment Share on other sites More sharing options...
rdxtnt Posted September 9, 2007 Share Posted September 9, 2007 I am confused. I haven't bought any Gothas - that I am aware of. Though I have just got some Lycra thread to give that a go, as my daughter goes off to Uni. in a couple of weeks.cheers Grant Just me being daft Grant. You said on your first post that you'd used some of your daughters hair to detail your DR1. I was trying to imagine the look on her face when you appeared with an armful of Gotha's and a pair of scissors Gary. Link to comment Share on other sites More sharing options...
T-Tango Posted September 9, 2007 Share Posted September 9, 2007 Side walls framed using plastrut and my daughters hair. So whats it like having a bald daughter , but true respect mate, my 1/48's bad enough, don't think I'd attempt 1/72 keep it coming Link to comment Share on other sites More sharing options...
Grant Posted September 9, 2007 Author Share Posted September 9, 2007 Gary - that's a relief , although I do have a Brisfit and an RE8 waiting... Tango - I did try and be nice and wait for her to wash hair then brush it, so I could raid the hairbrush. But one day she just walked into the modeling room, went OW! and gave me a clump of hair! Daft sausage. As for doing this at 1/72 - I don't know, I didn't plan this. There are times when I start a kit, and the mood just takes, and I have to do all the extra bits - you know? I blame all the excellent stuff that appears on Britmodeller. Sometimes it is depressingly good, other times - you just got to give it a go. cheers Grant Link to comment Share on other sites More sharing options...
Erwin Posted September 13, 2007 Share Posted September 13, 2007 So whats it like having a bald daughter Ask Britney Spears mother ! Link to comment Share on other sites More sharing options...
Grant Posted October 13, 2007 Author Share Posted October 13, 2007 Well it is finally in the paint shop! (My time has been taken up building clocks for some special birthdays recently.) The 10 control 'horns' survived the spraying, so looking forward to putting on the control wires next. cheers Grant Link to comment Share on other sites More sharing options...
Grant Posted October 15, 2007 Author Share Posted October 15, 2007 Started the rigging. The lycra thread is so elastic there is no way it can be threaded through any holes, without a little help. A small loop of hair is used to pull it through the wing... Then some drops of CA to hold it in place and then veeeerrryyyy carefully cut off the excess and the ailerons are rigged! Now for the rudder and elevators... cheers Grant Link to comment Share on other sites More sharing options...
palacefan Posted October 21, 2007 Share Posted October 21, 2007 that is looking so good, and big respect on it being so tiny. Link to comment Share on other sites More sharing options...
dylan the rabbit Posted October 22, 2007 Share Posted October 22, 2007 Looking good there Grant. I've been told how hard it can be fiddling around with something so small in the palm of one's hand.. Good work there mate. Wish the progress of my RE8 was so advanced. All the best, Nick Link to comment Share on other sites More sharing options...
dswoofie Posted October 22, 2007 Share Posted October 22, 2007 Credit to you for working on something sooo small! Great work so far... that thread looks to be a real pain! I had enough trouble with the fishing line! Karl. Link to comment Share on other sites More sharing options...
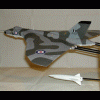
Grant Posted November 21, 2007 Author Share Posted November 21, 2007 OK, progress - well finished actually! Here is a close up of the rigging of the rear end. 3 separate bits of thread and a new, wooden, tailskid. Here is the finished artical, with wooden wingtip skids with black painted tamiya tape for the retaining straps. A head on view showing the nice little Aeroclub 110hp Le Rhone. A couple of overall shots. One to show just how small it really is. And finally, still a work in progress, a small part of a German airfield during 1918. Any and all comments welcome. Thanks for looking Grant Link to comment Share on other sites More sharing options...
miduppergunner Posted November 21, 2007 Share Posted November 21, 2007 Yes - super........ David Link to comment Share on other sites More sharing options...
rdxtnt Posted November 22, 2007 Share Posted November 22, 2007 Aaww, ain't she sweet. Nice work Grant Link to comment Share on other sites More sharing options...
Ratch Posted November 22, 2007 Share Posted November 22, 2007 A little cutie Link to comment Share on other sites More sharing options...

Recommended Posts