Rampage55 Posted January 3, 2009 Share Posted January 3, 2009 This is a build I am beginning for the Spitfire GB over on ARC and before I go any further I thought I would also post a build thread here to solicit Britmodeller's greater knowledge of all things Spitfire. Here's my plan. I am interested in building a Spitfire Mk IIA P7308 of No.71 Sqn, North Weald, August 1941, flown by Plt Off Bill Dunn who on August 27th during Circus 86 shot down two Bf109F's to become the first "Eagle" squadron ace. I will be using the venerable 1/48 Tamiya kit, built pretty much OOB. I'll be cannibalizing the bits needed for a Mk IIa(the bump on the nose) from the Airfix Spitfire, that eventually I plan on doing as an early No. 19 Sqn Spitfire. The markings will come from the AeroMaster "Yanks in the RAF" sheet and I'll have to scare up a set of seat belts but that's about it, nothing to fancy for this build. Here's the profile of P7308 that I will be doing. Please feel free to speak up if there is something I have over looked regarding this build. Thanks, Mark Link to comment Share on other sites More sharing options...
darson Posted January 3, 2009 Share Posted January 3, 2009 (edited) Mark that's a good plan but just for future reference Ultracast make an excellent Rotol 3 blade prop & blunt spinner that comes with a Coffman starter blister for use on the Mk.II. Also you will need the pilots head & back armor plate which is not included in the Tamiya Mk.I. Cheers Edited January 3, 2009 by darson Link to comment Share on other sites More sharing options...
Dave Gibson Posted January 3, 2009 Share Posted January 3, 2009 Hi Mark, I've got the same decal set and and I'm making both of Bill Dunn's aircraft. The Hurricane is almost finished and the Spitfire barely started. What Darren says is spot on. My only additions would be to remove the flash tubes from the wing and drop the elevators - imperative for a standing WW II spitfire. One final detail if you have the canopy open is to build up the canopy sliding rail on the port fuselage side. 99.9% of spitfire builders fail to make this correction. The kit is designed to be built with the canopy closed. Note the corrected (lower fuselage half. The canopy is no longer sliding on air! I would probably remove the crow bar from the door, but if you leave it on, paint it a steel colour, not red as red is post-war. HTH, Dave. Link to comment Share on other sites More sharing options...
Rampage55 Posted January 3, 2009 Author Share Posted January 3, 2009 Thanks Darren, I overlooked the pilots armor. I'm starting on the cockpit today and I'm glad I posted this before I did. Thanks Dave, Your tips were just the sort of thing I was hoping for. I'm planning on building Dunn's Hurricane one day also and I certainly look forward to seeing your builds. Do you have an in-progress thread going? Cheers, Mark Link to comment Share on other sites More sharing options...
Dave Gibson Posted January 3, 2009 Share Posted January 3, 2009 I'm planning on building Dunn's Hurricane one day also and I certainly look forward to seeing your builds. Do you have an in-progress thread going? Sorry Mark, not so much as a single picture taken of this build. It's been stalled for a few years. It only needs the canopy painting and the u/c attaching and it's finished, so keep an eye on "Ready for Inspection". Dave. Link to comment Share on other sites More sharing options...
Rampage55 Posted January 4, 2009 Author Share Posted January 4, 2009 so keep an eye on "Ready for Inspection". Will do Dave. As suggested I have added the armor plate. I copied the shapes from a Tamyia Mk Vb kit and cut them out of plastic cardstock. Then the kit headrest was cut down a little so it didn't stick out so far and glued in place. The top my need to be sanded down a little. After comparing several 1/48 Spitfire kits(Airfix, Tamyia and Hasegawa)..... Wow, they all seem to be marching to the beat of their own drummer. Here is the Airfix seat next to the Tamyia seat. I like the look of the Airfix one better but that is quite a difference. I have no idea which one is more accurate but one or both are not even close. At what point did the armor plate get added? Presumably before the Battle of Britain started. In which case my OOB Tamyia BoB Spit is missing it pilot armor. Thanks for looking, Mark Link to comment Share on other sites More sharing options...
Rampage55 Posted January 7, 2009 Author Share Posted January 7, 2009 Progress has been made on this little "Eagle" over that last couple of days. I have to say it has been a nice change of pace building a prop thingy after so many jet builds. Interior has been painted. I found a set of Eduard WWII British seat belts that I forgot I had stashed away. I like the detail but they are a bit one dimensional and a bit too clean and crisp looking to me. I still need to add a few more details before it's ready to button up. The instrument panel is nicely represented and with a little painting and dry brushing you can achieve a satisfying result. The plan is to get the fuselage halves buttoned up , the wing attached along with the bottom of the cowling and get this "Eagle" ready for the paint barn this weekend. Thanks for looking, Mark Link to comment Share on other sites More sharing options...
darson Posted January 8, 2009 Share Posted January 8, 2009 Great looking progress Mark and that IP looks great. Given that you won't really see much of it anyway once the fuselage is closed up its just fine given that Tamiya don't give you a lot of detail to work with. Cheers Link to comment Share on other sites More sharing options...
Rampage55 Posted January 12, 2009 Author Share Posted January 12, 2009 (edited) Thanks Darren The fuselage halves have been joined and the wing attached. The horizontal stabilizers were attached after cutting the elevators free so I can reposition them. I ended up with a small gap at the leading edge of the wing root where the bottom of the cowling attaches. Once I get that gap sorted I'll attach the carburetor intake. Thanks for looking, Mark Edited January 12, 2009 by Rampage55 Link to comment Share on other sites More sharing options...
Rampage55 Posted November 7, 2009 Author Share Posted November 7, 2009 (edited) This one's back on the workbench after being set aside at the beginning of this past summer. One of the things that slowed me up on this build was the fact I misplaced the small piece that's the intake for the carburetor. I finally cleaned my workbench after 8 months and 4 projects later and sure enough there it was buried beneath the rubble. I quickly attached it before I misplaced it again and attached the other under wing bits as well before they too became MIA...Whew!... All pieces present and accounted for... The other thing I wasn't too happy with was the look of the prop and spinner. So I took Darren's advice and picked up an Ultracast Rotol 3 blade prop and blunt spinner. Here she is just about ready for the paint barn. I have test fit the canopy and windscreen as well as the Ultracast spinner and I really like the way it looks. The prop blades are a little bent though, I'm hoping that a little hot water will sort that out. I've also attached the blister for the starter motor on the side of the cowl. It's a bit on the large side but I can live with it. Thanks for looking, Mark Edited November 7, 2009 by Rampage55 Link to comment Share on other sites More sharing options...
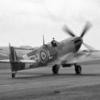
Rampage55 Posted August 5, 2010 Author Share Posted August 5, 2010 The Eagle has landed!...Well almost anyway, he's on short final. While I was getting ready to paint my BoB Hurricane I figured It would be a good time to get this one finished too. I'm really happy with the looks of this one and now I'm kick'n myself for taking so long in finishing this one off. So much for a quick build...Oh well, better late than never I guess. I've got a few details to finish off but she's just about ready for the display case. Thanks for looking, Mark 1 Link to comment Share on other sites More sharing options...
AnonymousDFB1 Posted August 5, 2010 Share Posted August 5, 2010 Very nice Spit Mark Link to comment Share on other sites More sharing options...
Doug Rogers Posted August 5, 2010 Share Posted August 5, 2010 Really nice job Mark, interesting to see how good that Rotol prop looks too. I've got Douglas Bader's Mk11a to do in the stash using the same Tamiya/Ultracast combo you've used. Glad you finished her off Mark. Link to comment Share on other sites More sharing options...
Davec_24 Posted August 6, 2010 Share Posted August 6, 2010 Nice, lovely weathering on that Spit! As you say, better to finish late than never, and she's definitely fit for the display case. Link to comment Share on other sites More sharing options...

Recommended Posts
Create an account or sign in to comment
You need to be a member in order to leave a comment
Create an account
Sign up for a new account in our community. It's easy!
Register a new accountSign in
Already have an account? Sign in here.
Sign In Now