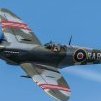
Laufeyson Posted March 11, 2018 Share Posted March 11, 2018 Here it is then, my first finished build as a Britmodeller, a straight OOB Airfix Grumman Wildcat F4F-4 Wildcat. A great little kit that goes together like a dream, I've already bought another one. I'm fairly new to the hobby, so any helpful hints, tips and constructive criticism is highly appreciated. I didn't have early war USN colors, so the paint is approximation/poor guesswork only. Top: Tamiya XF-17 Sea Blue + XF-2 White 3:1 Underside: Vallejo Model Air 050 Light Gray. Gloss and matt varnishes from Vallejo. Applied with airbrush. Canopy brushpainted. Micro Set for decals. Wash: Burnt Umber oil paint in odorless turpentine Weathering: Vallejo Model Air Aluminum applied with a small sponge, brown and black chalk pastels applied with brush Issues: As you can se from the underside, i need a proper scribing tool(already purchased). Here I used my thinnest hobby saw blade - not thin enough. The rudder decal gave me quite some grief, for some reason it would constantly lift along the edge. Ended up tearing both of them in half. Maybe I should have left the rudder of the model until it's all done. (Picture quality is far from optimal, mobile phone camera and heavy clouds outside is a poor combination.) The rudder decal in all its questionable glory.. On to the next build, the Academy Zero 52C! As mentioned above, any advice most . Cheers, Haavard 31 Link to comment Share on other sites More sharing options...
MDriskill Posted March 11, 2018 Share Posted March 11, 2018 (edited) Very nice assembly and finish work! I would say your modeling career is off to a great start. One technical detail though—it is not correct so show both ailerons drooped. They DID assume this position when the F4F’s wings were folded, but in that condition the normal control mechanism was disconnected. When the wings are extended, the ailerons work in their normal differential mode (if one is up, the other is down). Looking forward to the Zero! Edited March 11, 2018 by MDriskill 2 Link to comment Share on other sites More sharing options...
Laufeyson Posted March 11, 2018 Author Share Posted March 11, 2018 Thanks, Mdriskill. In the words of the almighty Homer Simpson: Doh! I'll remember this for future builds. Come to think of it, ailerons working differentially is only logical. It's the elevators that's drooped when the plane is parked, isn't that so? Cheers, Haavard 1 Link to comment Share on other sites More sharing options...
Neil.C Posted March 11, 2018 Share Posted March 11, 2018 That's brilliant! By coincidence my first build on here was a F4F and it was completely laughable but I had nothing but encouragement and help. They're a really great bunch of blokes around here. Welcome. 1 Link to comment Share on other sites More sharing options...
Hairtrigger Posted March 11, 2018 Share Posted March 11, 2018 Looks great, I like the powder marks on the wings. 1 Link to comment Share on other sites More sharing options...
Corsairfoxfouruncle Posted March 11, 2018 Share Posted March 11, 2018 Excellent looking Wildcat 👍 ... for the few occasions i have decals lifting. I use a drop of clear canopy glue or PVA to hold them down. Mind you thats after a few tries with decal setting solutions. 1 Link to comment Share on other sites More sharing options...
Laufeyson Posted March 11, 2018 Author Share Posted March 11, 2018 13 minutes ago, Corsairfoxfouruncle said: Excellent looking Wildcat 👍 ... for the few occasions i have decals lifting. I use a drop of clear canopy glue or PVA to hold them down. Mind you thats after a few tries with decal setting solutions. Thanks for the tip. I use PVA for canopies, I'll try it on the next disobedient decal For some reason I always get problem with lifting whenever a decal lies along an edge. 1 Link to comment Share on other sites More sharing options...
Corsairfoxfouruncle Posted March 11, 2018 Share Posted March 11, 2018 2 minutes ago, Laufeyson said: For some reason I always get problem with lifting whenever a decal lies along an edge. Me to ... then it struck me one day. Clear glue to hold the edges down. 1 Link to comment Share on other sites More sharing options...
dogsbody Posted March 11, 2018 Share Posted March 11, 2018 If you have some form of Pledge-type acrylic floor polish, you can wick a little under the decal. That might work to hold it down. That's a good looking kit you've built there. Chris 1 Link to comment Share on other sites More sharing options...
Laufeyson Posted March 11, 2018 Author Share Posted March 11, 2018 1 hour ago, dogsbody said: If you have some form of Pledge-type acrylic floor polish, you can wick a little under the decal. That might work to hold it down. That's a good looking kit you've built there. Chris Thanks Chris, good to se you again. I have noticed a lot of praise for acrylic floor polish like Klear and Pledge. Not sure if I can find something similar around these parts, but it's worth checking out. 1 Link to comment Share on other sites More sharing options...
Knight_Flyer Posted March 11, 2018 Share Posted March 11, 2018 Very nice build, the Airfix Wildcat is a neat little kit I think. 1 Link to comment Share on other sites More sharing options...
Laufeyson Posted March 11, 2018 Author Share Posted March 11, 2018 2 minutes ago, Knight_Flyer said: Very nice build, the Airfix Wildcat is a neat little kit I think. Thank you very much. It is a fine kit, apart from the rudder decals, I could find nothing wrong it. The landing gear was not so easy to put together, but that's just what I get for insisting on 1/72nd. Link to comment Share on other sites More sharing options...
noelh Posted March 11, 2018 Share Posted March 11, 2018 5 hours ago, Laufeyson said: Thanks, Mdriskill. In the words of the almighty Homer Simpson: Doh! I'll remember this for future builds. Come to think of it, ailerons working differentially is only logical. It's the elevators that's drooped when the plane is parked, isn't that so? Cheers, Haavard If you're going to droop any control surfaces check original photos to make sure the original aeroplane could be seen that way. Many have control locks to prevent that happening. Also ailerons may be geared to deflect more on down side than up. Also elevators. On a plane I flew we locked the controls using the seatbelts so the elevators deflected upwards. Check your references. 1 Link to comment Share on other sites More sharing options...
Laufeyson Posted March 11, 2018 Author Share Posted March 11, 2018 1 hour ago, noelh said: If you're going to droop any control surfaces check original photos to make sure the original aeroplane could be seen that way. Many have control locks to prevent that happening. Also ailerons may be geared to deflect more on down side than up. Also elevators. On a plane I flew we locked the controls using the seatbelts so the elevators deflected upwards. Check your references. Thanks for the tip. My first posted build, and I've already learning new things Link to comment Share on other sites More sharing options...
Mark4700 Posted March 23, 2018 Share Posted March 23, 2018 Fantastic effort. For someone new to the hobby you’ve created a little gem. One area to watch though with your weathering, and a trap I always fell into, there is usually very little staining from the gun ports in the wings. Most of the staining was around the shell case ejection holes in the undersides of the wings. Another good tip for when you rescribe. Buy a feeler gauge set (a couple of £s on the internet), take them apart and you’ll have some really useful straight edges that you can bend around fuselage etc. 2 1 Link to comment Share on other sites More sharing options...
stevej60 Posted March 23, 2018 Share Posted March 23, 2018 Very nice indeed! 1 Link to comment Share on other sites More sharing options...
Laufeyson Posted March 24, 2018 Author Share Posted March 24, 2018 11 hours ago, Mark4700 said: Fantastic effort. For someone new to the hobby you’ve created a little gem. One area to watch though with your weathering, and a trap I always fell into, there is usually very little staining from the gun ports in the wings. Most of the staining was around the shell case ejection holes in the undersides of the wings. Another good tip for when you rescribe. Buy a feeler gauge set (a couple of £s on the internet), take them apart and you’ll have some really useful straight edges that you can bend around fuselage etc. Thank you so much, for both the praise and the advice. It's always so difficult to find good reference photos of aircraft undersides. Restored planes at air shows are always so clean... I've always wondered what those rectangular holes in the wings are, just learned something new. Not bad for a saturday morning. Just bought a scribing pen at my local hardware store, bet they have feeler gauges as well. Best wishes for a happy, and productive, Easter! Haavard 1 Link to comment Share on other sites More sharing options...
Martin Axe Posted April 15, 2018 Share Posted April 15, 2018 Looks fantastic to me. 1 Link to comment Share on other sites More sharing options...
corsaircorp Posted April 15, 2018 Share Posted April 15, 2018 Hello Haavard ! Good looking Wildcat ! Nicely build and painted Don't you worry too much, We all have experienced some issues with the decals ! Give a try to the "Spiralschnauze" of a Focke Wulf..... you did great, keep up that fine job ! Sincerely. Corsaircorp 1 Link to comment Share on other sites More sharing options...
Laufeyson Posted April 15, 2018 Author Share Posted April 15, 2018 1 hour ago, corsaircorp said: Give a try to the "Spiralschnauze" of a Focke Wulf..... Have tried a couple of these, can never get them to sit properly. End up throwing them away... 1 Link to comment Share on other sites More sharing options...

Recommended Posts
Create an account or sign in to comment
You need to be a member in order to leave a comment
Create an account
Sign up for a new account in our community. It's easy!
Register a new accountSign in
Already have an account? Sign in here.
Sign In Now