ArtickWarspite Posted October 31, 2017 Author Share Posted October 31, 2017 I came very close to shelving this build. But once it was pointed out that it was the wing mold that was the issue and not my average skills, it renewed hope that this could be overcome. As mentioned, the very front of the bottom wing was misshapen. As a result, it threw out every step of the build thus far, making me think it was all my fault. I attached the fuselage to the wing, and then got a big metal G clamp and firmly clamped the wing to the fuselage and left if for a few days. After taking the clamp off, the sanding to get the chin level was surprisingly quite minimal, and I only lost a very small amount of surface detail- most of which has easily been replaced. When I started this kit, it was intended to be a reasonably quick build. Whilst it is no longer a quick build, I FINALLY feel like progress is being made. 4 Link to comment Share on other sites More sharing options...
BIG X Posted October 31, 2017 Share Posted October 31, 2017 5 hours ago, ArtickWarspite said: I came very close to shelving this build. But once it was pointed out that it was the wing mold that was the issue and not my average skills, it renewed hope that this could be overcome. As mentioned, the very front of the bottom wing was misshapen. As a result, it threw out every step of the build thus far, making me think it was all my fault. I attached the fuselage to the wing, and then got a big metal G clamp and firmly clamped the wing to the fuselage and left if for a few days. After taking the clamp off, the sanding to get the chin level was surprisingly quite minimal, and I only lost a very small amount of surface detail- most of which has easily been replaced. When I started this kit, it was intended to be a reasonably quick build. Whilst it is no longer a quick build, I FINALLY feel like progress is being made. WELL DONE SIR!!! Having made two of these and not being happy with this aspect on either I take my hat off to you. I think that overall it is a smashing kit and now this hurdle has been overcome I look forward to seeing the rest of the build coming together. In short - your good news has made my day already - if I could 'like' it more than once - I would That's a five star clap from me 2 Link to comment Share on other sites More sharing options...
ArtickWarspite Posted October 31, 2017 Author Share Posted October 31, 2017 13 hours ago, BIG X said: WELL DONE SIR!!! Having made two of these and not being happy with this aspect on either I take my hat off to you. I think that overall it is a smashing kit and now this hurdle has been overcome I look forward to seeing the rest of the build coming together. In short - your good news has made my day already - if I could 'like' it more than once - I would That's a five star clap from me Thanks, I'll try not to disappoint with the remainder of the build. Reading up on others who have built this kit, it would appear that this wing issue is not the first. Looks like multiple builders have had this issue in varying degrees. I just think mine was quite extreme. I'm happy that the hard part is now hopefully behind me, so I can concentrate on the remainder of the build. 1 Link to comment Share on other sites More sharing options...
ArtickWarspite Posted October 31, 2017 Author Share Posted October 31, 2017 A question with the Hurricane; When it was landed and stationary (like being fuelled up etc), what position would the flaps & ailerons be in? If anyone can answer that, it would be much appreciated. Link to comment Share on other sites More sharing options...
wyverns4 Posted October 31, 2017 Share Posted October 31, 2017 1 hour ago, ArtickWarspite said: A question with the Hurricane; When it was landed and stationary (like being fuelled up etc), what position would the flaps & ailerons be in? If anyone can answer that, it would be much appreciated. Hi, I have been watching your saga with interest, (3 X in the stash!) and like your application of modelling skills. Flaps - UP, unless servicing, otherwise guess who was buying the drinks that night. Ailerons - If control locks were fitted then neutral, otherwise as the overall-suited machine operator, (A.K.A. pilot), left them. After looking at lots of pictures, (must get out more...), neutral, or slight deflection appears most frequently. HTH! Christian, exile to africa 1 Link to comment Share on other sites More sharing options...
ArtickWarspite Posted October 31, 2017 Author Share Posted October 31, 2017 Thanks for clearing that up, it's greatly appreciated. Now that I've passed the wings debacle, those were the next part. 1 Link to comment Share on other sites More sharing options...
delta7 Posted November 1, 2017 Share Posted November 1, 2017 (edited) Glad you got your issues fixed. I had just received the kit when I saw your thread and it filled me with dread however fortunatly I have had no issues and a perfect fit all round. In order to help address the chin issue here is how I built it 1) fitted all spars to lower wing ( missed out gun bays detail as leaving these closed) 2) fitted top wing to lower 3) built up cockpit on lower wing 4) fitted internal bulkheads and instrument panel to port side 5) mated fuselague together and then joined to wing section 6) fitted lower engine cowel and bottom of rear fuselague I did extensive dry fitting at each stage prior to glueing but didnt need to trim or clamp anything. I painted the cockpit when all glued up on lower wing, taking care to mask off any mating surfaces. the main difference I think was fitting the lower engine cowel after mating wings and body, it was tight fit and I had to slide it back in and then click it down to fit. thanks for your post ,it made me think about this instead of rushing in and probably saved me a big heartache Edited November 1, 2017 by delta7 3 Link to comment Share on other sites More sharing options...
ArtickWarspite Posted November 14, 2017 Author Share Posted November 14, 2017 On 11/2/2017 at 5:01 AM, delta7 said: Glad you got your issues fixed. I had just received the kit when I saw your thread and it filled me with dread however fortunatly I have had no issues and a perfect fit all round. In order to help address the chin issue here is how I built it 1) fitted all spars to lower wing ( missed out gun bays detail as leaving these closed) 2) fitted top wing to lower 3) built up cockpit on lower wing 4) fitted internal bulkheads and instrument panel to port side 5) mated fuselague together and then joined to wing section 6) fitted lower engine cowel and bottom of rear fuselague I did extensive dry fitting at each stage prior to glueing but didnt need to trim or clamp anything. I painted the cockpit when all glued up on lower wing, taking care to mask off any mating surfaces. the main difference I think was fitting the lower engine cowel after mating wings and body, it was tight fit and I had to slide it back in and then click it down to fit. thanks for your post ,it made me think about this instead of rushing in and probably saved me a big heartache Thanks, glad that my experience is helping others. I do have another one to build for the diorama I'm slowly building, so yes, it's fair to say the construction process will be slightly different with very EXTENSIVE test fitting. The black panel line pre-shading is complete and the sky undersides have been painted. Today's effort was masking that in preparation for the brown & green coats which will come next, so will hopefully put up some more photos in the next few days. Looking at this kit closely, the fit issues will leave a scar on this kit as looking at it head on, the fuselage doesn't appear to be 100% in line and it looks slightly off centre. Not sure if it's me or the light, but it wouldn't be surprising considering how hard it had to be clamped. Link to comment Share on other sites More sharing options...
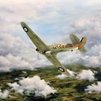
ArtickWarspite Posted November 22, 2017 Author Share Posted November 22, 2017 After all the issues, some real progress is finally being made.. 5 Link to comment Share on other sites More sharing options...
cybershed Posted November 22, 2017 Share Posted November 22, 2017 On 31/10/2017 at 9:20 PM, ArtickWarspite said: Thanks, I'll try not to disappoint with the remainder of the build. Reading up on others who have built this kit, it would appear that this wing issue is not the first. Looks like multiple builders have had this issue in varying degrees. I just think mine was quite extreme. I'm happy that the hard part is now hopefully behind me, so I can concentrate on the remainder of the build. I had a huge problem with one of the wings. Much filling and sanding. Expected better fit for a much vaunted new mould etc. 1 Link to comment Share on other sites More sharing options...
BIG X Posted November 22, 2017 Share Posted November 22, 2017 It's certainly looking like a Hurricane now 1 Link to comment Share on other sites More sharing options...
ArtickWarspite Posted November 22, 2017 Author Share Posted November 22, 2017 1 minute ago, cybershed said: I had a huge problem with one of the wings. Much filling and sanding. Expected better fit for a much vaunted new mould etc. Was it when you were putting on the top halves of the wings? I had problems there too, but that was because the bottom wing was all warped and misshapen leading to problems everywhere else. In fact, even when putting on the underside air intake there was a problem. Because every step of the build thus far had been compromised by the poorly moulded wing, the air intake had to be filled and sanded when the two halves of it went together as it left a yawning chasm right across the intake. My next worry is with such a poorly moulded wing is whether the landing gear is going to fit as it should.. Link to comment Share on other sites More sharing options...
Keith Jones Posted November 23, 2017 Share Posted November 23, 2017 Hope to have mine in primer this weekend following fair bit of tweaking and filling but nothing to extreme. I am with delta7. Dry fit, dry fit and dry fit again. Following comments on forums such as this I went into this build eyes open so was prepared. I wouldnt say it went together like a dream but there were no nasty shocks and already considering adding another to my stash. 1 Link to comment Share on other sites More sharing options...
cybershed Posted November 23, 2017 Share Posted November 23, 2017 16 hours ago, ArtickWarspite said: Was it when you were putting on the top halves of the wings? I had problems there too, but that was because the bottom wing was all warped and misshapen leading to problems everywhere else. In fact, even when putting on the underside air intake there was a problem. Because every step of the build thus far had been compromised by the poorly moulded wing, the air intake had to be filled and sanded when the two halves of it went together as it left a yawning chasm right across the intake. My next worry is with such a poorly moulded wing is whether the landing gear is going to fit as it should.. It was the port wing - where it joins with the fuselage. 1 Link to comment Share on other sites More sharing options...
ArtickWarspite Posted November 23, 2017 Author Share Posted November 23, 2017 6 hours ago, Keith Jones said: Hope to have mine in primer this weekend following fair bit of tweaking and filling but nothing to extreme. I am with delta7. Dry fit, dry fit and dry fit again. Following comments on forums such as this I went into this build eyes open so was prepared. I wouldnt say it went together like a dream but there were no nasty shocks and already considering adding another to my stash. Yeah dry fitting to the max seems the name of the game with this Hurricane. I've got one more to do for this diorama I want to build, so the next kit will be very closely inspected. I do not want to go through this drama again. Link to comment Share on other sites More sharing options...
Dances With Wolves Posted December 23, 2017 Share Posted December 23, 2017 (edited) On 21/10/2017 at 10:18 PM, BIG X said: I've just been reading Airfix Model World - issue 52 - March 2015 This contains the test build for this kit by Steve Budd. The narrative is a bit 'wordy' - but I know from experience in my own field how difficult it can be to describe in 'words' something that is more 'visual'. It seems he played fast and loose with the build stages - but - the important thing is - the photos show a perfectly smooth lower cowl to lower wing join. A quick look at the instruction book shows stage 33 - add lower wing to fuselage stage 34 - add lower front cowling stage 35 add rear lower fuselage I know for a fact that I have - on both occasions added the front lower cowl before the lower wing - but Steve Budd seems to suggest he did too - I wonder... Hi. "...a bit 'wordy'..."? Me?! How v-e-r-y dare you! Lol. As Jake Thackray quips in 'On again, on again', "s(he) never uses three or four words when a couple of thousand will easily do". Sorry to hear there's some unhappiness over the revised Airfix Hurricane. For sure, fit tolerances are tight and equally sure is that the bringing together of assembled wing unit and fuselage requires some adjustment. The standard space allocation in AMW, for a 'full build piece' is eight pages, 2,400 words and 3-4 'in progress shots per page (24 - 32 in total). I will typically have accumulated some 45 - 50 'in progress' shots by completion of a project. On that basis, coverage has to be pointed where most benefit would accrue. The same goes for the narrative. I'm hoping the following might help. I've 'borrowed' a couple of shots from the thread and annotated them with coloured arrows. Ditto, a couple of 'in progress' shots from the build archive, similarly marked. I've always been happy to steer away from the Airfix build guide when I see a potential benefit. The recommendation from Airfix is to incorporate the back armour / seat sub-assembly into the cockpit framing, which in turn, sits on the wing unit. I figured this might be a bridge too far for everything to line up perfectly and cut myself some slack by removing the pins where indicated with the red arrows. This meant I could install the seat and armour into the fuselage where indicated by the blue arrows and glue it in tight from behind (to avoid damage to the paint). That meant when test fitting the fuselage on to the wing I had to guide the armour between the side tubing sat on the wing, which then 'floats' in situ. What that meant was I could tweak the position of the wing, relative to the fuselage, without the armour restricting movement. The wing to fuselage arrangement has a 'dog leg' step where the green arrow points. The wing first needs to be back snug with no gap at this position. If I recall correctly, I had a slight gap. Flipping the model over, the mating surface with the rear lower fabric needed a little remedial sanding to run tight and the adjustment allowed the lower wing to 'back up' enough to close up the 'dog leg'. Remember the seat armour being loose, allowed this. With that small adjustment in the bag, the small rearward travel of the wing eased the join seen at the red arrow. It didn't resolve it but it did improve it. I recall both sides of my build, between the points indicated by the red arrows, needed tweaking. The principal was simply a case of noting where the wing and fuselage touched and little by little, using an oval, fine cut file, taking plastic out of first the fuselage, test fitting, noting the improvement, then taking a little off the wing root and again test fitting and checking either side. As the gap closed it was necessary to slightly refine points in the join elsewhere until the wing eased into the fuselage as intended. My build guide noted that the port wing closed up ok but the starboard side needed removal of the alignment pins which improved fit some 50%. I also noted that the spar should be glued no further outboard than the width of A2, with D23 and D24 and D63 and D64 only tacked to the spar (and n-o-t the wing), which allows the outer spar to float and self-align. If you're still awake...well done! Hope that might add a bit more clarity. The 'new' Airfix Hurricane is (at least in my view) the best in the scale - I chose to re-model the Dzus fasteners, the only detail that seemed over done. TTFN Steve Edited December 23, 2017 by Dances With Wolves Spelling correction. 2 3 Link to comment Share on other sites More sharing options...
BIG X Posted December 23, 2017 Share Posted December 23, 2017 1 hour ago, Dances With Wolves said: Hi. "...a bit 'wordy'..."? Me?! How v-e-r-y dare you! Lol. As Jake Thackray quips in 'On again, on again', "s(he) never uses three or four words when a couple of thousand will easily do". Sorry to hear there's some unhappiness over the revised Airfix Hurricane. For sure, fit tolerances are tight and equally sure is that the bringing together of assembled wing unit and fuselage requires some adjustment. The standard space allocation in AMW, for a 'full build piece' is eight pages, 2,400 words and 3-4 'in progress shots per page (24 - 32 in total). I will typically have accumulated some 45 - 50 'in progress' shots by completion of a project. On that basis, coverage has to be pointed where most benefit would accrue. The same goes for the narrative. I'm hoping the following might help. I've 'borrowed' a couple of shots from the thread and annotated them with coloured arrows. Ditto, a couple of 'in progress' shots from the build archive, similarly marked. I've always been happy to steer away from the Airfix build guide when I see a potential benefit. The recommendation from Airfix is to incorporate the back armour / seat sub-assembly into the cockpit framing, which in turn, sits on the wing unit. I figured this might be a bridge too far for everything to line up perfectly and cut myself some slack by removing the pins where indicated with the red arrows. This meant I could install the seat and armour into the fuselage where indicated by the blue arrows and glue it in tight from behind (to avoid damage to the paint). That meant when test fitting the fuselage on to the wing I had to guide the armour between the side tubing sat on the wing, which then 'floats' in situ. What that meant was I could tweak the position of the wing, relative to the fuselage, without the armour restricting movement. The wing to fuselage arrangement has a 'dog leg' step where the green arrow points. The wing first needs to be back snug with no gap at this position. If I recall correctly, I had a slight gap. Flipping the model over, the mating surface with the rear lower fabric needed a little remedial sanding to run tight and the adjustment allowed the lower wing to 'back up' enough to close up the 'dog leg'. Remember the seat armour being loose, allowed this. With that small adjustment in the bag, the small rearward travel of the wing eased the join seen at the red arrow. It didn't resolve it but it did improve it. I recall both sides of my build, between the points indicated by the red arrows, needed tweaking. The principal was simply a case of noting where the wing and fuselage touched and little by little, using an oval, fine cut file, taking plastic out of first the fuselage, test fitting, noting the improvement, then taking a little off the wing root and again test fitting and checking either side. As the gap closed it was necessary to slightly refine points in the join elsewhere until the wing eased into the fuselage as intended. My build guide noted that the port wing closed up ok but the starboard side needed removal of the alignment pins which improved fit some 50%. I also noted that the spar should be glued no further outboard than the width of A2, with D23 and D24 and D63 and D64 only tacked to the spar (and n-o-t the wing), which allows the outer spar to float and self-align. If you're still awake...well done! Hope that might add a bit more clarity. The 'new' Airfix Hurricane is (at least in my view) the best in the scale - I chose to re-model the Dzus fasteners, the only detail that seemed over done. TTFN Steve Hey Steve - thanks for setting things straight - great tips - which will help a lot of us. I personally have another 3 of these in the cupboard and your tip about the armour fitting makes loads of sense. Great work in AMW too - I'm a big fan and remember... ...I expect nothing less than 'perfection' in all your builds Cheers - BIG X - a.k.a. Steve Link to comment Share on other sites More sharing options...
Dances With Wolves Posted December 24, 2017 Share Posted December 24, 2017 23 hours ago, BIG X said: Hey Steve - thanks for setting things straight - great tips - which will help a lot of us. I personally have another 3 of these in the cupboard and your tip about the armour fitting makes loads of sense. Great work in AMW too - I'm a big fan and remember... ...I expect nothing less than 'perfection' in all your builds Cheers - BIG X - a.k.a. Steve Thanks for that Steve. Wish you well with that brace of 'canes when they head to the bench. Cheers also for the nod on the AMW stuff - I'll do my best... :-) Hope you and yours have a wonderful Christmas. Steve 1 Link to comment Share on other sites More sharing options...
BIG X Posted December 24, 2017 Share Posted December 24, 2017 1 hour ago, Dances With Wolves said: Thanks for that Steve. Wish you well with that brace of 'canes when they head to the bench. Cheers also for the nod on the AMW stuff - I'll do my best... :-) Hope you and yours have a wonderful Christmas. Steve Hey Steve - slightly off topic - but still talking of Hurricanes... I'm sorry to say I did this before I found out that humbrol dark green was 'incorrect' - so ignore that - but the inspiration was your AMW piece - with special reference to the logo. my camo pattern seems to match yours - but having looked at this... ...did we get it wrong - or did Gary??? BTW - apart from the 'wrong green' - this is one of my favourite models 1 Link to comment Share on other sites More sharing options...
Dances With Wolves Posted December 25, 2017 Share Posted December 25, 2017 58 minutes ago, BIG X said: Hey Steve - slightly off topic - but still talking of Hurricanes... I'm sorry to say I did this before I found out that humbrol dark green was 'incorrect' - so ignore that - but the inspiration was your AMW piece - with special reference to the logo. my camo pattern seems to match yours - but having looked at this... ...did we get it wrong - or did Gary??? BTW - apart from the 'wrong green' - this is one of my favourite models Hi Steve. I have an answer for this but sadly I must head off to bed - early start tomorrow. Can we pop this in the hanger for the minute please? I'll get back on it Boxing Day evening most likely, when we get back from my daughter's gaff. Have a great Christmas! Steve Von Festive :-) 2 Link to comment Share on other sites More sharing options...
Dances With Wolves Posted December 30, 2017 Share Posted December 30, 2017 On 24/12/2017 at 11:13 PM, BIG X said: Hey Steve - slightly off topic - but still talking of Hurricanes... I'm sorry to say I did this before I found out that humbrol dark green was 'incorrect' - so ignore that - but the inspiration was your AMW piece - with special reference to the logo. my camo pattern seems to match yours - but having looked at this... ...did we get it wrong - or did Gary??? BTW - apart from the 'wrong green' - this is one of my favourite models Hi Steve. Hope you and yours (along with everyone on BM) had a great Christmas - in tandem with that...happy New Year! First up, Terry Higgins is a grade one researcher at Aviaeology and I would certainly trust his view on any of the subjects his outfit chose to cover. That was my first reassurance that the 'B' scheme for 'GN-A' was correct. Coupled to that, the alternating use of the 'A' and 'B' schemes (up until the practice was abandoned in 1941) was itself I understand, reversed between Spitfires and Hurricanes (ie in the latter case, even serials received the 'B' pattern, while odd serials were finished in the 'A' scheme - reversed for Spitfires). As a caveat, I'm aware that commentary around the forums points to exceptions to this and I don't doubt that that was the case, although I'm unable to put a value on that in terms of frequency and so forth. Given that there are no known photographs of Nick's 'GN-A', no-one can say his VC winning ride didn't carry the 'B' scheme. There are photos (taken by Cecil Beaton) of Tom Neil larking about beside the replacement 'GN-A' but as I say, nothing of the original. When was your model completed by the way? There's a reason I'm asking... TTFN Steve 1 Link to comment Share on other sites More sharing options...
BIG X Posted December 30, 2017 Share Posted December 30, 2017 5 minutes ago, Dances With Wolves said: When was your model completed by the way? There's a reason I'm asking... TTFN Steve 12th September 2016 - according to the data on the photos I took of the finished article - now I'm intrigued... Link to comment Share on other sites More sharing options...
Dances With Wolves Posted December 30, 2017 Share Posted December 30, 2017 22 minutes ago, BIG X said: 12th September 2016 - according to the data on the photos I took of the finished article - now I'm intrigued... Hi Steve. Until I hear otherwise, you're officially the first modeller to correctly depict 'GN-A' with Nick's red devil in situ and publish to the web. After liaising with Terry at Aviaeology, to update their 'GN-A' decals, I wondered how quickly the red devil would start appearing. I've been in contact with Mal Mayfield over his masked rendition of 'GN-A' and chatted with him at Telford about it but his was concluded after yours, so... It's great to see Nick's Hurricane 'fully dressed'... ;-) TTFN Steve 1 Link to comment Share on other sites More sharing options...
BIG X Posted December 30, 2017 Share Posted December 30, 2017 12 minutes ago, Dances With Wolves said: Hi Steve. Until I hear otherwise, you're officially the first modeller to correctly depict 'GN-A' with Nick's red devil in situ and publish to the web. After liaising with Terry at Aviaeology, to update their 'GN-A' decals, I wondered how quickly the red devil would start appearing. I've been in contact with Mal Mayfield over his masked rendition of 'GN-A' and chatted with him at Telford about it but his was concluded after yours, so... It's great to see Nick's Hurricane 'fully dressed'... ;-) TTFN Steve WOW!!!!!! ...that's the closest I'm ever going to get to winning anything in this wacky world of modelling - You have just made my Christmas Thanks Steve - and everyone else... ...sorry for the thread hi-jack Link to comment Share on other sites More sharing options...
delta7 Posted January 3, 2018 Share Posted January 3, 2018 here is mine finished- used the tropical air filter and aftermarket decals to depict a Malta Hurricane. I found this kit a joy with no issues in fit , just was careful in test fitting. 1 Link to comment Share on other sites More sharing options...

Recommended Posts
Create an account or sign in to comment
You need to be a member in order to leave a comment
Create an account
Sign up for a new account in our community. It's easy!
Register a new accountSign in
Already have an account? Sign in here.
Sign In Now