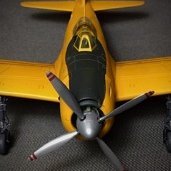
MDriskill Posted August 17, 2017 Share Posted August 17, 2017 (edited) This is not only my first completion in a couple years, but this poor old Revell kit has been on my Shelf of Doom so long, there are bits I don’t even remember working on! A friend claims he remembers my starting it in 2005...yikes. I only recall it was the best "refined cowl" 109 around then. The Fine Molds kits had just been announced maybe, but the Hobby Boss and AZ efforts were far in the future. I “converted” it to a, shall we say, "stand-off" G-6AS, which was probably easier than building the intended G-10. Leave the too-shallow-for-a-G-10 oil cooler alone, omit the separately-molded little chin bumps, sand and scribe your way to the early metal tall tail, and you’re most of the way there. Adding small wheel bulges scratched from scrap plastic, surplus wheels from an AZ kit, and reshaped prop blades from a Hasegawa G-6 to replace the kit’s short-shot mess, completed the basics. I did not use the famous Loon landing gear “fixer” set—to my eye, a cure that looks worse than the disease--or otherwise expend much effort addressing the kit’s accuracy issues. I did “animate” control surfaces, and add bits of sheet, sprue, wire, and scraps, to the cockpit and landing gear. The finish represents the well-known “White 1,” an early-build AS from JG 1. Weathering is primarily oil washes, colored pencils, and pastels. Edited August 19, 2017 by MDriskill 31 1 Link to comment Share on other sites More sharing options...
Meatbox8 Posted August 17, 2017 Share Posted August 17, 2017 A terrific model and a beautiful finish. It could easily have passed for 1/48th to my eye. An attractive scheme too. 1 Link to comment Share on other sites More sharing options...
Tbolt Posted August 17, 2017 Share Posted August 17, 2017 That is really nice. Love you weathering. 1 Link to comment Share on other sites More sharing options...
pizzapaolo Posted August 17, 2017 Share Posted August 17, 2017 Really, really good.... 1 Link to comment Share on other sites More sharing options...
Corsairfoxfouruncle Posted August 17, 2017 Share Posted August 17, 2017 Excellent build 👍 Love the all grey scheme like that. Makes me want to build one even more. 1 Link to comment Share on other sites More sharing options...
ArmouredSprue Posted August 18, 2017 Share Posted August 18, 2017 Stunning model. I just finished mine a couple of weeks ago and I've done it as G-10. I really love the weathering and the overall paint job. Really top notch work mate. Well done! 1 Link to comment Share on other sites More sharing options...
Spitfire31 Posted August 18, 2017 Share Posted August 18, 2017 In a word, superb! The finish looks just 'right' and the offset control surfaces give a sense of life. A real inspirer. Kind regards, Joachim 1 Link to comment Share on other sites More sharing options...
BerndM Posted August 18, 2017 Share Posted August 18, 2017 Simply stunning what you have created out of this kit ! 1 Link to comment Share on other sites More sharing options...
RidgeRunner Posted August 18, 2017 Share Posted August 18, 2017 A beustiful build. Martin 1 Link to comment Share on other sites More sharing options...
Rich G Posted August 18, 2017 Share Posted August 18, 2017 Superb work, a really nice looking 109, I like the colour scheme a lot. Rich 1 Link to comment Share on other sites More sharing options...
Pete in Lincs Posted August 19, 2017 Share Posted August 19, 2017 Very impressive. 1 Link to comment Share on other sites More sharing options...
MDriskill Posted August 19, 2017 Author Share Posted August 19, 2017 (edited) I appreciate everyone's very kind comments. It's a good feeling to finish one after such a long dry spell... Several have commented on the finish. The basic paint is Aeromaster RLM 76 light blue enamel. The main weathering technique was oil pin washes; starting after overall glossing with clear lacquer, decaling, and another gloss coat to seal the decals. The washes go on in layers with additional gloss coats in between. I started with a dark mix of burnt umber and black to highlight control surface separations, access hatches, and areas around the engine. When that was done, the model still seemed a bit "flat," but I thought repeating this grubby dark shade for every panel line on such a pale base color would be over-doing it...a little dirt goes a long way in 1/72! So I used a gray wash--sort of a dark version of the camo color--to more subtly highlight most other panel lines, and was pleased with that. Exhaust stains and other subtle streaking was done with pastel powder, applied with a small brush over the final semi-flat coat. Paint chipping is colored pencils. Edited April 23, 2018 by MDriskill 1 Link to comment Share on other sites More sharing options...
celt Posted August 20, 2017 Share Posted August 20, 2017 Well tidy indeed. Link to comment Share on other sites More sharing options...
Head in the clouds. Posted August 20, 2017 Share Posted August 20, 2017 Glad you finished it, see it was not so bad now you see her in all her glory. Nice job. Link to comment Share on other sites More sharing options...
kapam Posted August 21, 2017 Share Posted August 21, 2017 An excellent model. So beautifully yet subtly weathered and highlighted. Brilliant! Link to comment Share on other sites More sharing options...
Convair Posted August 22, 2017 Share Posted August 22, 2017 Very nice build. The 109s in a single overall color provide a very interesting piece of conversation. Link to comment Share on other sites More sharing options...

Recommended Posts
Create an account or sign in to comment
You need to be a member in order to leave a comment
Create an account
Sign up for a new account in our community. It's easy!
Register a new accountSign in
Already have an account? Sign in here.
Sign In Now