morty_3333 Posted March 16, 2017 Share Posted March 16, 2017 Hi Eveybody! This is My first Aircraft build on Britmodeller,a conversion of the venerable Revell 1/48 PBY Catalina into a Super Catalina that appeared in the 1989 Steven Spielberg Movie 'Always'. You must remember the opening scene:- I'll be adding some aftermarket to this build,namely the Belcher Bits replacement tail,Eduard Window Masks,Eduard Brassin wheels,Quickboost 48 554 resin engines,SAC white metal undercarriage set and Draw Decals set:- The Super Catalina variant is re-engined from 1,200 hp P&W R1830 Twin Wasps to 1700 hp Wright R-2600 Twin Cyclones,I am taking care of these with the Quickboost set, and using a donor kit for the cowlings, in the shape of an Italeri 2650 B25 Mitchell kit (Accurate Minutures Moulds):- Other changes required will be remove the front gun turret,modify the nose shape,scracthbuild some 'speakers?' for each side of the nose and enlarge the rudder. I have already made a start, and will post a progress report soon. Keep Sticking! Cheers, Pete 7 Link to comment Share on other sites More sharing options...
Crossofiron1971 Posted March 16, 2017 Share Posted March 16, 2017 Fantastic Project! Good luck! Link to comment Share on other sites More sharing options...
perdu Posted March 16, 2017 Share Posted March 16, 2017 Excellent! Link to comment Share on other sites More sharing options...
Jamie @ Sovereign Hobbies Posted March 16, 2017 Share Posted March 16, 2017 This is great! I love that film. Are there decals for Tanker 57 and 59 available too? (The A/B-26 Invaders) Link to comment Share on other sites More sharing options...
andymoore Posted March 16, 2017 Share Posted March 16, 2017 i'm in - I love that clip from 'Always' Link to comment Share on other sites More sharing options...
Jamie @ Sovereign Hobbies Posted March 16, 2017 Share Posted March 16, 2017 Incidently, since you're going to all this effort the real PBY / Catalina has a waisted rear fuselage at the base of the fin which the kit does not capture. I thought you may wish to know about that in advance to address it whilst doing everything else! Belcher Bits makes a resin correction but since you need to extend the fin anyway it's probably not the way to go in this instance. Link to comment Share on other sites More sharing options...
foresterab Posted March 17, 2017 Share Posted March 17, 2017 3 hours ago, SovereignHobbies said: This is great! I love that film. Are there decals for Tanker 57 and 59 available too? (The A/B-26 Invaders) Draw decals has tanker 59 decals available as well. Not many users of those old A-26's but they were a great sight to see coming in to drop on the fire ahead of you... foresterab 2 Link to comment Share on other sites More sharing options...
Sprueloose Posted March 17, 2017 Share Posted March 17, 2017 Great subject. Looking forward to seeing it come together! Link to comment Share on other sites More sharing options...
morty_3333 Posted March 17, 2017 Author Share Posted March 17, 2017 Hi Evertbody! Thanks for the replies to the posts,as Foresterstab says,there are Draw Decals available for the A26 Invader,I have some tucked into the box of a Monogram kit in the stash for a future project. Sovereign Hobbies,thanks for the info on the tail shape,I was aware of it and got the Belcher Bits replacement tail which addresses the problem,seems to be a standard fix for the kit. I was also made aware there is an issue with the size and position of the blisters (wrong cross-section and too large and the height on the fuselage is too high),but I won't be addressing that on this build. I was going the post some progress photos but Photobucket does not appear to be working at the moment,will try again later. Many thanks for the interest in the project! Keep Sticking! Cheers, Pete 2 Link to comment Share on other sites More sharing options...
bbudde Posted March 17, 2017 Share Posted March 17, 2017 I'm in here as I like the movie very much. Have fond memories on lazy weekends in the early 90' just watching some cool movies in the afternoon. Link to comment Share on other sites More sharing options...
allyby Posted March 17, 2017 Share Posted March 17, 2017 I'm here for the ride as well if you don't mind! Link to comment Share on other sites More sharing options...
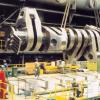
morty_3333 Posted March 21, 2017 Author Share Posted March 21, 2017 Well,Photobucket seems to be behaving It's self now,so some progress:- Tailpiece and rudder pinned to replacement fuselage end with brass pins and epoxy:- Top of tail cut off and new profile built up with plastic card:- Then built up with filler and MORE plastic card (Ooops!,faulty ruler,cold weather!¬ shown against original kit tail for comparison:- Wings strengthened with brass box section:- White metal undercarriage parts epoxied together using whell wells as jig:- Nose marked out for turret fairing removal and plastic card ribs attatched:- Front of original nacelles cut off,Mitchell firewalls prepared and parts from Mitchell kit glued to wings:- Started fill,sand,fill,sand etc........ getting there! :- A little weight added to fuselage!! (Catalina = Tail-sitter, Catailna + solid resin tail = !!!!!!!!!!) Approx. 200g! Hence the metal U/C. More soon! Keep Sticking! Cheers, Pete 5 Link to comment Share on other sites More sharing options...
John_W Posted March 21, 2017 Share Posted March 21, 2017 I used a lot of weight in 1/72, that looks like a serious amount in 1/48. Link to comment Share on other sites More sharing options...
perdu Posted March 21, 2017 Share Posted March 21, 2017 Looks rather good. Might be a good idea to cast the new nose bits out of lead Link to comment Share on other sites More sharing options...
moaning dolphin Posted March 21, 2017 Share Posted March 21, 2017 This is a nice monster of a project, my just kick off my shoes, pull up a chair and enjoy this! Bob Link to comment Share on other sites More sharing options...
daneel Posted March 21, 2017 Share Posted March 21, 2017 Love the movie, looove the Cat... will be watching with interest great work so far! Link to comment Share on other sites More sharing options...
foresterab Posted March 22, 2017 Share Posted March 22, 2017 Will be interested in seeing how this turns out. I've yet to see a PBY tanker in action although the North West Territories still has a couple on strength if I recall. Just had a co-worker retire after 40 years of fire duties and he told me the PBY was still his favorite tanker to see overhead. Looking good so far, foresterab Link to comment Share on other sites More sharing options...
rob85 Posted March 22, 2017 Share Posted March 22, 2017 Great start to an interesting project! Looking forward to how this turns out. That does look a lot of weight... but I can't talk as I did he same to my Lib and as you say you are using a resin tail, and they are a bit hefty compared to the normal plastic. Good luck Rob Link to comment Share on other sites More sharing options...
morty_3333 Posted April 11, 2017 Author Share Posted April 11, 2017 Hi Everybody! A quick update on the progress so far:- Air intakes cut from original Revell nacelles,trimmed and glued in position (some basic brass exhausts fitted as well:- Cockpit and rear section interior done and fuselage closed up:- Popped the wings on loose for a quick 'Look-See' :- 'Re-Tasked' the kit cockpit-top radome the give a basic guide for the 'rounded off pointy bit' on the nose:- Took pics of the fuselage panel detail before I get the angle grinder out! :- First fill-sand session:- .....And guide primed,much more 'Fiil,Sand Prime' to go It's a bit like 'Rose with the turned up Nose' at the minute,but I'll get it licked into shape! More in the not too distant......... Keep Sticking!! Cheers, Pete 3 Link to comment Share on other sites More sharing options...
woody37 Posted April 11, 2017 Share Posted April 11, 2017 Great progress, love the surgery work, making it look very easy! Link to comment Share on other sites More sharing options...
Sprueloose Posted April 11, 2017 Share Posted April 11, 2017 Love watching the intelligent butchery! The new shapes rising from the sea of putty and primer.... as it were. Link to comment Share on other sites More sharing options...
JeffreyK Posted April 12, 2017 Share Posted April 12, 2017 interesting stuff!! Note that the cowling ring on the AM/Italeri B-25's is totally goofed up, the opening at the front is way too small. DMold makes corrected cowlings, early and late type. J Link to comment Share on other sites More sharing options...
georgeusa Posted April 12, 2017 Share Posted April 12, 2017 Really like what you have done an d how well your conversion is going. Doctor, your plastic surgery was a success! Link to comment Share on other sites More sharing options...
morty_3333 Posted May 3, 2017 Author Share Posted May 3, 2017 Hi There! Yes, I'm still here!! Just been buried under a pile of dust, so not to much to show in the meantime , I've just about got the shape of the nose finalised,hoping to re-scribe tomorrow and get on with priming up properly! :- Used some Vallejo Plastic Putty around the intake fairings, I've heard some mixed reports about this but found it works really well. Apparently it does not like acrylic primers,I use alclad grey filler primer and had no problems, also it is said to be not good for large gaps and building up in layers and does not sand cleanly,but I think if You use it for small seam gaps etc. it works well,it has a very fine (less than 1mm) nozzle,and can be smoothed while still wet with a damp cotton bud,leaving it ready to paint.:- Wing landing light lenses fitted over recessed 'Little Cars' lenses, ready to clean up and polish:- More soon, not back at work till Saturday!!! Stay Tuned, and...... Keep Sticking!! Cheers, Pete 3 Link to comment Share on other sites More sharing options...
PattheCat Posted May 3, 2017 Share Posted May 3, 2017 (edited) Great movie. Great work. I'll stay tuned for sure. I once saw a french Canadair filling his tanks ... on something better named a pond than a lake. I just could say Wow. These flying firemen are incredible (mostly ex French naval aviation pilots, I think). Edited May 3, 2017 by PattheCat Link to comment Share on other sites More sharing options...

Recommended Posts
Create an account or sign in to comment
You need to be a member in order to leave a comment
Create an account
Sign up for a new account in our community. It's easy!
Register a new accountSign in
Already have an account? Sign in here.
Sign In Now