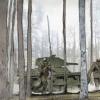
Ceithearn Posted January 16, 2017 Share Posted January 16, 2017 First, not happy with photo quality at all. Will try again with the Lumix and different lighting. Decades ago did not have the resources to evolve the hobby. Now, hopefully, making steps to toward the beautiful projects posted here on Britmodeller. Posting this very basic base for others beginning to build vignettes. The base is a 5/8" piece of plywood, corners adjusted with laminate trimmer, interior primer paint on the plywood, layer of drywall filler for texture. Decided to let the filler completely dry before adding the soil, as was not sure how the drying process would be affected by adding the soil. Brushed on a layer of white glue to the dry base, then sprinkled on the soil. Once the soil covered the base completely, let dry, then sprayed on a 50/50 mix of white glue and water to hold the soil in place. After some trial error on the portion of water to glue, found 50/50 worked best for the glue consistency. You can now stand the vignette on it's side and lose very little soil if any. Once the top coat of glue dried the finishing touch was a spray of black around the edges from a rattle can. Soil from backyard. Exposure....lighting..... The pieces of vertical branch are supporting a rectangle of glass which is helping avoid dust accumulation. Big Block Chevy in the background, Cdn loonie foreground. Quick, simple, inexpensive vignette. All the best, R. 1 Link to comment Share on other sites More sharing options...
Badder Posted January 16, 2017 Share Posted January 16, 2017 Hi R, A couple of tips for you.... firstly there's no need to use soil from the garden. It will contain a lot of plant material and tiny creatures, insect eggs, snail eggs etc etc (not nice) and it will decay and break down over time. You could just use sand, grit, broken up stones, crushed brick or even crushed plaster, and sprinkle that over the base and fix with PVA, then paint it brown or whatever. Secondly, while YOUR ground was still wet, you could have pressed your tank down into it a bit so that the tracks sank into the wet ground and looked much more realistic than having the tank 'floating' on top. Good luck with your future projects. Rearguards, Badder 1 Link to comment Share on other sites More sharing options...
Ceithearn Posted January 16, 2017 Author Share Posted January 16, 2017 Thank you for the input Badder. Your point on the tracks is well taken and fully agree. Really didn't even think of it as was more concerned about the actual construction portion of the project and having the soil stay in place. The soil isn't thick at all so to make a track impression would have had to be done when the filler was still moist. This brings to light the issue of pushing the tracks into a moist substance. Are people making the track impressions before finishing touches, cleaning them off (possibly removing from model), then completing build and weathering? Soil has been sitting around in an open container drying for a long time. Now covered with quite a gloop (technical term) of glue/water mix. Be interesting to see how it lasts over time, has been about twelve weeks now. Be keeping my eye out for the materials you mentioned. Currently on the bench is a LDRG Chevy truck and SAS jeep. Reading a couple SAS books has inspired me. Regards, R. 1 Link to comment Share on other sites More sharing options...
Badder Posted January 16, 2017 Share Posted January 16, 2017 1 hour ago, Ceithearn said: Thank you for the input Badder. Your point on the tracks is well taken and fully agree. Really didn't even think of it as was more concerned about the actual construction portion of the project and having the soil stay in place. The soil isn't thick at all so to make a track impression would have had to be done when the filler was still moist. This brings to light the issue of pushing the tracks into a moist substance. Are people making the track impressions before finishing touches, cleaning them off (possibly removing from model), then completing build and weathering? Soil has been sitting around in an open container drying for a long time. Now covered with quite a gloop (technical term) of glue/water mix. Be interesting to see how it lasts over time, has been about twelve weeks now. Be keeping my eye out for the materials you mentioned. Currently on the bench is a LDRG Chevy truck and SAS jeep. Reading a couple SAS books has inspired me. Regards, R. Hi, I look forward to seeing your LDRG Chevy and SAS jeep, both favourites of mine. You may find your 'soil' will be okay then, but there is always a risk. Remember, life will always find a way! I think it's just so much simpler to use sand/grit/powders etc and paint them. As for making track impressions in wet plaster etc, the usual methods are either: to use spare sections of track and press them into the ground. to use the tracks from the kit, BEFORE painting them and attaching them to the model, and wash them clean afterwards. to wrap cling film over the tracks of your tank and then press it down into the plaster. Hope that helps, Rearguards, Badder Link to comment Share on other sites More sharing options...

Recommended Posts
Create an account or sign in to comment
You need to be a member in order to leave a comment
Create an account
Sign up for a new account in our community. It's easy!
Register a new accountSign in
Already have an account? Sign in here.
Sign In Now