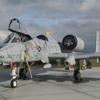
Shaun Posted January 9, 2016 Share Posted January 9, 2016 After reading another build thread, I've be asked to show the progress on my own 1/32 Harrier GR9 build. This is the stage were at, the wing is only dry fitted at this stage. This kit is a nightmare, it looks like a Harrier but has loads and loads of errors. I've tried to fix some but have to live with others! The start of the project I've a few more photo's if you want to see them? Shaun. 5 Link to comment Share on other sites More sharing options...
Simon Cornes Posted January 9, 2016 Share Posted January 9, 2016 Almost done then Shaun! You put me to shame - I had almost shoe horned the Aries cockpit into mine but its back in storage now!! Yours will be ready for Cosford? !!! Simon 1 Link to comment Share on other sites More sharing options...
Shaun Posted January 9, 2016 Author Share Posted January 9, 2016 Almost done then Shaun! You put me to shame - I had almost shoe horned the Aries cockpit into mine but its back in storage now!! Yours will be ready for Cosford? !!! Simon Mine is also currently in storage,(Bay1,Hanger 1, my loft ) I ran out of steam and "Life" has got in the way big time the past few months. If another board member comes up the some 300 gal tanks , we may get inspired to get it moving again? Shaun. Link to comment Share on other sites More sharing options...
rainstel109 Posted January 9, 2016 Share Posted January 9, 2016 (edited) Mine is also currently in storage,(Bay1,Hanger 1, my loft ) I ran out of steam and "Life" has got in the way big time the past few months. If another board member comes up the some 300 gal tanks , we may get inspired to get it moving again? Shaun. Well, wadya waiting for! Can I also suggest a certain Green color? Edited January 9, 2016 by rainstel109 1 Link to comment Share on other sites More sharing options...
Shaun Posted January 9, 2016 Author Share Posted January 9, 2016 Well, wadya waiting for! Can I also suggest a certain Green color? Its going to be a two tone gray scheme one, with a flashy tail! Shaun. Link to comment Share on other sites More sharing options...
Shaun Posted January 9, 2016 Author Share Posted January 9, 2016 Here is the Aires resin cockpit before I closed up the forward section. Shaun. 13 Link to comment Share on other sites More sharing options...
phildagreek Posted January 9, 2016 Share Posted January 9, 2016 The pit looks good. 1 Link to comment Share on other sites More sharing options...
Breaker Posted January 9, 2016 Share Posted January 9, 2016 Shaun, that cockpit is awesome! How was it to fit? What markings come in the box? Link to comment Share on other sites More sharing options...
AjD Posted January 9, 2016 Share Posted January 9, 2016 Good grief Shaun that cockpit is stunning! Been a while since we spoke at Yeovilton but did the book come in useful? If you're putting a flashy tail on it I certainly can't wait to see it complete! 1 Link to comment Share on other sites More sharing options...
Shaun Posted January 9, 2016 Author Share Posted January 9, 2016 Good grief Shaun that cockpit is stunning! Been a while since we spoke at Yeovilton but did the book come in useful? If you're putting a flashy tail on it I certainly can't wait to see it complete! The book has been amazing for discovering more faults with the kit!!, only joking. The book has been a great help, thanks to you and the team for producing it. The airframe I'm doing is on the cover of the book Shaun. Shaun, that cockpit is awesome! How was it to fit? What markings come in the box? Not too bad as far as I can remember, the kit comes with 20 sqn and 4 sqn markings. Here a couple more in progress pics. A hint of the chosen airframe. Don't get me started on the accuracy of the kits pylons. I used Piero's nose correction. Panel 60 is a strange mistake on the kit, the panel is covered by the flap fairing?. I've also added the fuselage reinforcing plates and blanked off the exhaust shrouds to prevent a see through look. Rear fuselage all buttoned up- Shaun. 4 Link to comment Share on other sites More sharing options...
AjD Posted January 10, 2016 Share Posted January 10, 2016 Are those scratch-built fairings I see there Shaun? Oh how I wish I'd got a copy of that nose conversion! 2 Link to comment Share on other sites More sharing options...
Shaun Posted January 10, 2016 Author Share Posted January 10, 2016 Are those scratch-built fairings I see there Shaun? Yes, all scratch built. I chose this route to avoid correcting all the kit pylons! I thought this would be easier? Shaun. Link to comment Share on other sites More sharing options...
Shaun Posted January 10, 2016 Author Share Posted January 10, 2016 Another photo update on the wings. I've used the Wolfpack resin 100% LERX, as my chosen airframe has this fitted. Here is a comparison shot.I added more depth to the JTS exhaust and now it looks a look better. Shaun. 4 Link to comment Share on other sites More sharing options...
F4u Posted January 10, 2016 Share Posted January 10, 2016 Nice work Shaun seems like a lot of effort you are putting into this kit and its paying off looking good ! Guy 1 Link to comment Share on other sites More sharing options...
Shaun Posted January 10, 2016 Author Share Posted January 10, 2016 And finally here it is all mocked up, it's a nice size(it's on an A3 mat) and weight! Shaun. 4 Link to comment Share on other sites More sharing options...
Breaker Posted January 10, 2016 Share Posted January 10, 2016 Hmmm, with the nose correction, could this be achieved by cutting the nose and realigning it? 1 Link to comment Share on other sites More sharing options...
Shaun Posted January 10, 2016 Author Share Posted January 10, 2016 Hmmm, with the nose correction, could this be achieved by cutting the nose and realigning it? There's a bit more to it than that, the FLIR fairing needs reshaping, the nose is a little short and the tusks are poor in the kit. Shaun. Link to comment Share on other sites More sharing options...
xffw45343tg Posted January 10, 2016 Share Posted January 10, 2016 Hmmm, with the nose correction, could this be achieved by cutting the nose and realigning it? Don't think so; the Trumpeter nose has a competely different profile to the real thing. If you can chase down Piero's build threads I think he does a side by side comparison. There was also a detailed analysis done on LSP by a chap who works on AV-8Bs and owns both a camera and a tape measure. The tragedy was that iirc Trumpter consulted with the SIG before releasing the GR7 then seemed (presumably for cost reasons) to ignore the extensive advice they were given. I'm sure out of the box it's passable as a Harrier from a distance but is also (sadly) a missed opportunity. Hats off to Shaun etc. Kirk Link to comment Share on other sites More sharing options...
xffw45343tg Posted January 10, 2016 Share Posted January 10, 2016 Shaun - just an FYI on the Aires cockpit for your next build . It is spectacular but not entirely perfect. The "bar" aft of the transverse control column linkage is fictitious (perhaps inherited from the Trumpeter item?). Also, the control column linkage itself differs on the right hand side where there should be a sort of segment shaped casting over where the lateral movement of the column is converted to rotary motion; the tube does NOT go into the right hand console base. Your painting is absolutely phenomenal though! Wow! Are you doing anything further with the finish on the top of the HUD lens? Cheers, Kirk Link to comment Share on other sites More sharing options...
Shaun Posted January 10, 2016 Author Share Posted January 10, 2016 Ok, finally photo update. This is where we are now with the build, the members who know the airframe will see where and what I've done to improve the kit. It's one of those kits, the more you research the more errors you find!, nearly everything is wrong in some way. As you can see I've built the model as a clean wing display aircraft with aerodynamic fairings on the wings. This was done for 2 reasons, all the kits pylons are inaccurate and the gun pods are also the wrong shape. I thought using the strakes would be the easy way out, but no!!, these are 10mm to short and are also the the wrong nose shape. This will be the scheme I'm building. Shaun. 6 Link to comment Share on other sites More sharing options...
Shaun Posted January 10, 2016 Author Share Posted January 10, 2016 Shaun - just an FYI on the Aires cockpit for your next build . It is spectacular but not entirely perfect. The "bar" aft of the transverse control column linkage is fictitious (perhaps inherited from the Trumpeter item?). Also, the control column linkage itself differs on the right hand side where there should be a sort of segment shaped casting over where the lateral movement of the column is converted to rotary motion; the tube does NOT go into the right hand console base. Your painting is absolutely phenomenal though! Wow! Are you doing anything further with the finish on the top of the HUD lens? Cheers, Kirk I know its not 100% correct, the cockpit is also the AV-8B night attack and the IP panel has small changes. Its close enough but the RAF Harriers have a slightly different layout. I can work on the HUD before I attach the windscreen. The will also be a jockey in the seat, so the control column won't be seen. Build another one, not sure on that!! 1 Link to comment Share on other sites More sharing options...
Radleigh Posted January 10, 2016 Share Posted January 10, 2016 Great build Shaun, I really want to do a 32nd scale Harrier Gr.9, I painted them for 3 years up at Cottesmore. 1 Link to comment Share on other sites More sharing options...
xffw45343tg Posted January 10, 2016 Share Posted January 10, 2016 Radleigh, do you have any pics of the rudder pedal area by any chance? At the risk of a slight thread hijack, I'm stuck on a model I'm making here. Link to comment Share on other sites More sharing options...
Kagemusha Posted January 10, 2016 Share Posted January 10, 2016 Very nice work - love the Harrier! 1 Link to comment Share on other sites More sharing options...
Radleigh Posted January 10, 2016 Share Posted January 10, 2016 Radleigh, do you have any pics of the rudder pedal area by any chance? At the risk of a slight thread hijack, I'm stuck on a model I'm making here. I don't sadly, my biggest regret was not taking enough photos I have a few side on shots in the paint booth but that's about it.... Link to comment Share on other sites More sharing options...

Recommended Posts
Create an account or sign in to comment
You need to be a member in order to leave a comment
Create an account
Sign up for a new account in our community. It's easy!
Register a new accountSign in
Already have an account? Sign in here.
Sign In Now