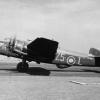
bombernut Posted June 29, 2015 Share Posted June 29, 2015 Evening all, Just finished this lovely kit. And what do you know, it's not a bomber. In fact I do a fair share of things that aren't bombers. Anyway, I didn't do much with this apart from a Quickboost seat. The aircraft was rigged with stretched sprue and the decals come from the Pavla kit, which in all likelihood will now never be built. Hope it looks OK in the less than optimal lighting. Cheers, Matt 34 Link to comment Share on other sites More sharing options...
Mitch K Posted June 29, 2015 Share Posted June 29, 2015 Lovely build of a lovely kit - thanks for sharing. Link to comment Share on other sites More sharing options...
JimHead23 Posted June 29, 2015 Share Posted June 29, 2015 Excellent. Very nice indeed. Link to comment Share on other sites More sharing options...
jrlx Posted June 29, 2015 Share Posted June 29, 2015 Looks really good! I have two of these in my stash (Mk IIs) for building the Swedish skate version and the RAF Green/Brown camouflaged version. Do you have a WIP of this build? I'd be very much interested in knowing your opinion about building this kit, what's good, what problems to expect, etc. Cheers Jaime Link to comment Share on other sites More sharing options...
AdrianMF Posted June 29, 2015 Share Posted June 29, 2015 Nice model! I love the rigging, and I chickened out of doing the aerial on mine. The colour scheme is really nice too. Regards, Adrian Link to comment Share on other sites More sharing options...
stevej60 Posted June 29, 2015 Share Posted June 29, 2015 That really is one beautiful Gladiator,definitely high up on the list of best build,s of this kit I,ve seen! Link to comment Share on other sites More sharing options...
batcode Posted June 29, 2015 Share Posted June 29, 2015 Very nice work, looks great Link to comment Share on other sites More sharing options...
Beard Posted June 29, 2015 Share Posted June 29, 2015 That's really smart. Link to comment Share on other sites More sharing options...
doozer1974 Posted June 29, 2015 Share Posted June 29, 2015 Fantastic work - very impressed with the rigging especially. Link to comment Share on other sites More sharing options...
Stosh65 Posted June 29, 2015 Share Posted June 29, 2015 That's a great job. Like it a lot. Link to comment Share on other sites More sharing options...
Knight_Flyer Posted June 29, 2015 Share Posted June 29, 2015 Looks fantastic with the rigging. Probably the reason I haven't started building any biplanes, not quite confident enough to try something like that. Link to comment Share on other sites More sharing options...
Natter Posted June 29, 2015 Share Posted June 29, 2015 That is really nice. Link to comment Share on other sites More sharing options...
Tentacles Posted June 29, 2015 Share Posted June 29, 2015 Very nice. I might have to buy one of these! Link to comment Share on other sites More sharing options...
JWM Posted June 30, 2015 Share Posted June 30, 2015 Excellent J-W Link to comment Share on other sites More sharing options...
Martian Posted June 30, 2015 Share Posted June 30, 2015 Looks good from here. Martin Link to comment Share on other sites More sharing options...
Marvel Onkey Posted June 30, 2015 Share Posted June 30, 2015 If you don't mind me asking- how do you stretch the sprue to get it so thin and so uniform to use it as rigging? I haven't been brave enough to try stretching sprue yet... Link to comment Share on other sites More sharing options...
CedB Posted June 30, 2015 Share Posted June 30, 2015 I'm with Marvel ^^ - that stretched sprue looks amazing and I've not tried it either. Tips appreciated! Link to comment Share on other sites More sharing options...
WildeSau75 Posted June 30, 2015 Share Posted June 30, 2015 Very nice - that rigging job is top notch. Would love to have it in my collection. Cheers, Michael Link to comment Share on other sites More sharing options...
MikeyJ Posted June 30, 2015 Share Posted June 30, 2015 A great job with the rigging. It looks really good Link to comment Share on other sites More sharing options...
bombernut Posted June 30, 2015 Author Share Posted June 30, 2015 Looks really good! I have two of these in my stash (Mk IIs) for building the Swedish skate version and the RAF Green/Brown camouflaged version. Do you have a WIP of this build? I'd be very much interested in knowing your opinion about building this kit, what's good, what problems to expect, etc. Cheers Jaime Hello Jaime, Sorry, no WIP, but there's not much to worry about with this kit. Location for the cockpit floor is a little vague and I found clamping the fuselage together while the glue was setting sorted that minor difficulty. You also have to make sure the ends of the struts are well sanded to get a snug but not overly snug fit into the wings. I like the idea of the moulded cross brace, but not the idea of cleaning up once installed. I made sure of the fit, then glued the upper wing to the cabane struts and then prepared each interplane strut individually. You can't mix them up. The only other thing I'd have done differently would be to build the engine and cowling assembly completely off the airframe. Mind you, that may prove more problematic when fitting the engine as the fit is tight and I can see the cowling exploding while offering it up to the fuselage. Overall, I found the build quite easy and very enjoyable. It's the first biplane I've completed in about 12 or 13 years. Cheers, Matt If you don't mind me asking- how do you stretch the sprue to get it so thin and so uniform to use it as rigging? I haven't been brave enough to try stretching sprue yet... Hi Marvel and CedB, Can't get my cursor down below this point so my answer lies here. I learnt to stretch sprue many years ago when at school. We had to stretch glass tube to make pipettes and the technique stuck. I take a short length of sprue (10cm is fine) and heat it over a candle - a centimetre or two is enough. Hold it with both hands and turn it over the flame until the sprue sags. Pull it away from the heat and draw your hands apart at a constant rate. If you do it fast and straight after you take it off the heat, you get a nice thin line. Leave it a few seconds and draw slowly to get a thicker line. When you've got a length and thickness you want, hold it in position until it cools. That will help keep it straight Practice! As to rigging, with the Gladiator I drilled right through the lower wing for all but the cross bracing for the cabane struts, where I drilled right through the upper wing. Airfix very thoughtfully have marked the spots. The locations on the upper wing are drilled slightly to give the hole a bit more bight as it were, and then I cut a length by trial and error. It should more or less spring into place, but I drop a little glue into the partially drilled hole, put one end in and then pop the other end into the fully drilled hole. I then glue that by dropping more glue through the hole from the opposite side. When it's all dry you can tighten the line by holding a well heated file handle (I have a favourite little rat tile file I use) just under the line. If it's a bit saggy, the heat re-aligns the molecules in the plastic and they try and resume their original position - hence it tightens up. I then fill the fully drilled hole, re-paint and you can see the result above. Hope that helps, but feel free to ask more questions. Cheers, Matt I'm with Marvel ^^ - that stretched sprue looks amazing and I've not tried it either. Tips appreciated! 2 Link to comment Share on other sites More sharing options...
Marvel Onkey Posted June 30, 2015 Share Posted June 30, 2015 Thanks for that, I think practice is the crucial ingredient, but at least I know the theory now- much appreciated Link to comment Share on other sites More sharing options...
mixup_1 Posted June 30, 2015 Share Posted June 30, 2015 That's some serious rigging!! Well done! This is a little beauty! Well done! Thanks for sharing! Link to comment Share on other sites More sharing options...
CedB Posted June 30, 2015 Share Posted June 30, 2015 Thanks Matt - I'll give it a try Link to comment Share on other sites More sharing options...
jrlx Posted July 1, 2015 Share Posted July 1, 2015 Matt, thanks a lot for sharing your experience with this kit. It will be useful for my future build. Also, thanks for sharing your sprue stretching technique. I've tried to stretch some sprues once, with little success, so I use elastic fishing line for rigging and antenna wires. It's easier to install for those with little sprue stretching abilities like me: just use a drop of CA on one end, stretch and then use another drop of CA on the other end. The problem is, we have to paint the line after, and that can be tricky due to complicated masking. I guess we could paint stretched sprue before installation, which would make things easier. Cheers Jaime 1 Link to comment Share on other sites More sharing options...
Davek72 Posted July 1, 2015 Share Posted July 1, 2015 Matt that's a lovely build and thank you for the tips on stretching spures. Not sure I am up for rigging yet but always good to know new techniques. Dave Link to comment Share on other sites More sharing options...

Recommended Posts
Create an account or sign in to comment
You need to be a member in order to leave a comment
Create an account
Sign up for a new account in our community. It's easy!
Register a new accountSign in
Already have an account? Sign in here.
Sign In Now