vontrips Posted May 13, 2015 Share Posted May 13, 2015 (edited) Oh no...another one of these monsters! I won't do the sprue pics, etc. on this massive kit as I think it's been pretty well covered here recently. Needless to say the box is massive, it has many parts and I shall be foolishly adding many more to it by scratch building parts. I probably won't follow the build order in the manual (though I have been fiddling with the engine parts in section 1 already). The fan caught my attention and I couldn't help but mess with it straight away! The back of the blades just had to be thinned, so I whittled away at it, removed the moulding lines and just like Roy it was the one of the first pieces off the sprue and a blade tip was broken...argh! You will not believe how long this took me! I machined a new retaining bolt for it too, but not happy with it as I've subsequently found out the fan was nutted onto a shaft, so I will remake this part. First part to be re-tweaked, how long will this build take, LOL! I must thank Dominique Beerts, who's amazing build has caught my attention for the last couple of years and inspired me to buy this amazing kit. If you know his WIP you will have seen he replaced many of the engines bolt heads. I've been contemplating this for a while and will do likewise, though I'm milling my hex's rather than using hex bar. Probably a waste of time, as they will be painted the same green as the engine, but it does give me an opportunity to get back into scratch building, which I've not been near for a couple of years. At the moment I'm producing batches of bolt heads in scale metric sizes for the block and ancillaries. These ones are 1.75mm (14mm@1/1) The bar stock is cheapo 4mm ally stuff from B&Q. Previously not very impressed with the stuff for machining larger pieces but cuts nice enough for these littluns Not sure how where I'm going with this kit yet. I do like them in black, but have an idea of Fiat 500 green and cream. I may remove the roof, but if I don't, it will be roof rack and 1950's wooden skis and certainly won't have that ugly '52 boot!!! What I am sure about will be this build will take me ages. I'm a veeeery slow builder and will dive into the kit probably only a couple of hours a week...be warned! Edited May 13, 2015 by vontrips 1 Link to comment Share on other sites More sharing options...
activexp Posted May 14, 2015 Share Posted May 14, 2015 Good heavens! Amazing work and you've hardly started on this monster kit! Link to comment Share on other sites More sharing options...
vontrips Posted May 14, 2015 Author Share Posted May 14, 2015 (edited) Some new goodies arrived this week...feels like Christmas here! Zero paint for the engine block. This is based on the RAL code bandied about on TA websites. I've treated myself to another set of ER16 collets - I love these things! It now means I can hold round pieces in the mill and swap over to the lathe with no fiddling with about with chuck keys etc. They can hold bar down to 0.5mm with no problems. They're not to the standard of a really expensive set, but I've run them up and they're well within the tolerances I'll ever need. Not too shabby for 12 quid including delivery!!! Edited May 14, 2015 by vontrips Link to comment Share on other sites More sharing options...
roymattblack Posted May 14, 2015 Share Posted May 14, 2015 Lovely to see another one of these beasties on the go. Roy. Link to comment Share on other sites More sharing options...
andrewfl290 Posted May 14, 2015 Share Posted May 14, 2015 Oh my word, I generally don't visit this section too often but as I have a soft spot for the Citroen Marque I can't keep away, I certainly feel rather spoilt. Link to comment Share on other sites More sharing options...
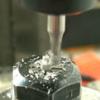
vontrips Posted May 19, 2015 Author Share Posted May 19, 2015 (edited) Not a hugely productive week so far! I'm still messing around turning fittings for this monster. Got the fan nut and spindle sorted: I've made a jig for the front suspension subframe. Not a massive amount of work, but hopefully, will help me glue this piece together without having the skills of an octopus! That's it, I'm afraid! Edited May 24, 2015 by vontrips 2 Link to comment Share on other sites More sharing options...
Codger Posted May 19, 2015 Share Posted May 19, 2015 Don't be afraid - that's high;y professional. WELL DONE. Link to comment Share on other sites More sharing options...
roymattblack Posted May 19, 2015 Share Posted May 19, 2015 A very nifty approach... Far easier than miles of masking tape.... (ahem...) Roy. Link to comment Share on other sites More sharing options...
vontrips Posted May 19, 2015 Author Share Posted May 19, 2015 Cheers guys! Sorry Roy, I asked you if you had made a jig on your thread - not realizing I had missed an entire page of your build! LOL. Link to comment Share on other sites More sharing options...
vontrips Posted May 22, 2015 Author Share Posted May 22, 2015 (edited) Well, the subframe jig worked a treat! The tubes are an interference fit so I could lift the assembly to finish gluing the joints. This kit is remarkably well engineered, even though the jointing methods are unorthodox! I even managed to get the assembly to fit the jig flipped over - a credit to Heller's engineers. I've dressed and filled the joints even though there is a seam on the original. Because of the parts thickness this seam would be about 15mm, so I'm going to attempt to re-scribe them closer to the edges and maybe, add some welds. The manufacturers have gone to a lot of effort to get mould lines in the correct places, which even puts Tamiya to shame. I'm tempted to leave some of the lines as they are so close to the casting lines, namely around the oil filler neck on the rocker cover and on the water pump housing. I was going to replace the strap on the magneto, but then decided to turn up my own out of polyurethane resin. The stuff I use has a 50/50 mix ratio, so I tend to mix small batches in 35mm film canisters. Any unwanted resin gets poured back into one of the canisters to make resin blanks. These blanks turn really nicely and don't wear my tools out. This one had already been used as a mandrel to drill and shape the fan nose. Still to make the retaining strap in thin ally sheet and will be drilling the magneto case for the armature slot screws. That's all today! Edited May 22, 2015 by vontrips Link to comment Share on other sites More sharing options...
Codger Posted May 22, 2015 Share Posted May 22, 2015 Great stuff! Link to comment Share on other sites More sharing options...
roymattblack Posted May 22, 2015 Share Posted May 22, 2015 Keep it going.... Great stuff. The further you get into this kit, the more it seems as if Heller used factory drawings of the parts. Some of the detail is verging on the ridiculous, and the fit of the parts is amazing. I will go as far as to say, BETTER than Tamiya. Roy. Link to comment Share on other sites More sharing options...
vontrips Posted May 23, 2015 Author Share Posted May 23, 2015 (edited) "I do not believe it"...talk about a Victor Meldrew moment! Went to glue the two head halves together and I've only gone and got one side (part 126) upside down!!! I'd made a mental note a while back that the instructions diagram was not good for this part, so referenced two popular builds of this model (Dominique & Roy, LOL!). Guess what, they've both done the same thing (don't tell them!). ;-) I didn't realize until I noticed the thing is a mm or two too wide for the engine block - by which time the glue had fully set up. Another glass of wine and I'll chop the parts and repair...grrr! Edited May 23, 2015 by vontrips Link to comment Share on other sites More sharing options...
vontrips Posted May 23, 2015 Author Share Posted May 23, 2015 (edited) Thankfully, the French Chardonnay was very palatable at least and the chop completed (without a blue word uttered!). Rocker cover to head & head to block fit far improved. I've noted that previous builders were shocked by the bad part profile fit on the head ends. I'm now thinking this is due to the half being fitted upside down! Lines up a treat, even after I hacked the joint apart! Edit: dynamo drilled for screws and connectors Edited May 23, 2015 by vontrips 2 Link to comment Share on other sites More sharing options...
roymattblack Posted May 23, 2015 Share Posted May 23, 2015 My head halves were seriously warped - and had a 'twist' in them to boot... Upside down...? ok - but they wouldn't have fitted straight without a good bit of twisting and clamping in any event. The vast majority of this kit is incredibly well engineered but the warpy plastic looms at times. Mind you, it responds well to hot water and careful bending.Lovely plastic - glues really nicely. WHY aren't there more 1/8 plastic model cars??? Roy. Link to comment Share on other sites More sharing options...
vontrips Posted May 23, 2015 Author Share Posted May 23, 2015 (edited) Yes Roy, I commented to Dom that I've been very lucky with my kit and I don't know why!? I think yours was a recent purchase, so it's unlikely they've changed the plastic formula recently, unless you have an old kit. Looking at your box it's a current production. Have you had to contact Heller at all? I'm happy with the kit, but have the bashed roofliner (which I expected) but my decals for the speedo are way out of register, so need another set. I hear that it's impossible to find an English speaking member of staff on their office number - zut alors! Edited May 23, 2015 by vontrips Link to comment Share on other sites More sharing options...
roymattblack Posted May 23, 2015 Share Posted May 23, 2015 Yes, mine is a 'brand new' one. To be fair, apart from a few warped bits, the quality is excellent. I also had a squashed head lining but it responded well to hot water. My decals were all fine. The plastic is great. It's a shame all kits aren't made of the same stuff. Mind you, I don't understand the vinyl bits logic for anything other than the torsion bars. Luckily - no Heller contact! Roy. 1 Link to comment Share on other sites More sharing options...
DominiqueBeerts Posted June 2, 2015 Share Posted June 2, 2015 did I mount it upside down? I never noticed. But if I did, it doesn't seem to affect the engine's smooth running You're doing nicely on yours. Apparently Roy has the same problems with his parts (in a new kit) than mine (in an old kit). My engine parts were heavily warped and I had to correct quite a lot to get them fit together. But I agree with both of you: they should make more models like these. I had a great time doing it. 1 Link to comment Share on other sites More sharing options...
vontrips Posted June 2, 2015 Author Share Posted June 2, 2015 Dominique, yes I had to put the plastic support pieces to get the sides straight on the block and head parts too! They weren't too bad - maybe a mm, or so. The rocker cover is totally flat though...very strange! They must have inconsistant plastic suppliers? It is a very well thought out kit. Just found out the offset joints on the block ends are correct to the full size engine! Still cracking away making nuts and bolts and fiddling with bits. Will put some pics up soon! Link to comment Share on other sites More sharing options...
Canuck63 Posted June 2, 2015 Share Posted June 2, 2015 Ok,here's another reason to go and purchase a larger trashbin for my WIPs and start my own forum; www.canadianknitter.com! CheersManu 1 Link to comment Share on other sites More sharing options...
vontrips Posted June 2, 2015 Author Share Posted June 2, 2015 LOL...fear not Manu! It's just taken me one whole hour to machine four 1mm bolt heads and I've lost two of them on the floor - grrr! Being alloy, I can't even use a magnet to find them! 1 Link to comment Share on other sites More sharing options...
Canuck63 Posted June 5, 2015 Share Posted June 5, 2015 I feel your pain matey....it's a bummer when you end up dropping a tiny part you've worked on for hours! Can't wait to see more of this WIP...the "Traction" is one of my fave classics!CheersManu Link to comment Share on other sites More sharing options...
vontrips Posted September 23, 2015 Author Share Posted September 23, 2015 (edited) Doh...trying to post pics by phone using photobucket. Not good! Edited September 23, 2015 by vontrips Link to comment Share on other sites More sharing options...
kpnuts Posted September 23, 2015 Share Posted September 23, 2015 Awesome build already will be watching this. Link to comment Share on other sites More sharing options...
vontrips Posted October 20, 2015 Author Share Posted October 20, 2015 (edited) Still battling with technology here! My laptop and camera have died together so fighting my way around my phone! Can't find a way of linking actual images from Photobucket so will have to live with the URL's at the moment. First pic is my attempt at rebuilding the steering rack.Remade the connecting pins in brass. They are turned to retain the end ball shape. There's one on each end! Not easy to machine at 5mm long! Edited October 20, 2015 by vontrips Link to comment Share on other sites More sharing options...

Recommended Posts
Create an account or sign in to comment
You need to be a member in order to leave a comment
Create an account
Sign up for a new account in our community. It's easy!
Register a new accountSign in
Already have an account? Sign in here.
Sign In Now