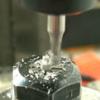
vontrips Posted October 20, 2015 Author Share Posted October 20, 2015 (edited) This is the torsion beam mod. I've ground out the web behind the arm mounts as they were welded onto the beam. A lot of hassle but I like the end result...Still needs a bit of clean-up!I also tweaked the friction damper adjusters - added threaded rod, plus the missing locknut! Edited October 20, 2015 by vontrips 1 Link to comment Share on other sites More sharing options...
vontrips Posted October 20, 2015 Author Share Posted October 20, 2015 I think my Mac bodgery has fixed things (temporarily!) Link to comment Share on other sites More sharing options...
Codger Posted October 20, 2015 Share Posted October 20, 2015 Superb machine work. Seriously consider making this one a cut-away. The finished model, obscuring this kind of talent is criminal. There can be dozens of finished Tractions on a shelf. but this one, cut-away with museum lighting, would be a statement on a level commensurate with your talent. One of one. Your skill is exceptional and should be displayed to reveal that. A body-on model in this case would never be as interesting. I know the level of additional work needed to accomplish this is not for the faint of heart. But obviously well within your envelope. Please consider it. Link to comment Share on other sites More sharing options...
kpnuts Posted October 21, 2015 Share Posted October 21, 2015 Well that is just unfair, how can us mere mortals hope to repeat that, fantastic work. Link to comment Share on other sites More sharing options...
vontrips Posted October 21, 2015 Author Share Posted October 21, 2015 Crikey guys! With your combined talents, I'm embarrassed by such compliments. Blushing like a schoolgirl here! Codger; you've got me seriously thinking about that cutaway idea now, but I'm worried my normally slow build rate will become glacial with such a project! This one I really want to complete, which would be unusual for me these days! Link to comment Share on other sites More sharing options...
Codger Posted October 21, 2015 Share Posted October 21, 2015 Crikey guys! With your combined talents, I'm embarrassed by such compliments. Blushing like a schoolgirl here! Codger; you've got me seriously thinking about that cutaway idea now, but I'm worried my normally slow build rate will become glacial with such a project! This one I really want to complete, which would be unusual for me these days! Then get a second kit and bang out a quick finished one. No machine work. Then go back to this and make it a unique masterpiece. You've got a good start. Since I am involved in a glacial project, I can appreciate that. But the satisfaction level is off the scale. I'm glad my idea has gained 'Traction' with you. Don't let us - and yourself - down. Link to comment Share on other sites More sharing options...
roymattblack Posted October 21, 2015 Share Posted October 21, 2015 Blinkin' amazing! What else is there to say? Any idea on body colour/s yet? Roy. Link to comment Share on other sites More sharing options...
vontrips Posted October 21, 2015 Author Share Posted October 21, 2015 (edited) Roy, not sure about colour yet! To be honest, I may have persuaded my wife it will live on the living room mantlepiece and I think black will be too much for our decor! Prepping the walls at the moment - maybe I should do the whole room black! If I don't go for black it will be an unauthentic (but period-ish) colour. I like tank grey, but it will be too military looking, so may go for a green. Odd, because I generally don't like green cars! I was planning on Fiat 500 Yeye green, but it's getting too commonplace; in London at least! Found this olive green car last week and like the combo with the black fenders; Codger, I like the idea of a second kit, but this was supposed to be a quickie just to get me back into modelling...guess I've got carried away already! Too many projects to do and must get back into my Stutz scratchbuild too. Still sculpting a 1/8th Frank Lockhart (which is not going too well!). Checked out your Roller thread again tonight for some inspiration. I always get as far as the engine completion and my mind just boggles every time...LOL! Edited October 21, 2015 by vontrips 2 Link to comment Share on other sites More sharing options...
vontrips Posted November 6, 2015 Author Share Posted November 6, 2015 (edited) Managed to get an hour at the bench tonight - only to tweak all of one small part! The brake fluid reservoir has been bugging me for a while. I was going to turn a new one, but getting two even diameter steps with square shoulders is always a problem for me. To get things square I normally machine left and right shoulders as two separate operations with left and right-handed tools and hope that the two cuts will meet nicely in the middle of the step...doesn't always work for me! With this in mind, I thought I'd clean up the kit part. To my surprise, it looks OK. The centre step is too small a diameter (to allow for the thick plastic mounting strap). I'll make a thin gauge metal strip to replace the part, so will pack this step out a tad with plastic card. I wasn't happy with the top so machined in the taper and rolled flange. You may notice I'm machining on the right side of the part! I often do this with the lathe running backwards. I like this method as I can see the profile of the cut so much easier than leaning all over the lathe...it's great for doing wheels etc. when using a boring bar. I machined the cap from ally. These pressed steel caps are tricky to get right as they taper, have a lip at the base and a course, tapered thread. There was no way I was going to cut a scale thread that matched, so I just cut some small grooves at regular distances. Unusually for me, I didn't get take any measures as I went, so this is as near a busking as I ever get!!! I'm rather chuffed with it, even though it's taken me forever! Sorry for the quality of the pics. This is as good as I can get from my phone! Edited November 6, 2015 by vontrips 3 Link to comment Share on other sites More sharing options...
vontrips Posted November 19, 2015 Author Share Posted November 19, 2015 (edited) New ball joint pins! Given that the plastic pins for the front suspension seem to snap quite readily, I thought it was essential to strengthen them...what a pain in the ar*e! Plan A; I started trying to turn new copies of the kit parts in brass, but couldn't get near the work piece as I had to use the tailstock & live centre to support the end of the bar. These machining operations are always troublesome as the piece gets so thin and wants to bend away from the cutting tool. Plan B; I ended up cutting the plastic ball piece off the parts and drilling them out to take what ever studding I had available. Not even sure what this stuff is, possibly 12BA? The 2mm alloy tubes act as a shoulder so I can tighten the ball joints against the hub carrier. This may help me during assembly later?! Hopefully, after all this faffing I've solved some of the fragility issues and I can get on quicker with the rest of the build. I think I've also found a workaround for another assembly problem for the lower A arm. My method should allow the builder to build the arm complete before adding it to the cradle. Will post pics if the method works! Edited November 19, 2015 by vontrips 1 Link to comment Share on other sites More sharing options...
kpnuts Posted November 19, 2015 Share Posted November 19, 2015 blimey I know how small those balls are, that is just incredible. 1 Link to comment Share on other sites More sharing options...
vontrips Posted December 24, 2015 Author Share Posted December 24, 2015 (edited) Not much progress but slowly cleaning up parts before paint. Last night I plucked up enough courage to assemble the bodyshell over the chassis. Still have the rear apron and wings to go on and have not attempted squeezing it back off the chassis. All seems OK fit wise so far, but I made a pigs ear with the adhesive. Used cyno which was too thin and it ran everywhere! Close up and dirty shot of the roof to body join. Not happy with the gullwing shape of the join as it wraps under the window, so hacking away at it before primer...no filler so far! Edited December 24, 2015 by vontrips Link to comment Share on other sites More sharing options...
kpnuts Posted December 24, 2015 Share Posted December 24, 2015 Looks good to me. 1 Link to comment Share on other sites More sharing options...
vontrips Posted January 2, 2016 Author Share Posted January 2, 2016 (edited) Spent a few hours over the hols trying to tidy the bodyfit - which in fairness is OK out of the box. Still working away on only one side so far! I love this kit! They have engineered each body componant as a tight fit so you have material to work on for paint thickness allowance...the doors are a tight fit without clean up, yay! Sorting out door fit before primer, as it's too damp to spray here and I hate filler of any sort, so sanding away defects without filling - where I can. All the mouldings are very good, though there are slight wobbles under both door handles on the right-hand side. About to remove these...wish me luck! Oh, and I've chosen a colour at last...1948 Volkswagen Pastel Green. Not authentic at all, but period perfect! Should look sweet with cream wheels and body coloured trims. Edited January 2, 2016 by vontrips 2 Link to comment Share on other sites More sharing options...
vontrips Posted January 2, 2016 Author Share Posted January 2, 2016 (edited) Out of 'me' time for the day! Door swage line sorted and scuttle clean up. The swage line follows across the recess for the bonnet...Heller got it spot on! Blended in the movable air vent to the windscreen aperture too. Edited January 2, 2016 by vontrips Link to comment Share on other sites More sharing options...
kpnuts Posted January 2, 2016 Share Posted January 2, 2016 Looking amazing mate. 1 Link to comment Share on other sites More sharing options...
Pouln Posted January 23, 2016 Share Posted January 23, 2016 Fantastic. I think this one will keep you busy for quite some time. Hope to see an update soon. Link to comment Share on other sites More sharing options...
Sgt.Squarehead Posted January 23, 2016 Share Posted January 23, 2016 Well this is definitely another one to watch. Link to comment Share on other sites More sharing options...
kpnuts Posted May 21, 2017 Share Posted May 21, 2017 Bump Link to comment Share on other sites More sharing options...
HeathrowStu Posted March 19, 2019 Share Posted March 19, 2019 Hi, I'm new to the forum and I'm part way through building this kit. I'm having trouble finding a decent thread that documents progress though. I'm messaging here in the hope that someone might reply. I am loathe to start a new thread on the topic as I'm sure there are plenty of historic ones out there. I can't find them though! any reply welcome and where do you see replies too? Link to comment Share on other sites More sharing options...
larchiefeng Posted March 19, 2019 Share Posted March 19, 2019 Search for the 1/8 Citroen traction avant- build by Roymattblack here on britmodeller. He pretty much wrote the book on building this kit. Actually, as a matter of fact he did do a complete dvd on the build of this kit. I bought one a few years ago just to have, I know that I will never build it but, it’s such an interesting build I just wanted it. I hope that helps. 1 Link to comment Share on other sites More sharing options...
kpnuts Posted March 21, 2019 Share Posted March 21, 2019 (edited) Whole heartedly agree built it 3 times and the first was with the help of Roy's disk he is a master of building cars his disk is invaluable. I must admit to being a bit disappointed as I thought vontrips had restarted his excellent build of this. Edited March 21, 2019 by kpnuts Link to comment Share on other sites More sharing options...
HeathrowStu Posted April 1, 2019 Share Posted April 1, 2019 Many thanks , I have messaged Roy! Is it appropriate to start my own thread for my own build? Link to comment Share on other sites More sharing options...
kpnuts Posted April 1, 2019 Share Posted April 1, 2019 Of course. Link to comment Share on other sites More sharing options...

Recommended Posts
Create an account or sign in to comment
You need to be a member in order to leave a comment
Create an account
Sign up for a new account in our community. It's easy!
Register a new accountSign in
Already have an account? Sign in here.
Sign In Now