72twink Posted August 6, 2014 Share Posted August 6, 2014 No progress reports? Link to comment Share on other sites More sharing options...
havoc Posted August 6, 2014 Author Share Posted August 6, 2014 Hello mate, I've done a little, added brake pipes and HT leads but it's been so hot I have had to stop. Also been doing the house . Other problem is that I am ready to undercoat but the hot weather is making spraying difficult I'm afraid so have had to cease for the time being. Thanks for the nudge,hopefully I will be able to start up again soon and post some more photos as well. Cheers, Clive Link to comment Share on other sites More sharing options...
72twink Posted August 8, 2014 Share Posted August 8, 2014 (edited) Hey Clive, Glad it's just life and summer getting in the way and it's not been banished to it's box Cheers, Tony Edited August 8, 2014 by 72twink Link to comment Share on other sites More sharing options...
havoc Posted August 12, 2014 Author Share Posted August 12, 2014 Lol, no chance of it being hidden away Tony. Can't wait to try again with it. Also my Springer doesn't like the compressor either, so he will be the one banished to his box if he's not careful !! Link to comment Share on other sites More sharing options...
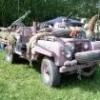
01CC99 Posted August 28, 2014 Share Posted August 28, 2014 Can I add a few extra thoughts on the Ferret - with a few photos. The main conversion feature was to change the two left side storage bins (red circles). Whilst a few early Ferrets did have the angled bins depicted in the kit by far the majority had right angled bins: circled red. The track, both front and rear also needs to be increased. The geometry of the rear sections of the front wings is not quite right, but modifying it is complex and few will notice it in any case. Upper yellow circle is addition of wiring to rear lights. Other yellow circle is scratchbuilt bin on left hand door. This is a Mk1/1 conversion based on a 1/1 scale Ferret I used to own, so slightly altered internal layout. I'll post another couple of images once I have fully mastered Photobucket. Link to comment Share on other sites More sharing options...
01CC99 Posted August 28, 2014 Share Posted August 28, 2014 This shows to alterations to the left hand bins better. Also not the two additional ties down 'U's. 1 Link to comment Share on other sites More sharing options...
01CC99 Posted August 28, 2014 Share Posted August 28, 2014 And here are a couple of interior pics: White circle is the adjusting lever for the commander's seat/ Main camo colours I used were Humbrol 86 and White Ensign blue black. 1 Link to comment Share on other sites More sharing options...
havoc Posted August 31, 2014 Author Share Posted August 31, 2014 Thanks for taking the time to post the photos. Very useful. As I'm not going to go as deep with the detail (first resin kit) I'm going to do this OOB, but thank you for your information. Looking very nice !! Can I ask what colour you used fir the B60 engine please? Cheers, Clive Link to comment Share on other sites More sharing options...
01CC99 Posted September 1, 2014 Share Posted September 1, 2014 Hi Clive Glad to have been able to offer a little help. Regarding the B60 Engine colour: I used Revell Matt 55 (called light green) straight out of the tin. It was close to the colour of my Ferret's engine which I think had been reconditioned and resprayed. I believe the original Rolls Royce colour is a few shades lighter. I am currently doing another Ferret - Aden without mudguards - and I have experimented to get a better original colour, The Revell paint looks like the right tonal mix but needs to be lightened with white, but add too much white and it produces a light blue which needs to have a dash of green added to it. I have seen a number of different shades, so my suggestion is to tone down the Revell colour with a little white and you won't be far wrong. If it starts to looking light blue you've added too much white! Apply the decal and give it a semi-gloss varnish and you should be there. Hope this helps. John Link to comment Share on other sites More sharing options...
havoc Posted September 1, 2014 Author Share Posted September 1, 2014 Many thanks indeed John. I ordered the paint today and will give it a go. I miss the days I used to work on my friends MkIII. Did quite an amount of work on it for him. Engine rebuild, complete brake overhaul including master cylinder, interior refit and electrics. Unfortunately we parted company and he took all the photos. A real shame. One day I will have one for myself. Loved driving the thing. Certainly turned some heads. Cheers again John, Clive Link to comment Share on other sites More sharing options...
havoc Posted September 3, 2014 Author Share Posted September 3, 2014 Engine paint arrived today. Hopefully will be restarting the build next week !! Link to comment Share on other sites More sharing options...
havoc Posted December 14, 2014 Author Share Posted December 14, 2014 Sorry for the lack of work here but I have had a total disaster on my hands with the kit. To be honest I am absolutely fuming !!!! Was at a point where the main undercoat needed to be applied on the major assemblies, but was in between airbrushes. Was waiting on my new Badger, so decided to use the Tamiya fine surface primer in can form. It's totally wrecked the kit. Well I spent a whole day trying to get it off !!! I left the can for two days in the room to left it warm etc and spent 30mins shaky the dam can, the result was runs everywhere. That was from a light dusting coat. I tried it on another old kit as well, same issue. The runs didn't appear straight away, so sprayed a fair amount. If Tamiya was round the corner, I would have quite easily shoved a KFS Ferret straight down someone's throat !!' I was totally gutted. I think I have managed to save her now and should be able to cover bits up. If you are thinking of using this stuff, don't waste your time and money. Tamiya, shame on you !!!! Air brush is now here so will be starting again soon, in the meantime I'm messing about with a flak 43 diorama to cool down !!!!😡😡😡😡😡😡😡 Link to comment Share on other sites More sharing options...
Alpha Delta 210 Posted December 14, 2014 Share Posted December 14, 2014 Sorry to hear of your disaster. It sounds like you've successfully recovered the model, though. I look forward to your next installment. Link to comment Share on other sites More sharing options...
72twink Posted December 14, 2014 Share Posted December 14, 2014 Character forming I think they call it! Good that you got it off sooner rather than later and are using a distraction, things won't look half as bad when you come back to it. I've never had problems with the paint in question so not sure what gets it off, have you tried oven cleaner or brake fluid? Link to comment Share on other sites More sharing options...
havoc Posted December 14, 2014 Author Share Posted December 14, 2014 Yes something like that !! It was still damp so was able to wipe the worst. I'd avoid brake fluid as is either mineral oil or silicon based and would have thought could cause further problems ??? Bunker was going well today until the pipe split !!! Arggggghgghh !!! On way to town now !! Link to comment Share on other sites More sharing options...

Recommended Posts
Create an account or sign in to comment
You need to be a member in order to leave a comment
Create an account
Sign up for a new account in our community. It's easy!
Register a new accountSign in
Already have an account? Sign in here.
Sign In Now