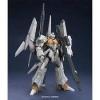
Paul Ayrey Posted June 16, 2013 Share Posted June 16, 2013 (edited) I have had this kit built for sometime now, but I thought I would post a topic to motivate me for when I have my Panther ll complete. The great thing I have found being a Britmodeller member that it is definately a good tool for keeping you working on your projects. I have a few kits built or partially built and are slow to get to being painted. Apart from toddler and baby duties the other distraction is viewing your latest buys as the immediate 'one to do', I have a Tasca Firefly and the Bronco Marder lllD that I am itching to start but really need to finish some of the others first. Here are pictures of the completed build, OOB except for the fruil tracks which have been reecycled from another model long since departed, just cleaned up with oven cleaner. There are two crew figures that I am painting the faces of at the moment for this - two from the Dragon 'Atchung Jabo' set with Hornet heads. Edited June 16, 2013 by Paul Ayrey 3 Link to comment Share on other sites More sharing options...
ta152e Posted June 16, 2013 Share Posted June 16, 2013 Nice Link to comment Share on other sites More sharing options...
AngloSaxon Posted June 16, 2013 Share Posted June 16, 2013 Lovely clean build. What scheme you going to paint? Mike D. Link to comment Share on other sites More sharing options...
Dads203 Posted June 16, 2013 Share Posted June 16, 2013 Another one to look forward too, nice work Paul, fantastic start matey :-) Link to comment Share on other sites More sharing options...
Matt182 Posted June 16, 2013 Share Posted June 16, 2013 Nice work Paul, It will look very good under paint. If I could just point out one thing, the part on the front of the turret roof is upside down (circled below) This is one of my previous builds where I made the same mistake. It's an issue with the instructions on all of Dragon's King Tiger kits. Luckily its an easy fix, just remove the part and fit it the other way up. Just thought you would like to know before you start painting. Cheers Matt Link to comment Share on other sites More sharing options...
Paul Ayrey Posted June 17, 2013 Author Share Posted June 17, 2013 Lovely clean build. What scheme you going to paint? Mike D. Hi Mike, probably this one: Link to comment Share on other sites More sharing options...
Paul Ayrey Posted June 17, 2013 Author Share Posted June 17, 2013 Nice work Paul, It will look very good under paint. If I could just point out one thing, the part on the front of the turret roof is upside down (circled below) This is one of my previous builds where I made the same mistake. It's an issue with the instructions on all of Dragon's King Tiger kits. Luckily its an easy fix, just remove the part and fit it the other way up. Just thought you would like to know before you start painting. Cheers Matt Oh, did not realise that, thanks Matt. Do you mean that the part literally flips over? I have (very quickly) scanned the internet, my photos of the Bovington example, and a few books but annoyingly no good images of this area of the turret! Also have looked at the part and am very worried that it will break if I try to get it up. As I said I think this kit has been built for some time (a year at least) so the glue has really had time to cure! Paul Link to comment Share on other sites More sharing options...
Matt182 Posted June 17, 2013 Share Posted June 17, 2013 Hi Paul, As you said, it just flips over and slots into the recess below. I didn't realise you built this over a year ago, it maybe more hassle than it's worth to try and correct it! Cheers Matt Link to comment Share on other sites More sharing options...
Paul Ayrey Posted June 23, 2013 Author Share Posted June 23, 2013 Now that the wind has abated for all of five minutes, I have managed to get outside to prime the model. Halford's Red Primer was used to prime the entire tank, then once dry the barrel was gently slid out from position and coated in Humbrol Tank Grey aerosol to replicate the factory heat resistant primer used on the real vehicles. A coat of hairspray will ffollow then I will apply the camo via airbrush. 1 Link to comment Share on other sites More sharing options...
Mike Posted June 23, 2013 Share Posted June 23, 2013 It's a smashing kit, that one. I've got one each of the Porsche and Henschel turreted versions, both of which have the moulded in Zimmerit coating. I think they'll probably be the reference KT for a very long time - I just wish they were easier to get hold of for a decent price though Link to comment Share on other sites More sharing options...
Paul Ayrey Posted June 23, 2013 Author Share Posted June 23, 2013 (edited) I know exactly what you mean Mike, kits are getting more expensive seemingly by the week. Dragon at their best do seem to corner the market on most afv lines. Edited June 23, 2013 by Paul Ayrey Link to comment Share on other sites More sharing options...
colin Posted July 13, 2013 Share Posted July 13, 2013 Boystown are doing some good deals on Dragon this weekend, takes the sting out of the cost a bithttp://www.boystownmilitaryminiatures.com/ Link to comment Share on other sites More sharing options...
tommy1drop Posted July 19, 2013 Share Posted July 19, 2013 Nice work Paul, just come across this build..looking good. Tom Link to comment Share on other sites More sharing options...
havoc Posted July 20, 2013 Share Posted July 20, 2013 Really nice, Going to look superb !!! Link to comment Share on other sites More sharing options...
Paul Ayrey Posted July 20, 2013 Author Share Posted July 20, 2013 Nice work Paul, just come across this build..looking good. Tom Really nice, Going to look superb !!! Thanks guys, hope you are going to like it ... Paul Link to comment Share on other sites More sharing options...
Paul Ayrey Posted July 20, 2013 Author Share Posted July 20, 2013 Progress at last .... Managed to get the airbrush out this evening. Have been avoiding it like the plague whilst this heatwave has been in full swing as I did not want to risk the paint drying in mid air. In any event, hairspray was applied over the hull red primer. Then a thinned Tamiya Wooden Deck Tan laid down as shown in the accompanying photo. This colour is a really light tone which is not shown to it's full effect in this image (as was quicky taken in poor light this evening). The reason for this choice is that other colours I have used in the past for German Dark Yellow, really darken up through the weathering. Therefore if I start light, hopefully the end result will be satisfactory. I'll apply another quick pass to cover any primer I missed in the fading light of dusk, then the camo ... 1 Link to comment Share on other sites More sharing options...
Dads203 Posted July 20, 2013 Share Posted July 20, 2013 This is going to be very good........ Regards Dan Link to comment Share on other sites More sharing options...
colin Posted July 20, 2013 Share Posted July 20, 2013 Noticed you armour people tend to stick all the small/detail stuff on and then paint the small detail in place, opposite to what say aircraft people do, missiles/bombs etc come to mind.Any particular reason for this, as I've done mostly aircraft up to now but the dark sides starting to appeal to me especially late war German stuff Link to comment Share on other sites More sharing options...
Paul Ayrey Posted July 21, 2013 Author Share Posted July 21, 2013 This is going to be very good........ Regards Dan Thanks Dan Noticed you armour people tend to stick all the small/detail stuff on and then paint the small detail in place, opposite to what say aircraft people do, missiles/bombs etc come to mind.Any particular reason for this, as I've done mostly aircraft up to now but the dark sides starting to appeal to me especially late war German stuff Hi Colin, Hope this helps, but as witth anything its horses for courses .. Most conventional armour kits are done pretty much with everything in situ, suppose its for ease of handling an painting. For example tools can be painted on the vehicle without being lost and you only have to paint what can be seen. Also has the advantage that everything can be blended with unified weathering. Most of the time wheels and tracks are left off (can;t remember now why this Tiger ll has them on), as I try to weather all of the lower hull. Wheels and tracks may be done in place particularly if the kit is using link and length or individual plastic links. Open top vehicles such as self-propelled guns are more akin to aircraft though, as you tend to paint and detail the interior before the exterior and may break it down into sub-assemblies. Paul Tamiya Deep Green applied .... Link to comment Share on other sites More sharing options...
Paul Ayrey Posted July 21, 2013 Author Share Posted July 21, 2013 Nato Brown completes the tri-tonal camoflauge of this vehicle; Chipping next, as a hairspary layer is present should be a case of a small amount of water and tools to create a (hopefully) subtle chipped effect! 2 Link to comment Share on other sites More sharing options...
LRB1975 Posted July 21, 2013 Share Posted July 21, 2013 Looking good! Link to comment Share on other sites More sharing options...
Paul Ayrey Posted July 25, 2013 Author Share Posted July 25, 2013 Hmmm... ok, somewhat of a head scratching moment I'm afraid. 1. I have not used the hairspray method before. I wanted a quicker chipping application than the tedium of brush work. 2. I also wanted it to be subtle; refer to point 4. 3. It's slow. Probably the same time as if using a blinking small pointy brush. 4. It can be overdone as you really are at the mercy of the water reacting with the paint 5. I don't like the red primer that I used, but it will darken with subsequent washes. Next time I will use a dark base. 6. If you work too long in an area the water reacts and bleeds a little like a wash, therfore contaminating the lighter colours. But, still a good technique and like anything takes a little practice. And I am confident that whilts stark now it will blend and soften in the following stages. So.. I'm gonna risk a photo of the work on the turret so far, and keep in mind that fingers crossed the effect will work out in the end .... Link to comment Share on other sites More sharing options...
Deon Posted July 28, 2013 Share Posted July 28, 2013 Should look great once youve added a filter or two Good Luck Link to comment Share on other sites More sharing options...
robw_uk Posted July 29, 2013 Share Posted July 29, 2013 looking good.. i too used the HS technique for the first time recently and found it is a skill you have to work at... i tended to take too much off (so went from a "slightly battered winter white scheme" to a "early spring, whitewash nearly all gone" one ;-)) Link to comment Share on other sites More sharing options...
Jaykay Posted August 3, 2013 Share Posted August 3, 2013 Hi Paul, it's looking really good. Not sure whether its of any use , but I bunged a coat of Klear (50/50 water) underneath the hairspray (on top of your primer in this case). It seemed (!!!!!) to stop the sludging of the paint a little, and made the chips a bit crisper. Jk Link to comment Share on other sites More sharing options...

Recommended Posts
Create an account or sign in to comment
You need to be a member in order to leave a comment
Create an account
Sign up for a new account in our community. It's easy!
Register a new accountSign in
Already have an account? Sign in here.
Sign In Now