Basosz Posted December 3, 2012 Share Posted December 3, 2012 (edited) So I got a few... I almost finished the SuperCatalina recently and was on a bit of a cleaning spree. Tidied up the complete bench last week and today I gave the spray booth a good boffin'. Then I figured I might as well do some actual modelling and got into the spirit of the KUTA. First I Klear-Equivalent spray painted the SuperCat (last thing that needed to be done apart from good pics and a backstory) and then I just kept on spraying. An FW-190 Tankbuster from the GB a while back needs paint. Was primed but then I lost interest. Oops. So the bottom of the wings and the sides are now under a nice coat of Vallejo RLM 74 (I think, I get easily confused by the numbers... it's a light colour). RLM 75 and 76 will follow after giving it a bit of time to dry out. Then it was time for the iSherman (not an Apple product, for sure they'd sue) also from a GB It had been previously primed Porcupined some wheels Taped up the rest Colour ought to be Sinaï Grey or something similar but I had some Tamiya XF-57 Buff at the ready that I had previously tested on the flash brake which I liked as a desert colour. Not entirely accurate I suppose but I like the looks of it. Also did the turret for some odd reason More porcupine Another favourite activity: painting a million wheels More to follow, comments welcome Edited December 3, 2012 by Basosz Link to comment Share on other sites More sharing options...
Basosz Posted December 3, 2012 Author Share Posted December 3, 2012 I forgot to mention that the 190 is scale 1:32 and the Sherman is 35th. I also have to say that I absolutely adore the Vallejo and Tamiya paints. Used em for the first time in the airbush today. The Tamiya stinks up the place a bit more but my sucking-air-out-unit takes good care of that. Both paints though... WAY better in the airbrush than Revell Aqua. Link to comment Share on other sites More sharing options...
wellzy Posted December 3, 2012 Share Posted December 3, 2012 Looks like your ready to roll good luck mate Les Link to comment Share on other sites More sharing options...
AnonymousDFB1 Posted December 3, 2012 Share Posted December 3, 2012 Looking good, what make is the M-51? Link to comment Share on other sites More sharing options...
Basosz Posted December 3, 2012 Author Share Posted December 3, 2012 It's the Academy one. Fit is pretty good. Now working on making the tracks look dusty and rusty. That vinyl is pretty vile though Link to comment Share on other sites More sharing options...
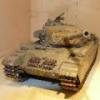
Basosz Posted December 4, 2012 Author Share Posted December 4, 2012 Painted the tracks. That vinyl is really not a good base for painting. Still... this is what I did: - good clean - primer - testors gunmetal black - pretty intense drybrushing with revell 91 (steel) - Vallejo dry pigments applied with some thinned out PVA - sprayed the same thinned out PVA on the pigments to settle them - re-drybrushing the tread on the track. Then I laid the tracks on the Sherman and sprayed some more PVA on the tracks to prevent the whole thing from flaking off. Only one element needs to be re-done cause it flaked off. Pretty good result I'd say Now I need to clean out the airbrush though Link to comment Share on other sites More sharing options...
erikmuntz Posted December 5, 2012 Share Posted December 5, 2012 Looks great! That is the same process I used for my one and only tank model keep it up! Erik Link to comment Share on other sites More sharing options...
AnonymousDFB1 Posted December 5, 2012 Share Posted December 5, 2012 Nice Kit, I have one but missing the hull I was given it like that so if you need spares... I have a friend and a member on here you is currently building one for a magazine, that's all I'm allowed to say... 1 Link to comment Share on other sites More sharing options...
Basosz Posted December 16, 2012 Author Share Posted December 16, 2012 Looks great! That is the same process I used for my one and only tank model keep it up! Erik I got the process from a google result and it looked usable so I stole... borrowed it. Worked out OK in the end but that vinyl really, really is a pig material to paint Nice Kit, I have one but missing the hull I was given it like that so if you need spares... I have a friend and a member on here you is currently building one for a magazine, that's all I'm allowed to say... Missing the hull just sucks Mish cause I agree it's really a nice kit (except for those damned tracks). No need for spares but thanx for the offer I just need to spray some matt varnish on it but apart from that I'm calling it done. I've learned some interesting things about washes and pigments on a matt base which was rather useful (and intended from the beginning) and gave me a result I'm happy with. The tracks are somewhat heavily pigmented while the wheels are just dirty but that's because I figured that crud would gather in the tracks but would do so far less on the wheels. Maybe I'll add just a little powder to the wheels to give them a bit of that dusty texture. I've taken some artistic liberties on the placement of the tools and some colours like the fire extinguishers and the blue jerry-cans but that is to provide some visual interest on a rather bland colour scheme of Tamiya Buff XF57. The blue cans are different from the ones on the side of the tank because they are for storing water for the crew while the black ones are for fuel. At least that's the explanation I'm going with. I'll get some better pics whenever I get some nice light outside. For now this will have to do. Link to comment Share on other sites More sharing options...
Basosz Posted December 16, 2012 Author Share Posted December 16, 2012 Oh and next up is finishing the FW-190 Link to comment Share on other sites More sharing options...
wellzy Posted December 17, 2012 Share Posted December 17, 2012 Nice one it looks good look forward to the FW109 Les Link to comment Share on other sites More sharing options...
Basosz Posted December 17, 2012 Author Share Posted December 17, 2012 (edited) Nice one it looks good look forward to the FW109 Les Thanks I'm well pleased with the Super Sherman. Did new things, learned new things, got a desired result. So progress Only other thing I did to the Sherm was to spray some Testors Matt Varnish over it and now it's done. Proper pics might take a while as the weather forecast is lousy. The 190 as promised is next and I fixed the engine with the cowl to the fuselage. There is a weird difference in some gap on the underside that I have no idea how to fix so I just minimised the difference figuring that it's the underside and no one will notice. Then some masking and then paint on the wings. Believe it or not, this is actually the lightest of the two colours that follow the really light stuff on the fuselage. You can see the tiniest of test patches on the left elevator to show the difference. This paint is now left to cure for a bit and hopefully tomorrow I can do some more Edited December 17, 2012 by Basosz Link to comment Share on other sites More sharing options...
Basosz Posted December 25, 2012 Author Share Posted December 25, 2012 As is almost always the case, life got in the way of "tomorrow" and thus turned out to be a week later. Still... I got some things done yesterday and today and this is how she looks now: I'm quite pleased with the mottling which although not perfect, was a first for me and I'm pretty happy about it. Learned some new things about airbrushing and added some experience. Never a bad thing I suppose. The colour on the spine is supposed to be the same two colours as on the wings but it's a fair bit less noticeable contrast. Still, I know it's there. Tomorrow I'm gonna put some Klear-equivalent on it and then decals. It may not be particularly politically correct but I can't wait to put on the swastika's. Also there is a lot of details to do but tomorrow (well today actually) is f&%$ing christmas so lots of modelling time Link to comment Share on other sites More sharing options...
Basosz Posted December 26, 2012 Author Share Posted December 26, 2012 Sun came out today so I made some pics. Not great ones but it's better than waiting for summer. Also posted some in the gallery Comments welcome! Link to comment Share on other sites More sharing options...
Basosz Posted December 27, 2012 Author Share Posted December 27, 2012 (edited) Got decals on and some legs under the 190 which I'm rather pleased with Home stretch for her as well. I'll have done TWO kits for this KUTA... It's a bloody miracle! *edit cause I forgot to put in the picture * Edited December 27, 2012 by Basosz Link to comment Share on other sites More sharing options...
Graham77 Posted January 4, 2013 Share Posted January 4, 2013 Both looking great. Really like the tank I am in process of painting a what if tank and am having a bit of a nightmare getting a decent finish i may borrow the tracks technique and just have a play with the rest and see what happens. Definitely harder than a car or airliner Well done and thanks for the tips Graham Link to comment Share on other sites More sharing options...
Romeo Alpha Yankee Posted January 5, 2013 Share Posted January 5, 2013 Your Sherman looks great Bas. The 190 is coming a long nicely too Link to comment Share on other sites More sharing options...

Recommended Posts