racedees Posted April 10, 2012 Share Posted April 10, 2012 (edited) Here is my contribution for this GB. It will be an oob build, so no modifications this time. So this will be the box with som content: To start some color on the inside of the fuselage. Pilots office: In the meantime I already closed the fuselage, attached the wings, stabilizers and exhaust, but I noticed that I forgot to make pictures of the progress. Edited May 12, 2012 by racedees Link to comment Share on other sites More sharing options...
racedees Posted April 13, 2012 Author Share Posted April 13, 2012 Like it was yesterday. I also did some filling, placed some little parts and glued the droptanks together. Soon some more. Hopefully some paint on the fuselag. Link to comment Share on other sites More sharing options...
Paul Posted April 14, 2012 Share Posted April 14, 2012 Looking good! It'll be nice to have a Dutch machine in the Hunter lineup Link to comment Share on other sites More sharing options...
canberraman Posted April 18, 2012 Share Posted April 18, 2012 My goodness, you really have worked hard in the last few days! Excellent progress - looking good! Mark Link to comment Share on other sites More sharing options...
racedees Posted April 21, 2012 Author Share Posted April 21, 2012 Can somebody tell me what color the RNLAF used on the under side? Was that: Bare aluminium or Light aircraft grey. According to the instructions it was aluminium, but when I look at pictures it often looks like Light aircraft grey. Link to comment Share on other sites More sharing options...
StephenMG Posted April 21, 2012 Share Posted April 21, 2012 (edited) Can somebody tell me what color the RNLAF used on the under side? Was that: Bare aluminium or Light aircraft grey.According to the instructions it was aluminium, but when I look at pictures it often looks like Light aircraft grey. Aluminium paint (not bare) or High Speed Silver as the RAF later called it, for the RNLAF undersides. Mark Edited April 21, 2012 by StephenMG Link to comment Share on other sites More sharing options...
racedees Posted April 26, 2012 Author Share Posted April 26, 2012 (edited) Continiued the project this evening. First I sprayed the aluminium on various parts.. This aluminium (Alclad II) was to glossy so I changed the color (Tamiya XF16) I forgot to make a picture of the new color.. Then some tape and a layer of Dark sea grey. And after that some dark green. Soon some more.... Edited April 26, 2012 by racedees Link to comment Share on other sites More sharing options...
racedees Posted May 1, 2012 Author Share Posted May 1, 2012 Just a little update: Removed some overspray and sprayed on some Klear. After that I managed to decal te upper and left side. Will I finaly finish a group build in time? Soon more.... Link to comment Share on other sites More sharing options...
racedees Posted May 6, 2012 Author Share Posted May 6, 2012 (edited) Little time to build these days, but I made some progress. All the decals are on and he is standing on it's own wheels now. Left to do are a few decals and sealing of the decals with some Klear. Almost there.... Edited May 6, 2012 by racedees Link to comment Share on other sites More sharing options...
canberraman Posted May 7, 2012 Share Posted May 7, 2012 Daniel That's looking lovely. Not too often we see a Hunter in RNLAF markings, you've done a great job. Mark Link to comment Share on other sites More sharing options...
Graeme H Posted May 7, 2012 Share Posted May 7, 2012 Great job Link to comment Share on other sites More sharing options...
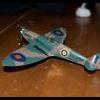
racedees Posted May 12, 2012 Author Share Posted May 12, 2012 Finished this project this morning. Here are the final pictures. Now I can start the F-16 STGB. Link to comment Share on other sites More sharing options...

Recommended Posts