Marcdb71 Posted March 10, 2012 Share Posted March 10, 2012 Decided i want to get this started havn't decided on markings yet,not going to make it easy for myself as i'm going use MDC rivet tool with Squadron walk around for help. Got eagle parts cowl And MDC wheels Going to use Quickboost exhausts MDC instrument decals & HGW seatbelts (never used before dont know what to expect ) Decided 1/32 might be better for my eyes. Link to comment Share on other sites More sharing options...
Mottlemaster Posted March 10, 2012 Share Posted March 10, 2012 Good to see another larger scale build . Nice selection of parts. Alistair Link to comment Share on other sites More sharing options...
jacksdad Posted March 10, 2012 Share Posted March 10, 2012 Welcome Marc. As Alistair says, thats a nice selection of AM stuff. Should be good. Steve Link to comment Share on other sites More sharing options...
tank152 Posted March 10, 2012 Share Posted March 10, 2012 (edited) If your going to rivet it, do your self a favour and treat your self to one of the RB riveting wheels, they're superb. The one you've got will drive you mad, I started to rivet my K4 with the MDC one, talk about awkward. I thought that the MDC resin wheels were great though. Looking forward to watching this one being built up. Edited March 10, 2012 by tank152 Link to comment Share on other sites More sharing options...
Marcdb71 Posted March 10, 2012 Author Share Posted March 10, 2012 Thank you tank152 for the advice sadly i've already started the rivet process (need something to take my mind off stop smoking though ) Link to comment Share on other sites More sharing options...
jacksdad Posted March 10, 2012 Share Posted March 10, 2012 I'll second the RB rivet wheel. I got one for when I do the 1/32 Lancaster but I have already used it on a Tornado. Based on how easy it is to use I think the MDC one would drive me nuts. Steve Link to comment Share on other sites More sharing options...
mick Posted March 10, 2012 Share Posted March 10, 2012 great choice should take all of Six weeks to finish the riveting Link to comment Share on other sites More sharing options...
Marcdb71 Posted March 10, 2012 Author Share Posted March 10, 2012 I was giving myself 4 1 week for each side of fusalage & 2 for the wings!!!!!!!!!!! Link to comment Share on other sites More sharing options...
tank152 Posted March 10, 2012 Share Posted March 10, 2012 One thing in your favour, your rivets will be round as opposed to straight edged. Link to comment Share on other sites More sharing options...
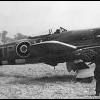
Marcdb71 Posted March 11, 2012 Author Share Posted March 11, 2012 Got started on the rivets finished both sides of fuselage (fingers hurt eyes gone bosseyed ) This is them before This is after Going to start on the cockpit now at least that will be easier no rivets!!!! Link to comment Share on other sites More sharing options...
Arniec Posted March 11, 2012 Share Posted March 11, 2012 Link to comment Share on other sites More sharing options...
jacksdad Posted March 11, 2012 Share Posted March 11, 2012 You have my sympathies. Steve Link to comment Share on other sites More sharing options...
Marcdb71 Posted March 11, 2012 Author Share Posted March 11, 2012 Thank you steve wasn't as bad as i thought just the tail section looks harder to do with all the compound curves around the tail wheel Thought i'd leave the wings till last as they look easier to do Link to comment Share on other sites More sharing options...
erikmuntz Posted March 11, 2012 Share Posted March 11, 2012 Allow be to give you some advice on the HGW belts. They have great potential, and can be made into incredible belts. One thing you MUST not do is stretch the fabric material! When I did this on accident, it tore the fibers and the belt curled up on me. One thing you might consider doing (since this is 1/32 scale) is using tamiya tape and a fine tipped sharpie for the stitching. It might be a little easier as the material is a little difficult to work with. The PE is great, but the material is tricky. Just my two cents. Oh.....and that a lot of rivets! Incredible work so far, incredible work! Erik Link to comment Share on other sites More sharing options...
Marcdb71 Posted March 11, 2012 Author Share Posted March 11, 2012 Allow be to give you some advice on the HGW belts. They have great potential, and can be made into incredible belts. One thing you MUST not do is stretch the fabric material! When I did this on accident, it tore the fibers and the belt curled up on me. One thing you might consider doing (since this is 1/32 scale) is using tamiya tape and a fine tipped sharpie for the stitching. It might be a little easier as the material is a little difficult to work with. The PE is great, but the material is tricky. Just my two cents.Oh.....and that a lot of rivets! Incredible work so far, incredible work! Erik Thanks for the advice going to work on them tonight see how i go,never used them before (knowing my luck rivets not to bad seatbelts could be a nightmare???) Link to comment Share on other sites More sharing options...
tank152 Posted March 11, 2012 Share Posted March 11, 2012 Well i've got to say that I'm impressed that you've got as far as you have done. You've got more staying power than me. I just couldn't get on with that MDC thing. It'll be worth all the pain though when shes all painted up. Link to comment Share on other sites More sharing options...
Marcdb71 Posted March 11, 2012 Author Share Posted March 11, 2012 Thanks didn't think it would end finished them at 2am , I've been spraying cockpit & wheel bay today just to have something easy to do,attempting the seat belts now everything a first accept the spraying boy I know how to give myself a challenge but then i need it after looking at everyone else's builds. Link to comment Share on other sites More sharing options...
mick Posted March 11, 2012 Share Posted March 11, 2012 great job on the riveting Link to comment Share on other sites More sharing options...
tank152 Posted March 11, 2012 Share Posted March 11, 2012 Which plans did you use to get the rivet pattern, did you mark them all out on the plastic before you started? Link to comment Share on other sites More sharing options...
Marcdb71 Posted March 12, 2012 Author Share Posted March 12, 2012 Hi tank I used the walkaround on the a-f as it was the only one that showed rivet detail & yes i drew them out with a pencil one panel at a time then used rivet tool then marked out the next panel so on & so on must of taken about 9 hours to do. Link to comment Share on other sites More sharing options...
Mottlemaster Posted March 12, 2012 Share Posted March 12, 2012 Yoy before and after photos show to great effect the addition of the rivets make . I dont think i had realised before why people botherd but i can see now how the airframe becomes more alive . WELL DONE Link to comment Share on other sites More sharing options...
tank152 Posted March 12, 2012 Share Posted March 12, 2012 Hi tank I used the walkaround on the a-f as it was the only one that showed rivet detail & yes i drew them out with a pencil one panel at a time then used rivet tool then marked out the next panel so on & so on must of taken about 9 hours to do. There'll be no turning back now you've done this, you'll have to rivet every build now. I can't see me not riveting again now that i've done the 109 i'm working on. At least the Eduard ones have got most of the rivets already done for you. Link to comment Share on other sites More sharing options...
Marcdb71 Posted March 12, 2012 Author Share Posted March 12, 2012 Thats what i thought,but i think its definetley worth it in the end i've got a Hasegawa 1/32 g14 & k4 to do and there screaming to be riveted (What have i let myself in for?) Link to comment Share on other sites More sharing options...
jacksdad Posted March 13, 2012 Share Posted March 13, 2012 Just my tuppence worth, but before you go riveting everything in sight have a good look at war time photographs. A lot of the rivets would have been flushed over and really only visible close up. And at 1/48 or even 1/32 would they be seen? Steve Link to comment Share on other sites More sharing options...
tank152 Posted March 13, 2012 Share Posted March 13, 2012 Thats what i thought,but i think its definetley worth it in the end i've got a Hasegawa 1/32 g14 & k4 to do and there screaming to be riveted (What have i let myself in for?) I know exactly what you mean. Just my tuppence worth, but before you go riveting everything in sight have a good look at war time photographs.A lot of the rivets would have been flushed over and really only visible close up. And at 1/48 or even 1/32 would they be seen? Steve I think that you have to keep them quite subtle when you do them, you certainly don't want them to be the first thing you notice when you look at a model. Link to comment Share on other sites More sharing options...

Recommended Posts
Create an account or sign in to comment
You need to be a member in order to leave a comment
Create an account
Sign up for a new account in our community. It's easy!
Register a new accountSign in
Already have an account? Sign in here.
Sign In Now