AnonymousDFB1 Posted January 23, 2012 Share Posted January 23, 2012 Oh interesting Link to comment Share on other sites More sharing options...
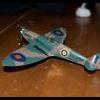
racedees Posted January 24, 2012 Author Share Posted January 24, 2012 (edited) Great idea no one else is doing a restored Modern Warbird this will look cool clean and shiny Where have you been able to source the small RR decals on the side cowling or are you having them made, also don,t forget to change out the props to cuff-less type This is civ.reg: N5427V and has a Cuff-less prop. But the N314BG has a cuffed prop. So you have the choise based on what is in the kit. If I remember correctly there is a Cuffed prop in the kit. (i'm on my work so I can't check it in the box). If that is true I will build the N314BG. I will make my decals myself with the help of printable decal paper (transparent). Edited January 24, 2012 by racedees Link to comment Share on other sites More sharing options...
smuts Posted January 26, 2012 Share Posted January 26, 2012 (edited) Nice to see a clean warbird, what will you do about the kits cockpit floor? as I belive its undersized. Andy Edited January 26, 2012 by smuts Link to comment Share on other sites More sharing options...
Thundergrunt Posted January 26, 2012 Share Posted January 26, 2012 Great Work on your Blue Noser!!!! Link to comment Share on other sites More sharing options...
racedees Posted January 28, 2012 Author Share Posted January 28, 2012 Did some work today. Finshed the seat and the instrument panel. I also modified the floor wich is to small for the fuselage. Will post some pictures tomorow. Link to comment Share on other sites More sharing options...
AnonymousDFB1 Posted January 30, 2012 Share Posted January 30, 2012 Looking forward to seeing the photos Link to comment Share on other sites More sharing options...
racedees Posted January 30, 2012 Author Share Posted January 30, 2012 Forgot to post the pics yesterday But better late than never.... Here they are. The cockpitfloor modifications: The white lines on the sides are the gaps. Some filler to even the difference in hight. Some finished interior parts: more soon Link to comment Share on other sites More sharing options...
AnonymousDFB1 Posted January 30, 2012 Share Posted January 30, 2012 Nice Work Link to comment Share on other sites More sharing options...
wellzy Posted January 30, 2012 Share Posted January 30, 2012 Nice work on the pit Bud wellzy Link to comment Share on other sites More sharing options...
Ian Posted February 3, 2012 Share Posted February 3, 2012 That IP is superb. Straight from the pilots notes ! Ian - Co-host Britmodeller 2011 P-51 Mustang STGB - Link to comment Share on other sites More sharing options...
racedees Posted February 6, 2012 Author Share Posted February 6, 2012 Finaly some progress. I hope I will make it in time.... I'm afraid not. But here are some pictures of an evening of work. Hopefully more soon.... Link to comment Share on other sites More sharing options...
AnonymousDFB1 Posted February 6, 2012 Share Posted February 6, 2012 Looking good Daniel Link to comment Share on other sites More sharing options...
racedees Posted February 29, 2012 Author Share Posted February 29, 2012 Did some work on the past 2 evenings. On the pictures I see that there are some sinkmarks to be solved. Link to comment Share on other sites More sharing options...
wellzy Posted March 1, 2012 Share Posted March 1, 2012 Great job on the pit keep up the good work. wellzy Link to comment Share on other sites More sharing options...

Recommended Posts