petr-pb Posted November 15, 2011 Share Posted November 15, 2011 (edited) Hello, With the new Airfix Zero finally available in our model shops it was impossible to resist, so I immediately bought one. Decided to build it plain OOB, no improvements at all, just for relax in the evenings over cutting mat. Nevertheless, I used the cockpit as testing ground for my first experiments with salt / mascol chipping techniques. And am not sure it went ok. It should be in this camouflage: taken from the Rising Decals sheet: Regards Petr Edited November 17, 2011 by petr-pb Link to comment Share on other sites More sharing options...
Harry Lime Posted November 15, 2011 Share Posted November 15, 2011 I wouldn't be too hard on yourself, the level of detail you've acheived certainly looks very good from here! If this is what you can do with the cockpit parts, I'm looking forward to seeing this one progress. Mark. Link to comment Share on other sites More sharing options...
Tim T Posted November 15, 2011 Share Posted November 15, 2011 Blimey, that is an impressive amount of work in such a small model! Looks good to me. Link to comment Share on other sites More sharing options...
petr-pb Posted November 17, 2011 Author Share Posted November 17, 2011 Oh, thanks, but the level of detail is made by Airfix design guys. The cockpit is much better than in Hasegawa kit. Today´s progress - drybrushing with some light yellowish green mix: Link to comment Share on other sites More sharing options...
Moofles Posted November 17, 2011 Share Posted November 17, 2011 Very impressive. Link to comment Share on other sites More sharing options...
petr-pb Posted November 17, 2011 Author Share Posted November 17, 2011 My last today´s post - decals applied at the dashboard (Cartograph needed extra-strog solution "Hypersol") and some cockpit details picked out in various colours. So, for now, good night Link to comment Share on other sites More sharing options...
Steve N Posted November 18, 2011 Share Posted November 18, 2011 Looking good! That cockpit is far more detailed than the Hasegawa Zeroes, and the instrument panel decal looks really good..more than adequate for 1/72. I'll definitely have to pick one of these up! I wonder if Airfix might consider doing an A6M5 at some point..although come to think of it, they'd need completely new wings, fuselage, and engine cowl. Probably more effort than they'd want to go to for this line. SN Link to comment Share on other sites More sharing options...
petr-pb Posted November 30, 2011 Author Share Posted November 30, 2011 Some progress today, first coats of Tamiya colours, thinned with Tamiya Lacquer thinner with few drops of X-22 Clear varnich. Each layer softly polished with a piece of cotton wool. Link to comment Share on other sites More sharing options...
woody37 Posted November 30, 2011 Share Posted November 30, 2011 Love your painting technique, need to get a few oils and practice Link to comment Share on other sites More sharing options...
Col. Posted November 30, 2011 Share Posted November 30, 2011 Very nice work on the cockpit and an interesting start to the exterior colour. Will be tuned in to see how it turns out . Link to comment Share on other sites More sharing options...
petr-pb Posted December 5, 2011 Author Share Posted December 5, 2011 Thanks a lot :-) Today´s photos - camoulfage is finaly finished, XF49+XF21, lightened a bit with XF55 Deck Tan (especially on fabric covered areas). All tamiya acrylic colours were thinned using Lacquer Thinner which gave the best result, but smelt horribly. Link to comment Share on other sites More sharing options...
petr-pb Posted December 6, 2011 Author Share Posted December 6, 2011 Now, with the Blue-Black cowling and some decals applied, it looks like an aeroplane at last. Link to comment Share on other sites More sharing options...
Harry Lime Posted December 6, 2011 Share Posted December 6, 2011 Now this is looking good! Fantastic paint effect, very subtle and makes it look just right. Mark. Link to comment Share on other sites More sharing options...
petr-pb Posted December 8, 2011 Author Share Posted December 8, 2011 Now this is looking good! Fantastic paint effect, very subtle and makes it look just right.Mark. You are very kind, Mark, thank you. Today, two photos made in the day light. Quite different than previous ones made in artificial light. Camouflage colour "faded" a bit in comparison with the FAOW art work. Link to comment Share on other sites More sharing options...
Col. Posted December 8, 2011 Share Posted December 8, 2011 The quality of your work makes this look as if it is in a larger scale than 72nd Petr and I can't wait to start my kit now having been inspired by you. Well done on such excellent paintwork. Link to comment Share on other sites More sharing options...
petr-pb Posted December 15, 2011 Author Share Posted December 15, 2011 Minor progress, decals are completed, now some experiments with shade of oil colour washes. Darker mix of oils on the undersurfaces now, on the uppersurfaces it should be some less prominent shade. Link to comment Share on other sites More sharing options...
petr-pb Posted December 17, 2011 Author Share Posted December 17, 2011 Oils now finished, matt (or semi-gloss) varnish next time... Link to comment Share on other sites More sharing options...
MakingModelsAgain Posted December 17, 2011 Share Posted December 17, 2011 Looks amazing - just hope I can make mine look this good. One question though, how/with what did you mask the canopy? Not an easy one to do, with all those internal curves on the frames! Link to comment Share on other sites More sharing options...
petr-pb Posted December 18, 2011 Author Share Posted December 18, 2011 You are far too kind, thank you. Canopy masking was quite simple thanks to raised canopy frames, so windows were covered with masking fluid applied carefully with wooden toothpick. Honestly, I wouldn´t mask this canopy with tape just because of those internal curves. Link to comment Share on other sites More sharing options...
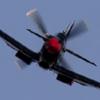
petr-pb Posted December 28, 2011 Author Share Posted December 28, 2011 to all Britmodellers - Happy New Year! And a bit of progress for today. Propeller - Alclad Aluminium on the front side, back side oversprayed with matt black and then carefully sanded off at the tips: Lower surface is semi matt: Upper surface is dead matt and oversprayed with heavily dilluted tamiya XF-55 deck tan to simulate sun bleached effect: Control surfaces on the tail and wing got some dry brush with Naples Yellow oil colour: Link to comment Share on other sites More sharing options...
Harry Lime Posted December 28, 2011 Share Posted December 28, 2011 Outstanding! Your weathering techniques are working really well together to produce a superb looking overall result. Mark. Link to comment Share on other sites More sharing options...
Bennygman Posted December 29, 2011 Share Posted December 29, 2011 Brilliant! There's some fantastic work in this section of the forum at the moment! Steve. Link to comment Share on other sites More sharing options...

Recommended Posts
Create an account or sign in to comment
You need to be a member in order to leave a comment
Create an account
Sign up for a new account in our community. It's easy!
Register a new accountSign in
Already have an account? Sign in here.
Sign In Now