
Search the Community
Showing results for tags 'royal navy'.
-
 Hello Everyone, This one is going to be my main project. I was recently sent this kit by a very good friend of mine, who knew that I wanted to build another one especially after I saw the last James Bond movie, No Time To Die. I have previously built an Airfix 1:350 Type 45 destroyer kit as HMS Daring when the kit was first released and had always meant to build another one to go with my few other Royal Navy warships models (HMS Illustrious, HMS Turbulent, HMS Astute). This build has not been started yet (except for washing and priming the sprues), so I will post some photos of the untouched sprues and then include photos of the various build steps as I go along. I will most likely start the painting and building process tomorrow. All the best, Rick
 -
My first surface ship and first go at an ocean. I'll be doing more, a nice break from a lifetime of aircraft. White Ensign PE set. Inspiration for ocean and technique credit to "Studio Blue Ocean" of Youtube Things I have leaned from this project 1) rigging is hard 2) I still hate photoetch 3) creating the sea was as satisfying as the ship, but I unsealed her, ripped her out and repainted the hull and the entire sea 3 times before I was happy. I know she is supposed to fly a black flag from the rear mast but I forgot. I will get around to it! Shot against white card outside with sun dipping in & out of cloud, the white balance was doing odd things but you get the gist. Thanks for looking!
- 16 replies
-
- 43
-

-

-
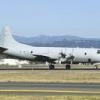
Final completion for 2023, just beat the clock. Kinetic 1/48 Sea Harrier FRS1, 899 NAS Royal Navy 1988. Completed with the addition of a resin Mk10 seat from Pavla, resin wheels from Reskit, exhaust nozzles from Eduard and pitot from Master. Kit decals and SMS lacquer for the Extra Dk Sea Grey. Scratchbuilt FOD covers to finish her off. I took some liberties with the the markings. XZ455 was credited with two Dagger kills in the Falklands, the first by Flt Lt Penfold. It is unlikely that the aircraft would be carrying these markings in 1988 but I wanted them on so they're on. Here's some pics of the finished product. My #7 for the year. Cheers and Happy New Year.
- 37 replies
-
- 114
-
-
-
- sea harrier
- 899 NAS
- (and 1 more)
-
I am a British royal navy enthusiast from China, after seeing the airfix 1 / 72 FG.1 kit and Buccaneer s2c kit, I decided to make a 1 / 72 ark royal IV hangar and lift scene platform, I am ready to use 3d printing technology to complete it, so I need data and image modeling, but I can hardly find the ark royal IV blueprint, and more detailed hangar and elevator photos, I hope someone in the BBS can provide some information, help me complete this project.(My English is not very good, many forgive me)🫡
-
 Hello all, I finished this yesterday after a couple of months working on it: Hasegawa's 1/48 Phantom FG.1. I actually used the 111 Sqn/Black Mike boxing, but wanted an early RN airframe, so managed to get hold of some Hasegawa decals from the 2008 Ark Royal edition. They weren't great, so most of the larger markings have been masked and airbrushed, including me replicating the incorrect letter spacing in the ROYAL NAVY legend from the decals. The roundels are from Aeromaster. I chopped the serial up so I could model 010/XV588, which was not provided. There are a few modifications - Quickboost seats, Aires wheels (painted the wrong colour!), rebuilt fuel vent mast into a 'v' shape, anti-collision light cut out and made from clear UV resin, and braces between the splitter plates and the fuselage sides added from strip styrene. I don't like pylons, and since RN Phantoms often flew at air shows with them removed, decided I could leave them off. Because Hasegawa moulded the recessed detail incorrectly on the underside of the wing leading edge, I also painted this incorrectly. I enjoyed this build, especially the challenge of the multi-piece canopy and filling the shutlines with CA before rescribing them all. This is the tenth Hasegawa 1/48 Phantom I've made, and hopefully the last. I hope a full build article will be published in due course. More photos at https://jonbryon.com/hasegawa-1-48-mcdonnell-douglas-phantom-fg-1-2/ Comments welcome and thanks for looking. Jon
 -
 Hello everyone, Im thinking of building a ship in the “Golden age of Transport” group build. I normally build wingy things but feel like doing a ship for this era. Im looking for answers to which 1:700 kits most likely. Though the old revell 1:426 Arizona may be a possibility as it’s cheap and can be found relatively easily. I want to build either the USS Texas, USS Arizona, or HMS Hood, Iron Duke, or Royal Oak in 1932. So question #1 would be what are the best kits ? Question #2 best paint colors for these ships? I know there is some contention to Arizona’s colors in 1941 but will not be worried about this as this is long after I wish to model. I will build a 2nd Arizona someday in 1941 colors to reflect her last days. Thank you in advance and I will leave a link in case anyone is curious. Dennis
 -
 I've got the chance to pick up this Tamiya kit pretty cheap but want to know how well it builds and if it's worthwhile adding it to my stash? As a much younger model maker I was bought an Airfix 1:24 scale Harrier GR1 kit that was more complex than my skill level at the time and I didn't do the model justice and never completed the kit before losing interest in modelling for 30 odd years. A loft clearout resulted in that half botched kit being dumped. However, since getting back into the hobby, I've always wanted to build a Harrier once again and finish what I started as a kid. Is this a good one to try? TIA all, Morfman
 -
Hello everyone, A few years ago I built HMS Illustrious escorted by HMS Kent; I thought I'd try a 'then and now' and build HMS Ark Royal escorted by HMS Zulu. They'll be in the med shortly before Ark Royal was lost, I think that's plausible as they were both stationed there. I've been gathering bits for the last year or so and am finally ready to start putting them together; Got some bits from Micromaster, which are absolutely beautiful, along with the detail up set from Tetra Model Works for Ark Royal and the WEM set for Zulu along with a quad 2pdr from North Star. Also the Ark Royal boats set from Atlantic models and some replacement 4.7 inch turrets from Shapeways along with a few 3D printed bits and bobs of my own design. When I built HMS Hood I made a spare 4 in gun mount for the X position on Zulu. One thing I'm struggling to find is individual PE ladder rungs in 1/350 - I've seen them before but can't find any at the moment does anyone know where I can source some? Going to be a long build, but hopefully I'll be able to make a start next weekend, probably on Zulu first. Cheers Nick
- 12 replies
-
- 12
-
-
- 1/350
- Royal Navy
- (and 1 more)
-
Hawker Hunter FGA.9/FR.10/GA.11 (A09192) 1:48 Airfix Arising from a post war specification during a period where the prevailing government thought there wouldn’t be another conflict for a decade or more, the Hunter took some time to develop into the aircraft we know and love due to the rapid development of aviation at the time, and a constant search for better performance. Eventually, the Hunter F.1 reached prototype during the scramble for capable jet aircraft at the time of the Korean war. The F.1 morphed into a single F.3 whilst still developing rapidly until the F.4 came along with additional fuel tanks in the wings and a more powerful variant of the Sapphire engine. Development continued apace with the F.5 following on with another variant of the engine, and so it went on into the F.6, some of which were later converted into the new FGA.9 ground attack Hunters for service with the RAF. They were given heavier controls to make them easier to fly near the ground, fuel tanks under the wings, and more powerful engines. The FR.10s were reconnaissance airframes that were again converted from F.6s, adding cameras and the majority of the same upgrades as the FGA.9s apart from the control optimisation because it wasn’t required. The Royal Navy took on a quantity of converted F.4s as Weapons Training GA.11s, but seemingly contrary to their intended use, the guns were removed along with their troughs, however an arrestor hook was added, with forty taken on charge for this role. The Hunter was a much beloved aircraft by ground crew, pilots and airshow visitors, remaining in service as a trainer after it was replaced by the Lightning, Phantom and Harrier, which its adherents would cite as a sign of a great aircraft that took three types to take over its role. Whilst it’s an over-simplified argument, at the time it probably had some legs. Most of the remaining airframes were retired from the training role once the Hawk T.1s came into service, with a few remaining in specialist roles as development aircraft, the two-seat T.8Ms in Royal Navy service being amongst the last to retire. We’re lucky enough to still have a few flying examples in the UK, so we can enjoy the distinctive “blue note” of its engine at airshows. The Kit This is an additive re-tooling of the F.4 kit and arrives in Airfix’s red themed box with five sprues in grey styrene, one in clear, a large decal sheet, instruction booklet in spot colour, with painting and decaling guides at the rear in colour. If you’ve seen or already own the earlier kits you’ll know what to expect in terms of detail, which is good, and extends to all the usual places of interest around the airframe. The three main sprues are unchanged, but two additional small sprues have been added to this boxing with a pair of new exhaust fairings that we’ve seen before, as well as two extra nose cones, exhausts, air-brake, drop-tanks and other sundry parts. Detail is just as good as previous editions, but they look crisp in the darker grey styrene that Airfix are using now. Construction begins with the two-part seat chassis, which has a choice of cushion with moulded-in belts or without for those wanting to provide their own. A headbox top is fitted with yellow and black striped pull-handles, then the cockpit tub is made up from a rear bulkhead plus added cross-member, seat-rail, cockpit tub, control column, diagonal lever, instrument panel with decal and a gunsight. The coaming is moulded into the fuselage, but the beginnings of the nose gear bay is attached to the underside of the cockpit tub beforehand. To prepare the fuselage for closure you need to add a small insert in the rear along with sanding a pit behind it, add a couple of outlets under the wing root, and drill a 1mm hole nearby. The remainder of the nose gear bay is fitted after the cockpit is inserted, consisting of two parts within the ribbed nose. A bulkhead with a representation of the first compressor blade of the engine is fitted after being painted a silvery colour aft of the wing root cut-out, and then it’s a case of making up the two trunking halves that form a Y-shape inside, and direct the air from the wing root intakes to the engine for compressing, mixing with fuel and igniting. The auxiliary outlets and drilling of holes are repeated on the starboard fuselage half, and a pair of cylinders on a rack are attached to the nose gear sidewall after which you can close the fuselage. If you’re going for an in-flight model, there are two small holes on the underside that should be opened for the Airfix stand (sold separately) before you apply the glue. You’re advised to place 20g/1oz of nose weight behind the cockpit before you close the fuselage, so don’t forget, and maybe add a few extra grams for good luck. For decal option C, the gun troughs should be filled and sanded to the shape of the surrounding skin, as the Navy airframes didn’t carry guns. Two choices of exhaust trunking and rear engine face are supplied for the variants, with appropriate rear fuselage insert halves, which is to cater for the differing exhaust and cowling sizes between the marks. The insert is glued in place under the tail, laying the full-span upper wing halves over the depression in the fuselage top, drilling a pair of 1mm holes in the outer panel either side of the dog-tooth panel’s cut-line that’s for earlier marks. The lower wing halves are separate, and you have a choice of holes to drill, depending on what you plan on installing under the wings, adding closed gear bay doors if you are making an in-flight model. Another bay door is fixed over the nose gear bay, and slim splitters are added to the outer section of each intake. For the wheels-down model, the three main bay walls are arranged round the moulded-in detail, and a small vane is inserted into a slot in the upper intake lip. For both options, there are a couple of pre-marked holes to drill out if you are fitting the drop-tanks before you close up the lower wings. The separate rudder can be deflected 20° to port and starboard, while the elevators are each single parts that slot into the tail fin with no options for deflection. You can however deflect the ailerons and drop the flaps by 13° either way and 80° down respectively, and add the triangular insert between them, repeated on each side. Decal option C’s parts are slightly different from the other two options, and those are covered in the steps after options B and C. Providing you’ve not elected to close the gear bays, it’s now time to install the landing gear struts, beginning with the main legs that fit into a recess in the outboard wall of the bay, adding a retraction jack and a prominent rib at the same time in each bay. There is an additional scrap diagram showing where the retraction jack and rib sit within the bay to assist you in getting it right. The lower bay door is captive to the leg, and the two additional doors fit into the bay edge at angles, referring to in the scrap diagram below for alignment and angles, while the inner bay door is slotted into the inner side on two sturdy hinges. The tyres are separate from the hubs and have slight flat-spots moulded in that will automatically fall into the correct location on the ground due to the keyed axle on the leg – a nice way to simplify your task. At the front the yoke is formed from two parts trapping the single-part wheel in place, with bay doors and a retraction jack fitted to the front and rear of the bay, attaching the rear bay door to the leg by two links. While we’re in the vicinity of the nose, the two “Sabrinas” that collect the spent cannon casings to avoid them being ingested by the engines are clipped into position on their two holes for options A & B, one each side behind the gun troughs. Moving further back, the semi-conformal air-brake has its hinge fairing added first, then you can either lay it flat for retracted, or add the jack and deploy it for extra visual interest, having a choice of two – C being the odd one out as you might expect. Option C also gets the arrestor hook behind the air-brake to reflect its RN ownership. There are two types of drop tanks, both made up from two halves plus a separate pylon each, the one with fins being suitable for all decal options, while the others are only for A & B. They fit into the holes you drilled in the lower wing earlier, the finless tanks having an anti-sway brace to keep them stable. One option for completion depicts the aircraft with four tanks , two of each type under the wings, while the other has finned tanks on the inner pylons and three-part rocket pods on the outer, which is correct for option C. The wings are finished off by adding the tip lights, with the port one having the pitot probe inserted between it and the wing, so be sure to fit that first. A blade antenna is fitted behind the cockpit on the spine, and for the first two decal options there are a pair of blisters applied to the upper wings in the dog-tooth section where you drilled the holes earlier. You then have a choice of a single-piece closed canopy, or a two-part open canopy, which slides back as far as the antenna location, and remember – there’s no frame at the rear of the Hunter’s canopy, so don't paint one or the purists will lynch you. Markings There are three decal options on the sheet, one for each of the three variants, with each one allocated a full page in colour to assist you with painting and decaling, while the stencils that are common to A & B variants are dealt with on one page, and C on another, both in black and white and without other markings to reduce distractions. From the box you can build one of the following: Hawker Hunter FGA.9 flown under Tower Bridge by Flight Lieutenant Alan Pollock, No.1 Sqn., RAF West Raynham, Norfolk, England, April 5th 1968 Hawker Hunter FR.10 No.4 Sqn., RAF Gütersloh, West Germany, 1961 Hawker Hunter GA.11 Fleet Requirements and Aircraft Direction Unit, RNAS Yeovilton, Somerset, England, 1976 Decals are by Cartograf, which is a guarantee of good registration, sharpness and colour density, with a thin gloss carrier film cut close to the printed areas. Conclusion A modern Hunter FGA.9, FR.10 or GA.11, that’s just as good as the other two variants we’ve had from Airfix over the last few years, consigning more old Academy kits to the back of the stash or the nearest second-hand kit dealer. Incidentally, there is a special edition with commemorative coin included that should look nice near your model or on the base once it is finished. It’s a free option, but in case you don’t want one, we’ve included links to both it and the kit on its own. Very highly recommended. With Limited Edition Collector’s Coin Just the Kit Review sample courtesy of
-
 Fellow Modellers.. Here's my Revell 1:72 Royal Navy Gannet T5 circa Culdrose 1964... This kit i got from a friend of mine. Some bits on the sprues were missing .I decided to do it 'Wheels Up' as a different pose to my usual wheels down. The kit plastic was a bit soft and not willing to take a decent sand and polish .. it's not to my usual standard but hey .. you can't make a winner every time.. " A man's gotta know his limitations" The Flouro orange was the thing most daunting. I elected to use an old Humbrol Gloss Orange No 209. My Dad used this to paint his fishing floats..it' looks ok i guess.. I did a De Haviland Airfix Vampire in RAF Training colours recently also.. This had rather thin and fragile Orange panel decals.. I brush painted it all.. Anyway mistakes and missing parts besides.. i hope you like it! Here's a pic for comparison with the Aifix Vampire i did previously where the Orange Dayglo is decals.. Regards, Andy
- 13 replies
-
- 29
-
-
- Gannet T5
- Revell 1:72 Gannet
- (and 1 more)
-
 Hello, colleagues! I'd like to present another model from the FROG/NOVO contest - the british naval fighter McDonnell Douglas Phantom FG.1. It is the repack of the old FROG model F262 by Industrial Group "Mir" (Minsk). As usual I built this model in "Out of the box" nomination, so no modifications to the original kit were allowed. The only modification allowed to me by the contest administration was the extension of the nose landing gear. This gives the model more "british" look. The model is of poor quality and was difficult to build. According to the rules of the contest I had to stay within the limits of the kit - rised panel lines, geometry inaccuracies and so on. So, the result is before you. It is the naval fighter XT872 005/R, Naval Air Squadron 892, Royal Navy, HMS Ark Royal, 1973. Thanks for looking!
- 36 replies
-
- 63
-
-
- FROG
- HMS Ark Royal
- (and 1 more)
-
Here is my representation of HMS Courageous, a Churchill Class submarine of the Royal Navy using the recently released Mikro Mir kit of HMS Conqueror in 1/350. Built half OOB as I like the waterline look of my maritime. The only extra work done was adding the side vents and correcting the white draught marks to red, oh and adding an extra set of draught marks to the forward edge of the rudder. Depicting the boat as 'crossing the line' in 1981(ish). Short build log here: Stuart
- 33 replies
-
- 45
-
-
 I seem to recall a few posts quite a while back asking about the difficulties of converting the Hasegawa 1/700 Mikasa to an RN pre dreadnought, and it seemed this project would be too difficult and involve too much work and surgery. I have also seen a post or two where some modellers have built the 1/350 or 1/700 Mikasa kit as an RN ship with varying, sometimes very minor or minimal degrees of modifications. I have the Hasegawa 1/700 Mikasa kit in my hands 'as I speak'! Looking through my reference library (specifically Burt's British Battleships 1889-1904 volume) and several websites,it seems that a Formidable or Duncan Class (and maybe even a Canopus Class?) could be made from the Mikasa with not too much work being involved? Or is this not a great assumption? How much surgery would be involved? Any thoughts guys? Jason
- 13 replies
-
- 1
-
-
- Royal Navy
- pre dreadnought
- (and 1 more)
-
Westland Lynx HMA8/MK.88A/Mk.90B (A10107A) 1:48 Airfix The Lynx began life as a European take on the almost ubiquitous American UH-1, and a replacement for the ageing Westland Wasp, but grew somewhat into a flexible and adaptable aircraft, utilising new technologies and having light weight honey comb structure in its rotor blades, cutting down on the rotating mass, which is a common goal in many spheres of engineering, not just aviation. Soon after its maiden flight it started showing its qualities, and broke the world speed record for a helicopter, hitting just short of the 200mph figure. French collaboration resulted in Aerospatiale gaining a 30% share of the workload, but French Army orders were cancelled even before the first prototype flew, although the UK still bought Gazelles and Pumas as their part of the agreement, and the French Navy were the first to receive theirs. Interestingly, a specially modified ex-demonstrator, G-LYNX set another speed record of 249mph in 1986, which still stands at time of writing. As with most aircraft in service, shortcomings were addressed, and the Naval version with the designation Lynx HMA.X progressed over the years up to HMA.8, with four additional sub-mods coming on-stream over the years, while The Mk.88 was the German specific variant, and the Mk.90 the Danish variant that was upgraded from A through B after improvement to Super Lynx standards. The oddly shaped but incredibly efficient BERP rotor blades, improved GEM engines and gearbox were introduced in the mid-80s, and after the withdrawal of the original Lynxes from service in the late 2010s, the Wildcat replaced it, based on the Super Lynx 300 and bearing a distinct family resemblance to its predecessor, although it is a substantial improvement on the original, with its angular tail boom being the quickest way to tell the difference at a glance. Only 28 were ordered for the Navy, but as they seem to offer much improved availability over its predecessor, that shouldn’t be too much of an issue. The Kit The kit arrives in a sturdy red Airfix box with a digital painting of the British variant on the front. Inside is a single bag containing five sprues of Airfix’s familiar pale grey styrene, with the clear parts bagged separately inside. A large decal sheet, a thick instruction booklet and three folded A3 painting and decaling diagrams finish off the package. The detail is just as good as when first released back in 2012, which doesn’t seem a full decade ago, but maths like that is pretty easy, even for me. Looking across the sprues, you can still see multiple layers of strengthening plates, very fine raised rivets, and recessed panel lines that should please most modellers. The detail extends to the interior, which has lots of really crisp quilted sound insulation provided. This was one of the reinvigorated Airfix’s early ‘special’ kits, and the care that has been lavished upon it shows almost everywhere you look. Construction begins with a choice of three mission profiles, the Counter Piracy and Air Sea Rescue options allowing you to use all three decal options, while the Anti-Surface Warfare option is only suitable for the British Naval decals. There is another choice available, which is the orientation of the passenger seats in the centre of the aft area. There is also the option of a winch that extends through the side door, plus two different seat layouts for the former option, equipment boxes for the British Naval option, and an additional seat in the passenger area for the two overseas decal options. Throughout the instructions you will be shown A, B or C in various combinations, depending on which option that particular step pertains to. Initially that simply relates to the 1mm holes you need to drill in the floor panel, but more on that later. The pilot and co-pilots seats give you another choice of whether you want armoured seats of the anti-surface warfare variant, or the more traditional type for the other two roles. For the standard type, they build up with separate seat cushions, mounting section, and moulded in belts. For the armoured “in-theatre” variety, a tub is built up from two interlocking parts, into which the seat cushions are placed, with the whole assembly fitted to the standard mounting frame. Separate collective and cyclic sticks are provided for the cockpit, and two instrument panels are supplied for the battle-ready decal choice and the other two choices, with different layouts and decals for each option. More decals are provided for the central console and other panels, to correspond with your choice of seats and decals. A C-shaped bulkhead separates the pilots from the rear crew, and the interior walls all get very nicely rendered quilted sound insulation panels. The optional equipment is inserted into the pre-drilled holes under the hoop if appropriate, then a trio of jump seats locate against the rear bulkhead, and the aforementioned passenger seats mount back-to-back in the centre of the rear cab in either orientation, again depending on your choice of decals. The seats have moulded in, but separated tubular legs, which is nice to see, although the seats look a little slab-like and uncomfortable for the passengers. By this stage of the build, and with the addition of the internal roof and side panels, the cockpit and crew area form a self-contained unit, which is then slipped inside the fuselage halves after some holes are drilled and the knee-height windows are installed in the cockpit, and the holes are drilled in the rear of both halves to accommodate the IR turret under the boom, along with another choice of other sensors and antennae. This is an intelligent method of constructing the cockpit, as it requires no alignment of sections inside the fuselage halves – it is simply installed and closed up, with the side-covers glued over the tops of the doors on both sides. The engine cowling is installed next, with a couple of holes drilled in the undulating cowling part before they are joined, allowing a couple of small parts to be inserted in the sides. The simple exhaust pipes make up from two parts each, and are inserted into the outlet panels from outside, deflecting the exhaust around 90o from the direction of flight. This area is then completed by the addition of the forward cowling and other fairings, which has the mounting hole for the main rotor moulded in. At this stage the fuselage has no underside to speak of, and this is supplied as a separate insert, due to the sheer quantity of detail that is moulded into the area, from tiny rivets to appliqué panels, all of which would have been impossible if moulded with the rest of the fuselage. Firstly, the twin winglets are made up from top and bottom half, and are slipped into position at an angle then flattened out before being glued into place, passing through the fuselage under the floor and covered by the fuselage lower surface. The underside part is well supported so should fit well, although as always, some test fitting and fettling of the join would be advisable before committing to glue. The nose is assembled from an optional cut-away top, underside with circular radome bulge, and two side panels to achieve a combination of shape and detail, with the upper nose receiving the electro-optical sensor turret that is made from four parts that if you are sparing with the glue, can be left to rotate in at least one direction, but if you’re a bit crafty, you could attach the turret before enclosing the nose with some scratch-built adaptations, allowing it to rotate in both axes. Another group of sensors is glued to the front of the nose, depending on which version you are making, then the whole nose is joined to the fuselage, secured on a stepped edge that should give some room for fettling to make a better fit. The large sliding doors are next, and depending on your option, you’ll use a different door with the same crystal-clear glazing part, and scrap diagrams show how the doors should look in both open and closed positions. Both doors have a small section of the corner removed to accommodate complete opening without baulking the winglets behind. The tail boom is another well-detailed assembly, so take care when aligning the seams to minimise sanding once cured – it would be a shame to lose all that lovely detail. If you are folding the tail, it has a small bulkhead in the rear, and a couple of small holes are needed if you plan to model your Lynx with the blades folded for storage, leaving the tail to be made later. For the aircraft ready for flight a separate tail with fin moulded-in is used, then the holes are still drilled if folding the blades, and a spine part is inserted into a keyed space, after which it is a straight fit to the stepped edge at the rear of the fuselage. The Naval Lynx has wheels rather than skids, and the main gear is made of a straight strut with moulded-in scissor-links, a separate hub and tyre, and these are trapped in the winglets by adding the tip fairings, positioning the wheels along the line of flight or at 45o to the direction of travel. Now comes the final fit and finish of the sensor suites and all the delicate parts that modellers so often knock off. You will need your wits about you to ensure that it all goes smoothly, and it might be an idea to make some notes on the instructions before you start, in order to reduce the likelihood of getting it wrong. As well as all the blade aerials, antennae and other sensors peculiar to each decal option, there is also the nose wheel, which is built on a shorter strut with twin hubs and tyres, the latter having a slight flat-spot at the bottom. The British option has four anti-submarine torpedoes made up from halves with separate tail fins and individual forward vanes, while the two depth charges have two-part cylindrical bodies, flat nose, tapered fins and a circular fin at the very rear. There are a pair of mounts made up for the torpedoes or depth charges against the fuselage, with another pair sitting outboard of those, meaning the crew have to dismount through the side door over the weapons. That should be fun if it’s wet. If you’re not using the weapons fit, there is the option for a door-mounted machine gun made up from a substantial number of parts, including a big ammo box and feed. It is attached to the side of the fuselage on a flat platform. The optional winch attaches to the other door in the hole you drilled at outset. The main glazing is shown added after all the fiddly bits, which might be unwise, and that has a few additional parts to detail the inside. The cockpit side doors are made entirely from clear styrene, and would benefit from painting inside before installation to prevent the exterior colour showing through the glazing, and to provide a matt interior finish. A small forest of blade antennae is fixed to the nose along with the windscreen wipers, then a representation of the mesh intake covers are added to each side of the forward cowling just aft of the main rotor, which is next on the list of things to build. The essential rotors are added last, and here you have the option to model them deployed for flight, or folded for storage. The main rotor-head is common, as are the blade cuffs, but the blades are assembled differently for each option. The blades are suitably thin, with nice attachment bolt detail, and that unusual looking BERP tip section with the slight downward kink at the very tip. There is no droop moulded into the blades, but the real things don’t droop because of their composite nature unless they’re tied down, so that is correct. A set of blade props are included with locating points on the fuselage for the folded option, which have the blades set at the appropriate angle to the shafts, and a set of diagrams showing how they fit into these yellow painted retainers. The rotor-head is based on a small circular part, and it looks like it’s possible to leave the rotors loose for transport, although a rotor that can actually turn will need a little modification to the kit parts. The tail head and stabilising fin on the tail are separate parts, and to this the composite tail rotor is fixed, which is made from the main part with moulded in blades, and a raised crown that glues into the open front of the hub. The folded tail is built from a pair of halves with a bulkhead at the front, then follows the same process as the deployed blades, including the wire bumper underneath, but fixes to the aircraft folded forward by a straight hinge piece. There is a slight glitch in the instructions mentioning that the fin can be attached to the boom in the flight configuration, but it could still apply if you’ve changed your mind since gluing the folded boom to the fuselage. Markings There are three decal options on the long sheet, and each one has its own instruction A3 sheet, with stencils that are appropriate to the aircraft’s operator on the opposite side of the sheet for simplicity. From the box you can build one of the following: No.815 Naval Air Sqn., HMS Portland, Royal Navy, RNAS Yeovilton, Somerset, England, 2017 Marinefliegergeschwader 3, ‘Graf Zeppelin’, Germany, 2018 Søværnets Helikoptertjeneste (Danish Naval Air Sqn.), 2013 Decals are by Cartograf, which is a guarantee of good registration, sharpness and colour density, with a thin gloss carrier film cut close to the printed areas. It includes a substantial number of instrument panel decals as well as many stencils to give your model that extra bit of detail. Conclusion The Lynx became a capable aircraft as time went by, and served in the British Navy and Army for many years before retiring relatively recently in favour of its offspring, the Wildcat. Lots of detail, a busy decal sheet and multiple operator options still makes for an impressive model. Very highly recommended. Review sample courtesy of
-
 HMS Conn, Senior Officer's ship of the 21st Escort Group, in March/April 1945. Conn is flying a Jolly Roger, signifying the Group's success in sinking three U-Boats in a single cruise in March 1945. Conn is depicted in a modified Admiralty Scheme 'C', white and B55, with Carley Floats painted up in the red and yellow pattern used by some late war RN and RCN units. Conn shows most of the alterations made by the RN to the original US Buckley class Destroyer escort design. These changes included enlarged bilge keels and additional top weight in the form of 120 additional depth charges to help overcome excessive rolling in a seaway, shields to the 3 inch main armament, additional Oerlikons, a Director Tower to the bridge, and a weather shield right forward to protect a 2pdr 'pom pom' bowchaser when carried. A HF/DF aerial sits atop the mast. Other RN additions included extra Carley Floats, a 27 foot whaler carried under Quadrantal davits in the port waist, and a canvas shelter for depth charge crews just behind the after 3 inch bandstand. Snowflake Rockets are carried in the bridge wings, and 2 inch rocket flare rails are attached to 'B' gun shield. Foxer acoustic torpedo decoys sit each side of the after depth charge rails. For those who haven't followed the build, yes, it is an operating model, running two 380 Kv brushless outrunners with separate speed controllers. The basis is a fibreglass hull from Southern Cross Models based here in Australia. The entire superstructure lifts off to access the working bits and fit batteries etc. For a more detailed explanation of why I painted things the way I did and how the build came together please see the work in progress log. Thanks to everyone who followed along and answered questions or offered suggestions along the way and also for the inspiration I received from watching the completion of many other fine RN builds on the board in the last few months. cheers Steve
- 18 replies
-
- 45
-
-
-
- Captains Class
- Royal Navy
- (and 1 more)
-
.thumb.jpeg.76a8f878ab5cae68d5c7d350a6c6fb81.jpeg) Hello fellow britmodellers I’m new to this forum but in scale modeling I am since childhood. Of course, first models were assembled with tons of glue and were painted with brush, as a result layers was so thick that wings ended up being twice its original thickness he-he. After almost 8 years of pause I’ve decided to come back to my hobby and this time even bought an air compressor, although with Chinese airbrush (can’t have it all at once, huh?) and have made some models to practise. Most of them ended up in a trash can but some (two actually) survived and maybe I’ll show you them someday as my first steps after pause. Nevertheless, today I’m going to show you my first ‘professional’ (as I think) build. Eduard F6F-5N profipack in 1/72 scale. Build was OOB, only Eduard F6 stencils decal was bought additionally (to my surprise it wasn’t in the box, well, isn’t this a profipack?). Painted with mr.color and tamiya acrylic paints and with my new H&S ultra airbrush. Eduard’s decals with removable carrier film are thin and looking good after placing them, but stencils that I’ve bought additionally were from older series and film was quite visible on the surface of a model. So after three coats of tamiya gloss varnish there was a lot of polishing work to go. I’ve used 6000 to 8000 polishing clothe and was actually satisfied with the result. Final steps were white filter, panel wash by Humbroll, dust, sand and that was it. Hope you’ll enjoy the result of my work, Alex
Hello fellow britmodellers I’m new to this forum but in scale modeling I am since childhood. Of course, first models were assembled with tons of glue and were painted with brush, as a result layers was so thick that wings ended up being twice its original thickness he-he. After almost 8 years of pause I’ve decided to come back to my hobby and this time even bought an air compressor, although with Chinese airbrush (can’t have it all at once, huh?) and have made some models to practise. Most of them ended up in a trash can but some (two actually) survived and maybe I’ll show you them someday as my first steps after pause. Nevertheless, today I’m going to show you my first ‘professional’ (as I think) build. Eduard F6F-5N profipack in 1/72 scale. Build was OOB, only Eduard F6 stencils decal was bought additionally (to my surprise it wasn’t in the box, well, isn’t this a profipack?). Painted with mr.color and tamiya acrylic paints and with my new H&S ultra airbrush. Eduard’s decals with removable carrier film are thin and looking good after placing them, but stencils that I’ve bought additionally were from older series and film was quite visible on the surface of a model. So after three coats of tamiya gloss varnish there was a lot of polishing work to go. I’ve used 6000 to 8000 polishing clothe and was actually satisfied with the result. Final steps were white filter, panel wash by Humbroll, dust, sand and that was it. Hope you’ll enjoy the result of my work, Alex -
 For some reason I don't quite understand I have been fascinated since my teenager years by helicopter cruisers. As you may recall many navies tried to build thee in the 1960's and 70's, but ultimately this class of ship became relegated to being considered a failed experiment. So, in the back of my mind I have this vague plan that I will try to build a series of these, including for example the Haruna, the Italian Vittorio Veneto, the Jeanne d'Arc. Anyway, this plan started to materialise when I got (for an eBay bargain) a Matchbox kit of the HMS Tiger, represented after its 1968 conversion to "helicopter and command cruiser". I did not really know much about this kit other than it was the only one available in 1/700. Opening the box was a rude shock. You know you are in trouble when the images of the built product in the instructions (which presumably represent the manufacturer's best hopes) look like one of those little plastic ships that we used to get in cereal boxes. The kit is ancient, and it does not lie about its origins (see first photo). This got me scrambling for anything that would help make the model look a bit more like a real ship. Fortunately I found that Atlantic models has created a photoetch set for this kit, which I will be using in this build. Well, one has to start somewhere, and here is step one.
- 53 replies
-
- 12
-
-
 Good evening mates, to be honest, at the moment my Jaguars’ main wheel bays are a little too demanding in terms of …inspiration and I’ve ended up postponing and postponing them. Now there are a few things happening to other members that have let me understand that probably…it’s normal to loose a bit of motivation when a project is taking too long to be brought to an end. Fritag has a perseverance I admire, but we’ve just seen he just went through what first it looked like an experiment (with those PE) and it may turn out as a new job!!! Ex-FAAWAFU was a bit tired with his Sea King and is now going Through Supermarine’ production!!! Perdu is passing with nonchalance from a “Perduxbox” Buccaneer to a “Pernovo” Gannet, Martian’s putting everything else momentarily aside to start a Kamov 28. Forgetting for a moment he did momentarily put his Roc project aside to go on with what seems to have been another project momentarily put aside … the Karel Doorman’s last cruise. This last Thread , whose meaning I understood only on a second time (initially I thought Karel Doorman was a friend of Martian’s!!!) reminded me an old dream I had for a long time , but I never started for lack of …existing models in the right scale (for me 1/48). Back in 2011, on one of my many journeys to the UK, I had bought Aircraft magazine’s April issue, to have something to read in the night. ] In it there was a beautiful article about Ark Royal’s last cruise.I literally felt in love with the opening page picture ( here below ) and I started dreaming of a diorama depicting a Gannet, a Phantom and a Buccaner parked on the flight deck. All those coloured tails were wonderful and a Wessex as that depicted in the article’s third page would have been a nice addiction. At that time, I discussed the idea with my friends modellers and I must say the picture was a real success. But then, the idea only remained an idea for all these years. The “Royal Navy… air” I’ve been breathing since I joined BM and in particular Martian’s friend Karel’s thread brought the old dream back to my mind. The only thing I’d liketo avoid, is to bring the Jaguars to an end first and start working to the Ark project every now and then. About it I have a question for the well informed,: did these helicopters belong to a Squadron ? The aircraft on board the Ark during her last cruise I found what follows: 1. NAS 809 on Buccaneers. 2. NAS 892 on Phantoms. 3. NAS 849 on Fairey Gannets EAW3. 4. ??? on Westland Wessex. 5. NAS 824 on Westland Sea kings. 1. I had been waiting for years for a Decent Gannet AEW 3 in 1/48th , but finally went for the Sword model in 1/72nd, as I saw it and couldn’t resist! That was my first model in 1/72nd after more than 20 years!!! The model looks great and I thought to depict it while landing… …so I purchased the Eduard PE flaps ( I love that system and some times I’ll scratch build it for my Wyvern, which I…left momentarily aside a few years ago!!!). Of course, the fact this set is dedicated to the Revell EAW1 kit wouldn’t have been a problem…untill I heard on this version the wing was shorter!!! My wife, whom I call “Treasure” is always disappointed as she says I don’t listen to her and she’s got to tell me twhat I’ve got to do at least twice! Eduard Staff may have been listening , and that’s probably why I had a doupble copy of theinstruction sheet!!! Anyway this isn’t going to be important, as I’m not going to use most of the set!!! I also purchased the ALLEY CAT decaal sheet dedicated to thie version of the Gannet, as I heard the orignal stencils are so thin, the ay just …get lost in the decalling process. 2. The news that Airfix British Phantom’s will be released in the next few months, together with the high quality standard this glorious Manufacturer has reached in their last products, did the rest! I’ve got it on order. I also ordered Xtradecal dedicated sheet 72268, to have more choice. The Phantom doesn’t say much in the parking configuration, much better to show it ready to launch, maybe with the deck’s heat deflectors open. 3. Perdu’s Matchbox Buccaneer’s thread gave me strength and I bought aRevell reboxing of the thing. If I follow Perdu’s instruction , I can do it!!! https://www.youtube.com/watch?v=fNIrEYimmXs …sorry, but I couldn’t find the english version!!!! The only problem seems to be the decal sheet: I’ve got the Airfix sheet for 1/48th kit, but 4. Italery Wessex will be chosen to represent the SAR aircraft. About it I have a question for the well informed,: did these helicopters belong to a Squadron ? I can’t identify the crest on the top starboard (…correct…???) side, behind the cockpit. 5. Hannants seems to have only the Airfix kit on stock, which should be a new tooling. Any ideas if there’s some PE or decal suggested for the version belonging to NAS 824 on board Ark Royal in her last cruise? On second thoughts, I’m getting interested in depicting the Ark herself. The model which seems to be the closest one to this configuration of the famous ship seems to be Fujimi 1/700th scale kit. The main question mark for a project like this is: how to develop it? I mean, the first idea started from was a diorama with a Gannet, a Phantom and a Bucc as shown in the picture. This could do, with all aircraft in parking configuration with wings folded. On the other hand, these aircraft could be depicted in a quite effective “ready to take off” pose . • The Buccaneer is quite singular in both cases, ( wings and airbrake folded or nose up , ready for launch).Even showing it on the lift notfully up wouldn’t be bad!!! • The Phantom’s best configuration is with th nose gear extended , ready for launch. • The Gannet is quite singular with folded wings , hook down, open canopy and ladder out, but it’s not bad even with those curious flaps extended. Even a pre-flight configuration could be interesting , with a couple of crews and what seems to be a starter, as seen for Buccaneers too. At the moment I’ve already started cutting the Gannet’s flaps, just to discover the Eduard PEset is wrong for this model. I could still use the folding mechanism struts( if this is the right name for them!!!) and modify the flaps cut off the wings. • The Wessex could be depicted parked with folded rotor or even i 1/144 scale in the background of a Buccaneer or the Phantom ready for launch, as shown in one of the article’s pictures. • The Sea king is the less colorful of the party and is still a question mark. Suggestions are welcomed. I could : 1. build a big base depicting the flight deck for the three aircraft as in the article’s picture; 2. Build a separate base for each model; 3. Build a big base with some sort of …”islands “for each model, something like my F-15, as in the picture below.I like this idea, but room might be a problem. That’s all for now… enough written modelling , for this weekend!!! Hope I’ll soon share some real modelling. In the meantime, any answers to my questions or suggestions are welcomed. Thanks for your patience!!! Ciao Massimo
- 1,437 replies
-
- 23
-
-
- Royal Navy
- buccaneer
- (and 1 more)
-
No luck with any of my references or internet search in trying to find out the actual size (height) of the ROYAL NAVY titles, code number and serial number on the Lynx HAS2/3. Can anyone provide these dimensions please? Looking for the white markings on MSG finish (1990s on) and the black markings on the DSG finish in the 1983/4 timescale. Thanks Peter
-
Finally got my hands on a 1/350 HMS Brave which I've been wanting since I got back in to modelling. This project is another of personal significance as my Dad was posted to Brave when I was born and I was the first person christened on the ship. Life at the minute means this one is probably going to sit on the shelf for a little while longer, but I'm so excited to have my return to modelling lined up after a bit of a hiatus starting a business.
- 6 replies
-
- 13
-
-
- royal navy
- atlantic models
- (and 1 more)
-
G'day all. It's been a while since a completion. It just so happens I reduced the stash by one this afternoon. This is the lovely 1/72 Airfix S2C Buccaneer. It's a great kit to build with only two real gripes. I found that the inserts for the exhausts at the rear fuselage required some material removal as did a small amount at the nose to fuselage join. Other than that she's in the display cabinet safely. Kit decals used as XV336 while with 800 NAS on HMS Eagle in June 1971. I opted for the folded wings and deployed airbrake not so much as a space saver, but because I think its an airframe that doesn't look too bad like this. Keen to hear you thoughts. Cheers, Mick
- 20 replies
-
- 60
-
-
Can anyone help with the minefield that is Royal Navy colours in 1944-45 please? My father served on board the Captain Class Frigate HMS Inman in the North Atlantic and I'd love to take a break away from aircraft and make models of his ships. Now Inman was an Evarts class versions so I've found that I'll need a USS Evarts from Ironshipwrights.com with various resin mods and etch etc. I then need to work out what colour scheme and camouflage they wore and this is where it gets tricky. I could model them straight from delivery wearing their shiny US colours but I'd ideally prefer a war weary, just completed 6 weeks at sea version from late '44. There are very few images of Inman available and some people online have said that it was an overall grey, however on the photos available you can just about make out a line / hump of colour that matches where Sovereign Hobbies publication of C.B. 3098 THE CAMOUFLAGE OF SHIPS AT SEA 1943 shows for a Captain Class (Plate 20). These photos were probably so edited / filtered during the war that it's so difficult to actually work out what they were. So I'm lost and need help – Am I looking at overall grey (507C) or White with the simplified Western Approaches pattern in B55 or is it just a poorly overpainted combination of the two carried out hurriedly in dock? The pendant number also looks very dark as I thought they were meant to not be too much of a contrast? These are the two pictures readily available - Thanks for any help you can give. Bob.
-
The Build log is here https://www.britmodeller.com/forums/index.php?/topic/235070426-1350-hms-kent-county-class-cruiser-1941/ Thanks are due to Richard Dennis @dickrd and Jamie Duff @Jamie @ Sovereign Hobbies for their considerable input into the Colour scheme, which differs substantially from previous interpretations. I've made extensive use of 3 D printed items from https://micromaster.co.nz/ which IMHO have set new standards in small scale detailed realism HMS Berwick, a sister vessel to HMS Kent along soon Thanks for looking Rob
- 33 replies
-
- 71
-
-
-
- Trumpeter
- Micromaster
- (and 1 more)
-
This is the old Revell kit build from the box, just with the addition of spares folder decals as I bough her second hand. A simple kit with minimal interior detail, but I did like the surface detail and it looks quite nice built up. I went hard with the weathering as these aircraft tended to get pretty filthy. Not a modern "uberkit" but still a nice build.
- 8 replies
-
- 27
-
-
-
- Royal Navy
- Martlet
- (and 1 more)
-
Micro-Mir's 1/350 K class submarine (early), built as the unfortunate K4. The K class are often cited as technological horror stories, but the Royal Navy did eventually solve the many issues with this incredibly ambitious concept, if you count 'not suddenly sinking' as successful resolution. But it was a time when anything seemed possible and it was thought that a high speed "submarine cruiser" could make everything else obsolete. Turns out this theory was correct, but it required the power of the atom. Doctrine was the real problem - the idea was the Ks would essentially be destroyers that could submerge to lie in ambush, but were expected to fight just as much on the surface, thus the guns and deck torpedo tubes. The result was a vessel that "had the speed of a destroyer, the turning circle of a battlecruiser and the bridge of a picket-boat", and led to several tragic collisions that cost many lives. Micro Mir's K Class kit is available for rebuilt 'swan bow' boats or this version, as built. Its a nice kit with good fit but suffers from a lack of sources. The Maritime Museum plans are available online, but they don't show good external side views and depict the K's as built - modifications immediately started! There are few good photos available, by far the best being the famous photo of K4 beached showing the starboard side: The kit has the port side exactly the same, which isn't possible as the hull beam torpedo tunes are staggered. I fixed the tubes and repositioned the ballast tank openings to match other photos. The kit comes with photo-etch but its designed for a K after rebuilds that moved the 4" guns onto the superstructure deck. As built the Ks didn't have a hand rail or ladders, instead there were hand and foot holds which I drilled out. So all I ended up using was the propellers which look very nice. I also: Added flood and drain holes as required Added railings made from brass rod and EZ Line Scribed various deck details Filed out the funnels Cut out and faced the funnel wells Built the main deck hatch on the starboard side of the superstructure Added life rings per photos from rolled up brass rod. The kit's main sprue comes with guns, propeller shafts and masts, and then there is an extra sprue with the guns, propeller shafts and masts again, but better cast. All the guns are identical, so I improved two of the 4" with some small details and rebuilt the other as the superstructure's 3". The masts and shafts are nicely done but I replaced them with brass rod, using Albion alloys 0.4/0.6/0.8/1mm tube for the masts. Until rigged and painted they worked, retracting into 1mm tubes set into the hull. I painted them duraluminum to look like greased metal, but they may have been simply grey. The spread aerial was worn by on fitting out trials, I can't tell from photos if it was used in service but I thought it would be good practice. The triangle is nickel silver wire and the aerial itself 0.08 fishing line. The kit provides the bridge windows as decals, but I drilled out the round ones and built the square ones out of photoetch ladder with Krystal Klear glazing. The bridge has an interior with pelorus and hatches, but its invisible. Oddly the decal sheet has nothing that fits the name plate on the kit stand, so I used 1/72 8" RAF letters which fit nicely. Paints are Humbrol satin 123, 164 and 165 with each used to weather the others. I ignored the kit paint scheme and followed photos - K's had black decks. Flory was used for washes on the details. Note the kit depicts the submarine in an unlikely configuration - funnels up but the boiler air intake doors (between the funnels) closed. So she can't be under way. I chose to build K4 not for the famous photo, but because she lies with K17 and her entire crew just over the horizon from my house. Brave men.


.thumb.jpg.b4a5069fd2c2dd5708ce1694345c5b11.jpg)

