Search the Community
Showing results for tags 'marines'.
-
US Aviation 1980-90 Acrylic Paint Set (3028) ICM via H G Hannants Ltd ICM have recently released their own brand of acrylic paints on the market, and are creating some kit specific sets to go with their major releases, of which this is one. The set arrives in a cardboard box with six screw-capped bottles inside, each containing 12ml of paint. The bottles are clear Polypropylene, and are capped with cylindrical tops with knurled sides, and a one-time security seal that you break on first opening. A label on the side gives you basic information about the colour and code, a little information regarding application in English and Ukrainian and a bar-code. This set provides the major colours to assist you in painting your 1980-1990 era OV-10A/D Bronco in temperate or desert schemes from ICM themselves, or indeed almost anything in US Air Force or Marines service (within reason) during that period, and you will find the following colours in the box: 1055 Deck Tan 1056 Light Earth 1039 Rubber Black 1072 US Dark Green 1032 Blue Grey 1011 Clear Red The paint is thick in the bottle, with plenty of headroom between the surface of the paint and the lip of the neck. I dropped a glass stirring ball into each bottle, and they took a few seconds to disappear beneath the surface, indicating their viscosity. On the rear of the pack is an example of the usage of these colours using the kit mentioned above, and depicts a pair of Broncos in those very schemes. During testing, I used Ultimate Acrylic Thinners to dilute the paint to spray through my Gunze PS770 airbrush, which has a 0.18 needle chucked in. The paint dilutes well once it has been mixed thoroughly, and sprays well through my airbrush, which has a smaller than usual needle that is a good test of the finesse of the pigment grind of any brand, some of which don’t spray very well though anything less than a 0.3mm needle. There were no problems with blockages at all, and the coverage was excellent after my usual ad hoc dilution method, which was probably nowhere near the 40-60% thinners or water that’s suggested on the pack. Apart from the varnish, the other paints all dry to a matt finish. In past tests, the Satin Varnish worked very well diluted with water, sprayed over the spoons that were also partially taped up to perform two functions at once. The satin patina that resulted is exactly what was expected, and the tape lifted no paint at all, despite my best efforts to do so. Bear in mind that the spoons were prepped by a buff with a very fine sanding sponge to give them the best chance of adhesion. Using a brush, the colours cover well two coats with minimal brush marks visible. Conclusion The paints were excellent through the airbrush with nothing in the way of drama during the testing process, including the Oily Steel and Satin Varnish. The colours also brushed out very well with the flat brushes I used, as did the varnish. There is a little less paint in the bottles than some brands, but a shade more than others, so it’s about average. That is more than offset by the very reasonable price they’re asking for the set, even at RRP. Highly recommended. Available in the UK from importers H G Hannants Ltd. Review sample courtesy of
-
OV-10A Bronco US Marines (48305) 1:48 ICM via H G Hannants Ltd The Bronco was conceived as a light attack, long loiter aircraft of modest size, enabling it to operate from roads close to the combat zone. As so often seems the case, the final design turned out to be much larger and heavier due to the requirements of the avionics and ejection seats, thus limiting its use to conventional airfields. The twin boom aircraft first flew in 1965 and was destined to serve with the US Navy, Air Force and Marines as a replacement for the Cessna O-1 Bird Dog & O-2 Skymaster. The Marines were the first to take the OV-10 into service as a forward air controller platform operating both night and day missions. Whilst the Bronco is best known for its operations in Vietnam, it also served in later conflicts as late as the Gulf War before being retired from US service in 1995. The USAF received Broncos in 1968 and deployed the aircraft in the Forward Air Control (FAC) role, using smoke laying methods initially, and later using laser targeting designators. Eventually it carried its own ground attack armament including rockets, machine guns and bombs that gave it the capability of Light Attack Aircraft, and made it a daunting prospect for the enemy to see overhead. The US Navy used it in this capacity in Vietnam, although attrition was quite severe, and later in its service several airframes were used as testbeds for special operations, eventually being transferred to the Marines. Seven export contracts were signed with other foreign operators including Germany, Columbia and Indonesia, the very last of which will be leaving service in the near future after long service. The Kit A reboxing of a new tooling from ICM with new decals and some other minor differences, which arrives in one of their standard top opening boxes with the captive inner lid, and has eleven sprues in grey styrene, one in clear, two sheets of decals and a glossy instruction booklet with spot colour inside and glossy colour profiles on the back pages. Unpacking the sprues reveals the detail is excellent, and the booms have raised as well as engraved rivets on their surface, which is just as it should be if you check out any walk arounds that get close enough to the aircraft to see them. The clear parts have been engineered so that they fit together as individual facets, and are crystal clear, allowing the modeller to see their hard work in the cockpit, providing they don’t put any gluey fingerprints on the glazing during the build. Overall, it looks like it will build into an excellent replica of the aircraft. Construction begins predictably with the cockpit, starting with the crew seats, of which there are two. The base of the seats are made from the curved lower and cushion, while the backs are formed from a shell with two cushions, one for the pilot’s back, the other for the headbox. The two elements are brought together and a small part is added to the headbox, then different rear detail and a launch rail are added to the rear of them both. There are colour call-outs as we go along, and two warning decals are supplied for the seats, although these are shown applied to the cushions, which seems odd, but having checked some references, that’s where they go. Every day’s a school day! The rear seat is glued to the cockpit floor which has a bulkhead and a shelf moulded into the rear, then side consoles are fixed onto the floor around the seat with control column on a lateral support, and a throttle quadrant that sits on top of a raised portion of the port console. A divider between the two seats is prepared with rudder pedals and other details, then has a choice of either of two instrument panels added atop the flat section, based on your decal choice. These are well detailed and have dial decals for each option. The divider is glued in place, then the front cockpit is made up starting with the seat again, but with a different set of launch rail parts with “antennae” to the side of the headbox. He too gets a control column and floor-mounted rudder pedals, after which the seat is bracketed by side consoles that have detailed tops, but no decals which is a shame. A bulkhead for within the footwell of the front cockpit is created from several parts, and fixed in place with the details facing forward, forming the rear bulkhead of the nose gear bay. The pilot gets a well-appointed instrument panel with coaming and decal, plus a number of small parts sitting on top of the coaming. This is glued in, and more details are added to the rear shelf in the shape of equipment boxes that probably have festive twinkling lights on the real thing. The cockpit is put to the side briefly while the crew nacelle is prepared with interior sidewall details, plus an internal frame that runs up the side of the canopy. You are advised to align this with the canopy sides, which have a shallow groove running top to bottom, so it would be an idea to glue the parts, then tape the canopy sides in place and align the frame with the groove, taping it in place until the glue sets. With the sides complete and painted internally, the cockpit can be secured inside and locked in place by bringing the two halves together. Providing you have painted the front of the crew nacelle, the nose gear bay is already complete and just needs the main strut, a diagonal support that goes far back under the canopy, and a pair of bay doors. The underside of the cockpit floor is then covered over by a well-detailed underside panel that has recesses ready for the stubby weapons pylons, and has a small central strake added toward the rear. Here it will be key to align the nacelle skins before the glue sets to avoid having to make good later and risk losing any of that lovely detail. The weapons “wings” need four holes drilling in their underside if you are going to hang weapons from them, then they are closed around a small rectangular insert that the barrels later plug into, the wingtips are added, and each one has an insert applied to the leading edge that makes up the rest of the fairings for the weapons. These are glued into their recesses on the underside, and are fitted with shackles on the twin pylons on their undersides if you plan on using weapons. Another small nose gear door fits to the diagonal leg, and the four-part nose wheel with separate hub parts is first trapped between the yoke, which is then glued to the bottom of the nose strut along with the other half of the oleo scissor-link. I suspect this could be a weak point of the nose gear, so ensure you leave this to set up for a good while before attempting to put weight on it. The addition of the optional four gun barrels to the winglets and a couple of sensors completes the crew nacelle for now. The upper wing of the Bronco is a single full-width part that also has a section of the fuselage upper and the twin boom tops moulded-in, while the underside is in four sections. Before the two surfaces are joined, two spar sections are attached to the upper wing straddling the future location of the engine nacelles, and if you plan on adding wing pylons, there are a few holes to be drilled in the outer lower panel of the wings. All the flying surfaces are separate and the twin flap sections per side are made of three parts laminated together, while the ailerons are a single part each to which are added balances and trim actuators. When completed, the six flying surface sections are fitted to the cut-outs at the rear of the wing unit along with a pair of actuators for the ailerons, a pair of exhaust deflectors on top of the engine nacelles, and a large sensor blister at the centre-rear. The wing assembly is then mated to the crew gondola, and the canopy is begun. The blown windscreen that offers the pilot a good field of view has a sight fitted to the top centre before it is glued to the front of the cockpit, then has the clear canopy roof put in place, bridging the gap between the windscreen and cockpit rear. The two canopy sides are next, and these parts are each single pieces, which doesn’t give the modeller the opportunity to prop the front two sections in the open position without taking their life in their hands and cutting the parts with a razor saw or fine scriber and a lot of trepidation. No doubt an aftermarket company will step-in here. Building of the two nacelles begins with the gear bays, which starts with the making of the gear legs that have two main parts and a Y-shaped insert that traps the lower section in place but leaves it movable. Two more parts make up the suspension strut, which are also trapped in place by a V-shaped insert, and then glue is applied to the previously mobile joint, setting the correct angle for the leg permanently. It is glued to the stepped bay forward roof with several small parts, after which it is joined by the detailed sidewalls, rear bulkhead and another few parts to close over the rear of the roof and add more detail. The tail fins have fairings removed and smoothed off for one decal option, and are then joined around the bay assembly, capped off at the front by the intakes and propeller backing plate. Underneath, the triangular inserts for this variant with their many raised rivets are glued in carefully to avoid damaging that lovely detail. The two-part rudder is fixed to each tail, and an exhaust is made up from two halves, with baffles within. Align these carefully to minimise the join-line and check your references to get this right. A small intake is added to the side of the nacelle just forward of the exhaust. This process if carried out twice of course, in mirror-image so your Bronco doesn’t fly round in circles. The large horizontal elevator panel is made from top and bottom surfaces plus the elevator itself, and this is slotted into position between the nacelles as they are glued into place under the wings. You might need to grow another hand or two to make this happen, or get yourself one of those wonderful jigs like that of EBMA to help hold everything in place for this. Four optional shark-fin spoilers can be glued onto their corresponding slots in the top of each wing if you wish, or leave them in the box for a clean upper wing. The twin props have the three blades moulded as one, with a front and back boss, and take care to install the correct props on the nacelles, as the blades (and the turboprop engines) are handed, spinning in opposite directions to cancel out the effect of torque steer. A windscreen wiper and various sensor lumps are added around the fuselage, with more underneath, at which point you’ll notice that the main gear is without wheels. Each of these are made of a two-part wheel and two-part hub, with no weighting moulded-in, although that’s easily remedied by a quick sanding of a flat-spot on the bottom, just don’t overdo it so it looks like it needs more air. There are two wing pylons on long supports to add to the outer wing panels if you chose to drill the holes in the underside of the wings, then it’s just a case of choosing which munitions you want to hang from them. There is a diagram showing which weapons can be fitted to which pylons, but if you’re aiming for realism, check your references to establish real-world load-outs for training and live-fire missions. In the box you get the following: 2 x LAU-33 twin rocket pods 2 x LAU-069A 21 rocket pods 2 x Mk.77 Incendiary bombs 2 x LAU-68 6 rocket pods 2 x 150gal fuel tanks 2 x Mk.81 Lowdrag iron bombs with optional daisy-cutter fuse 2 x Mk.81 Snakeye iron bombs with optional daisy-cutter fuse 2 x Mk.82 Snakeye iron bombs with optional daisy-cutter fuse 2 x Mk.82 Lowdrag iron bombs with optional daisy-cutter fuse 2 x LAU-10A 4 rocket pods The detail of the individual weapons is excellent, with multiple parts for fins, fuses and rockets, and only the seamlines to clean up along the way. The canopy is about as clear as can be, so it’s going to be important to mask it up before you inadvertently ruin the startling clarity. Although masks aren’t included in the box, there is a handy template near the back of the instructions that you can place tape on and cut out masks for your use on the model. Each section is numbered and there is another drawing showing their location on the canopy. Very handy! Markings There are five options in the rear of the instructions in various schemes, including plain and camouflaged options. From the box you can build one of the following: 155434 US Marine Corps., 1987 155434 Marine Observation Sqn. 1 (VMO-1), Spring 1990 155454 Marine Observation Sqn. 2 (VMO-2), Summer 1990 155465 Marine Observation Sqn. 1 (VMO-1),Saudi Arabia, 1991 155434, US Marine Corps., 1991 Decals are printed by ICM’s usual partners, with good registration, sharpness, and colour density, with a thin gloss carrier film cut close to the printed areas. The weapons all have stencils to apply, which are shown next to each profile, as their colours varied over time. There are also rear and white tip decals for the props, and the large wide T-shapes on the upper wings are also included as decals, as are the tapered exhaust gas “hiders” on some of the decal options. Conclusion The Bronco is an appealing aircraft, and this new boxing with a wide choice of schemes is an excellent looking model that is crammed full of detail, and widens up the market further for the Bronco loving modeller to include the US Marines. Very highly recommended. Available in the UK from importers H G Hannants Ltd. Review sample courtesy of
-
.thumb.jpg.d17ff607fc7e89ed057e63fcb6f2a888.jpg) Hi Everyone, I`m relieved to say that this one is finished, my attempt at Academy`s 1/48 scale F-4J kit Finished to represent an aircraft of: US Marines, VMFA 232, the `Red Devils`, based at Nam Phong RTAB, circa 1972 The aircraft itself is mostly what is in the box except for the rear view mirrors and some added seat belts but I added some different armament to fit the units mission and theatre of operation These being some Eduard Brassin` Zuni Rocket Pods and some Rockeye Cluster Bombs from the spares box . The decals came from Furball `USMC Rhinos` set 48-012 Hope you enjoy, thenks for looking Cheers Russ
Hi Everyone, I`m relieved to say that this one is finished, my attempt at Academy`s 1/48 scale F-4J kit Finished to represent an aircraft of: US Marines, VMFA 232, the `Red Devils`, based at Nam Phong RTAB, circa 1972 The aircraft itself is mostly what is in the box except for the rear view mirrors and some added seat belts but I added some different armament to fit the units mission and theatre of operation These being some Eduard Brassin` Zuni Rocket Pods and some Rockeye Cluster Bombs from the spares box . The decals came from Furball `USMC Rhinos` set 48-012 Hope you enjoy, thenks for looking Cheers Russ- 57 replies
-
- 76
-

-
Howdy Everyone, Just put the finishing touches on my latest effort so I thought I`d share some pic`s My attempt at Eduards boxing of Hasegawas 1/48 F-8 Crusader Kit Finished in the markings of `The Stinger` of VMF(AW)232, while based at Da Nang 1966-67 Chose this scheme to complement my `Red Devils` Phantom you might remember from a while back, as I was a bit disappointed with the selection that came with the kit The rest is pretty much from the box contents, just added some brake pipes from some wire, the MER`s and bombs came from a Has` A-7 Corsair kit and the RBF Tags from Revell Skyraider. Managed to use most of the Resin and Photo Etch, but kept the kit wheels as they painted up better and the resin nose wheel looked too small to my eyes Decals came from Microscale sheet AC48-0054 which are for a later incarnation of the same plane, only difference being the tip of the fin which I modified to suit These aircraft didn`t seem to be as dirty as the `Death Angels` airframes but a bit grubby nevertheless. Hope you enjoy, thanks for looking Cheers Russ
- 74 replies
-
- 131
-
-

-
So not just the USMC, but all Marine forces, any maritime land based service branch of any navy, worldwide. The GB would include figures, boats, vehicles, aircraft...from any era. Whaddya think? --John
-
 Ready for inspection, my A-4M, which has kept occupied for the past 2.5 months. This is out of the box except for the added weapons, and a few scratch built details in the landing gear and ejection seat. The centreline multi-ejector rack and Mk 82 bombs are from Hasegawa's weapons set A. The Sidewinders are spare Matra 550s from a Kinetic kit, modified to look like AIM-9Hs. I have kept the weathering light, to resemble what I saw in most photos of Skyhawks from this squadron and era. For more photos, and a few tips on the build, check my web page (link in my signature below).
 -
Questo é il mio ultimo progetto, il trattore da rimorchio dell’US NAVY e MARINES in scala 1/48 e 1/35. Lo utilizzerò per i miei modelli di F-18 F Hasegawa, F-35B (in attesa dell’uscita della versione Italeri) MV 22 Osprey Hobby Boss, AH-1Z e UH-1Y Kitty Hawk, per la scala 1/35 per il AH-1Z Academy e MH-60R/S.
-
Do you have any idea (better supported by photos, of course) about the camouflage of UH-1N, CH-46 and CH-53D helicopters operating on LHA amphibious carriers in 1982-1984? I am currently building Dragon/Italeri 1/700 USS Nassau LHA-4, equipped with an airwing consisting of the three above-mentioned helicopters plus AV-8A and OV-10A planes. Harriers are already wearing a low-vis gray+green over light grey camo with black lettering and all-black insignia. Broncos are overall dark green with black lettering and insignia, but how did the helos look like back then? In the photo of the AV-8 aboard Nassau there is a "monocolor" UH-1N looking definitely more gray than green, but the tailboom is out of camera range and I don't know if it's a Marines or Navy machine (white USS Nassau letters on the side door direct me closer to the Navy option). AFAIK the beautiful gray/black/green wraparound camouflage was introduced to USMC chopters a little later (1985/86?), so machines contemporary to the AV-8A and Bronco on the LHA-4 deck should be rather uniform dark green. But was the lettering white or black? Were the insignia still colourful, or was it an all-black low-visibility version? Any help will be appreciated. Cheers Michael
-
There is a photo from the Vietnam war, in black & white, showing a group of US Marines taking cover behind a tank during the street fighting in Hue, you’ve seen it, you know the photo. i am sure I saw a group of 1/35 figures depicting that scene some years ago but I am damned if I can rediscover them. Anybody got any ideas? It’s not a collection of Bravo 6 individuals but a complete set. Grateful for any help.
-
Hi everybody, here's my latest off the workbench; I bought this kit last summer, at the gift shop of The Flying Leatherneck museum in Miramar, San Diego. I was there for vacation with all my family, and my youngest daughter in particular enjoyed so much that visit that she asked me to buy this kit and if she could help me building it. She did help during the first phases of the build, in fact; then, when things became more complicated for her, she just checked for progress She said she's happy about the final result, so ... It took me a little more than 3 months to build this kit, which I found refreshing compared to the 9+ months of my previous build. Here are some details KIT: TAMIYA 1:72 F4D-1 Skyray AIRFRAME: DOUGLAS F4D-1 Skyray 134895 of VMF 115 MARKINGS: mostly airbrushed using self made masks, except for the smaller MARINES and VMF 115 writings, the drop tanks stripes and the stencils, which are kit decals. PAINTS: Mission Models paints for the camouflage (Light Gull Grey and White), Italeri, Lifecolor and Tamiya acrylics for the interiors, markings and inisgnias, AK Interactive Extreme Metal Steel, Tamiya Gun Metal and Tamiya Clears (Red, Yellow; Blue) for the exhaust nozzle area. WEATHERING: tempera washes, black and dark grey. AFTERMARKETS: none SCRATCHBUILDING: - Seat belts, with wine bottle foil - Seat top and ejection handles, using kitchen alu foil for the former and 0.6mm solder wire for the latter - Seamless intakes, plounge molding white styrene sheet (0.25mm thickness) around a master carved out from a rubber gum - Brake lines and cables on the gear struts and inside the wheel wells, using various copper and solder wires Edit: here's the WIp thread, in case you are interested in: Here are a few more pics of the finished model Underside In progress shots of the interiors Thanks for watching, all comments welcome Ciao
-
 Hi everybody; last August I was in California for a big family holiday/vacation and, among other things, I got the chance to visit the The Flying Leathernecks museum in Miramar, right next to the Marine Corps Air Station and just outside of San Diego. After the visit, we walked into their gift shop and my youngest daughter insisted on buying this kit, so that she and I would have built it together once home. Was I supposed to disappoint a 9 years old cute little girl? Not really! So I bought it and, after finally completing my 9 months build of the Italeri A-10A Thunderbolt II, I got started with this: Here's the airframe on display at the Flying Leathernecks: and there's an excellent walkaround of it from Bill Spidle on PrimePortal: http://www.primeportal.net/hangar/bill_spidle4/f4d-1_139177/ Since my daughter is actually participating into the build, it will be mainly OOB, even though I already have in mind a couple of ... improvements to be done along the way. 😉 Anyway, the kit looks pretty simple, only two sprues plus the transparents: The windshield and canopy are crystal clear form the box, but having recently experienced how tough and resistant to masking (even when leaving the masking tape on for a loooong time ... ) the Aqua Gloss coating is, I dipped them in it and left to cure overnight: This is the scheme I'm going to go for: it's a Marines airframe, of course, as a tribute to the museum and the great time we all had visiting it. Here's the decal sheet: although admittedly, one of the improvements I have in mind is to cut my own masks for most of them I hope you'll enjoy the build, please feel free to add any comments/pointers/tips any time Ciao
- 374 replies
-
- 26
-
-
1/10th Mookies miniatures bust of a RM SBS Commando during the Fanning head raid on the Falklands in 1982. Painted with acrylics - Vallejo, Tamiya, Andrea;
- 9 replies
-
- 19
-
-
- falklands war
- SBS
- (and 1 more)
-
hi everyone new here got myself some Airfix 1/32 US Marines the other day thinking it would be simple but I do not use Airfix paint I use tamiya paint I have tried looking it up what tamiya paint to use for em but most evolve mixing and stuff and this may sound noobish but I dont like doing that😁. I have tried using converters from airfix to tamiya charts and I just dont get it. if anyone has a idea how to paint would really like to know. cheers this is the sort I am trying to do http://thepacific.wikia.com/wiki/Uniforms_depicted_in_The_Pacific http://thepacific.wikia.com/wiki/Uniforms_depicted_in_The_Pacific thanks everyone
-
Hi Everyone, Finally got to do some modelling after a 2 week break and managed to put the finishing touched on my latest effort this morning My attempt at building a CH-53D from Revells 1/48 CH-53G kit and finishing it to represent........... A US Marines Sea Stallion at about the time of `Operation Frequent Wind Option IV` 29th April 1975 Which was the evacuation of Saigon, S Vietnam following the N Vietnamese invasion of the city Most of the work consisted of leaving lots of aerials and sensors off and using the earlier type main rotor blades in the kit I did attempt to enhance the interior a bit but you cant see much through the thick transparencies and I refined the tail rotor mechanism a bit. Another of my `Far to big to go anywhere` kits, but, I originally had bought it to chop up to try and make a `Jolly Green Giant` which would have been smaller Decals came from bits and pieces in the stash. Hope you enjoy, thanks for looking. Happy New Year, Russ
- 35 replies
-
- 53
-
-
 Hi all, Having just completed my YA-7F project posted earlier, I decided to try and squeeze in an old "shelf queen" that has been in the works for 3 or 4 years. As a very slow progressee, it didn't seem very suitable for a W.I.P., so here are just the pictures of the final result. The kit was the venerable Hasegawa SBD-3, with a few mods, and some aftermarket parts: The True Detail TD72461 SBD/A-24 cockpit set, as well as the Carrier Deck's Accessories 1/72 SBD Dauntless Dive Brakes set. Paints used were Model Master and Colourcoats enamels. Since I wanted to show the cockpit open, I had to vacuform the kit canopy, which was too thick to stack. The vacuform copies were also a little thick, but are marginally okay. Plus, after 4 years or so, I just wanted to put this one to bed! Without further verbiage, the pics: This SBD-2 joins my small but growing "U.S. Marines at Midway" collection. Show below are the F4F-3 Wildcat, and the F2A-3 Brewster Buffalo, along with the SBD-2: If I live long enough, I'll build one of each type that was there, and maybe a couple of the U.S. Army types as well. Thanks for looking, Ed
- 16 replies
-
- 30
-
-
Pics from Graham James
-
Hi everyone, finally finished my attempt at building a Electric Intruder from the Wild Weasel boxing of the 1/48 Revell/Monogram kit Although not done as a Wild Weasel as I wanted to do a Vietnam aircraft Used a mixture of the kit decals and a few from the stash to represent an aircraft of VMCJ-1, Marines, Da Nang, South Vietnam, circa 1969-72 The actual aircraft is an option in the box but in US Navy markings Apart from a little detailing on the canopy frame, some slightly altered antenna and drilling out some of the various air ducts it`s what`s in the box Paint slapped on with hairy stick as usual Hope you enjoy looking at, Cheers Russ
- 60 replies
-
- 55
-
-
North American OV-10A Bronco, Da Nang, 1969
russ c posted a topic in Ready for Inspection - Aircraft
Hi Everyone, Just finished refurbishing my attempt, at making something resembling a Bronco from the very old Hawk 1/48 prototype kit I posted it here quite a few years ago but had to do it in very generic markings as there wasn`t any aftermarket ones available The last year I picked up Caracal Models Bronco Sheet CD48068 in the hope that a new tooling would soon follow..... .....but alas it didn`t happen. So the next best thing I thought was to tidy up and partially repaint the one I`d done to represent an actual aircraft ........ ....to go with my Vietnam FAC collection. Finished to represent a US Marines aircraft from VMO-6, based at Da Nang, S Vietnam 1969 and I`ve still got a scheme left on the sheet to do if a decent kit finally does appear. Hope you enjoy, Thanks for looking Cheers Russ- 47 replies
-
- 61
-
-
Hi Everyone. Hope you don`t mind seeing some photo`s of my just completed Hobby Boss 1/48, Grumman A-6A Intruder Completed to represent an A-6A of VMA(AW)-242, `The Bats`, U.S, Marines, Da Nang, South Vietnam, circa 1968 I was looking to do something different with the weapons load than the normal `Snakes and Rockeyes`, when I came across a photo... on line and later a profile in the Osprey Book, of one loaded with WWII vintage 2000 pounders, decorated as Easter Eggs. Had to make a few modifications to back date the base kit to fit the time frame, luckily none of them really difficult Decals came from; Intruders From The Beach` AOAdecals, 48-001 and the bombs from Tamiya Skyraiders Apart from those, the brake pipes and some bits of wire here and there, the rest is from the box. Hope you enjoy, thanks for looking Cheers Russ
- 42 replies
-
- 66
-
-
Hi Everyone, Just took some photo`s of my latest effort: Hasegawa`s 1/48 TA-4J kit completed as a TA-4F Forward Air Controller Skyhawk...... ...to go with my Kittyhawk Marines FAC Cougar you may remember me posting. Finished to represent a TA-4F of US Marines, H&MS-11, based at Da Nang, South Vietnam around 1972. Luckily all the parts I needed to back date to a `F` were still included in the box. The markings were a mixture of items from the decal stash and some various coloured stripes I bought off Hannants The Zuni Rockets are made from some items from a Hasegawa weapons set and some cocktail sticks.... as the Hasegawa ones don`t poke out the front enough. Hope you enjoy, Thanks for looking Cheers Russ
- 45 replies
-
- 60
-
-
 Hello everybody. I've been away from this site (and, indeed, model making) for a rather long time. Recently, however, I have noticed the old urges making themselves felt and so here I am. My entry for this GB is Italeri's UH-34J Sea Horse. I've been interested in this type since I first saw Full Metal Jacket and innocently asked why a Wessex was appearing in a Vietnam War film . In the interests of actually finishing a GB I'll be building the subject of the box art, in an OOBish sort of way. I do have the Airwaves etch for it but I'm cautious about committing myself to all that effort, especially as the moulded mesh is so well done. Surely I can finish before December! Andy
 -
Hello, In between bursts of enthusiasm for my ongoing 1/24 Tiffie build I've scaled right down and been gradually working on the very fine 1/72nd Academy Crusader. I've always liked this US jet, building the old Hasegawa version many many years back and trying/failing to do something decent with the Esci 48th version a while ago. In this scale I can afford to visit the aftermarket, and have added Eduard's Zoom, Quickboost slats (with Flaps to follow) and intakes. I've read that the slats set is too short - we'll see, they certainly have finer edges than the kit parts, which itself is beautifully moulded with very fine panel lines and riveting, which I'll do my best not to foul up! You'll see I started work before taking this pic - Eduard didn't send me a used fret! ll be building it wing up, flaps down, probably with one of the kit decal schemes for two US Marines users. As this has been a slow burner build, I'm presenting quite a lot in this first post, including the cockpit with the pre-coloured etch adding lots of detail that while I know others can replicate themselves, I know my limits! That ejector seat pull is lovely but fragile, it's pinged off twice know, but is now kept in a very safe place. Strangely Eduard only printed the yellow and black on the topside, so some very careful paintwork will be needed below, as it will be visible. Wheelbay and speedbrake inserts, excellent moulding here painted with Tamiya pure white spray can and some washes of grime: The closed up fuselage happens early on, with the various sub-assemblies dropping easily into place: The cockpit in place, with a little scratchbuilding for the gunsight and shroud - spare etch and kitchen foil... Very unforgiving in close up, this scale - dust issues in the black paint I think... The hollowed-out Quickboost replacement intakes - nothing wrong with the kit ones other than no openings, but very fiddly job to open them. So, that's pretty much up to date on this build. This is a very clean and crisp kit to build, so I'm hoping I can show more progress soon. Welcome all your constructive comments, Take care, Matt
-
Hi Everyone, thought I`d post some pic`s of my latest effort; My attempt at sticking together Kitty Hawk Models 1/48 `Twougar` Done as a TF-9J, FAC Cougar, of the H&MS-13, US Marines, based at Chu Lai, South Vietnam Built completely OOB with no additions what so ever Had a lot of problems getting the parts to stay stuck together on this one, as the plastic seems to only partially bond using normal cement and bits would seem to be stuck only to break off whilst handling it later on Still, I`m glad to have one in the collection ( though I`m expecting it to fall apart if someone slams a door or sneezes loudly ) Hope you enjoy it, thanks for looking Cheers Russ
- 39 replies
-
- 43
-
-
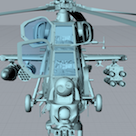
Bell AH-1G Cobra 'Marines' Special Hobby 1:72 The US Air Force started to use helicopters early in the Vietnam War as offensive platforms. Following a failed attempt to provide a dedicated attack helicopter in the guise of the Model 207 Sioux Scout in the early ‘60’s, Bell independently invested $1m into a new helicopter using some of the technology of the infamous UH-1 Iroquois, or more affectionately known ‘Huey’. This was in spite of the fact that the Army was more interested in a Lockheed venture with the AH-56 Cheyenne in response to Bells previous failure, however that didn’t come to fruition. Only 8 months later, the Model 209 made it’s first flight and subsequently won over its rivals in evaluation. The 209 was to become the infamous sister to the Iroquois, the Cobra. The airframe took the rotor, gearing and turbine engine from the Huey, but incorporated a new tandem seat cockpit arrangement with armoured panels to go some way to protect the crew from ground fire. Other key features were stub wings to carry a variety of suitable attack weapons and an under-nose turret housing a 20mm cannon and in some cases a grenade launcher. In 1967 The first of over 1100 Cobras entered US Army service and provided much needed fire support in the Vietnam War for ground forces amongst other specialised activities such as forward ‘Hunter Killer’ teams working along side OH-6A scout helicopters searching out ground forces. The AH-1G also initially entered service with the Marines, although they wanted the extra reliability of two engines, so service in the Marines was short lived until the twin engines ‘Super Cobras’ became available. Whilst the US Army retired the last of its single engine AH-1’s in 2001, nine overseas operators included Israel, Japan and Pakistan. Israel widely used the Cobra, in particular in the 1982 Lebanon War against Syrian forces, but they too retired their fleet in 2013. Pakistan still operate their Cobra’s and Japan still operate their licence built versions too. The kit This is the 5th boxing of the UH-1 from Special Hobby. It comes securely packed in a top opening box with 5 medium grey sprues and a separately packed clear sprue. First impressions indicate a very good quality kit. Very sharp moulding with finely recessed panel lines and intricate detail is apparent with a coloured A5 sized instruction booklet on glossy paper. Presence of flash is negligible and I couldn’t find any sink marks on any exterior surfaces. There are a lot of optional parts included that aren’t used for this version, so fortunately or unfortunately, depending on your preferences, the parts use is much less than initially thought. Whilst the instructions are colour with good diagrams, the images are quite small and some of the locations for small parts are a little vague, so some studying before steaming ahead with the glue may be necessary. The paint guide refers to Gunze colours. There are decal options provided for 4 machines. Parts breakdown is quite traditional with two fuselage halves and separate tail. Construction starts with the cockpit. I would say that the detail in the cockpit is adequate. Separate seats with additional side armour parts are provided with the forward cockpit getting collective and cyclic controls too. The rear bulkhead in the cockpit tub requires removal and an alternative part is provided to replace it that includes a padded surface effect The side panels on the cockpit tub are quite minimalistic, so the optional pre-painted PE set advertised in the instructions are an option you may want to consider. The instrument panels have recessed instruments and the instructions indicate a decal for both panels is included, but I can’t find them on either of the two decal sheets provided. With the tub assembled, it locates between the fuselage halves. Pleasingly, the halves have location pins unlike some of the early short run kits my SH/MPM kits making assembly a little easier. The surface detail in the fuselage exterior is a mixture of nicely recessed panel lines, raised panels and rivet detail. If one was to be critical, you could say the rivets are a little excessive in size, but under some paint, should look fine in my opinion. Two rotor mast base designs are provided, however there’s no explanation of which one would be fitted to which versions included. As I’m far from an expert on the Huey, I couldn’t help out on this. Personally, I’d go for the more detailed one! Two separate tails are provided to accommodate either the left or the right sided tail rotor, depending upon which option you intend to build. The tail parts simply but on to the end of the tail boom of the main fuselage. The stub wings are equally well moulded with good surface detail despite their small size. The instructions call out for the fitment of both the XM-158 and XM-200 rocket launchers (7 and 19 2.75” rockets respectively). However there are also two XM-18 minigun pods, two XM-157 rocket launchers and an XM-35 stub wing mounted minigun included on the sprues which may go to good use. Three of the four schemes included call for the combined minigun / grenade launcher turret to be installed, however one of the versions is a test aircraft using a blanking part. This is provided as an additional resin part. Not called for in the instructions, but provided is a minigun only turret too. The nose section calls out for a weight to be added. Take care here, I for one often forget this or don’t notice the instruction! A great addition is the parts included to add the ground handling pack. This includes 2 x two wheeled bogies that locate on the skids and a trailing tow bar. Unlike Cobras provided by other manufacturers, the canopy is provided as all separate parts. This does make assembly trickier, but gives much better opportunity for an open cockpit display. The parts are very clear with minimal distortion. There are also several tiny clear parts included on the sprue, but fortunately, you only need a few of them with this kit as they are very small and would probably end up feeding the carpet monster! Decals The two decal sheets included have good register. The text on the stencils is a little vague, not as sharp as some I’ve seen, but again, I’m being critical here. Schemes are provided for 4 rotorcraft: AH-1G 68-17108, VT-26 HMA-367 Scarface, USMC, Vietnam 1969-70 AH-1G 68-15194, US Navy Test Pilot School, NAS Jacksonville 1974 in midnight blue scheme AH-1G 68-15045, ex USMC HMA-773 assigned to US Navy Test Pilot School, NAS Patuxent River ‘75 AH-1G 68-17105, HMA-169 (VMO-2), USMC Camp Pendleton, California, ‘72 Conclusion This is a very nicely detailed kit, arguably, the best on the market currently with no less than 4 schemes to choose from. I matched the main parts up to drawings in the Squadron Publication for a ball park check of accuracy and there were no obvious errors to raise attention to. There are lots of additional options on the sprues to venture in to aftermarket schemes if you can get decals, and the spares box will also be treated to some new parts too. The small parts and none-single piece canopy make this a more challenging kit for young or beginner level modellers, but a joy for anyone with a few builds behind them who possess a good set of tweezers. Without too much effort, this could be built into a superb little diorama given the open canopy and ground handling pack included. Also included in the box is a 25% discount voucher for 'Cobra- The Attack Helicopter' hardback book by Mike Verier, RRP £25 adding even more value for Cobra fans Review sample courtesy of
-
Hi Everyone, I`m afraid I`ve nothing new to show, so hope you don`t mind seeing one from a year or two ago Monogram boxing of their 1/48 F-8 Crusader In the kit markings of VMF-235, `The Death Angels`, Da Nang, South Vietnam, around 1965 I modified the kit seat to more resemble the real thing, widened and lowered the main gear, raised the nose gear slightly and........ added some 2000lbers off a Tamiya Skyraider, as per several pic`s in books I`ve seen and suggested by someone on another forum Hope you enjoy looking at, Cheers Russ
- 27 replies
-
- 16
-