Search the Community
Showing results for tags 'SeaKing'.
-
Does the 1/48 Airfix Sea King come with mounts for torpedoes and depth charges? From what I can see it does not come with the weapons themselves but shouldn't the HAS.1 and HAS.5 have the mounts for them?
-
 1/72 scale airfix sea king har2 202 squadron RAF Boulmer. main kit used was the airfix sea king har3/no.43 new tool with some decals coming from the old tool sea king har3 with 202 RAF boulmer markings. Sprayed with Vallejo model air and masking kit used. airfix grey wash used. 6 month build for someone who actually worked on the aircraft serial. Really enjoyable build and I found the kit fit fantastic. No filler needed and minimal sanding. Contemplating using the same kit again for a Royal Navy ace of spades build
- 15 replies
-
- 36
-

-
XZ585 Westland Seaking HAR.3 RAF Coltishall 202 Sqn 1986 This is my attempt at the old tool Airfix Seaking, and well its a meh. The first issue with this, is that is has a crack on the starboard side, which i couldn't be bothered to do much to it to fix it. I have heard alot of bad about this kit, and If im honest i didn't experience many problems (apart from some odd shapes for the seaking) The worst fitting place was around the inlets but even that wasn't difficult to get rid of. Yellow is a few layers of Tamiya Xf-8 and a couple layers of X-3. Decals have a slightly milky look, but im putting that down to the age of them. The real let down is the exhaust staining i attempted, but that can be an excuse to buy a new tool one. Here is the WIP
- 14 replies
-
- 31
-
-
Westland Seaking Mk.43 as used by the Royal Norwegian Air Force, pictures thanks to Mark (Tiger331)
-
Good evening all, This is my latest completion, it started out as a Canada Day quick build back in July but like all builds it dragged on a bit! Although 4 months for a build is quite quick for me lol! So this is the Revell version with a few slight modifications. All the sticky out bits were removed as the fuselage was relatively clean. I did have to make two additions, one on the tail and one under the cockpit. These were made from plastic square section rod shaped appropriately. The seats were reshaped as the kit ones are incorrect and the sponson internals were boxed in. The only extra I added were Airfix intakes as they were deeper and looked better than the Revell offering. I used Model Master Acrylics for the paint finish, the colours aren't 100% accurate but good enough and the decals are from a Cutting Edge set for Seakings. Unfortunately this lacks severely in stencilling which is quite prominent, I used what I could from other sets but didn't go overboard. I also had a major disaster for the "Royal Canadian Navy" decals. While I was doing a little touch up I pulled half of the letting off with tape but alas not much I can do about that. So here she is Seaking 4001 of the Royal Canadian Navy. Cheers now Bob
-
 Good day one and all! Its been some time since I've frequented here, I used to spend many a lunch and break time in work trawling through these pages but about 2 years ago they blocked BM (I know the B*********). I then found it difficult to keep up with all that was going on, slowly losing out, I had done a couple of posts but nowt major. However recently a random google search highlighted a BM page and remarkably it was back. The mighty BM had returned! So having had a good a catch up, and nice to see a few builds still going on ( @hendie and @Martian Hale being the main culprits) it was like I hadn't been away. So I thought Id would make a concerted contribution, but what? Well this weekend is Canada Day long weekend, and the weather sucks like a Cornish Bank Holiday, so its almost a perfect storm. It has to be a Canada Day weekend quick build, so I went through my stash and dug out one of my Seakings. I had a decal sheet from ages ago that I bought for the 771 version, but it also had a old Canadian version so what better than a RCN Seaking in Grey, EDSG and fluorescent!.......in a weekend! The challenge is on, convert a revel Mk41 into a CH124. This will be a quick build so no major work on the interior and to be honest artistic license (I love that phrase) will be applied liberally! So first up it was time to clear the bench... Time to stash my swordfish for the weekend and get out the plastic This version comes with a lovelly decal sheet but no it has to go! this is my chosen option So I don't have much time, its Friday night and I want to complete by Monday 2nd July, Canada Day. So it was straight into the build. The first thing is ALL doors and windows will be closed tight so that gives me the scope to ignore much of the internals. The only visible bit will be the cockpit and the most hideous bit about that is Revells seats. I know Canadians take it easy but the comfy chairs Revell supply are no where near realistic so its a quick re model. They are the same as Sikorsky offerings and not the Westland type so a bit of modification is required. (Disclaimer: Although I have spent several years around Canadian Seakings, my main experience is the RN type so a lot of the internal details may be more UK than Canadian......but hey that's where artistic license comes in!) This is the evolution of the front seats As I'm only bothered about the cockpit I only need to worry about 2 seats. After this I added a tubular surround to the seat and that is where I am, although I haven't go a photo yet of that part but ill show it when its complete. Another area is just behind P1 which the kit displays as a random spaghetti pattern so that was removed and a more appetising background created. This was then primed with Mig Ammo One shot primer. I prefer this as it sands well and is a good bed for Mig, Vallejo Air and Model Master, my preferred acrylics. I have tried vallejo primer (grey and black) and although it sprayed well it wouldnt sand, it seemed to want to peel rather than feather, causing much heartache on my silver swordfish! But this Mig stuff is great! So before I retire tonight this is my progress So that's the primer down, tomorrow morning will be an interior grey (not sure which yet) and then a splash of colour and finally close up the fuselage, not a bad target for day two! This will be a tricky target, for although the weather is pants Mrs C will need some attention, which basically means a touch of mooching around the shops. And we have a rib fest here in Halifax so that may be a distraction if we can find a break in the weather but at least I don't have any kids soccer so that is a god send! Oh well, time to settle down with a bit of Chateau Nerf du Bobby homebrew (which ironically is a bit papp but its cheap and cheerful!) and ponder on tomorrows details. Cheers now Bob
 -
 Hi, Appreciate that there has been a recent group build for the Sea King however I didn't take part as it's taken me 5 months to get to this stage. I'll admit, I've not got that far however my hope is that I will end up with a large model representing this actual aircraft, which coincidentally, was the last aircraft I flew in back on 21st August 1996. Not a particularly interesting flight .. more of an AFCS ( automatic flying control system) check test flight. She passed and was serviceable for future use. The last I heard .. she is sitting down in HMS Sultan, being used as a training aircraft for future WAFU's The link for this is http://www.planepictures.net/netshow.php?id=1036995 Anyway, I started with the excellent ( and only) 1:48 scale kit that I could find and ask Santa for. The har.5 kit from Hasegawa "Ark Royal" ?? edition because this would require the least of all options to convert to the has.6 version. First job was to source a MAD sponson for the stbd side, which I did from fellow member "WAFU" and sent him the regular sponson from my kit. Next came the purchase of some PE, which I have never really used before and was pondering the purchase of PE tools. In the end and after some discussion with other members, I just bought some quality smooth pliers and snips. This was mainly due to the fact that there was no real requirement for bending lots of PE that I'd purchased. And so I began... I decided to leave the front seats as is and I appreciate that the Westland versions do not have the large seat supports shown here. This was to help support and place the PJ production 1:48 Lynx crew which I will add later ... especially the all important aircrewman and then... ..the most frightening job for me was to take a saw to my model and I carefully cut out the main cargo door, which thankfully I can reuse and attach later. This was nerve racking to say the least but after some hints and tips from other members, I purchased the best quality micro saw I could afford ... best investment ever. Dry fitted almost everything that I could, as I wanted to minimise fit issues which would require sanding and as such , loose detail. I haven't tried re scribing and due to the good quality of this kit, hopefully I won't have to. There was a gap above the main cockpit and fuselage and this was addressed later. This picture shows the hole I cut in the cabin floor, in order to fit the sonar and you can just see the first bit of PE fitted, which is the sea anchor storage, fitted behind the P2's seat. Decided not to fit the PE yaw pedals as I actually preferred the plastic kit parts, however I did fit the pedal surrounds and sanded down the instrument console, ready for the attachment of the self adhesive PE parts. PE broom cupboard bent & attached. This is where the hydraulic actuators and other gubbins for the AFCS are housed, behind the P1's seat. The first aid kit, flare pistol and piddle tube ( back up intercom !!?? ) was also attached to this cupboard. Finally , I was ready to start some scratch building for the back of this aircraft as the kit is absolutely bare ... which is a shame. The rear crew seats were made using bits n bobs of plastic, copper wire and cocktail sticks. I cannot take credit for this idea, it was borrowed from the excellent thread below http://www.britmodeller.com/forums/index.php?/topic/234976450-sea-king-crew-seat-detaing-revell-72nd-scale-kit/ The seats I was happy with .. the observers / aircrewmans stations .. eh not so much !.... so I started again .. from scratch. Whilst I was trying to figure out the rear consoles, I decided to fit some soundproofing and cabin flooring. For this I simply used some cut up plastic sheet, cut up jiffy bags and some of the plastic straps that held the polystyrene packaging on my new fridge freezer ... another expense I could have done without. Waste not... want not !! Rear consoles v2 ... made using some of the polystyrene packaging, cut to shape and faced with some plastic card. I also use the jiffy bag to make the cover that surrounded the dipping sonar. This was maily due to the fact , that even with the rear cabin door open, viewing access is minimal through said door and cabin/cockpit windows. As you can see, the dimensions of the consoles are much better second time around. I also took the opportunity to fit soundproofing to the cabin ceiling. .... and after painting and applying the cut up cockpit decals from OOB, I ended up with this. I elected to keep the front personnel door closed, so I simply used some polystyrene block to make the fwd equipment rack and also a representation of the MS10 liferaft.. which you can just see through the cockpit. View from the other side Actually quite liked the self adhesive PE for the cockpit .. but it did require a lit bit of help to stick ie superglue Back to the rear cabin area and shown is my first attempt at rear cargo seats. These have since been removed and v2 fitted. I used the luminous "hamma bead" method to fashion the radar screen. Melt the beads using a warm iron and cut to shape. This worked quite well and when exposed to strong light and viewed in darkened conditions you get the following effect. Excuse the poor quality photo .. but you get the idea This was the dirtied effect I was looking for and so far so good. It was then time to take possession of the following bespoke decals sourced from Roger at www.whirlybirdmodels.com Fantastic and just what I wanted. This guy is a genius and we spent several months conversing by email and phone to get the above just right. These are unique to my model and I am over the moon... but lots to do so they have been safely packed away for now The fit of this kit is the best I've come across yet and I finally joined the two halves and dry fitted the various access panels. The gap above the cockpit and glass were filled with platic card and some detail added using wire. The hull is a snug fit and fits perfectly despite what the picture above suggests. I am not going to glue the boat hull section until I've attached the various antenna and decided what I'm going to fit inside the sonar well. I know it will be the correct dipping sonar but I am thinking of scratch building the full body, which I can remove to display, if so required. So this is where I'm at to date. This has taken me 5 months so far, mainly due to work commitments. I could not commit to the time scales of the group build but the fantastic work of all contributors was borrowed for incorporation into my model. This is going to take me several more months but hopefully the result will be be worth it. By posting on this WIP forum, it should ensure that I don't forget about it and do bits n bobs when I can. Thanks for looking in... best wishes
 -
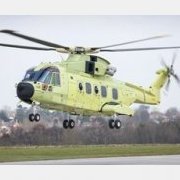
Sikorsky SH-3A/D Seaking (AR14405) 1:144 AFV Club via Pocketbond The Sea King is one of the most enduring aircraft of the post-war period, the Sikorsky SH-3 Sea King flew for the first time in 1959. Although no longer in production, the Sea King continues to serve with air arms around the world, including those of Canada, Germany India, Ireland, Italy, Spain and the United Kingdom. The SH-3H was a US variant developed specifically for anti-submarine warfare. Originally conceived of as a development of the SH-3D, the SH-3H morphed into a sophisticated ASW platform and was fitted with anti-ship missile detection equipment. It was capable of carrying a pair of torpedoes as well as a range of depth charge weapons. Just as they had done with earlier Sikorsky designs such as the S-55/H-19 Chickasaw (produced in the UK as the Whirlwind) and S-58 Choctaw (Wessex), Britain's Westland Helicopters secure a licence to produce the Sea King not long after the aircraft made its first flight. The Kit In what seems to be an extension of their Mini aircraft series is seems AFV club are expanding their 1/144 scale kits (They previously only did P-40 kits in this scale). Inside the box there is enough plastic and decals to build two Sea Kings. All parts are well moulded, there is no visible flash, and there are fine engraved panel lines. In the cockpit two rudimentary seats and an instrument panel are added, the centre console being moulded in. The front and aft bulkheads are then attached to the main cabin floor. Windows are added into the main cabin along with the pilot entry door, and then the two fuselage sides are brought together around the cabin floor. The lower boat shaped hull part is then added, along with the cockpit glazing. On top the engine inlets are added along with a part on the rotor head box. The main side door and its running strip are then added. The two sponsons are then built up and added, with the main gear wheels being built and added into them. The tail wheel is also added. The winch over the mail door is added. The tail boom is assembled and added at this point. It can either be out, or in the folded position. Once added the tail rotor is fixed on. Next up the min rotor is added. Again like the tail boom the rotors can be in the extended position or folded. Markings There is a fairly comprehensive decal sheet which looks to be printed in house. The colours appear good, and everything seems to be in register. Whats good is that AFV Club have not skimped on such things as the US Navy titles, so from the box you can build any two of the four markings; HS-4, USS Iwo Jima, April 1970 HC-1, USS Coral Sea, 1972 INS Shikra, Mubai, 1980 HS 50, Royal Canadian Navy, HMCS Bonaventture 1965. Conclusion It is good to see more kits for those modelling in this smaller scale, these are quality kits and come highly recommended. Review sample courtesy of UK Distributors for
-
Hello! I would like to partecipate with an amphibious helicopter Airfix 1/72nd Westland Sea King HC.4 with BigEd set I hope I can finish it in time..
- 13 replies
-
- 6
-
-
- airfix 1/72
- SeaKing
- (and 1 more)
-
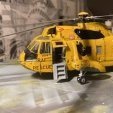
I havent seen this version finished so I thought I would put mine up. I do like the yellow RAF rescue helicopters as the last picture wll testify. This is a superb kit and the interior detail is very good shame a lot cant seen if the doors are shut. I have however opened the aircraft up I did the kit version but have just notice that i missed off the directional spot at the rear of the fusalage. Too late now. I had a spare air filter from a revell kit so I used that instead and when the airfix decals went on and the microset had done its job I was rather pleased with the result. Otherwise all straight out of the box Very good value kit will be buying more. Normal rules view from 5ft Rodders ooops that blade nees bending down A theme is developing here :-)
- 26 replies
-
- 53
-
-
 Hello everyone. I really wanted to make a WIP of this build but because 1) time constraints, 2) not having my own nor the borrowed laptop handy, and 3) a temporary problem with the image hosting website I use (postimage.org) I decided to go forego the WIP posts. Anyway, I posted the pictures of the assembly on my Facebook page -is it allowed to say FB here??? I wonder...-. It was an extremely satisfactory build And I must insist that lacquer paints are the best! The model was entirely hand painted and no masking was used on the windshields. I made a great effort in painting the interior really well, (and the interior took me days) just to realize that you won't be able to see it ever again. There were very few mistakes. The most notable one was the grey line on the door side. It is higher at the back than at the front, something you'd notice if the door were closed. That's why I had to leave the door open. And the floor visible through the open door has two color tones because the paint I used was a lacquer that I recovered from a solid dry state and it had changed tone by the time I used it at the "doorstep" after a little putty filling I had to do there. The kit itself was strangely missing the interior ceiling by design but well. Other than that, a spectacular model indeed. Oh, and I didn't paint the rotor blades exactly how they should be. Too much, too much.
 -
Had an email invoice from Airfix today for my 2 new Seaking HAR.3's and on checking the Airfix site its now showing as a New Arrival! No dispatch email just yet but hopefully Mr Postie will be bringing me a wee parcel in a day or 2 Eng
-
Finally finished this model, which I started back in May this year.. Full build thread is here - http://www.britmodeller.com/forums/index.php?/topic/234981204-navy-709-flexops-due-sea-king-has-6-xv711-circa-1996-819-nas/ Before the photos, just want to publicly thanks "Wafu" and " daryle-five-zero " for supplying / swopping various parts in order to build this. I also have to thank whirlybird decals for making the bespoke squadron & aircraft decals. Model is Hasegawa mk 5 with added PE and a totally scratch build rear interior. Enjoy .... Many thanks and happy modelling
- 46 replies
-
- 58
-
-
 Few pics of my current build, Airfix new tool Seaking HC.4. I'm afraid work and real life mean I'm not the fastest builder and my 'bench time' is (as I'm sure many others will agree) not as much as I'd like, so I'd struggle to maintain an interesting 'In Progress' thread but since this is a new tool, I thought you might like a peek at my progress. As for out of the box, I caved and added some seat belts from tape, comm's cables for the crew and a few wee bits of detail on the forward R/H 'broom cupboard' as I intend to have the crew door and main door open. I also added some prominent pipe work on the R/H sidewall and used tape painted in a darker colour to simulate sidewall panelling. With the interior done I buttoned up the fuselage with very little trouble. Due to the now well known tight tolerance issues with the new tool Airfix kits I dry fitted everything! Most of the window cut-outs required opening up slightly to get a good fit. The bubble window gave the most trouble and required the interior of the recess shaved to improve the fit, it's still not 100% but I can live with it as it is now. This afternoons challenge was drilling out the Lightning holes on the troop step! Not content with that I have also drilled out lightening holes on the jammer mounts on the fuselage sides Next up I need to get the cockpit glazing sections together and masked up, a job for my days off next week! Will post a wee update on any progress before then. Many thanks to my work colleague and HC.4 guru FAAKeith who has provided no end of info and guidance on detailing and what to watch out for. All comments and questions welcome, Thanks, Eng
- 71 replies
-
- 10
-
-
Well I can honestly say this has been one of the most enjoyable builds I've done in many years and I have stuck with this almost constantly without the usual distraction of another new kit arriving or loosing interest. Not quite the Out-of-Box build I'd intended, however the only extra I bought was an Eduard mask set for the windows, the rest of the changes were all scratchbuilt. Work-in-Progress thread here - http://www.britmodeller.com/forums/index.php?/topic/234997923-airfix-seaking-hc4-almost-oob-build-fiddly-bits/ Airfix, well done on a great piece of work, a type sorely needing covered in 1/72 and I for one have another two of these, and two of the HAR.3's still to go! Alterations to the kit as follows:- - tape seat belts on all the seats, - additional cabin details including headset cords, sidewall linings, and emergency kit on the aft wall of the 'broom cupboard' - rotor head rebuilt with swash plate, pushrods and a representation of the folding rotor pipe work on the blades. - detailed the crew entry door with reinforcing angles, stiffeners and handrail assemblies, - underside cargo lifting slings and associated cables, and controls, - drilled out the lightening holes on the main door crew step and the IRCM mounts - added power cables to the IRCM boxes, - grab rail and additional support rods for the winch above the main door, - under nose antenna replaced with fine wire and cockpit side antenna fabricated from wire, - wire antenna along left fuselage made from fine mending thread. Couple of things I'm not too happy with:- - green tint to the upper cockpit windows is not pronounced enough, - the underside sling looks slightly under scale and could have been doing with slightly thicker wire for this, - overall finish is a bit too matt, looking at some of my In-progress pics it would have been better left slightly glossy (I'm NOT remarking that cockpit!!) Right, time for some pics. Just a few notes added to my instructions over the course of this build! All comments, good and bad, gratefully received, hope you like her! Rgds, Eng
- 48 replies
-
- 57
-
-
Good day to one and all, and welcome to, I believe, my first RFI for 2016! I know I have been slacking so I do apologise. I built this in the Helo GB but display it here for those that don't frequent that far down. This is the Seaking MK4 from the newly tooled Airfix offering. I opted to backdate it to around 1990 when I was on 846 as a wee apprentice causing havoc. This depicts a Sea King that we were going to take into Egypt post Ex Dragon Hammer 90 but she had a main lift frame crack so was sent back to the UK for repair. It was the first to be fitted with a sand filter and we arrived back in the UK literally a couple of weeks before the start of the first Gulf War. I didn't go for that though as I was still a young apprentice and had to finish my course first. Now I must confess it turned out to be a bit of a half ars hearted build. First the decals in the kit don't provide for the stensiling of 25 years ago (jeeze that statement makes me feel old!) and I couldn't find anything anywhere! I had an old model decal sheet for a Seaking 3 that provided everything but it was yellow on a black background when it should just be yellow for this era. I also opted to do the mesh after the build was underway and I didn't do all of the mesh. Airfix do provide decals for all the applicable areas but this is black mesh and not green which would look a bit bizarre. If I do another I would cut out all areas, thin and then attach from behind. So what are the good and bad about this kit? Interior cabin is reasonable and a little embellishment will bring it all out, the cabin seats are overscale and not correct, Revell are much better. Cockpit is ok, IP decals are a little garish, the drivers seats are very nice and a good representation. I didn't like the strake on the kit (the piece of angle iron stuck to the left upper side of the rear fuselage) but lived with it. Tail rotor is fine if a little simple (separate star would have been nice), Tail fold detail is simple but a good base, To me the overall shape is decent and the fit is very good but a little tight in some areas. There are a couple of dodgy panel lines but overall I like it. It looks like a MK4 so that's good enough for me. Would I do another? Probably not a Mk4 but if a 5 or 6 was released then definitely and then I would spend a lot more effort on it. So the extras I added, scratched tail gust lock, tail fold detail, tips socks badly tied in to represent the 'snakes wedding' look of the real thing (never was a decent knot tier). Various handles and lashing rings added (but could have done more). Anti ice probes and OAT added to canopy. Rope from cotton, HF aerial from very fine rigging thread (it is there honest!), scratched main rotor swashplate and control rods, detail added to lower door steps, lots of lumps, bumps and holes removed/filled and finally a pee tube added inside. Painted with model master acrylics. Edit: She is displayed with the Revell sand filter as the airfix one is too simplistic and looks hideous with those decals! The only disappointing area of the kit for me. So I think that is about it. Thanks for looking Edit 2: She also has no number, I did apply one but it came off during handling so that is a 'follow up action!' Bob And with her Belgian cousin Finally a couple of shots of the real thing on HMS Intrepid, 1990 although the first one is VJ! And ..... just don't ask!
- 23 replies
-
- 32
-
-
Greetings everyone, I intend to kick off this group build attempt with the new cracker from Airfix, the lovelly looking Seaking 4.I have a good friend to thank for the kit. He was returning back from the UK and brought one back for me, so cheers Steve! First up is a look at the kit for those that haven't seen it yet (where have you been!) all washed and ready to go (I take it washing a kit before a GB starts is allowed??) and the decal sheet So what to build her as, I have a soft spot for the Mk4 because it was the first aircraft the Navy trusted me to look after. It was VN of 846 NAS back in 1990, We sytarted on the Intrepid for a tour around the med on Ex Dragon Hammer, and then we had a couple of weeks camping in the dessert and operating in Egypt. Bit spooky because 2 months later the gulf war kicked off and my squadron were one of the first to go. Unfortunately (or fortunately which ever way you look at it!) I left the squadron a week before to continue on my Tiffs course. So this is what I would like to model A Mk4 from 1990 of 846 (this one shown is VJ also of 846 which joined us) unfortunately I can't remember any serial numbers so I don't know if I can model VN accurately. This is another shot load lifting off the Intrepid And this is the only photo I have of VN with some sprog Tiff awkwardly relaxing on it for a photo op (but it doesn't show the number!) I can't remember who died that day but I seem to have my trousers at half mast! So thats attempt number one ready for the off tomorrow Bob
-
Has anybody any other pictures of this seaking? or know anything about it? a great whatif don't you think. Rodders
-
Finished I do like the kit it builds up quite well view from 5ft Rodders No I dont like the sand filter decals either
- 28 replies
-
- 21
-
-
 Attention all Fleet Air Arm modellers, the new Airfix 1/72 Sea King HC.4 has just arrived in stock and is available to order now. The kit has decal options for 2 aircraft, 1. ZA314/WT of 848 NAS in 2011 in the basic Olive Drab colour scheme 2. ZF115/WV/R of 848 NAS in 2009 with the white stripe winter camouflage
 -
I thought the Junglies had been retired? there's a couple been buzzing around Kent today at low level towards Manston( also being converted to a lorry park at present) Unless of course a "Lorry Park" is cover for a 4000 people refugee camp? Steve
-
Greetings all This is my latest completion, built over in the Seaking STGB but also thought I’d share the completed article here. It is the Revell 1:72 Seaking Mk6 kit modified to Mk 48 standard and built to represent RS05 of the Belgian Air Force. She is depicted in her anniversary markings which are quite colourful and make a difference to the usual grey Seakings. I chose this version because way back when (about 10 years ago) when I work for the Armed Forces Premier aircraft repair unit – MASU (other units are available but not quite as good! ) – I spent 3 months in Koksijde repairing the main lift frames. Now Koksijde is a beautiful seaside resort which is kicking in the summer, but I was there in mid-winter and it was dead but still managed to have a blast and the locals were so good to us, but I digress… Some of the work carried out was: Remodelled seats to resemble the real things and not dining chairs Scratch built rear cabin area to fill it full of SAR equipment Scratch built Personnel door area to resemble the electronics rack Strake replaced with fine aluminium shim Sponsons boxed in and landing gear drilled out Totally remodeled rescue hoist to accommodate the plate on this version The engine intakes and exhausts are blanked but RBF flags have blown off! Scratch built camera mount – camera to be fitted at a later date, it’s still in the ‘workshop’ Grab handles fitted above windows Lower personnel door and various etch gleaned from old Airwaves and PP Areoparts sets Upper personnel door scratched She was finished off in Model Master Acrylics and the decals are an excellent set from Daco decals. Canopy inside is a bit pants due to overspray from poor masking but to take the canopy off to correct it would have been a pain so have decided to leave it. A couple of notes post pictures: The fuel jettison pipe is now fitted! The rotor blade droop looks poor in the phots (especially the rear one) and has been corrected. Also missing is an aerial on the nose (glidescope I think) which I need to knock up (or steal from the Mk 4 kit when that comes out). Phots taken in my dingy basement with my tacky camera (its persisting down outside) so not the best. Anyhoo the pics……… And here is the wip http://www.britmodeller.com/forums/index.php?/topic/234975429-whl-seaking-rs-05-belgian-sar/ Cheers now Bob
- 13 replies
-
- 13
-
-
First the obligatory picture of the boxes I think we all know what the insides look like! I haven't yet decided what aircraft to build other than a MK 4 in delivery condition with the white lettering. I was thinking of doing either a Pakistan aircraft with the Exocets (Old bobcat kit of the super puma has them I can rob) or an Indian navy one both decals on the way to me if eBay is to be believed. If not as you can see I have 2 set of C Scale conversion for the Mk 4 and decals for 8 different aircraft so may do a winter one or SFOR aircraft Anyway here we go....... Cockpits can be done with out choosing the 2nd aircraft yet. Rodders
-
 Next Cyber-Hobby Seaking variant is the SH-3H "Sub Hunter" - ref.CH5114 Sources: http://www.platz-hobby.com/products/4367.html http://www.scalemates.com/products/product.php?id=489196 V.P.
 -
Folks, A little elf told me that Santa is bringing me the 1:48 Hasegawa Mk5 limited edition Sea King for Christmas. This kit comes with the barn door FOD shield and larger radome but not sure about the starboard extended sponson. I intend to make it a long term build and build it is a HAS6, airframe number XV711, callsign 09, as shown below. I will be sourcing the various after market PE etc as well as some scratch building.. but I am wondering what's the best way to go, in order to obtain the decals ?? It must be the aircraft shown below, as it was the last Sea King I crewed back in 96 and the picture below shows us at Old Warden back in July 1996 Is it best to TRY and make my own decals in order to supplement what's in the kit, for example the serial numbers and the claymore etc.. or are there companies/experts who can make 1:48 scale decals to order ?? Any advice would be appreciated. Thank You