Search the Community
Showing results for tags 'Italian Air Force'.
Found 12 results
-
 Here's my first entry, and I think it might be the first chopper for this GB. Correct me if I'm wrong? I'll get into it when I get back from the mainland. Nice little profile... --John
- 4 replies
-
- 8
-

-
- bell 47
- Italian Air Force
- (and 1 more)
-
Here some photos of my rendition of the 1/72 scale ESCI AB 205 Huey in UNTAG colours. UNTAG was the name given to a UN group that oversaw the implementation of UN Resolution 435; the transition of the then South West Africa to the independent country of Namibia. Thus also being the last African colony to gain independence in 1990. UNTAG consisted of various contingents from all over the world, amongst others Germany, Australia, Spain, Italy to name a few. Italy’s contribution to the effort was amongst others a couple of Hueys. They were initially intended for use in logistical purposes, but were pressed into service much more urgently in medi-vac and similar mopping up operations, as the peace / independence process go off to a shaky start. With the peace deal between South Africa, Cuba, and SWAPO signed and sealed, and the South African forces being disarmed and retreated as per agreement, the so called liberation fighters from SWAPO thought it would be a good idea launch a full invasion attempt on day one of the transition period when the UN took over the administration of South West Africa. In the following clashes with the hastily re-armed South African forces, the SWAPO fighters suffered heavy losses. The UN had its hands full tending to the mess, with the Hueys being used to ferry casualties. When said casualties were not too severe, the liberation fighters were unceremoniously dumped back at their bases in Angola where they were supposed to be according to the peace agreement. The “incident” became known as the “April fools party”, as the first day of the transition was 1st April 1989. Anyway, these Italian Hueys were the first Hueys that I ever saw, never mind heard! Hence the choice of this particular scheme. The model is basically built straight from the box. Albeit being the second time, as I restored this model. I added minor details here and there, such as the ventilation louvres on the engine cowling and the antennas specific to this version. The only problems I had with the kit were the clear parts. Never mind the glue marks from the previous build, they were just too small to really fit. I guess that during the molding process the dwell time or pressure or a combination of such was wrong so that the parts shrank post injection. The side windows I could glue in using gelled cyanoacrylate glue to fill the gaps. However, the windshield was too far out. Therefore, I used the original to create a male former for a vacu-formed replacement. The decals are home printed – hands down the easiest print yet, as they all are black or red on a white background. So no juggling for color compensation etc. The red cross in the window is a print out on paper (as the original appears to be) held in place with some future. I kept the weathering relatively low, as they were delivered all clean. Just added a hint of exhaust staining on the tail boom, gave the walkway on top of the fuselage, rotor blades, and panel lines a wash of dirty white. The dirty white weathering stemming from the white dust that is so characteristic of Ovamboland, where the April Fools Party operations took place. R
- 9 replies
-
- 42
-
-

-
- Italian Air Force
- SWA/Namibia
- (and 1 more)
-
Piaggio P.108B Quadrimotore (SH72406) 1:72 Special Hobby The P.108B as you might have gleaned from the Italian name was a four-engined bomber that saw service with the Italian Air Force during WWII, and it had a similar performance envelope to its Allied equivalents, despite looking perhaps a little odd, especially around the nose. It first flew just before the end of 1939, entering service at around the same time as the British Lancaster in 1941, and showed much promise despite being about twice the cost of the existing bombers in service with the Italian Air Force at the time. When all factors were added up however, the bomb load and lower crew numbers made it a much more palatable proposition, and it won the competition for manufacture. There were other variants of the type considered, but the B was the only one that saw any substantial active service in North Africa and over Gibraltar, although their achievements were far from legendary, with high attrition due to accidents as well as through enemy action. After the Armistice with the Allies, support for the remaining aircraft fell away, and some were sabotaged to stop them from falling into German hands, although if they had, they may well have tied-up many German engineers trying to keep them in service, as was usually their wont. The 108T transport variant carried on to the end of the war in German hands, while the intended replacement for the 108B, the P.133 was never completed. The Kit This is a reboxing with additional parts of a 2004 tooling from Special Hobby after its last outing a few years ago. It arrives in a modest-sized top-opening box that is jammed full with sprues. There are five sprues in grey styrene, a clear sprue, a bag of resin parts, a decal sheet and instruction booklet with colour profiles on the rear pages. The detail is typical of the period of Special Hobby’s output, but time has been very kind to the moulds that still seem to be as crisp as the day they were first created. The clear parts are nicely crafted too, and the resin is the icing on the cake. Construction begins with the cockpit, starting with two seats for the pilots, which have tubular arms at the sides and pencil-rolled back cushions. The seats are placed on raised boxes and are fixed to the floor along with a central console on top of which the instrument panel sits, along with its decal to detail it. The 108B had twin controls, so two columns with yokes are glued in front of the seats, then the completed assembly is inserted into the starboard fuselage half once it has been painted internally and has clear windows and spar added, with a bulkhead and window blanking cover inserted further back, plus another on the port side. The fuselage is closed up once the port side has its windows added, then the elevator fins are made up from top and bottom halves and butt-jointed to the fuselage. Pinning the butt-joints would be a wise move to strengthen the joint here, and don’t forget to install the tail wheel and its strut before closing up the fuselage halves. The 108B has large wings with two engine nacelles per wing. The nacelles are made up first, with the larger inner one consisting of two halves, while the outer nacelle is a single part. The remotely-operated resin turrets are fitted into holes in the top of the outer nacelles along with their twin machine guns, another of the 108B’s oddities. The engines were designed to out-perform those of the opposition’s B-17, and in the kit they are each supplied as a single detailed part on a backplate, which fixes to a ledge in the two-part cowling. The engine mounting fairings are made from a cylindrical section with scallops around the edge, and a tapered section that receives the engine and its cowling. The inner nacelle has an insert slipped in from the front before it is added, for later use with the landing gear parts. The two wings slide over the short spar and are glued in position, allowing plenty of time for the glue to set up, taking care to align them correctly while the glue dries. The front of the fuselage is open at this stage, and once the floor for the bombardier has been inserted, the nose glazing can be glued in, choosing the turreted section or the glazed over parts depending on which decal option you have selected. The canopy is a single part that covers over the cockpit, as the crew enter and leave elsewhere. If you have selected one of the decal options with the nose turret, an additional piece of glazing and a resin gun are added above the main nose section, then an antenna and D/F fairing are positioned behind the cockpit, with two resin and clear styrene domes fitted into holes on the aft section of the cockpit hump above the trailing edge of the wings. This boxing has four resin prop bosses, which receive three styrene blades each, and each one needs a 1mm hole drilled in the rear so they can be fixed to the front of the engines later. More resin is used for the exhausts, with two pipes used per nacelle, giving the modeller a choice of two long hedgehog-style exhausts or shorter curved exhausts depending on the decal option. The outer nacelles have their exhausts on the underside of the cowling due to the presence of the gun turrets on the topside. Under the inner nacelles are the main gear bays, which receive Lancaster-like H-shaped twin struts with angled retraction jacks, plus a pair of bay doors, one on each side. The tyres are each two styrene parts and have a shallow flat-spot to indicate weight of the all-metal airframe compressing the air within. Another clear dome is fitted beneath the fuselage, a small resin intake glues under each engine cowling, then a few antennae are added to the nose while the props are fixed into position on the engines. Markings There are four decal options included on the sheet, with a broad range of colour schemes and even operators to choose from, especially considering there were only 24 made. From the box you can build one of the following: MM22004, Red 1, 274a Sqn. BGR, Regia Aeronautica, Guidonia, Spring 1942 MM22004, Red 1, Sqn. BGR, 2th July 1942 MM24325 of 274a Sqn. BGR, handed to the USAAF, Sept 1943 MM22005, Red 8, 274a Sqn. BGR, Regia Aeronautica, Decimomannu, Sardinia, July 1942 The decals are printed by Eduard and are in good registration, sharpness and colour density, with a thin gloss carrier film cut close to the printed areas. You may or may not know that as of 2021, the carrier film from Eduard decals can be coaxed away from the printed part of the decal after they have been applied, effectively rendering them carrier-free, making the decals much thinner and more realistic, and obviating the need to apply successive coats of clear varnish to hide the edges of the film. It’s a great step further in realism from my point of view. Conclusion A welcome re-release of an odd four-engined Italian aircraft that many people may not have heard of before. Now where can I get one in 1:48? Highly recommended. Review sample courtesy of
-
Meant as a quickie beside my B-52 these two kits costs me more effort than planned. The Special Hobby kit in 1/72 scale shows a lot of fit issues and so a lot of filling, sanding and rescriping was necessary. The little scene shows two training aircrafts from 70° Stormo in Latina, south of Rome. The two kits are almost oob built , only the flaps were lowered and some static dischargers and antennas were added. Regards Daniel
- 11 replies
-
- 40
-
-
-
- Special Hobby
- 1:72
- (and 1 more)
-
Dear fellow Britmodellers, here's my 1/72 Fly Models Fiat G.50bis, built from the box. This is a multi-media kit consisting of plastic and resin parts. I painted with Gunze/Mr.Hobby acrylics, mixed to match the Italian AF colors. Photographs by Wolfgang Rabel. A full build review will appear in an upcoming edition of Scale Aviation Modeller International. Thanks for your interest, best greetings from Vienna! Roman
- 24 replies
-
- 52
-
-
- Fiat
- Italian Air Force
- (and 1 more)
-
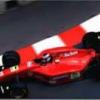
 After the flop with cold war gb, it's time for a new challenge for me. A real BIG challenge: a 32nd scale Revell's Tornado IDS wearing the famous 6° Stormo's "Red Devil". I really love Tornado so i decided to make a model in the big scale. Starting from the famous Revell kit: The box is for a ECR version, but inside you have all you need to make a normal IDS version, included instrument panels, bombs and cannon gun muzzles. i will build my model oob beacause i want to concentrate my efforts on the painting stage. I take some bits (the second BOZ pod, resin seats and resin nozzels) from another "unlucky" attempt to build a big Tornado. I will use airmodel instruments, master pitot tube and Tauromodel's decals to make a ol camouflaged machine with hi-viz roundels and codes. I love heavy weathered aircraft like this... I hope to start working on it soon, so stay tuned and wish me luck! ciao Ale
- 4 replies
-
- 3
-
-
- Tornado
- Italian Air Force
- (and 1 more)
-
 Good night to all! I'm back with my last work, an Aermacchi MB-326 G from the old ESCI (now Italeri) kit in 1/48 scale. The only two aftermarkets that I used are the Neomega cockpit (very poor and inaccurate)... and the 300 litres fuel tanks from SkyModels. MB.326-53 by Valerio, su Flickr MB.326-62 by Valerio, su Flickr I built from scratch the following elements: Flaps MB.326-14 by Valerio, su Flickr MB.326-21 by Valerio, su Flickr Exhaust MB.326-52 by Valerio, su Flickr MB.326-57 by Valerio, su Flickr MB.326-64 by Valerio, su Flickr Intakes MB.326-28 by Valerio, su Flickr MB.326-31 by Valerio, su Flickr MB.326-34 by Valerio, su Flickr MB.326-35 by Valerio, su Flickr Wing Fences MB.326-68 by Valerio, su Flickr MB.326-70 by Valerio, su Flickr MB.326-69 by Valerio, su Flickr Canopy structure MB.326-83 by Valerio, su Flickr MB.326-100 by Valerio, su Flickr Gun Sight MB.326-97 by Valerio, su Flickr MB.326-104 by Valerio, su Flickr This is the real one....! the Italian Air Force owned only two MB-326 G in the 70 years (RS-19 Matricola Militare 54289 & RS-20 Matricola Militare 54290), assigned to Reparto Sperimentale Volo to test & evaluate the new variant of the aircraft. 11998908_442586189260246_7379382820028146589_n by Valerio, su Flickr And this is the final result! painted with Alclad White Aluminium and Xtracolor X-104 International Orange. Finished with Mr.Paint Satin Varnish. Decals is a mix of Italeri, Small World Accessories & Tauromodel sheets. MB.326 end-14 by Valerio, su Flickr MB.326 end-11 by Valerio, su Flickr MB.326 end-13 by Valerio, su Flickr MB.326 end-10 by Valerio, su Flickr MB.326 end-12 by Valerio, su Flickr MB.326 end-9 by Valerio, su Flickr MB.326 end-6 by Valerio, su Flickr MB.326 end-16 by Valerio, su Flickr MB.326 end-15 by Valerio, su Flickr MB.326 end-1 by Valerio, su Flickr MB.326 end-2 by Valerio, su Flickr MB.326 end-3 by Valerio, su Flickr MB.326 end-4 by Valerio, su Flickr MB.326 end-7 by Valerio, su Flickr MB.326 end-8 by Valerio, su Flickr Hope you'll enjoy! Thank you! cheers! Valerio, Rome - Italy.
- 43 replies
-
- 63
-
-
-
- Italian Air Force
- MB-326
- (and 1 more)
-
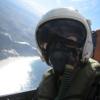
My contribution to the GB will start with a pair of Italian Air Force Starfighters, a recce pod-equipped F-104G from 28o Gruppo and an F-104S from 102o Gruppo. Here's a jumble of parts from which I'll build the pair, and the eagle-eyed will spot more than enough bits for two models; with any luck I'll also attempt a third kit in the pile, an F-104J that was started many years ago. At some point in the intervening years I've attempted a refurbishment of the incomplete model, only to put it aside for a rainy day or a F-104 STGB like this... A bit of reference material - and the odd instruction sheet, in case I get confused about what goes where... Thanks for looking. Andrew.
-
F-16A ADF Fighting Falcon ‘Veltro 51 (Octopus)’ 1:72 Hasegawa The F-16 Fighting Falcon has been one of the most successful combat aircraft of the last 30 years. It has provided air forces around the world with an affordable, reliable, high-performance multi-role fighter aircraft. No fewer than 4500 examples have been manufactured, making it one of the most produced jet fighters in history, and it continues to notch up export orders to this day. The F-16A (single seat) and B (two seat) were the original production variants of the F-16. Many examples are still in service with air forces around the world. The Italian Air Force leased 34 ex-US Air Force examples in 2003 under the ‘Peace Caesar’ programme. The aircraft were needed as a stop gap measure whilst the Italians awaited deliveries of the Eurofighter Typhoon. The last Italian F-16s were returned to the USA earlier this year. As you might expect of an aircraft produced in such numbers, there have been quite a few kits of the F-16 produced in a range of different scales. Most of the major manufacturers can count at least one or two variants of the aircraft in their inventory. Hasegawa’s F-16 has been around for a few years now, and in that time it has appeared in a variety of boxings, often with extra sprues added to enable different variants to be built. Age has not dimmed the kit’s attractions though, and it still rates as one of the better offerings in 1:72 scale. The kit’s parts are moulded in light grey plastic. The parts look reasonably crisp and sharp, but there is a little mould flash here and there. It’s a sign that the moulds are starting to show their age, but it isn’t anything that can’t be cured with the swiper of a sharp scalpel blade. The kits surface detail is fairly typical of a reasonably modern Hasegawa kit, which means it is precisely and delicately engraved and there is no softness of unevenness in the panel lines. The kit shares another trait in common with some other Hasegawa kits of a certain vintage in that the cockpit is a very simple affair. The instrument panel and side consoles lack any kind of raised detail and decals are provided to represent the instruments instead. A reasonably decent ACES II ejection seat is included, but overall this kit’s cockpit would really benefit from photo etched or resin enhancements. Unlike the F-16 kits of some other manufacturers, which have been engineered to allow both A and B variants to be built from the same basic moulds, the fuselage halves of Hasegawa’s kit are moulded in one piece without a separate cockpit area. This eliminates the need to clean up a potentially awkward join line. On the other hand, the wings have been moulded separately, so there may still be a little cleaning up to do, albeit in a less awkward location. The undercarriage bays have a basic level of structural detail moulded in place. They are not as busy as the undercarriage bays in the 1:72 Kinetic kit, but they are pretty respectable nonetheless. The undercarriage itself is nicely detailed, although the nose wheel is moulded in one piece with the gear leg and none of the wheels are weighted. The potentially tricky engine intake is moulded in five parts and is nicely detailed, although it is not full-depth. A fairly good set of ordnance is included, including AIM-9 Sidewinders, AIM-120 AMRAAMs, two 370 gallon fuel tanks, one 300 gallon fuel tank and some bombs. Most of these are not used for the kit depicted on the decal sheet, so you can have a field day filling the spares box. The canopy is nice and transparent but is not tinted, which is a bit of s shame as I’m sure Hasegawa have provided tinted canopies in the past. A handful of photo etched parts are provided to represent the particular variant of F-16 used by the Italian Air Force. It should come as no surprise to learn that the decal sheet caters for just one aircraft – that depicted on the box artwork in the special scheme worn by an aircraft of Veltro 51. Unlike some other sheets of this nature, this one doesn’t include too many big decals as many of the larger areas of colour have to be painted instead. Most of the fiddly bits are catered for on the sheet though. The sheet itself is printed by Cartograf. Conclusion Overall this is a nice kit and it should look good once finished in this striking scheme. The overall shape is good, as is the quality of engraved detail. The basic cockpit is probably the weakest area. Review sample courtesy of UK distributors for
-
 While trying to pass the time on shift I just happened to think about another possible group build, which is bound to have some interesting and very colourful subject matter, an Italian Air force Group Build. The Italians have produced some wonderful and very colourful aircraft over the years, from the early flying boats of WW I and the 20s, the interesting and varied aircraft of WW II. Plus the modern stuff is well catered for as well. There are a good range of Italian aircraft and aircraft operated by the Italian air force so subject matter should be too hard to find. Though if numbers dictate it could be expanded to all military equipment, civilian, or only to WW I to WW II aircraft, just depends on number and interest. Even have something already in mind, have a Flashback (Classic Airframes) 1/48th Savoia Marchetti SM.79 Im just dying to build. ------------------------------------------------------------------------- Ok Ive started a list so we can get an idea whos interested and the numbers so far. Here we go; 1/ trickyrich (me guess Ill be the host with the most!) 2/ Giorgio N co-host 3/ Lex77 4/ Enzo Matrix 5/ Paul J 6/ John W 7/ usetherudders 8/ Alpha Delta 210 9/ PaulR 10/ Radleigh 11/ Wez 12/ Paolo6691 13/ Jockney 14/ wellzy 15/ vppelt68 16/ Arniec 17/ SimonR 18/ Sgt. Squarehead 19/ Jinxman 20/ Prenton 21/ CliffB 22/ Tornado 23/ Misterfriend 24/ paganpete 25/ nimrod54 26/ wyverns4 27/ Mottlemaster 28/ Doug Rogers 29/ bobster 30/ swat11 This could....will be lots of fun so try and drag a few more bodies, preferably alive, a long for the fun. Fingers and toes crossed this gets up!
 -
We've all been there with our mental colour cards trying to figure out which is the correct green, peering at every conceivable book and internet resource. Even blindly following the recommendations of a bloke you ever met or heard of before. Painting strips of slightly different shades of green again and again slowly becoming mad and even more unsure of your choice. So after my little rant which Tamiya XF- green is the correct one or nearest to an Italian camo Panavia Tornado from the 80's. Hopefully one of you Tonka boys will help me out. thanks, Wayne
-
Hi all I am midway trough an Airfix F-86E I want to finish as an Italian airforce plane. I had a look around the internet and I found some pictures with ejection seat in what could be dull silver or very light grey, but then I found a comment here on Brit, from, I think Giorgio N (Sorry it seems I can't find it right now), saying that the seats on Italian planes were Black. I checked the pics I have and he is right you can clearly see the upper frame being black, also the head rest is black too. now my question is very simple, was the seat completely black? Does anybody have a picture? Thanks Paolo