Search the Community
Showing results for tags 'Interior'.
-
 Star Wars The Mandalorian Razor Crest Updates (for Revell) 1:72 GreenStrawberry We reviewed the Revell release of this (IMHO) iconic but short-lived Star Wars ship in Platinum Edition here recently, and the original release that came without the additional cockpit parts of the later edition. You might note that the Platinum kit included some GreenStrawberry parts for the cockpit and cannons, but they had also been incredibly busy making more detailed update sets for the kit that will bring a huge increase in detail to the kit that would otherwise take the modeller forever to complete themselves, assuming they even had the skills. The sets are themed for various areas of the kit with minimal overlap, and can be purchased individually to suit your needs or budget, or you can push out the boat and opt for the FruitPack edition that includes all the sets with a discount to match. We’ll link to the FruitPack as the end of the review. The Sets Each set arrives in an appropriately sized cardboard box in their usual black, grey, red and green theme, with the resin parts in a Ziploc bag, and any Photo-Etch (PE) sheets separately bagged with instructions and black paper divides (for multiple sheets), to prevent chaffing and bending of the parts. Cannons (15822-1/72) This set completely replaces the kit cannons with eighteen resin and five PE parts. Each cannon starts by joining the three stepped tubular sections together to form the main assembly, adding a separate muzzle to the end of the barrel, then making up a two-part sub-assembly for the shroud around the outer mid-section, which has a smaller shroud added to the front of this section, and a curved strip around the end of the cylindrical body. The left and right assemblies are handed, and simply slot into the holes in the sides of the nose in the same manner as the kit parts. Engines & Exterior (16022-1/72) The Razor Crest has an oversized engine nacelle to either side of the hull, and these are the subject of this set, consisting of thirty-seven grey resin and two clear red/orange resin parts, plus a PE sheet of detail parts. Each nacelle is made in mirror-image, starting with the exhaust petals made from two highly detailed halves, which have ten vanes inserted into grooves in the rear, aligning the assembly with the base part that it is glued onto. The clear orange/red part is intended to allow you to easily light your model, and this circular part has two sleeves fitted to the central tip before it is glued to the underside of the exhaust assembly. The kit cowlings have PE strips fitted around the inner lip before the exhaust are inserted into them, with a scrap diagram showing the correct alignment to complete the engine part of this set. The rear landing gear struts are targeted for the next round of upgrades, starting with removing a simplified section from one of the actuators, creating the replacement from four PE parts, which adds a lot of extra detail with lightening web-work on the struts and sides of the supports. This is glued to the main gear legs, and the captive bay door is fitted over it after removing a small area of raised styrene that is marked on the instructions in a dull green. Behind the main gear bays are grilles at the end of the nacelle, which the set replaces with more accurate detailing in the shape of an insert for each side of the hull, plus two circular detail-parts on the rear loading ramp. The final parts of the set replace ten triangular strengthening parts near the front of the engine nacelles, which should be removed and made good first, folding each replacement into a wedge-shape before gluing it into position equally spaced across the two locations. Cargo Bay (16122-1/72) This substantial set is packaged in a deceptively small box, although it is still the largest of the boxes, mainly because there are five large sheets of PE of varying gauges, plus thirty-four resin parts, some of which are quite large. There is also a small piece of paper printed with template shapes for some alterations that are carried out during the build process, the instructions for which stretch to seven sides of A4. The first stage is to remove large parts of the cargo area sidewalls, increasing the size of a doorway, removing some tapering tubes in the nose, and filling any rough areas once complete. With that done, the PE front bulkhead is prepared, folding several wires down over the bulkhead to add detail, then adding a resin trunk, a set of PE tools in a rack, and a two-layer recessed bay to the cut-out in the bulkhead. This is glued into place at the front of the cargo bay, where the space-toilet is found, completing the structure by using the kit parts, which includes the short sections of the side walls that were left after removing the rest. The cockpit floor is also replaced by a long PE part with etched-in detail, and a small fold to the forward edge. In the outer walls of the two forward bays, a triangular fillet with grilles etched-in are made with the use of two templates to make styrene back-plates, fitting them into position at the top of the compartments, and installing two resin detail parts into the starboard bay, a toilet and a PE ‘basin’ that is folded from two parts. Extra diagrams show these installations from above as a “modeller’s eye view” to assist you with placement. The next task is to create sub-assemblies for installation in the bay over a couple of pages of the instructions. It starts with folding up ten PE blasters to attach to the weapons locker body and doors that are supplied as three resin parts. A section of the cargo bay is made from two open doorways with a section of roof above it, plus two grab-rails added to each doorway. A ladder is folded up and attached to an equipment box, and another ten lighting boxes with three rectangular cut-outs is made with use of another of the pattern pieces to complete the assembly. Next, a jig is cut from the PE sheet and folded into a C-shaped carrier so that five ribs and three cross-ribs can be installed and glued together without undue issues, unless you’re too liberal with the glue and stick it to the jig! Don’t do that. Another jig is folded up to create a longer section of ten ribs and three cross-ribs, putting these to the side carefully to avoid damage before installation. A tapering rib has a similarly shortening set of lightened ribs half-etched to it so that they can be folded perpendicular to the long rib, rotating them as you do. The jigs are then bent in the opposite direction to create the same three assemblies in mirror-image to finish the three ribbing sub-assemblies for the hull. The kit hull is moulded as a tub with a blunt nose, and sharply tapered rear where the main loading ramp is located. The tapering rib assemblies are fitted to the rear of the hull, adding another rib level with the floor near the roof. A resin strengthener is fitted in front on both sides, gluing the ribbing to the wall and adding two resin equipment blocks over the top, plus four lighting boxes at roof level. Another doorway is fitted forward of this section, and the short ribbing insert is glued to the wall, fitting another lighting box at roof height, locating the resin compartment in front, then installing the gun locker and ladder in front of that, which finishes filling the interior from nose to tail. The same ribbing sections and light boxes are fixed on both sides of the hull, the starboard side having two wiring looms instead of resin equipment blocks in the long compartment, a control panel next to the side door, and a stowage net in PE laid over the ribbing. The doorways should all line up with grills on the floor, and the instructions point this out, perhaps a little later than it should, but pay attention to this in anticipation. The kit upper floor is prepared by removing a cross-bar from below, and cutting out a hatchway just behind the cockpit using the template provided, after which the rear of the floor is cut away, as shown by the red printed area on the drawing. The open undersides of the cockpit floor should be filled as instructed, then another stowage net is fixed to the underside, allowing it to sag under gravity. The new ceiling to the lower floor is detailed with four resin clamps for carbonite frozen criminals, adding four raised panels to it, and another stowage net, again sagging under gravity. The kit ceiling is lowered into position over the new ladder, and at the rear an aft ladder is folded up and glued in position at the edge of the new ceiling after it has been inserted and glued down. It's a big set, and the most expensive of the six for good reason. There’s a lot of content, and it’s time-consuming to create for the manufacturer. You will need to create sub-assemblies and undertake painting in stages, and with care an amazingly detailed cargo bay will be the result. Cockpit (15722-1/72) It’s worth noting that this set is not the same as that included on the Revell Platinum boxing, which was a simplified version to appeal to a wider and possibly less-demanding audience. There are twenty resin parts, and a sheet of PE, plus a template to cut out the hatchway that is printed on white paper. The first step is to fold up small PE parts to represent the controls on the resin instrument panels on both sides of the cockpit, then folding up additional boxes that are fitted into a recess at the back of each console, and help space the consoles from the cockpit wall, and will also support the next panels to be made. The PE floor with etched-in detail is inserted into the resin tub first, followed by the two panels made earlier, creating a cylindrical control column from three resin and two PE parts, which fits near the front of the PE floor in the centre. On either side are two rudder pedals, folded to a wedge shape, gluing the non-detailed side to the floor, adding two additional consoles stepped above and behind the lower side consoles, then making a representation of Mando’s favourite weapon to hang on the bulkhead outside the cockpit, plus a small instrument box with trunking running up to the ceiling. Inside the cockpit above the doorway, there are three small domes moulded in a line, which are partially covered by a two-part PE assembly that allows the domes to be seen through the grating underneath and through the circular etchings on the front of the part. The pilot’s seat is resin, and is mounted on a PE box that is folded up, and has a PE support running up the back, while the two passenger seats have a similar mount, but also have seatbelts included. The port seat can be posed folded away to the side, with a separate flat resin seat and different PE belts to suit the stowed seat. Inside the kit's upper hull, the cockpit framing is moulded-in, and short raised sections should be removed with a sharp blade, scraping it flush, then adding a longitudinal frame the entire length of the canopy, with three grilles at the rear, and two equipment boxes with separate faces over the pilot’s seat. A tiny pair of PE instrument are located on the sidewalls of the cockpit as shown in a transparent diagram, taking care not to lose them, as they are very small. The kit floor and walls are adapted to suit the new layout, removing the forward half of the side walls and the moulded-in ladder that will be replaced, while the floor has three raised boxes removed and made good, using a template to remove a section of the floor behind the cockpit for the hatch that leads to the lower level. The new cockpit tub is glued over the kit floor, and the floor in the compartment behind has a new PE surface installed, adding the remains of the kit sidewalls, and the kit rear bulkhead to complete boxing in. A new PE ladder is folded up, and you are shown the moulded-in ladder in the lower level that will need removing before installing the replacement, and a two-layer door is also supplied in case you wish to depict this in the closed position. The final diagram shows the location of the ladder and the closed door to assist you with placement. Flaps (16222-1/72) These aren’t flaps as we’d expect to see on a terrestrial aircraft, but are air-brake flaps that extend from the engine nacelles on command, revealing the bays behind them. The set consists of five resin parts, one of which is a jig, and two sheets of PE from which the flaps are created. The first step shows the areas of the engine nacelles that should be removed in red, giving helpful 'before and after' diagrams to assist you with construction. The outer nacelle parts are separated into two subsections that are joined back together by a large and detailed piece of resin with the bays moulded-in, which joins them together on large lips that should prevent any issues. The engines are then built as normal, making the flaps and leaving them detached until after main painting in case of damage, which is likely if you’re a clumsy modeller like me. The four flaps per nacelle are all made from two layers, folding over the gridded section onto the solid portion without gluing them down, then applying the PE to the curved jig and bending them to shape for later fitting. The jig is a perfect arc of the nacelle, and as long as you press the flaps over it squarely, they should be the correct shape when removed. Annealing the flaps may assist with bending the parts smoothly, holding them over a flame until they discolour, without letting them become red hot for more than a fraction of a second, then allowing the part to cool naturally, which leaves the brass more malleable. The four flaps per nacelle are shown being installed at the rear end of the bays, with another diagram showing which numbered flap should be located where, as they all have different details on the outer skin as seen from behind. Cargo Stuff (15922-1/72) This set is the most fun, as it includes equipment, accessories and other items that would be seen inside Mando’s ship, consisting of twenty resin parts, and a small PE sheet. There is a little overlap with the Cargo set, which extends to the stowage nets and the clamps for the carbonite frozen perps that he often carries on the way back to collect their bounty. The first item is a tubular container with PE backpack straps, which is shown in one of the compartments with several loose items, including another backpack and helmet, plus sundry boxes and other parts. The stowage net in the short compartment is shown holding equipment in position, another diagram showing the net in the longer compartment, the various boxes also shown without the net over them for clarity. The final and best parts of this set is the four carbonite frozen criminals in their “frames”, hanging from the ceiling by large clamps, in the same manner as seen in the show. There is an Ewok, a humanoid wearing shorts, a Rhodian (Greedo’s race), and a Ithorian (Hammerhead), one in each frame for you to arrange in any order you like. Painting them will be relatively easy, as once a person is frozen in carbonite, they’re a monochrome metallic shade. Of course, leaving the rear ramp open is the best way to expose your hard work within the model. FruitPACK (FP23) For the super-detailer, all six of these sets are included in the FruitPACK, which you can check out by following the link below, representing a substantial saving on purchasing sets individually. Conclusion This Star Wars fan thinks Mando and the Razor Crest are the best things to come out of the modern trilogy and its off-shoots, so when I build my kit, it will be a fully detailed model, although I’ll have to learn how to make a lighting kit before I do. The detail presented here is truly amazing, and it’s worth every penny. Don’t hang around though, as some of the sets are going to be out of stock soon, so get your order in while you can. Extremely highly recommended. Review sample courtesy of
 -
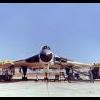
I'm building the Italeri Dakota Mk. III at present, as per 48 Sqdn. on D-Day. I need advice on equipment location/colours in the crew area aft of the cockpit but forward of the main fuselage section. Has anyone got photos of the layout and especially what equipment/fittings went on the various bulkheads? Many thanks.
-
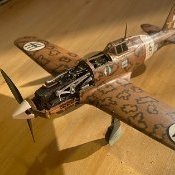 Hello colleagues! This is my first post in the armour section, I hope you'll like it. The previous Macchi C.202 was a challenge to finish because it is so delicate, this was rather a laborious kit to finish. For the main interior colours I used Humbrol 224 Dark Slate grey, and another Humbrol for the white, possibly Humbrol Ivory. The mechanical parts are gun metal + aluminium dry brush, and as a finish PLW Deep Brown wash. The shells are painted with Humbrol 54 brass metallic. For the main exterior colours I used: Tamiya XF-60 Dark Yellow, Tamiya XF-64 Red Brown and Tamiya Dark Green XF-61. The model is stock, but it was lacking interior decals so I bought Archer Fine transfers decals: German 88mm ammo stencils and Panther and Tiger stencils (for interior). I kept weathering and damage to a minimum, I do not have much experience in that anyway. I wanted a tank in a nice condition albeit oily, the wash is PLW Deep Brown. There is no varnish on this one, just paint. Here is the Google album with all the pictures.
- 23 replies
-
- 23
-

-

-
After completing my mammoth scratchbuild, I need a new project. I threw together a lovely 1/72 T-35 kit, but it only took a handful of sessions, and whilst I’m happy with the result and thoroughly enjoyed it, I only have very limited display space, and it failed to entirely enthral me like a true DIY model does. I’ve not yet decided on a new full-scratch project and am not really ready for the commitment just yet anyway, so time to “scratch the scratch itch” in part at least…. Looking through my stash (not something that took long as there’s only a couple of planes, an old car and one tank) I found a nice looking Hobbyboss Vickers medium MkII. It looks to be a very nice kit, with individual link tracks, a little bit of etch and some clever moulding, all very neatly packaged. Some of this clever moulding includes a one-piece upper hull which has a number of separate hatches, so to my mind, it’s crying out for an interior. It’s also full of injector-pin marks, so the first job was to scrape (using a curved No.10 scalpel) and sand them away. I then set-to with the plastic card. I’ve found a couple of images of a resin interior kit online, which together with real interior photos, allowed me to start knocking up a raised floor, bulkhead and driver’s compartment from 0.5mm sheet. These are just blu-tacked in place for now. I’ll detail (and probably paint) them all before slotting them into place. It’s a nice, clear and open box basically, so pretty simple to make and easy to see why crews were apparently fond of this machine. I need some checker-plate flooring though, so I think I’ll need to order some textured card. It’s good to be back in the saddle, and while I get to scratch some fun bits, it shouldn’t take a year to complete (hopefully!)
-
Hi! I'm starting a new build of Takom's fantastic Panther kit. It has a full interior included and very thorough detailwise. I have an ABER set to it, which has all the goodies including aluminum barrel, brass MG barrels, antennas etc. There's also MasterClub tracks, Eduard Panther interior set, Tamiya brass shells and Aber shackles. Some of the aftermarket aren't really necessary, but on the other hand, why the hell not. The details are very crisp and so far the kit goes together really nice. Nothing much has done yet. I'm at the point to get the first paint on it to get the lower hull sides and bottom together. Sorry about the crappy images. We had a rare occasion of sunshine this time of year here and there's a lot of light and shadow on the photos. Cheers! Kristjan
- 152 replies
-
- 17
-
-
Hi Pals, Hi Pals, I end this kit, which has been quite enjoyable to build and paint, which includes a fairly decent interior and which I decided to do, although in this specific case, not much is seen, even with the hatches open, if we disassemble the turret, something else if it is visible. I have tried something new with this model (the truth is that I almost always do it ... lol), since I continue learning and improving what I already know how to do, and that is that the internet is a very useful resource, since it is not possible for me to share with nobody the hobby in person (now, even less). Oils are definitely something very useful when it comes to painting, and even weathering on models, and it is also the first one with which I use satin varnish, trying to get a feeling of something "metallic", which I think is achieved by impacting the light in certain parts, I hope the photos show it, because in my hands, if I can make the mental abstraction that "it is not plastic" ... lol Thank you all very much for watch and comment, and for the tips that have corrected at least a couple of errors (there are 2 less ... lol), I hope you like it. Cheers and TC Francis. 👍 BLACK BACKGROUND White background
- 36 replies
-
- 34
-
-
-
- STUART
- 1/35 ITALERI
- (and 1 more)
-
Time to start a new build. After contemplating kits in my stash for a week I have decided to go with Asuka's 1/35 M32B1 Recovery tank. I have the Academy 1/35 M36 kit that has the drivers compartment/ transmission etc. in it and will kit bash it to fit this build. I am also considering adding an engine bay to this build as well. I will use online references and also Tankograds Book on this vehicle for my build. The plan is to depict a WW2 era vehicle. I think I have the Star Decals set for this too. I may replace the tracks with aftermarket if paint doesn't stick to the rubber ones.
- 25 replies
-
- 4
-
-
- interior
- Asuka 1/35
- (and 1 more)
-
Does anyone know of or have a clear image of that area to the right of the pilot's seat? Is that section just a crawl area for the crew to get into the nose or did it have some kind of jumpseat for the navigator to assist the pilot? I await. Chris
-
One of my parallel projects, other than the Marder I in another post, is this Tamiya Wespe. I started building the driver's compartment and improving the fighting compartment details some 2 years ago then put it on shelf. Thanks to the new Marder I, I brought it down from the shelf to be painted along with the Marder. Here are some construction pics from before. The driver's compartment benefited greatly from the gearbox taken from Dragon panzer II. The gearbox would be almost a waste hidden in a panzer II anyway. The rest of the compartment was detailed up with plastic sheet, part from spare box and some scratch-built items. The fighting compartment walls were detailed up based on photo from Nuts & Bolt excellent book on the subject. Nanond
-
Dear All, One of my next projects will be the Revell 72nd scale F4U-1A Corsair which, whilst not as fine as the Tamiya equivalent, looks to be a good kit and at less than half the cost of the latter. The kit itself has two decal options, one for a Marine Corps unit in December 1943 and the other a Navy unit in February 1944, one of which I will be using, and both have the same colour scheme shown which has a mixture of white with blue/grey outer wings panels for the undersides. However after searching this site via Google and also referring to an article on interiors colours in the October 1981 edition of SAM I'm slightly confused about the correct colours for the wheel wells, engine cowling, oleos and the internal sides of the undercarriage doors. Some suggest that all would be in the external colour, so white in this instance, yet others refer to the use of chromate yellow unless it compromised the underside colour? I've checked my SAM publication on the Corsair (MDF 18) and pics of preserved examples in the US show white being used for the wheel wells, oleos and undercarriage door inners (including the tail wheel doors) but as museum pieces don't always get it right can I safely assume this to be correct? Other pics in this book show chromate/zinc yellow primer being used in the gun bays, engine cowling/bay and inner tail section, with interior green for the cockpit all of which I'd expected. Regards Colin.
-
So this has been my big lockdown endeavour, the 1/35 Meng 505th King Tiger with full interior. A real labour of love and a solid project to work on. I would recommend to all, but be careful with the fit of the hull as the 'scale thickness' armour means that it is very tight to secure over all of the innards. As I was working I decided I wanted a little base to display it on, which then morphed into a few figures to denote scale, which then became a lot of figures and what is almost a full diorama! My initial set of photos (apologies for the poor quality/ composition) and happy to take more if anyone is interested:
-
Hallo again This Königstiger was a Takom kit with full interior. It was my first battlefield tank with full interior. The recovery Panther was my first one. Actually, it is very fascinating to work on such a kit. It is like a WingNut Wing kit. Really. The parts are all well done, good detail and accurate. Lots of grasping is sometimes needed, but this is good so. The instruction is well done. I think, you may ask about my painting. Actually, I only build tanks fresh from maintenance or repair shop. Not battlefield worn. This I dislike most, because I have seen such vehicles battlefield worn, but here I see only the pain and misery. So I leave it out by all means. Happy modelling, stay health!
-
Hallo again Well, this is my second interior kit. My lessons learned from my Bergepanther G is the following: Do not get lost in detail in your first session. Check out all parts, which make up the main body. Check the rear wall with sidewalls in the engine compartment. Here is one of the lousiest flaws! If the sidewalls do not properly fit with the rear bearing for the tension axle, the game is a horror. Check out, that the gluing surface really fits at the bottom of the sidewall. The intersection with the rear bulkhead is also a point of major conflict. So I tested all this with the upper hull and got a green signal. Well, it is a quite simple action ahead. Since I am used WingNut Wing kits like the Fe2b, so this interior kits are a challenge to do something different for a while, after almost 25 years of aircraft. See you again. Stay health. Happy modelling
-
Uh oh...new obsession I'll never finish anything.....
-
Hi, all! Looking carefully at Mirage 4000 1/72 Modelsvit, I suddenly discovered that I had absolutely no information about him cockpit electronic bay. My interesting detail colour equipment inside cockpit electronic bay. Why I doubt the colors offered Modelsvit in assembling? Because, Modelsvit in assembling offers paint detail canopy frame as Humbrol 127: Really? Serious? It's Humbrol 127 inside canopy??? Next "funny" moments with Mirage 4000 1/72 Modelsvit. Look on this photo very-very carefully: It only seems to me, that the canard , ailerons and the wing zone above main wheel bay have stencil & white element on canopy: ??? Probably it's standard sencil "NO STEP" on French language. Of course, these stencil are not a Modelsvit decal.... That's why I want to double-check the Modelsvit assembling from the photo of the real Mirage 4000. Any help??? Resource photo: Wikipedia, Airwar....and first thing that came across in the search for Google for Humbrol 127... B.R. Serge
-
Hi Gents I know the subject has been treated but i would like to know if someone can do a reliable synthesis for the colors of: - Interior (cockpit, turret): Raf Grey-green. - Undercarriage bay: Aluminium or Raf Grey-green ? - Undercarriage : Aluminium/black or Raf grey-green/black - Flaps (interior): grey-green. for a Mk.1 or Mk.1f. Do you know where i can find a plan with rivets lines (book, internet) ? Thanks a lots Best regards Pierre
-
Hi everyone, I guess it is time for my first build here on the forums. So couple of weeks ago my family decided to get me a surprise gift for all the work i put into studying and it arrived today to my dormitory. The plan for this one is to make a diorama of crew at rest around the tank relaxing in a bit what if scenario. Maybe the countryside? or a dirt road by the field. I am not a big fan of my family wasting so much on me, literally spoiling me but I have to admit, I am impressed they know me so well and they picked all my favorite tanks from the second world war. The box itself is huge. It was at this moment it occurred to me that I might require a bigger desk than my current one. The box art in my opinion seems a bit minimalistic for Trumpeter but still looks neat. (The ruler by the box has 30cm) Upon opening the box I was greeted by a lot of plastic. The kit is made of more then 1500 parts and might take a while to build. First part of the build is the lower hull and the suspension. Just looking at the suspension assembly makes my head spin around, and tracks do not help either but i am still looking up for it as it will be a satisfying job. So here is the progress so far. There will be also a separate topic for the Takom Tiger II soon because i like doing 2 to 3 models at once just so I can breathe from one project working on another
-
I'm currently building the Airfix 1/24 scale FW190A-5/6 and would like to partially scratch build the interior framing. I only intend to put on the framing on the panels around the engine, as they will be left off, and inside the rear fuselage where the radio is stored. Those of you who know the Focke Wulf 190 A series will know about the rather large hatch just aft of the cockpit on the left side. I'm going to display my aircraft with this hatch open, and thereby the interior of that part of the fuselage will be visible. Which plastic rods are best to do the framing in 1/24 scale please? I'm also going to insert the Airfix electric motor to turn the prop.
-
T-60 PLANT No.37 EARLY SERIES. INTERIOR KIT 1:35 MiniArt The T-60 was the result of the ongoing development of light tanks that had started well before WWII. This particular tank started development in 1938 as an attempt to replace the T-26, T-40, the failed T-46 project and the T-50. Whilst such a large number were produced, it was hated by all who had to deal with it – all except the Germans, who found it to be a substandard and underwhelming opponent, and a rather nice ammunition carrier or gun towing tractor, once captured. As a result of its poor armour, substandard armament and sluggish performance, it was more dangerous to its crews than anybody else, earning it the title Bratskaya Mogila Na Dovoikh, literally: “a brother’s grave for two.” The basic design was completed in a mere fifteen days, and Astrov, seconded by Lieutenant Colonel V.P. Okunev, wrote to Stalin contrasting the advantages of the mass-producible T-60 with the more complicated T-50, which had already received the go-ahead. An inspection from a senior minister resulted in two decisions: firstly, the 12.7 mm (0.5 in) machine gun was to be replaced with a 20 mm (0.79 in) ShVAK, although it was still inadequate against the Panzer IIIs and IVs that the T-60 would almost certainly engage whilst there was a shortage of T-34s. Secondly, the Main Defence Committee (GKO), headed by Stalin, ordered 10,000 T-60s to be produced immediately. Some sources have claimed that Stalin’s interest in the vehicle is because he attended the vehicle’s final trials in person. The displacement of the Soviet industry in 1941 disrupted production and further refinement of the T-60. In autumn, Zavod Nr 37’s work on the T-60 was transferred to Zavod Nr 38 at Kirov and GAZ in Gorki. Shortly after, industrial evacuations continued, and GAZ was the sole producer of the T-60. In 1942, the T-60’s frontal armour was increased to 35 mm (1.37 in), which was still inadequate and made the tank more sluggish. The GAZ-203 engine gave the T-60 theoretical speeds of 44 km/h (27 mph) on road and 22 km/h (14 mph) off-road, but this was always difficult to achieve as a result of horrifically bad mud and snow. Replacing the spoked road wheels on the 1941 model with all-metal disc wheels, especially as a result of rubber shortages, did not help alleviate this problem either. The development of removable track extensions also did little to help mobility. Finally, any attempt to increase the calibre of the gun proved difficult. There were attempts to replace the main gun with a 37 mm (1.45 in) ZiS-19 or a 45 mm (1.77 in) ZiS-19BM, but proved unsuccessful as a result of the small turret. By the time a redesigned turret with the ZiS-19BM had passed trials, the T-60 as a whole was cancelled with the introduction of the T-70 in late 1942, although 55 T-60s were produced in 1943. The Germans would use captured tanks under the designation Panzerkampfwagen T-60 743(r), and the Romanians would modify 34 captured tanks into TACAM tank destroyers in 1943 armed with captured Russian 76mm divisional guns housed in a lightly armoured superstructure. These vehicles were confiscated by the Russians when Roumania changed sides ins 1944. The Model The kit comes in the fairly standard, yet sturdy and colourful top opening box MiniArt use, with an artists impression of the vehicle on the front. Inside there are thirty three sprues of varying sizes, mostly small, in a medium to dark grey styrene, along with one sprue of clear styrene, two small sheets of etched brass and a smallish decal sheet. As with most MiniArt kits there is a huge amount of detail contained on the sprues and in this one there are 490 parts, including the etched brass. The mouldings are superb with no imperfections and very few moulding pips. Some of the smaller parts, and there are a lot of them, do have a fair number of sprue gates, but fortunately they are relatively small and shouldn’t cause too many problems. The sheer number of parts is explained by the fact that this kit is equipped with a full, and I mean full interior, which for a model/vehicle this size will mean you will need a magnifying glass/Optivisor when building. The build starts with the lower hull floor, to which the drivers position is attached, complete with detailed gearbox, levers and brake drums. Then there is the comprehensively detailed engine, which is a model in itself, and has more parts than some whole kits, around 22 in total. The two batteries and battery tray are then added to the left hand side of the hull adjacent to the drivers position, followed by the right side panel which is fitted with a fire extinguisher and four support brackets. The rear bulkhead is fitted out with several parts on the outside, before being attached to the lower hull, as is the lower glacis plate. The engine assembly is then glued into position and connected to the gearbox via a couple of drive shafts. The interior is slowly built up with bulkheads, ammunition racks with spare ammunition drums and boxes and another fire extinguisher. The left hull panel is then attached, along with the outer drive covers, idler axles, internal longitudinal bulkhead and several pipes. The upper hull plate is fitted with several panels before being glued into place. The drivers hatch is made up from five parts, while the drivers vision block is made up from six parts. Both assemblies are then glued to the driver position, and can be posed either open of closed. Depending on which colour scheme the modeller has chosen there are two options for the style of headlights to be used. The suspension arms are then glued to the hull, followed by the road wheels, return rollers, drive sprockets and idler wheels. The engine cover is next made up of three plastic and two etched grille pieces. This is then glued into position on the top deck, along with the drivers access and viewing plate. The tracks are each built up from eighty five individual links, which, unfortunately are not click able, but have to be glued, making it a little more awkward to get the sag and fitted around the idlers/drive sprockets. But with plenty of patience and care they can be made to look the business. The track guards are fitted with many PE brackets, as well as storage boxes, pioneer tools and a nicely detailed jack. These are then fitted to the hull and the build moves on to the turret. There is a large PE grille fitted to the rear engine deck along with a PE surround. There are two covers that go over this if winterising the vehicle, each plate is fixed with four to six PE wing nuts. While the turret is very small there is still plenty of detail packed into it. The turret ring is fitted with commander’s seat, ready use ammunition locker, plus traversing and elevation gearboxes and hand wheels. Inside the turret itself there are two four piece vision blocks, spent ammunition plug, vent cover, the breech and sight for the main gun which is slide through the trunnion mount, as is the three piece co-axial machine gun. The turret roof is fitted with a two piece hatch and before it is glued into position the machine gun ammunition drum is attached and the spent cartridge chute to the main gun. The roof is then attached, as is the outer mantlet and barrel cover of the main gun. The turret is the attached o the hull and the build is finished off with the fitting of more PE brackets around the hull and the engine exhaust glued into position. Decals The small decal sheet contains markings for eight tanks. Captured tank, unidentified German Unit, Eastern Front 1942. Captured tank, unidentified German Unit, Eastern Front, Spring 1943. Unidentified Red Army unit, 1942. 52nd Red Banner Tank Brigade, 9th Army Northern Group forces, Transcaucasian Front, Dec 1942 Unidentified Red Army unit, Winter 1942/3. 171st Separate tank battalion, 4th Assult Army, Kalinin front, Holm, Jan/Feb 1941. Unidentified Red Army unit, spring 1942. 64th Tank Brigade, 21st Panzer Corps, 6th Amry South Western Fron, Kharkov Offensive, May 1942 Conclusion This is another amazing kit from MiniArt and brings yet another lesser known military vehicle to the mainstream modelling community. With the numerous parts count and the large number of very small parts, this kit is really aimed at the more experienced modeller, but looks like it should build up into a superb model, absolutely full of detail, so much so that there shouldn’t be any need for aftermarket parts. Review sample courtesy of Miniart - Distibuted in the UK By Creative Models
-
I just came across this, looks like a third company investing into the panther, and its interior. From the specs given, it looks to be a seriously detailed model. I am now stuck between a rock and a hard place... Between investing in the 1/16 panther, takom's panther(s), and then RMF's (I didnt include Meng since it doesn't include a full interior). https://www.flickr.com/photos/140207497@N02/24167237737/in/dateposted-public/
-
So here is my (pretty much) finished Takom King Tiger! Bought for me for Christmas and I've enjoyed every minute of the build. It was built out of order sort of and the idea was taken from a video I watched on YouTube so I cannot take the credit for the idea on how to display this. Paints used were Ammo by Mig King Tiger set and Tamiya. Primer was ultimate black Primer. All I need to do now is get a wooden base for the thing and maybe add some steel to the track cleats. I've done minimal weathering on this and finished it as a clean build. Thoughts welcome!
- 28 replies
-
- 25
-
-
- Takom King Tiger
- interior
- (and 1 more)
-
Hi everyone, I am about to start my Airfix B-17G and would like to know if it would be alright to follow the instructions and paint almost all of the interior sidewalls, etc. in aluminium to resemble unpainted natural Aluminium. I somewhere here read a thread about B-17 interior colors some time ago but can't find it anymore. IIRC the general outcome of the discussion was that B-17s could have appeared in almost any combination of painted and unpainted interior sections. Would it be likely for a late B-17G like the Airfix "Skyway Chariot" to have been left unpainted inside - regarding side walls and bulkheads? My second queston is about the interior green itself - Airfix instructions say Humbrol 195 Dark Green. I would like some opinions about Airfix' choice of color and maybe a recommendation for alternatives because I do not have 195 amongst my Humbrol cans. Ingo
-
Afternoon All, I recently acquired the Aeroclub 1/72 De Havilland Venom FB1 and FB4 kits with the intention of building them as RAF machines from 249 (FB1) and 28 (FB4) Sqdns. I'm looking to see if anyone has some decent cockpit interior images so I can add some detail to the cockpit interiors? Anything you can provide me with would be gratefully received! Thanks in advance, Mark.
-
The C-47 that served in Europe with the various TFWs, did they still retain the seats along the inside interior or were they removed so only cargo was carried. If seats were still in place which ones were used as there are 2 different types in the Airfix kit. About to make a start and it would save some time if I did not need to put the seats in. Also were they painted in Interior Green or left unpainted. TIA Robert
-
U-Boat Crews for Interior Sections 1:72 CMK To compliment the new interiors designed for the Revell 1:72 Type IX U-Boat, reviewed HERE, CMK have also released two sets of crew members to man the interiors. Although we have only had two sets released, I’m sure that there will be more, as there are quite a few more interior sections that ill need to be brought alive by having crews installed. The first set, F72253, is for the command section and includes two officers and one crewman. Each is set in a particular pose, so you can’t just buy more of the same set to increase the numbers of men in the section, but they do come with separate heads, so at least you can have them looking at each other or particular controls etc. They very well moulded, but, once they have been removed from the moulding blocks you will still have some cleaning up as there is quite a bit of flash, particularly between their limbs. The second set, F72254, is to man the galley section. They have quite distinctive poses, one working on the stove, one checking a gauge or hand wheel and one picking up a box of provisions. Two are wearing chefs aprons, one standard overalls, and again, all have separate heads, one with a chef’s cap whilst the other two have standard brevet caps. CMK also provide a frying pan, a box, (with the lifting man’s hands moulded onto it), and a utensil I can’t quite identify. The picture on the blown poly pack shows quite a bit of space in the galley, which isn’t really the case, so while it may show how cramped it is, it might be an idea to use the box carrier in another section of the sub. Conclusion It’s great to see CMK releasing these sets, as even though the interior sections are superb in their own right, the ability to have crew members manning each section is a wonderful idea and will bring the whole thing to life. Yes, the painting of each man will be a little taxing, but it’s good to have a challenge every now and then. Very highly recommended. Review samples courtesy of


-1-1MINIATURA.thumb.jpg.bd7a7e672869500d45ee6e80478f6f25.jpg)