
Search the Community
Showing results for tags 'Halcyon'.
Found 21 results
-

1/60 Halcyon Alien Space Jockey
Lee Chambers posted a topic in Ready for Inspection - SF & RealSpace
Hi all, this is the final reveal for the Alien Space Jockey diorama. As I previously mentioned in the work in progress topic, in order to give the model a sense of scale, I decided to add the background as it was depicted in the movie. I tried my hand at mold making and resin casting and this was my first attempt at using these products. I'm pretty happy with how it came out, however my only advice to anybody trying to do anything similar is that you seem to need twice as much mold making silicone than you actually think you require. In order to get a nice solid mold, plenty of the silicone is required to pour into your donar part, otherwise you run the risk of distorting the casting. Also, I treated myself to a new camera so that I could hopefully improve my photography in the future to enhance my model builds. Hope you enjoy the photos. My next project is the 1/9 Dragon Man of Steel Superman & 1/8 Moebius Wonder Woman build which I hope to start working on next week. Finally, you can see the work in progress of my build in the link below.- 12 replies
-
- 23
-

-
- Space Jockey
- Alien
- (and 1 more)
-
Hi guys, not built a vinyl kit for a while so I decided I would have a go at this old Halcyon kit. I am planning on building the kit into a cave scene diorama as it looked in the movie and I hope to add lighting to the figures helmets. The plan is to try and capture the creepy classic Alien scene.
- 21 replies
-
- 10
-
-
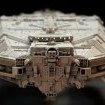
USS Sulaco - Halcyon - 1:2400 - Alien 2
Dubz posted a topic in Ready for Inspection - SF & RealSpace
My Halcyon Sulaco. Here are some final images. It was a fun build with a very rare kit with lot's of potential to build a unique ship. Thanks for watching. Dirk- 8 replies
-
- 23
-
-
- USS Sulaco
- Halcyon
- (and 1 more)
-
Another re-furb,Halcyon Judge Dredd kit from about 1995,I remember being incredibly impressed by this film for the first fifteen minutes,then off came the helmet and it was pretty much all downhill,still give it a viewing now and then,bit of a guilty pleasure. "I am the Law" Cheers Andy
-
The last,and smallest of the Halcyon vinyl 1-1 scale Alien creatures,The queen embryo as seen on the x-ray scans of Ripley from Alien 3 The stand is a modified neca figure base with an Alien 3 insert. Cheers! Andy
-
My final 1-1 scale Halcyon Vinyl kit(actually thats not strictly true,I do have the alien queen foetus knocking about somewhere ) The Dog buster from Alien 3 . Handsome little fella isnt it the base is a homemade job with extra added fleshy bits. Right,Back to Batman and the Joker ! Cheers Andy
- 13 replies
-
- 17
-
-

-

-
Apologies to Mikemc,But it would appear Alien Queen Chestbursters are like Buses,You wait ages for one,then two turn up Another 2 decade + stash lurker finally completed. I am contemplating "bloodying" her up,but not sure as I quiet like how she looks at the moment
-
Halcyon Vinyl kits from the early 90's May not be SFW Worst Modelling day..............................................Ever Its a boy!
- 15 replies
-
- 22
-

-
-
-
After my Frankenstein based detour I'm back on familiar ground Dating from 1991 this is an original Halcyon Face-hugger undergoing a restoration due to less than stellar paint job(by me) and general "sagginess" and wear and tear. The original box art(Which I no longer have) Dissection Crude,but effective wire armature added to tail and fingers. Trying to run away! Bits of the chestburster in the background.
-
Not the prettiest Ship in the Galaxy,but one of the most iconic,The Halcyon vinyl and injected plastic Nostromo. Been a bit of a chore,but really happy to have it in the collection. Cheers Andy
- 12 replies
-
- 23
-
-
A recent "Grail" kit that I have finally managed to get my grubby hands on,Its the 1992 Halcyon Nostromo vinyl and I.M plastic kit,(a bit of a weird combination) The Box art The main body parts,its a fair size Other vinyl bits and pieces Injection parts,mainly landing gear and engine parts And the instruction sheet.
-
Halcyon USS Sulaco,Purchased from a model shop in Hunstanton about 17 years ago,Quickly built,and just as quickly forgotten about,Actually got round to painting it up about 2 weeks ago. In the meantime,managed to lose the little drop ship that came with it,and the decals,Luckily,have the old AMT USS Enterprise kit with its fleet decal sheet ,so cut out the required letters from that. Model is about 12 ins long Cheers Andy
-
Hi guys, this is the final reveal for the T-800 Terminator. It was a much easier build than I had expected, really enjoyed building this kit, I had a blast tinkering with the lighting and taking the photos. I welcome any comments and/or criticism, thanks for viewing.
- 5 replies
-
- 6
-
-
- Terminator
- Halcyon
- (and 1 more)
-
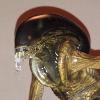
 This is fairly old stuff, but you might find it interesting, avalible in the 1990's from HALCYON. Here is the remaining picture of the shuttle Narcissus kit, This was the HALCYON kit to about 1/72. Injection moulded, I brush painted it matt very light blue-grey and stuck the transfers on about, um 20 years ago, If you can find this kit, it is very good quality I painted the transparencies gloss black on the inside rather than bother with internal detai,l (the movie internals do not really fit inside). HALCYON did a vinyl NOSTOMO to a huge 1/400 or so, as well as a number of Aliens, in various finishes . In the loft somewhere. Photographed on its stand against a felt background, then photoshoped in some stars. 2 stops under exposed. This is the original HALCYON vinyl ALIEN. I superglued it together and added a load of spurious detail to hide the joins, (Milliput), then glopped lots of acrylics on it. The tail has a metal rod so it can be posed in place, as can the arms. which rotate on the shoulders. A very expenive model, and accurate to the movie: thinking of stripping off the acrylic and re-painting, as I can now do a better job: I think I just smeared the paint on. it should have been blue-ish. Skull cover was transparent vinyl, which is not glued on. I added globes to the skull eye sockets, though you never see them in the movie. Model is about 14 in high and stands on the tail without a stand Below is the injection-moulded polystyrene ALIEN , about 9in high form HALCYON. , was supplied with an egg and stand, but I didn't think much of that so I made it self-supporting. Colour is adjusted to look bluish, these could be re-painted to update to a better quality. Note Vinyl green alien has two thumbs, six fingers in total, IP alien has five fingers. all ALIEN figure vary in details. but I think the HALCYON Vinyl one is the most accurate.
 -
I didn't do a WIP for this build as it was relatively simple and quick, although the paint job took over a week of spraying, building up layers of small strips of masking tape and spraying again, only for when the final unmasking took place for the whole thing to look as if it had the measles or some dreadful skin disease!!! I was devastated after all that work, but then decided to spray one of the lighter grey colours (XF 80) over the whole lot to damp it down and voila, it worked! I then gave it quite a heavy dirt wash which finished it off nicely. A few spots of silver to bring up some highlights and I'm very happy with the result! The box says its 1:2400 Scale and it measures 12" long... it even comes with a tiny Dropship - so this is the initial frame in my scenic progression - the next scene was built a few years ago and can be seen here : http://www.britmodeller.com/forums/index.php?/topic/234913827-aliens-dropship-and-apc/ and from back in April 2012, the next in the sequence...
- 10 replies
-
- 28
-
-
Alien Queen.on the prowl "What a large cranium" Battle is joined Cheers! Andy
-
These are two recent completed builds that I previously posted, however now that they are on the shelf together I decided to do an Alien vs Predator photo shoot just for fun. You can see my finished Halcyon Alien 3 build here and you can see my finished Billiken Predator build here.
-
I bought this kit off eBay last year however I only decided to build it a few weeks ago. It's a nice little kit, lots of seams to tidy up especially around the neck area but plenty of crisp detail for a relatively old kit from the 80's. I had a plan of doing my own style of paint for the skin tones using an automotive custom paint as can be seen from the pictures. I used an Alclad black gloss base coat followed by the pearlescent white paint and then I put a candy fools gold followed by a candy red and then a candy blue, as can be seen from the pictures it gives a quite unusual skin tone effect that mimics an amphibious type of skin tone. I wasn't happy with the look of the tail so I adjusted it to look as if the creature was swinging it back ready to sweep its prey of its feet, this gave it a better look than the original which was just straight out the back. I am very happy with the look of my custom paint job on the beasties skin but I also wanted to retain the original dark on screen look without overdoing the new paint scheme. I think I struck a pretty good balance, don't look at the pictures in the dark LOL!
-
 Hi Britmodellers, A quick intro - I'm Peter, I'm new here, and this is my first post. I've been around plastic and glue for 20+ years, and by far my favourite subjects to depict are Movies and Sci-Fi. I've built Batmobiles, USS Enterprises, Deloreans and Aliens. I have a strange pull towards the 1990s kits from AMT/Ertl and Halcyon. They're not the best moulds, or even the best plastics, but they were the things I lusted after when I was 15 - especially the Halcyon PVC kits like the Facehuggers and Chestbursters. In the last few years, I've dabbled in 28mm figures - Warhammer 40k and Fantasy, and I'd like to think I take the skills and techniques I've learned in painting tiny scales across to 'giant' models of 1/9th and 1/24th scales. I found this site via Twitter, and Rob's Aoshima Back to the Future build, which is coming along really nicely - I'm looking forward to seeing the final result! So - onto my own ambitious project! A few weeks ago I found a couple of my old Halcyon kits in the stash. A 1/9th Attacking Alien, and a 1/9th Predator from Predator 2 (the Danny Glover one in the city). My favourite moment in that film is a throwaway piece of scenery: in the Predator's trophy cabinet on the spacecraft is an Alien skull - a perfect universe connector, and one that has spawned the whole AvP franchise - but how can I get both of these kits to interact with each other? I started with the Predator. It's an awesome kit - standard brittle styrene, with soooo many mould lines and ejection pin marks to clean up. There are 43 separate dreadlocks, and when I fit them, they have to go in a specific order, and have a very small tolerance in angle. I'll be painting them well before I glue them on! The Alien will be involved as well, although at this point, I'm not sure quite how. There are two heads on the sprues, though, so that opens up some options. I'll be writing up the build here, and eventually on my own blog, with on-the-fly photo updates on Twitter. Please feel free to leave comments, advice and even criticism! See you next time.
 -
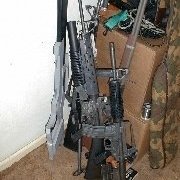
 Hello all, Thought it was about time I signed up and posted up my WIP pics of my Halcyon 1:72 Aliens Dropship that I have been working on over the past few months. At the start of the year I was cleaning out an old cupboard at my folks where I came across my old Aliens Dropship from 1993, it was wedged for years (22 years to be precise) against the wall and a storage box, over the decades bits had fallen off and was looking pretty sorry for itself. After much searching for parts that had come adrift, I was only missing 2 minor components (will cover that later). So I decided to rescue it, strip it down and reassemble with a fresh paint job to become a display piece in my living room, seeing as i'm a massive Aliens fan, I thought it would be rude not to ( along with some other Halcyon kits I have). After browsing the web and seeing a few other Dropships (including one from here), it motivated me to take it to the next level, so I am planning on going full out with the hyper detail (so to speak) and realism. Not being a modeler, having only dabbled in the old Rogue Trader days of 40k/GW this should be a decent task, esp as there are no time deadlines to adhere to First of all let me apologise for the picture quality as they were taken on my 4 year old iphone for my own reference. So this is how she looked after 22 years of neglect January 2015 After collecting together all the piece, the time was now to see what parts of the plastic could be separated without damaging any of the parts and also to strip off any of the old paint, I remember I never undercoated this, just 2 base coats. Nail varnish remove (acetone) was used and did a pretty good job, including weakening the "most" of the glue in order to remove parts and to fill any gaps at a later stage. ..and all the parts stripped down and paint removed (majority of it anyway) you will notice the canopy has fogged, I made the mistake of using the acetone on it, my heart skipped a beat. ...HOWEVER all was not lost as I knew a trick to remove that (bottom right of pic). Everything in that pic was stuck, and couldn't come apart, so this build now will take place half assembled, as I would learn this had pro's and con's (but more pro's). After a check I was missing 3 missiles inc the panel, one of the 5x4 missile head panels that go in the from of the missile pylon and a wedged item that sits on the outer pylon to give it its angle when deployed. All these will be made up from plastic card and greenstuff. There was however collateral damage, one of the from landing gear panels had snapped, so plasticard will fix that. Next step was to tackle that hazed over canopy, so popped into the Garage for the trusty Megs headlight restorer, its basically a very mild cutting paste, rubbed this in with a lint free cloth, took about 20 min but came up a treat, so panic over and lesson learnt, Thanks for reading Sonny More updates to follow.

