Search the Community
Showing results for tags 'Finnish AF'.
Found 8 results
-
 Hello Everyone, The Tamiya Hawker Hurricane Mk.I is a Superb kit, although its an Italeri rebox. The kit is a simple straight forward build and its a New tooling for the Hurricane in 1/48 scale. The detail is great out of the box for this scale and the panel lines are not overdone. The overall fit is great too. Decals provided are great with lots of options, a bit thick IMHO. I really liked the Finnish AF colors. The kit is built OOB and no mods are done. The paints used are locally available Acrylics and are airbrushed. For the chipping I used a sponge and for the Weathering I used a Dark Brown watercolor wash alongwith Oil Pastel Powder for the staining. Overall a Enjoyable build. Hope you like the Pictures and the Wip Video. Best Adi
 -
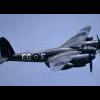
 Hi comrades! My build of Classic Airframes kit is approaching the painting stage And now, my question is: how the prop was painted? In different references (mainly profiles, so I'm not really sure about them) the prop is painted different: solid black, black with thin white line, red and white, blue with white line... Which one is true for start of 1943 when BW-393 had temporary winter camouflage? Thanks a lot for help!
 -
 Hello everyone... I present to you Finnish hawk CU-581. Quoting @vppelt68 the history of this plane is. The model was built in the Nordic Group Build. “CU-581 was an ex-French AF plane, bought to Finland in 1943 and assigned to Lentolaivue 32 in July 1943. Written off in November 1944 - though the plane was already destroyed by AA-fire 24.6.1944, while strafing Soviet landings in Tuulos on the Laatokka. Kapteeni Veikko "Vede" Evinen, CO of 3./HLeLv 32 and a six kill ace, died of his wounds the next day.” There isn't much to say beyond that. Sad to know the pilot lost his life in this plane. But he was fighting for something he believed in. So I can respect him and honor him for that. Please feel free to post comments, ask questions, and or thoughts. Dennis
 -
 Hi, Beriev MBR-2 was one of the most numberous small flying boat of WW2 and the basic such machine in Soviet Union. This type apeared in 1930. initially with open canopies and M-17 engine, later (as MBR-2 bis) with pilot cockpit closed, a closed turret, added flaps and redesigned tail as well as M 34 engine The Avia/Eastern Express kit of Beriev MBR-2 bis looks in box very promising. However after careful look and comparison with drawing and photos some flaws became obvious. Among them the most important are too deep and unrealistic parts of wings and tail covered by fabric and too sophisticated shape of hull. Building earlier variant with M 17 requires introduction of all changies between those two variants. So, constructing this model I did following main changies: 1. change of shape of bottom of hull 2. filling up deep holes between ribs (i used Tamiya resin putty to avoid future deformation of wings) and reconstruct all ribs on wing and tailplane and remove flaps. 3. reforming rear part of fuselage and fin 4. Build new engine cover. 5. Replaement of 2 blade metal prop by 4 blades wood one 6,Removing of cockpit fairings 7. Additional detailing of MGs and 200 kg depth charges Model presents VV-183 captured by Finns on 31 July 1941. Machine was renovated and started service on 23 July 1942 but on 8th September the same year the plane made emergency landing near Norrksar due to engine failure and later sunk while in tow... (reference: Martime Aircraft by K.Keskinen, K.Stenman, K.Niska, 1995, p. 89 ). Since she was in use for about one and half month I did not do serious weathering or a lot of exploitation signs. Thi is first of mine planned series of WWII Berievs. I am building now also MBR-2 bis, Be-2 (KOR-1) and Be-4 (KOR-2) the two last in flying boats and floatplanes GB II. The MBR-2s I started prior launching of GB. Comments welcome Regards Jerzy-Wojtek
 -
Hello All... I would like to present my Finnish Air Force Bf-109G6 MT505 from 1950. I am of Finnish Descent and am happy to finally have a representative model of my ancestral home. I also have a polish Mig-21 that is complete, and a PZL-23 waiting to be built. The colors are Dark olive over grey the White stripes(not the band), are indicative of participation in war games. Here is the WIP for the model. https://www.britmodeller.com/forums/index.php?/topic/235052872-my-finnish-“mersu-”/ I would like to thank @vppelt68 as this kit was a gift. I photographed the build on a miniature Finnish Flag to give it a nice base. Im impressed by these AZ kits and will be picking up some more of them in the future. Especially if they do an “Emil”. Without further talk i present MT505. I hope it meets everyones expectations. Questions, comments, stories, or jokes ? Dennis
- 11 replies
-
- 26
-

-

-

-
- Finnish AF
- Bf-109G
- (and 1 more)
-
Hi folks, this is the brand new SBS Model kit I picked up at the Moson show and built it over past couple of weeks. It's resin kit with etched and white metal parts, all done to high quality we have come to expect from this company. It was pretty much straightforward affair except few joints here and there to be addressed with little putty, but nothing really excessive for a resin kit. I replaced the markings for O.Tuominen machine (1/LeLV46, autumn 1941) and followed the coloured profile and pictures from Finnish Fighter Colours book by MMP. Maybe not every scratch or paint touch-up is correct, but I'm quite happy with it. The paint chipping was done using "hair-spray" technique, using a medium-strong hair spray from my wife's stock. Cheers Libor
-
Just received my pre-order copy of this booklet: Yep, that's a 2€ coin there. The subtitle says "Messerschmitt Bf 109 G in the Finnish Air Force" and that sums up nicely what this book is all about! Larger than A4- format, 400 pages, 479 b/w- and 6 original colour photos, 24 colour plates by Karolina Holda and Thierry Dekker, 32 line drawings in 1:72 and 1:48 scales. All the plane histories, kills and losses... What am I doing writing all this, I should go reading! Available in Finnish, of course from here http://www.koalakustannus.fi/kirjat/kirja.php?id_prd=233 V-P
- 1 reply
-
- 3
-
-
- Bf 109
- Finnish AF
- (and 1 more)
-
Hi there. I've recently started this kit and thought why not share it. This is one of MPM's boxings of the DC-2. The kit has been released under various options, and I chose the Finnish one as the serial code is the same as my initials. This kit has also been built there. http://www.aircraftresourcecenter.com/Gal11/10601-10700/gal10630-DC-2-Attard/00.shtm First up box art, which doesn't show the one I'm doing. As this is basically a short run kit, get ready for a lot of planning/test fitting/filling/sanding. You get 3 plastic sprues, a sprue with clear parts and a bag of resin and PE. The PE is only for the bombs for a different version. The only resin parts I'll be using are the exhausts, the rest again for the bombs. The parts are basic but look really good, except for the clearparts. The hard plastic has nice detail, but very shallow panel lines which I fear will dissappear under a coat of paint. I decided to build the kit as various sub models starting with the cockpit and interior. The cockpit only exists of 2 seats, 2 yokes, an instrument panel and a floor. I added a few strips of Tamiya tape for seatbelts. The clear parts aren't very clear so that is enough detail for the cockpit. The fuselage has no interior except a floor and a few bulkheads. As this was a transport aircraft it would have had 2 rows of 7 seats. I made the seats and curtains out of spare plastic. Again as not much will be seen once the clear parts are in, so I kept it basic. Also as the clear parts are to be pushed in from the outside, hopefully the curtains will add as backing and prevent me from pushing the clear parts through into the fuselage. As all the parts are butt joins. Test fitting is key. This indicated the tail and fuselage didn't match up, so I had two choices, either follow the instructions and do fuselage first or to glue the tail onto the fuselage halves before joining the fuselage. Either way I would have to putty and sand. I decided the latter as this would mean less filling/sanding. This had the added bonus of being able to add a piece of strip to help strengthen the bond. Next up the undercarriage. This is basically two sub-models, the undercarriage and wheel wells. I glued the undercarriage together to get the correct angles using the wheel wells as a template, then put them to one side, so that after painting it will drop into the wheel well. The wheel well is just the centre section of the wing, with two pieces acting as the top of the well. I also made a start on the engine, which is just one piece. Right now I have the main parts together, I will take some pics shortly. (Got to keep my audience in suspense, right ) Almost every part so far has required test fit/fill/sand. The butt join didn't help with the correct dithperal (or spelling ). I had to redo the port wing as it didn’t match up with the starboard wing. More on that and other issues with the photos. For now I hope you like/enjoy what you see and any comments/criticisms are welcome. Sorry about the quality of the photos. www.ilmasotakoulunkilta.fi/IlmaSK/ilmaskmma.nsf/sp?Open&cid=ContentE9451 That is a link to the restoration of the real deal.