
Search the Community
Showing results for tags 'B-29'.
Found 25 results
-
Consider this my PSA (public service announcement) for today: So what I thought was going to be a relatively straightforward and relaxing build of the Fujimi 1/144 B-29 has turned nightmarish. With the airframe all together and the landing gear installed, because it's easier to do that before you assemble the wings, I wanted to test fit the resin wheels I got. They don't fit. They bump into the nacelle and won't go on the axle. Weird! I thought maybe they were bigger than the kit wheels, but no, the kit wheels don't fit either. I rechecked the instructions and yes, I did assemble everything correctly. So this is one of the early boxings of the kit and I have several others, including a much more recent reissue. So I went and got the newer kit and it turns out at some point Fujimi has modified the kit to make the main gear legs stick out at least 3 mm (1/8") further so the wheels will fit on. B#*#%^?s!!! I pulled off the landing gear from my model and have spent an afternoon with brass and styrene tube making the main gear the length it should have been all along! B*##!@y B#*#%^?s!!!! So, word to the wise, the modified versions of this kit have the main gear mounting points extended about 3mm (1/8”) with a half circular section (if it was fully circular you wouldn’t be able to get the main gear strut on at all after the wings are assembled). If your kit doesn’t have those then either build the kit gear up or add spacers to make the gear extend further beyond the nacelle. In addition to the main gear strut, there are 3 points of contact for the drag link and the retraction arms and they all need to be extended. Other than that it’s a nice kit. No, really, it is. It’s much better than the Minicraft/ex-Crown kit in terms of shape and surface detail. The Fujimi kit’s engine nacelles just have a shallow circular depression where the engine should be but there are very nice replacements from Brengun, or buy a Minicraft kit, because they are cheap, and rob the engines from that.
-
 Hello everyone … I was able to get over to the Small local airshow today. My first in almost 4 years, it felt good after all the Pandemic lockdown. There wasn't much available as I couldn't get close to the AT-6, she and the Stearman were too busy flying passengers. I waited in line for over an hour but gave up on the B-24 when I realized I might tip the darn thing on its butt. Oddly enough there was no line for “FIFI” the B-29. So walked over and got right in. The Catalina was not open to general visitors just a few selected by the owner. So couldn't get anything up close and personal. The other planes were quite exposed and I was able to get up close and personal with undercarriage and other bits. Warning the colors have been shifted as it was quite overcast early on and all the photo’s were too dark. Going to tag @keefr22 and @John Laidlaw also. Next up is a Piper cub thats from another local airport. I see him fly around quite often. Personally the A&P training in me thinks the prop has seen better days. If it were mine I’d find a new one or a metal prop and paint it to look like wood. “Diamond Lil” B-24A in RAF colors. She was a lend-lease or purchase that was recalled into USAAF service after pearl harbor. Im guessing thats why shes painted up this way. And now “FIFI” One for Mike @72modeler Emergency egress for the crew being used for ventilation. I tried to photograph inside but its as dark as a blackhole. Ive never seen these before in photo’s so asked the pilot what they were. Turns out they a resin blocks around the bolts to prevent corrosion. The bolts hold the inner/outer wings together. Too anyone building a B-29/50 there is only about 3/4” clearance between the main wheel and gear door. That ⬆️ would never pass a model inspector at a show. But it was wrinkled as all heck.same plate on another nacelle. My apologies as I tried to take photo’s of the bomb bay and forward interior but couldn't get them very good. Cockpit Starboard rear sorry but too cramped to get the whole area in the photo. Cockpit port rear same issue sorry. Cockpit forward. There was a crewman in the starboard seat answering questions. He took one look at me and said well you wouldn't be a tail gunner. Im 6’7” and weigh 32 stone. Last up was the Stearman as he was taxiing in for his last time. What you don't see is the ladder at my feet. Straight down with only about 20” inches clearance all around. I hope these are worth your time to visit. If I can answer any questions please feel free to ask, or leave comments. Dennis
- 14 replies
-
- 10
-

-

-
 Hobby 2000 rebox from the Academy 1/72nd Boeing B-29 Superfortress kit. - ref. 72069 - Boeing B-29 Washington B.1 - Limited Edition Sources: https://hobby2000.pl/index.php?id_product=94395&rewrite=p94395-hobby-2000-72069-washington-b1&controller=product&id_lang=2 https://ksmodel.pl/sklep/szczegoly/hobby-2000-72069-washington-b-1-limited-edition-1-72-27516/ https://www.facebook.com/commerce/products/h2k72069-washington-b1---academy-+-cartograf-+-maski/6254762827937321?ref=mini_shop_items_for_you&referral_code=newsfeed_carousel_ad - ref. 72070 - Boeing B-29 Superfortress - Limited Edition Sources: https://hobby2000.pl/index.php?id_product=94396&rewrite=p94396-hobby-2000-72070-b-29-superfortress&controller=product&id_lang=2 https://ksmodel.pl/sklep/szczegoly/hobby-2000-72070-b-29-superfortress-limited-edition-1-72-27517/ https://www.facebook.com/commerce/products/h2k72070---b-29-superfortress---academy-+-cartograf-+-maski/6432480750131509?ref=mini_shop_items_for_you&referral_code=newsfeed_carousel_ad V.P.
- 12 replies
-
- 8
-
-
- B-29
- Superfortress
- (and 1 more)
-
 I started this build back in July but only completed it a couple of days ago, as my first finished build for 2021. This is from Academy's Silverplate boxing of their 1/72 B-29 kit. The subject is built up in the colors of the infamous "Enola Gay". Painted with Alclad Airframe Aluminum, Aqua Gloss, Tamiya acrylic and lacquer paints and primers from Gunze. To be honest, this was by no means an easy or smooth build. I hadn't attempted an NMF finish on this scale before, and in this case it turned out to look a little more dull than I wanted to as a result of the overcoat of gloss to seal the paint. Some of the parts look more sloppily painted or weathered than I'd have liked, and I ran into a lot of problems during the build especially with assembly and fit. Some of the decals also silvered on me, which was something I wasn't expecting from Cartograf of all decal makers. The kit itself leaves a lot to be desired compared to what we have today, which to me is surprising given how well it scored in reviews. To be frank, building the kit felt like building something that Academy didn't try all that hard with. The kit goes together in a way that doesn't seem to be thought out very well which results in a lot of fiddling and build problems that in themselves don't ruin the kit but make it feel sloppy. This combined with parts that only vaguely fit and ejector pin marks and seams on very prominent parts among others make building kit a bit of a slog in my opinion. I know some modelers like this challenge which is perfectly fine, but I wasn't all that prepared to experience these build issues and it really took away from the overall experience. Since this kit is the only good option for a 72nd B-29, I suppose it's all about knowing what you might be in for. It does build up to look like a massive shiny display piece in the end. Thanks for viewing!
- 42 replies
-
- 119
-
-
-
- b-29
- superfortress
- (and 1 more)
-
Hi there The Mustang is waiting for its 3D printed MLG's, following an attack by the carpet monster. The 2 X P-400 are drying up from an enamel paint layer - will take some time. I found myself with some bench time (the wife is down with Covid-19 in the bedroom ) So... I did not want to start a new kit - as this is just a temporary halt. It's not that I do not know which kit is next, but I try not to have too many kits in progress. I could have spend some time arranging stuff around the bench - boring After a while I decided to deal with this B-29 - as it is a big build with lots of parts, so I can sneak some progress here and there. This kit has a story - so let me share it. As you know - my dad was an a/c mechanic with the IAF. You can find one of his stories here. He was also a modeler and got me into the hobby when I was a kid. The story goes that at the night I was born he completed a big B-29, and with the family growing and the salary not, it was the last model he built for a long time. Later on he introduced me to modeling and we build together. These building sessions are some of the happier memories of my childhood. The B-29, along with a couple other kits (B-17, Anson, F-4) were hung up in our family room and later on moved to a shelf in my room. They were the basis for my model collection. I fondly remember the silver monster. I can't recall if it was a 1/48 or a 1/72. I will have to look up some old photos. I remember it was big but back then I was way smaller myself. When I got back to the hobby, my Dad was interested in all the updates and in my builds. We talked for a while about building another kit together, 'for old times sake'. When I moved to our current home, and got myself a decent bench, we talked some more and I suggested we build a B-29 - as kind of a 'getting back to modelling' build. It took us a long time to finally find the time. My parents live an hour from our home but most of the time they get here on family occasions. After a long time, we arranged for them to come early on some family gathering and we sat together. Even in 1-72, the B-29 is a BIG kit, with a decent number of parts. We started with airbrushing the bombs (all 32 of them) - and it was a new experience for dad. When I was a kid we could not afford an airbrush and all painting was done with Enamels and a brush. We followed up with some silver painting of some parts and then time ran out. Dad was happy but it was clear that sitting down with me and building was hard for him - his eye sight is not what it used to be. The kit being a 1-72 did not help either. Since then, the huge box is kind of a fixture in the back part of the bench. Last month, my dad turned 80, and it dawned on me that if I want to celebrate the completion of this kit with my Dad, I need to push forward on my own and find other ways to make it a shared and meaningful experience. With this idea racing in the back of my mind, my eyes fell on the 'fixture' and I decided that this will the 'micro project' I will spend some time on, and keep doing little steps with this kit in hope to get it to the paint booth and then finish it up. I opened the box, took some pictures of the things we started, spent some time arranging the setup - opening a new build folder on my drive, opening a new project and album on Scalemates, Opening a new album on Imgur and writing this up. A lot of setup for one build So, here we go: Kit sprues, box, instruction and two after market items - a decal sheet and a PE set: I decided to start with the cockpit, as per the instruction. This was a short sitting so I just cut and cleaned all the parts, glued some parts - those that make sense to glue before paint, reviewed the PE instructions to see I'm not building something I will have to remove. Then I sorted the parts to the 'green pile' - those will get a Z-C coat, and to the 'black pile' - those will get ..... a flat black coat. Green pile: Black pile: Stuff: That's it for tonight, and probably for a while. Ran
- 17 replies
-
- 12
-
-
Hello All, This is a kit I bought many years ago and it has sat in my stash until I was finally motivated to build it when I saw a friend of mine build his. I acquired it when I lived overseas but realised building it there would create a monumental transport issue when getting it home. Even so, building it at home also posed some storage challenges so I decided to try and address that in the build. It is an interesting kit as it was repackaged by Hasegawa with decals from Aeromaster. The aircraft was Rattle n Roll of the 6th Bomb Group. Being a "vintage" model, it has some flash issues, but not too bad, and, needless to say, raised panel lines. And here all are the parts in the box, with a "under construction" 1/48 Spitfire to give an idea of size. In terms of extras, I also added the Eduard canopy masks (EX367), wheel set (648132) and exterior photo etch (48744).
-
*** Slightly better photos added Feb 2021 *** Still struggling to get really good snaps of this big bird but at least the lighting is a better in the photobox. Enjoy! Hi all, photos of my finished Academy 1/72 B-29, sorry for the distinctly mediocre picture quality, haven't really figured out how to photograph big models like this... The scheme is "Celestial Queen" with decals from warbirds and I also added the Eduard etch set. She's painted with various shades of Alclad - it was a bit of a battle at times as I was pretty much learning how to airbrush and how to do NMF as I went along. I enjoyed detailing the cockpit and scratch built a few bits and pieces like a lamp, map and headphones for the radio operator. The front of the fuselage is held on with little magnets so you can take it off to see the detail inside (looks better in real life than in the photos!). This works quite well but if I was doing it again I'd make the whole upper half come off so the joins appear along panel lines rather than on top. I also put quite a lot of effort into the bomb bay with doors open and all those bombs to decal! It took me most of 2018 to get done but in the end I'm really happy with it and it looks pretty cool alongside the B-17 with matching red wing tips! I learned absolutely loads along the way, thanks to those who provided help and encouragement, the WIP is here: Enjoy!
-
Boeing B-29 Superfortress (03850) 1:48 Revell Platinum Edition The B-29 will be forever remembered as the only aircraft to drop an Atomic Bomb in anger, and lets hope that fact remains true. The aircraft did do a lot more than this as well. The B-29 was designed for high altitude strategic bombing. It was recognised early on that the then main bomber of the USAAF the B-17 did not have sufficient range to operate in the Pacific theatre of operation. Boeing then began work on a fully pressurised version of the aircraft with a tricycles undercarriage. At the time the development of this was funded by Boeing as a private venture, this was then submitted in 1940 when the Air Corps issued a formal specification for a long range bomber. Production followed swiftly after Boeing won the contract even though this was less than straight forward as it was a complicated aircraft and production was spread over 4 facilities. The need for pressurisation led to the aircraft having a step through cockpit with no separate windscreen, the whole nose assembly being glazed. The engine posed many more problems than the airframe with failure being quite common due to oil cooling problems. The B-29 could reach speeds of upto 350mph at nearly 33000 feet. Even though fitted with a 4 remote gun turrets and a tail position the aircrafts best form of defence would come from its high altitude flight. In WWII the aircraft was only used in the Pacific. Post WWII the aircraft was used by the USAF in the Korean war and by the RAF as the Washington as a stoop gap measure before the Canberra came online. In a strange turn of events the Soviets reverse engineered some B-29s which had landed on Soviet controlled air fields following emergency landings during WWII, this became the Tu-4. The Kit This is Monogram's kit from way back in 1977 and its BIG, 65cms long and 90 cm wingspan. Even though its a product of the time with raised detail the moulds have held up well and they have added new parts to the kit over time. It would seem that Monogram measure on of the Silverplate B-29s which were built for the Atomic Bomb project and differed from normal B-29s. It looks like different props have been included in the kit to try and get round this as well as the inclusion of all gun positions, as the Silverplate aircraft only carried the tail guns. Both the "Fat Man" and "Little Boy" bombs are still on the sprues as well. For this edition Revell have included masks for all the glazing and three sheets of photoetch. There is a large nickel sheet in colour for the interior, a smaller colour nickel sheet with all the seat belts; and a brass for the engines and nacelles. Construction starts in the cockpit, so no surprise there, though really on the underside of the cockpit. The part which makes up the main cockpit floor also makes up the top of the nose gear wheel well. The bulkheads for the well are all placed in, then we can flip the part and work on the cockpit. The central bomb aimers seat, and bomb sight go in. The pilots control columns then are added, then their seats are made up and fitted to the supporting bulkhead, the navigators station then goes in behind this bulkhead. The instrument panels for both pilots then go in. Behind the cockpit the flight engineers consoles and seat are then fitted. The rear pressure bulkhead for the front section is then fitted and to the right the radio operators station is fitted, along with the ladder to the crew tunnel. The whole section then its into the right fuselage section. It is recommended that 90g of nose weight is fitted under the floor. If fitting bombs into the bomb bay ten 12 of these now need to be made up. Into the right hand fuselage the rear pressure bulkhead is added, and then the connecting tunnel between the front and rear sections can go in. The right hand bomb racks are then fitted in preparation for 6 of the bombs to be fitted to it. Work now moves to the rear crew compartment. In the gunners station the left and right stations go in followed by the central upper position. The bulkhead then goes in which separates the crew rest area from the gunners position. The rearmost pressure bulkhead then goes in. In the tail the tail gunners position is built up and installed along with the tail bumper. To the other fuselage half the bomb racks and bombs must be added, Then the two main wing spars are then fitted and the fuselage can be closed up, and the nose glazing added. We now move onto the wings and control surfaces. At the rear the tailplanes are made up and added first. For each wing is it recommended that 40g of weight is added to each nacelle to help the CoG. The wings can then be joined to the fuselage. All of the landing gear is now made along with the wheels and installed onto the airframe, along with the gear bay doors. Exhausts for the engines need to be made up and installed. He none seem to be in the kit and the instructions show you haw to fabricate these from bits of sprure! The bomb bay doors are now fitted along with their actuators. The defensive turrets can now be made up and added to the fuselage, the tail guns are also made up and fitted at this time. The engine nacelles have their engine front added, then the propellers. These can then be fitted to the wings. To finish up the model any remaining glazing is added along with aerials, pitot tubes and other antenna. Decals The decal sheet from Cartograf (so no issues there) . Two decal options are provided; 29 "Dina Might" - 421st Bomb Sqn, 504th Bomb Group., USAAF, North Field, Tinian Island, March 1945. (As shown on the box art) 16 "Sweet Sixteeen" - 873rd Bomb Sqn, 498th Bomb Group, USAAF, Isley Field, Saipan, June 1945 (Aircraft with black undersides) Conclusion This will surely make up into an impressive looking model. Recommended. Revell model kits are available from all good toy and model retailers. For further information visit or
-
Been on an epic journey with this - build thread is HERE . Many thanks to BM's Canberra Fan for the generous donation of the kit; also thanks to the many people who genuinely supported and encouraged me during the build process. Aircraft represented is a 90 Sqn machine polished up for the 1953 Coronation celebrations at RAF Odiham. Build notes: True Details replacement props, Eduard Brassin wheels, Eduard exterior etch set, Karaya metal gun barrels, Falcon vacform transparencies for the bubble windows. Painted with Alclad (various shades) and Mr Metal Color (Stainless and Chrome Silver) for the metalwork, and mostly Xtracrylix for the other colours. Also used metal foil (kitchen and Bare-Metal) for some of the details. Thanks for looking! Alan
- 70 replies
-
- 83
-
-

-
Hello All, I have been working on this Academy B-29 on and off for a couple of years. Finally decided to make a big push on it to get it done. In any case I have not decided on the markings yet...but most likely a WWII machine. It has a gloss coat of Tamiya black as a base and many hours of polishing before putting on the the Vallejo aluminum...which is outstanding. I have a few panels I will be doing in varying shades but the overall came out pretty good I think. In any case I hope you enjoy the pictures. Of course any comments are greatly appreciated. All the Best! Don
-
RESIN2detail is to release 1/48th Boeing B-29 Superfortress resin fowler flaps for the Monogram/Revell kit Source: https://www.facebook.com/RESIN2detail/posts/1108542982669786 V.P.
- 1 reply
-
- 1
-
-
- B-29
- Superfortress
- (and 1 more)
-
RESIN2detail is to release 1/48th Boeing B-29 Superfortress resin fowler flaps for the Monogram/Revell kit Source: https://www.facebook.com/RESIN2detail/posts/1108542982669786 V.P.
-
 Hi All, As long as this nice (? well, mild anyway!) weather continues my outdoor shed is still bearable. The last few years I've usually built ships indoors during the winter months, but this year I've been bold enough to start a nice aircraft project going into January. This has been one of my "must-build" kits since I saw one hanging from the ceiling of Beattie's in Leicester when I was 17 or so. Since then I've never really got round to getting one of these kits, but last year I was very kindly donated one by my good mate Canberra Fan. At Telford in November he also discovered a set of Air-Craft decals for RAF Washingtons, and that set this build up! I have some hopes for this project, but if it comes out anything like Ian (fu manchu)'s recent epic build, (and I'm not going to draw comparisons with the late Paul Coudeyrette's amazing looking version!) I'll be really happy! I do hope this comes out as a bit of a reference build, as this is one of those kits that lots of people seem to own, but not many get made due to the sheer scale of the finished product. I hope plenty of people get involved with references, questions and the like, as I hope to answer a lot of questions about the kit and subject, as well as pose a few of my own. References I've found useful so far are Chris Howlett's excellent PDF Washington Times series (link HERE) and Dave Forster's 192 Sqn info page HERE. I'd also recommend a good general B-29 page featuring brilliant panoramic views like THIS (it's Enola Gay - a museum piece but authentic!) Here goes...!!! Al
- 189 replies
-
- 8
-
-
- Monogram 1/48
- B-29
- (and 1 more)
-
A great place, highly recommended if you ever get the chance to visit: thumbnail_IMG_1676 by tony_inkster, on Flickr thumbnail_IMG_1633 by tony_inkster, on Flickr thumbnail_IMG_1640 by tony_inkster, on Flickr F-100A 'Super Sabre' by tony_inkster, on Flickr F-4D 'Phantom II' by tony_inkster, on Flickr CH-54B (S-64) 'Tarhe' (Skycrane) by tony_inkster, on Flickr A-4D1 'Skyhawk' by tony_inkster, on Flickr HH-43F 'Huskie' by tony_inkster, on Flickr UH-1B 'Iroquois' (Huey) by tony_inkster, on Flickr P-47D Norma by tony_inkster, on Flickr IMG_6825 by tony_inkster, on Flickr IMG_6823 by tony_inkster, on Flickr IMG_6817 by tony_inkster, on Flickr IMG_6822 by tony_inkster, on Flickr
-
I must have been nice this year as Father Christmas came up trumps and delivered the 1/72 Academy B-29. I want to make it bare metal, but with the turrets and conventional bomb load, so went for the "Old Battler" version. Thanks to the discussion in the link below I've sourced the Eduard cockpit and engine etch, the canopy mask set and Kits-World decals for the "Celestial Queen" whose red tipped wings and fin particular appealed . Detailing and painting the interior is one of my favourite parts of the modelling process and I was looking for a way to show this off once the model is finished. Last year I built a B-17 which was held together with small magnets and can be split right down the middle. This worked ok but I didn't fancy trying again with the larger B-29. Instead I've opted to cut away part of the fuselage around the cockpit. This cutaway section will then be held in place with small magnets but can be removed using the turret has a little handle. I decided to bite the bullet straightaway and the surgery was the first thing thing I did after opening up the box. I used a new, sharp modelling knife and scored along existing panelling lines (carefully) to make the cuts. I think the operation was a success: The canopy piece is glued to the cut away section to allow better viewing of the cockpit and also because it helps to "jigsaw" the two parts together. I've put some filler on the cut away part and this is waiting to dry and be sanded down. I'll also fill and sand the tanker version panel lines at some point. Having made the effort to open up the cockpit my thoughts have now turned to making the interior detail look good. The etch set should help (my first go with extra etched parts) but I noticed that the floor of the cockpit is somewhat lacking in detail. I've therefore tried to use Aluminium tape plus a rivetting tool and the knurled finish on the handle of my modelling knife to give the floor some texture and interest. This will all be painted over but hopefully the patterns will come through, we'll see! I'm not going for a super accurate depiction but these type of textures at least seem plausible based on some images I hunted down online. I'm afraid progress will probably be fairly slow on this one but I'll try and keep the updates coming as regularly as possible. Thanks for looking in!
- 89 replies
-
- 12
-
-
 Well folks this one has sneaked up on me a bit! I got a sharp reminder while perusing the GB's for what was happening to see lots of you were piling in with some great choices. So with out further a do here's mine.... IMG_2743 by G DSC, on Flickr Box art from a 1992 issue made in France no less.... IMG_2744 by G DSC, on Flickr A big box full of bits, which i hope to make in to a Stirling shape! IMG_2745 by G DSC, on Flickr And, yes it does have the tractor and bomb trolley too. Looking forward to this immensly as i haven't made a 1/72 4 engine type in years. Cheers Greg
- 136 replies
-
- 15
-
-
I've started thinking about by next project and thought I'd take on a 1/72 B-29, an aircraft I've wanted to build since I was a kid. It looks like the Academy version is the best option and I'd like to do nmf but with turrets, so not the Enola Gay / Bockscar version. Is the best option to get the "Old Battler" and a different decal set? Can anyone recommend a WWII, nmf scheme and decals? Also what other extras are worth looking at? Thanks!
-
Just sitting here puffing on the thought pipe . Why was the B-29 never deployed in Europe? It was far more capable than the B-17 and probably stood better chance of surviving than the B-17 due to speed and altitude. I do wonder if the German piston fighters would have had as much success downing them. I guess it was best suited to the Japanese theatre due to range so they were all sent that way and that B-17 production was in place and geared up. Makes you wonder what would have happened if Japan had given up a year early and they'd been available in Europe. Discuss... :-) Phil
-
Good evening from Germany I`m thinking about buying (and of course building ) the Academy B-29 and got some questions to you: At first should I buy the eduard etched Stuff; I mean is it worth it`s prize? And when building one in silver: is it a natural metal finish, so I can highlight some panels, or is it silver painted? Thank you in advance Levin
-
Flight engineering has designed an impressive 1/48th engine nacelles upgrade set for the old Revellogram Boeing B-29 Superfortress kit. Source: http://www.flightlineengineering.com/b29-kit.html V.P.
-
It may have been posted already, not sure. The B-29 named Doc has just had it's long restoration done. It will be flyable!! It was supposed to be flying by now. Look for it online, they have a youtube channel. Hope they someday bring it above the border.
-
I picked up the Airfix kit from the stash to have a look at it as I'm contemplating the idea of making the Stratovision aircraft. The kit is better than I remembered, although it seems to have the wing leading edges too blunt (leave as is...). However, looking at some photos, the engine nacelles seems to be not vertical (as depicted in the kit) but perpendicular to the wing middle line. I don't remember to read about this in any review. Look at the this photo: http://www.40thbombgroup.org/images/Schutte/Katie1.jpg Can it be an illusion? How's the Academy kit is this detail? And is it much better than the Airfix one? Thanks for any help. Carlos
-
Minicraft 1:144th B-29's - Korean War I started building these for the Korean War GB earlier this year but with a house move and a baby arrival I ran out of time. The Minicraft 1:144 B-29's are quite simple kits but required quite a bit of work to make them presentable. All the gun barrels were removed from the turrets and replaced with wire. The raised panel lines were sanded back and both aircraft were completely rescribed. Decals are by Kits-World and are some of the best I have used lately. Painted with Citadel and Vallejo. Weathered with Mig Ammo washes. WIP Here Spirit of Freeport IMG_4272 by Snapper_city, on Flickr IMG_4273 by Snapper_city, on Flickr IMG_4274 by Snapper_city, on Flickr IMG_4275 by Snapper_city, on Flickr IMG_4276 by Snapper_city, on Flickr IMG_4278 by Snapper_city, on Flickr IMG_4290 by Snapper_city, on Flickr IMG_4291 by Snapper_city, on Flickr Top of the Mark IMG_4280 by Snapper_city, on Flickr IMG_4281 by Snapper_city, on Flickr IMG_4283 by Snapper_city, on Flickr IMG_4285 by Snapper_city, on Flickr IMG_4287 by Snapper_city, on Flickr IMG_4289 by Snapper_city, on Flickr IMG_4288 by Snapper_city, on Flickr IMG_4293 by Snapper_city, on Flickr IMG_4269 by Snapper_city, on Flickr IMG_4271 by Snapper_city, on Flickr
- 8 replies
-
- 16
-
-
- B-29
- Korean War
- (and 2 more)
-
 Hi all These will be my air entries to the GB. Two of Minicraft's 1:144 B-29's with decals from Kits world. IMG_3897 by Snapper_city, on Flickr IMG_3899 by Snapper_city, on Flickr I will be building the 'Spirit of Freeport' and 'Top of the Mark' with black undersides. IMG_3900 by Snapper_city, on Flickr I'm tempted to get another B-29 and do 'Command decision' also which shot down five Mig-15's during her time in Korea. There is some great reading a few paragraphs down HERE about 'Top of the Mark' and 'Command Decision'.
- 66 replies
-
- 5
-
-
- B-29
- Korean War
- (and 2 more)
-
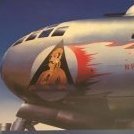
Pics by Mike Murray from Castle Air Museum. The aircraft on display at Castle Air Museum is made of parts of three B-29s recovered from the Naval Weapons Center, China Lake: B-29-75-BW 44-70064 ; B-29A-35-BN 44-61535 (the original Raz'n Hell); and B-29-50-BA 44-84084. The fuselage and tail sections were trucked to Castle; the wings were lifted over the mountains by helicopter. It was restored entirely on the Museum grounds. It has the markings of the 28th Bomb. Squadron, 19th Bomb. Group in the Korean War era, when the group was at Kadena AB, Okinawa. The nose art is an accurate reproduction of that it had in 1950.


.thumb.JPG.ebe7bd09037c033b484e59e59a925a45.JPG)
