
Search the Community
Showing results for tags 'Alfa Romeo'.
Found 7 results
-
 I've had a dig through some stored hobby stuff and I've decided to resurrect a ancient project. It's based on Tamiya's kit with the exception of converting the normally aspirated engine to a "sovralimentata" which is a slick hydraulically driven supercharger. Anyway here are some of the archived photos of the project. They're a bit out of chronological order. It was an overly ambitious project on my part and I even decided to replace the horrible rain drip rails with scratchbuilt rails.
 -
 A nice model to construct with the usual Tamiya good fit and reasonable amount of detail. It wasn't too difficult to enhance although reference material for this actual spec wasn't overwhelming. The body colour is Zero paints Jagermeister orange, 1057 finished with Tamiya TS13 clear, several coats polished with micro mesh cloths. The Tamiya decals are fairly good, although the 'Jagermeister' type and the logo were surprisingly thin, I replaced with an (I have to admit) unknown aftermarket set. Carbon fibre Twill weave decal is 1/24 from Scale Motorsport #1024 and #1124 Carbon Fibre, on certain elements of the ducting in the engine bay. Racing harness is my own artwork, inkjet printed on 80 gsm paper, with Scale Motorsport hardware. There's a good deal of additional 'wiring/plumbing' in the engine bay and interior, using a variety of wires from Top Studio, Replicas of Maryland, 'scratched' brake reservoirs made from Evergreen rod. Weathering/dimensional highlighting/panelling lines is predominantly MIG 'Dark Wash'. Heat exhaust staining is airbrushed Alclad 'Burnt Iron'.
- 6 replies
-
- 17
-

-
- touring car
- DTM
- (and 1 more)
-
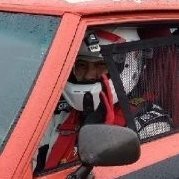
HI all, not really a WIP, just some shots of a half built model. After a long break from modelling I fancied the newly released Alfa from Italeri. It's OK. Fit is very good, sink marks not so good. Detail is pretty good too overall. Anyway, here's where I'm up to:- So far I've:- Drilled out all of the kit 'bolts' indistinct plastic blobs, and replaced them with proper resin items Drilled out the core plugs, built up the outers and fitted brass core plugs turned 4 ali filler caps for the rocker covers and 2 for the engine block replaced the ignition leads with braided cord scratch built clips for the distributor cap scratch built air filter from PE mesh scratch build braided lines and banjo connector for the oil pump. added braided cable from the rocker covers to the bulkhead - rev counter I assume, although not sure why there would be two? Lots of alcad and hopefully subtle washes, I'm going for old but not dirty which is tricky to pull off. More to follow no doubt. Eventually I think I will turn some proper wire wheels, and replace the kit leaf springs and dampers with something better - but go with the kit items for now. Thanks for looking, Nick
- 22 replies
-
- 10
-
-

-
- Alfa Romeo
- Italeri
- (and 1 more)
-
This was a dated kit, showing its age in a few places, but overall this was still a great build. I look forward to picking up a few more of these 70's style Formula 1 cars in the future. A later incarnation of this car called the BT46B was banned due to it's controversial ground effect invention, which was a gearbox driven fan that spun at 8000 rpm which although on paper was supposed to help cool the engine, in reality the whole of the engine bay was fully enclosed, thus creating a huge suction that created a massive ground effect advantage over the Lotus which had dominated the season up until the arrival of the "Fan Car". Ultimately, it was banned due to complaints from other drivers and rival teams claiming that the fan was illegal by definition of the rules. Finally, you can see my work in progress of this build in the link below.
-
Hi everyone, I've had this kit in my stash for a few years and my nephew wanted me to build it for a Christmas present for him, so finally I thought I should get started on it. It will include the driver with the Niki Lauda decals on the car and driver helmet. It should be a fun build.
-
OK... the Lambo is still under way, but this one is now done! Lovely little kit of a lovely little car. The only thing I'd do differently if I did another one would be to thin out the body at the wheel arches, to give the dropped suspension a bit more room to move... bestest, M.
- 7 replies
-
- 4
-
-
- Alfa Romeo
- Tamiya
- (and 1 more)
-
 Two very different cars, but both a tribute to the best of Italian sports car know-how... The GTA in primer. I'm trying out a technique suggested by "Cruz", on another forum, in which you wash the shut lines with black while the car is in primer, before painting. He suggests rescribing the lines first, but I thought that the GTA had crisp and deep enough lines out of the box to test the technique without needing to scribe them. The Murcielago in primer. I wanted to get as many parts of the body together as possible to avoid having to match the colours, and glue clear-coated pieces together. In practice, this means the extreme nose, skirts and lower edges of the extreme rear can be attached. Doors and one intake (which has a segment of body colour inside) have to remain separate... The Murcielago will be Giallo Orion -- a pearl yellow colour -- with lots of black/grey carbon trim. This is, once again, the ever reliable Zero Paints system of ground coat, base coat and clear coat. Whereas the Giulia Sprint GTA is in a colour scheme inspired by some of the racers I've seen at Donington over the years. More Zero Paints, this time Alfa Rosso Corse and Lamborghini Powder Blue (a Miura colour which eventually lost out to the lime green when I built mine, but I may still do another in this colour, because it looks so cool...) And now with the clear coat on. You can see how much it changes the apparent colour of the base coat, especially on the Lambo. I think the change is even more intense with the pearl finish because it reduces the scattering of light by the pearl layer, and lets you "see through" to the base coat more directly. I also tried using clear over a decal for the first time, (the Alfa "snake" on the bonnet) which has worked very well. There are the odd spot imperfections here and there, but once again the Zero 2K clear has done its job and settled into a smooth, glossy finish all over. These will now go away into plastic boxes for a week or so to fully cure before polishing out those spots. It's good to be back at the bench! bestest, M.

