Search the Community
Showing results for tags '1/8'.
-
Hi guys, this is the final reveal of the 1/8 Heller BMW R750/5, which my friend asked me to build for his elder brother and some pics of the real bike. His brother who is now 57 bought the bike when he was 19 and toured Europe on his Honeymoon!
-
 My first KUTA 2023 subject, this is the 2009 issue Revell 1/8th scale Apollo : Astronaut on the Moon. This boxing of the original 1970 kit was to mark the 40th anniversary of the original moon landing, it was also released again 10 years later to mark 50 years. 20231108_221152 by Ghostbase, on Flickr I remember starting this kit just after I purchased it at a reduced price from Modelzone. I think I read somewhere that it was originally produced as a vacform kit; this would make sense becase there are very few parts however they are quite large and made of very thin plastic. The reason I stopped building it was because of the join of the parts. I had added filler then decided to paint over the sanded joins with enamel white. I then decided to add another coat of primer and this reacted with the enamel paint to give a 'frizzy' effect. 20231109_141507 by Ghostbase, on Flickr This has been on the shelf of shame for about 12 years, lets see if I can do a better job this time 🙂 Michael
 -
Another kit that I finished last year... I tried to change the shape of the cover over the helmet, but not really too succesful. Some little details added. I think the impression/atmosphere of the kit is quite good, accuracy is another issue As always, thanks for looking. Cheers P.S., yes I know Neil would have a hard time reading the checklist on his left arm. The watch is way too low - maybe I will change it - one day ....
-
Ok so not a complete car.... I was asked if I could modify a 1/8 scale wheel for a mate at work. Heres what I managed, he wanted the front rim extended outward by 5mm, so I had to make a new wheel and add inner rims to keep the tyre in place. Even made some values
-
Mainly because I've just got a new Ring Flash I'm playing with, I thought I would put some new photos of my completed F40 engine up. And a couple of 'giant pen' shots to finish in case you were wondering how big it is Thanks for looking Nick
- 29 replies
-
- 40
-

-
Last years (like every years) was the biggest model expo in Italy (Verona) Modelspace Italy asked me to show my MP4....was a pleasure but was also a moment to think about my build. Watching my Mclaren i'm not satisfy with the result, so i decide to improve it After thinking about it i decide to restore my Mp4/4. After 4 years of modelling and after 4 years which i lightly improved my skills, i decide to make this: - Add all carbon to car - Try to add all missing extra detail I think that put the decal on front wing will be quite easy. The external pillars are screwed on front wing My trouble will be with rear wing pillars. If I remeber well, i think was glued....so i hope to don't damage it. For few euros, i collected the first 2 issue with complet fornt nose and rear wing. At home i have also the full bodyshell. In the future months I'll purchase new tobaccos decal and some carbon for undertray.
- 87 replies
-
- 1
-
-
- 1/8
- McLaren F1
- (and 1 more)
-
I believe this was originally issued by Aurora in 1958.
-
-
 Death has come to your little networking hub. You can either ignore it, or you can give my latest build a like.
 -
Death has come to your little networking hub. You can either ignore it, or you can give my latest build a like.
-
 Golf and Mp4/4 are stopped 😕........are stopped because i started a commissioned work to finish at the end of this year (later in first 15 days of January). I started this work in 10 october The subject is a 1/8 hachette (very poor and detailless model) Lancia Delta Martini.....The person that commissioned me this model ask to me a little work to leave a bit the "toy effect"....so I (re)started to work on this third Delta. The rally will be the San Remo (italy) 1991, pilot Biasion e co-driver will be Siviero. So, I started to dismantled the model mounted by the "client" I smiled with the "carbon and kevlar" Some wrong fitting work anf many mistake in combo color In 2 hours i full dismantled the model ouf of box previously mounted and restarted the work from point zero.
 -
 I've been meaning to get into this group build for a while, but coming up with a kit took some doing - a lot of the more memorable kits I built in my youth are quite rare and expensive these days (Airfix Saturn IB and Boy Scout spring to mind, as do a lot of Aurora kits). I knew I had this kit, but it was in my secondary stash in my mum's loft, and I've only been able to retrieve it recently due to the lockdown. Back in 1973, when I was 9 or 10 years old, I built a lot of the Aurora glow-in-the-dark monster kits, missing just King Kong and Godzilla. For some reason I remember they were 79p each back then, so I don't know how I afforded them. In 2008 I saw the Moebius reissue of Dr Jekyll as Mr Hyde in Modelzone for £20, which seemed a good deal at the time. Some pictures are, I think, called for here. The box: The main parts: The clear parts: The glow parts: The instructions: and I even found the receipt, which is how I know when I bought it: I've started construction, but it needs some paint on his shirt front and trousers before I can assemble his lab coat.
- 14 replies
-
- 10
-
-
- Moebius
- Aurora repop.
- (and 1 more)
-
Here's Ringo
-
and transformed
-
This is a commission build for a customer who has the full size bike that I have been doing some restoration work on. He bought this kit from another BMW owner, it’s a very nice looking kit, but no pinstripe decals are provided, so I will have to paint them on. Overall this is the same model kit as my previous build of the RT model, the only real difference is the more sporty nosecone fairing and sports seat, however the client has a standard passenger seat that is also in the kit, so it will not be as the box art. Shame really, as I like the look of the sport seat unit. I will show more build photos soon guys.
-
Hi everyone, well I am calling this done, I scratch built the tote bag on the rear carrier and made the bungee cords. I also added the notched trim around the centre of the rear panniers or bags, for this I cut up a zip tie [cable tie] and epoxied them to the panniers. The original panniers had some similar details. Although I went for a shiny finish on the paintwork, I also wanted to add some road grime and so the look I was shooting for was a the rider and his companion had just spent 4 hours on the road in some pretty lousy weather, heavy rain, road spray and gusty winds between more thundery downpours. So they have pulled over for a well earned break, hopefully by the time they have had a brew, and hot soup the sun will be out for their final journey home. Paints used are: Mr Hobby 1500 black, Aqueous H89, H94, Molotow Chrome, Tamiya Clear orange, blue, red, 2k Clearcoat and Alclad pale gold.
- 21 replies
-
- 16
-
-
Hi, to everybody. I’m italian and a big vw fan (i have a couple of mk3) I started 2 years ago the collection of this 1/8 golf GTI (100 issues) only for italian market and the collection is now terminated......my model not (some stop due to work on a couple of 1/8 Delta WRC) I’ve started a tuned/stanced project but i decided to remade it with extra details to add more realism to my model. I work on this model when I'll made some work pause on Mclarem Here the status (i've stated to rework in July)
- 108 replies
-
- 3
-
-
- Volkswagen
- golf gti
- (and 1 more)
-
This kit dates back to 1987/88, I picked it up off eBay as an unstarted kit, just before Christmas, been itching to start it. As I am very familiar with the full size machine and it was a very popular bike in its day, known as the "Airhead" models, due to being an opposed air-cooled flat twin or boxer, it should hopefully build up into something very interesting to look at. I have built Hellers R750/5 machine in the past, so I am familiar with how the engine is put together and the cycle parts are very similar also. I hope to update you very soon with progress.
-
so here are some of the sprue from the Heller Ty 125 kit. The are very nicely moulded. In stead of vinyl tube you get a vinyl sprue(black) for the cables that have to be held in place between the parts they connect to rather than pushed on. The bottom pic(figure 10) shows how you make the 2 rear shocks using the piece of wire and the jig, nice but I will see how they turn out before probably dipping into my toolroom box of springs. Looks like a very good kit so let's get started with the piston head fins which are a separate parts a nice touch remove the horrible chrome from the wheels and other parts and set up my nice little compressor and airbrush
-
 I was excited to build a brand new 1/8 scale kit from a new company after building so many Pocher kits over the years. Here are my quick building impressions of the new LeGrand 1/8 Collection VW Beetle kit (a complete kit version of the DeAgostini/ModelSpace partworks kit) a decorative metal sign is included body parts are prepainted with all necessary scripts and trim, wheels are metal, tires are softer than Pocher plastic parts are prepainted, bagged and boxed in groups (no sprues to cut!) the screws are nicely prepackaged in three compartmentalized boxes (you will have many spares remaining for other projects) Introduction Part quality and fit is good, all metal and most plastic parts have a nice pre-painted finish. There are no decals to worry about, all necessary markings are pre-printed. A small Phillips screwdriver is supplied with the kit, but more specialized tools can make the job easier. I have been using Wiha Precision Phillips screwdrivers sizes #00 x 40 mm, #0 x 50 mm, and #1 x 60 for a range of screw sizes and torque required. Pay attention to the numbering of parts in the assembly steps, which usually is the order in which they should be assembled. Many parts have D-shaped mounting holes or assymetrical mounting points that help ensure they are oriented correctly. Parts with Left and Right pairs are often stamped L and R to help with placement. It may also be helpful to consult the step by step assembly instructions for the subscription version https://www.model-space.com/landing-pages/beetle-uk/download.html. They are designed more for a novice modeler but include many more diagrams and photos, although the assembly order is different compared to our kit. For my build here I am ignoring those instructions and evaluating only the included paper manual. Group 1 Steps 1-4: The first assembly steps took longer than expected, as identifying some parts was harder without numbered sprues. Examine the master illustration of all parts in a "group" and their numbers at the start of each section, as the diagrams for the chassis and rear suspension assembly steps are a vertical view that is not always clear. Further ahead in the assembly manual the illustrations have a 3-D perspective that makes things easier. The wheels are metal! I was able to mount the tires after just warming them in my hands, but warming them with hot water or a hair dryer as the manual suggests will make it easier. Step 6: Parts 1.49L & 1.51R: be sure to orient them correctly according to the diagram; round hole faces front, towards steering rack, and oval hole faces rear. Parts 1.52 are small metal pins with a burred end; insert the smooth end first, then press with pliers or a small vise until the burred end which secures them sits flush in the hole. Step 7: Screw lower spring cups parts 1.56 & 1.61 to front suspension, then screw part 1.66 loosely to the chassis leaving as much wiggle room as possible. Then assemble the shock absorbers & springs which must be held together at the ends, compressed and fitted into place, before tightening part 1.66 to the chassis. Group 2 Steps 10-12: Assembly of the seats and interior floor is clear and straightforward. Step 13: Press the rear mounts for the seats in the correct holes and hold firmly before flipping the floorpan over to snap the forward tabs in their slots; it make take a few tries, and you may have to squeeze the forward seat mounts to get the tabs to line up with the slots while viewing from below. Step 14: Part 2.52 has a larger and smaller hole that will orient it correctly on the mounting pegs. The diagram does not show that grey flocked part 2.54 must be pressed into the rear seat back 2.53. Group 3 (engine!) Most parts are nicely pre-painted, although some black plastic parts will look better if painted. Remember all part numbers ending in "M" are metal and are located in the foam block that contains the body panels. Step 16: Be sure part 3.7M is oriented correctly and matches the contour of the engine block. Step 17: After starting the screws I had to press the engine block halves 3.8M and 3.11M together slightly with a vice to eliminate a small gap. However, the gap between the transmision and engine block is intentional, as a plastic part will slide between them in step 19. The mounting tabs and slots for parts 3.9, 3.10, 3.12, 3.13 are assymetrical and will orient them correctly so the flats on the cylinders will face each other. Step 20: parts 3.20L and 3.21R and stamped R and L, but are shown on the wrong sides in the instructions and will not fit if assembled as shown. Step 21: I had to add part 3.22 after mounting parts 3.20 & 3.21 to the engine because of limited clearance. Be sure the flanges on parts 3.21 & 3.22 are pressed completely into the matching recess in the black part between them and the engine. Fit the pushrod guides parts 3.24 into parts 3.23R & 3.25L before inserting the group into the engine block. Squish the ends slightly so they will stay aligned and in place if necessary. Part 3.29 is begging us to replace it with real wire. Step 24: Spark plug wires; refer back to page 16 to match correct lengths to parts #'s. Group 4 Body assembly was quick and clear in general. Step 35: Slide the thin metal ring onto the ridge at the bottom of part 4.3 before fastening to the interior door panel, and be sure the seatbelt buckle faces away from the door. Step 43: I had to unscrew and bend the arm of the fuel filler door several times to get a correct fit in the opening when closed. Group 5 (dash and moving body panels) Step 57: Part 5.43 was a loose fit so I squished the mounting pins slightly to get it to stay securely. I rotated the mounting arms of the rear bumper slightly to get a correct fit in the body. Step 58: Inserting metal pins into the door hinges right against the painted body made me nervous. I also had to bend both lower hinges slightly to get clearance for the hinge pins. Nylon jawed pliers were a life saver here to squeeze the hinge pins into the hinges. After mounting the doors they may not fit right, but the door opening will spread when the body is mounted to the chassis. Step 59: The dash was a tight fit because of interference at the sides from body assembly screws. Next time I may drill holes to allow more clearance. Step 64: The placement and ID of parts 5.68 & 5.69 is difficult, better to wait until after the body is mounted to the chassis. Step 67: When assembling the body to the chassis you may need to do some flexing and wiggling to get everything to line up at the correct mounting points. Start at the front with the car upside down and be sure the tops of the front suspension towers fit into the recesses in the wheel well. Then spread the body at the sills if needed as you work your way to the back. After mounting the body to the chassis I gently but firmly spread the upper body opening front to back by bracing against the windshield header and the rear of the car to create more space for the doors to close properly. You will see there is some natural flex in the bottom of the chassis when the doors are open. Step 69: I wrapped a thin strip of tape around the neck of the windshield washer reservoir 5.72 to achieve a secure fit in the mounting collar. Step 70: Windshield trim 5.78; notice the mounting pins angle downwards, and all four must be pressed in and down at the same time. The ends of the rear shelf 6.3 must be snapped firmly under tabs inside the body to get a correct fit. Windshield washer nozzle 6.33 is a very small part but shown deceptively large in the illustration. Group 6 (final assembly/convertible top) Steps 72-74: Be sure to refer to the photos on page 60 in addition to the parts diagram on page 57 to help clarify the assembly of the folding top mechanism. Step 76: It is a little fussy to get the reinforced holes in both layers of the cloth top to align with the "sandwich" of rear window plus interior and exterior trim pieces. Make sure each layer (outer cloth, rear window, inner cloth, inner trim piece) is fully seated onto the pins of exterior trim piece 6.26 before tightening each screw. Be careful your screwdriver does not slip and scratch the window! After the rear window is attached undo the velcro and reattach so the metal top mechanism is between the layers of the cloth top. Step 78: Be sure each piece 6.31 clicks fully into each hole in piece 6.29. Refer to the photo on the previous page 62 of the manual for clarification. Step 79: When attaching the rear of the top to the body, insert the black pegs on parts 6.17 from step 74 first. You will have to angle the top of these parts inward to insert the pegs. Step 80: Face the front of the model and brace it against your body while pulling the front edge of the convertible top to the windshield header, then press the pegs firmly into the holes to secure the top. The cloth top is bulkier than the real version, something that is more difficult to scale down than hard parts, so it is hard to fold without looking awkwardly high. My solution is to unmate the velcro holding the inner and outer layers together, fold and stack the top layer carefully, then fold or roll the inner layer into the middle before covering with the fabric boot. There was some interference when I first retracted the top so I had to pinpoint the problem joints and flex the metal bows gently to get them to stack symetrically. The elasticized fabric boot looked awkward until I researched photos of the car and saw that the real one often looked worse. Summary: I enjoyed this build and the quality of the parts. Total build time was quicker than expected because the car itself is simple (like comparing the Pocher Classic Fiat to the Alfa). Minor criticisms: Getting the doors to fit well was a little fussy, partly because the nicely scaled metal hinges are a little too flexible. I'll accept the trade off because the accurate hinges look so good. I wish there was a better latching system than just a friction fit against the body opening. The tires look a little wide to me but also look great on the car. I wish the bumpers were metal. I will suggest improvements to the manual for the next LEGRAND 1/8 kit, additional steps and clearer illustrations. Color photos as shown with the subscription instructions linked above would be best. Final Thoughts: The finished model looks great, and will look even better when I get a chance to polish and wax it as I do for every build. The convertible top looks good up or down, an improvement over the prototype photos. The metal mechanism works well and makes so much more sense than the plastic pieces Pocher provided in the Classic car kits.
 -
-
Hello again. A new project has begun. Or rather, 2 almost identical models. Both models are of the Scania Lt 141 type from 1979. They were ordered on the same day by the two owners and I took the challenge of building them simultaneously. I started preparing the drawings in November 2018 and here are the pictures of the results for now. They are built in scale 1/8 and are basically 100% scratch built. I made sure to make molds for as many of the parts as possible. It simplifies the work on the other model - and maybe on future projects as well.
-
Hi all, this is the final reveal of the 1972 Kawasaki 750 H2. This was the most powerful and unpredictable bike to own in that era and carved out a reputation for itself as a bit of a Hooligan. To emphasize the character of the bike I decided to ditch the centre stand, as any hard rider would find it a limitation in the ground clearance. Also I have scraped the chrome on the underside of the exhausts, which was a common occurrence when leaning this bike over into bends. As a final detail I wanted to show the oil tank gauge indicator which was basically a clear tube that exited and entered the oil tank and was visible through the slot at the rear of the right hand side panel to make the clear tube look in scale. I used a piece of fibre optic strand and looped it round and fixed it into the side panel and then with a little dab of red paint, gave the impression of oil in the tube. A small detail but accurate nonetheless. In the hands of an experienced rider, the Mach 750 H2 was the fastest production bike in the world, but with someone less skilled on board, it was an accident waiting to happen. It earned its nickname 'the widow maker' all too often. You can also see the work in progress of my build here. Finally the last picture is for all the doubters who think this is a real bike. I thought the plastic spoon would give a sense of scale to the non believers LOL!
- 22 replies
-
- 16
-
-
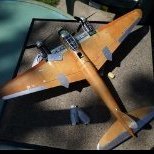
Hi all, here is the start of another 70's classic superbike build. The Kawasaki Z900A4 or KZ900 in the US. This is going to be a kitbash of sorts as this kit is not available. I bought two kits which I will take parts from to build the Z900A4. Don't fret! I have a plan for a workshop diorama in the future, for the leftover parts. As you can see I have made a start on the bodywork, the paint colour is diamond dark green. I used the Z1000 decals for the side panels and cut them and painted in the number 9. There was some subtle differences between the Z1000 and the Z750 which eventually became the Z1. The fuel tank and the bodywork is correct on the Z1000 for my Z900 conversion, as is the fuel cap, carbs, airbox, rear light, front forks, headlamp, seat, mudguard and clocks. The 750 kit will require the exhaust system and a few other parts, which includes the triangular rear subframe for the exhaust mountings, these will have to be cut from the 750 kit and grafted onto the Heller frame. I am using mostly the Heller chassis parts, so that I know that the bodywork will all fit correctly. Finally I have some pics of a real bike which I recently restored. Wish me luck and will update you again sometime next week.
-
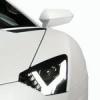 Lamborghini Aventador Roadster LP700-4 Pocher 1/8 kit, with detailing and LEDs Follow up post of my build thread, where I talked a lot about everything. Here I'll let the images speak:

.thumb.jpg.ad2b820bfdebfdb8541e9255a05f38c7.jpg)