Search the Community
Showing results for tags 'sea king'.
-
Hi all and forgot about posting this one here from earlier in the year. Built for the Carriers GB here on Britmodeller. Mostly OOB but with some corrections to make accurate for the type - full build thread if you're interested is here ! Cyber Hobby SH-3D Helo 66 (1) by Dermot Moriarty, on Flickr Cyber Hobby SH-3D Helo 66 (2) by Dermot Moriarty, on Flickr Cyber Hobby SH-3D Helo 66 (4) by Dermot Moriarty, on Flickr Cyber Hobby SH-3D Helo 66 (7) by Dermot Moriarty, on Flickr Cyber Hobby SH-3D Helo 66 (14) by Dermot Moriarty, on Flickr Thanks for looking and Happy New Year to you and yours. Cheers, Dermot
-
 I fell in love with photos of Qatar’s beautiful Exocet-armed Sea King/Commandos in the late, lamented World Air Power Journal back during the Gulf War years. I waited patiently, hoping that some aftermarket company would produce suitable decals, but that never happened. Eventually, with the proliferation of good online photos, I found an image clear enough to use to reproduce the Arabic inscription used on the tails of Qatar Emiri Air Force’s Commandos and Gazelle helicopters. This done, I was able to make up and print my own decals on my PC. Chosen aircraft for my depiction was the oft-photographed QA33 (c/n WA922), one of (8) Commando Mk. 3s acquired by Qatar for the anti-shipping role, fitted to carry Exocet missiles. These aircraft serve with QEAF’s No. 8 Anti-Surface Vessel Squadron, operating from Doha. I tapped Revell’s popular 1/72 kit of the Sea King Mark 41 with Skua missiles as the basis for the project. The kit offered the necessary options for the required fuselage windows and many additional pieces like the intake filter and 6-blade tail rotor. I removed the molded-in floatation bags from the kit sponsons, then scratchbuilt the smaller “thumbtack”-style pop-out emergency floats and sponson-mounted sensor domes. [For a more complete account of the various changes to the kit, check out the build log here.] The Exocet missiles came from Italeri’s venerable NATO/US Aircraft Armament set, with scratchbuilt launchers and mountings. Paints for the attractive QEAF camouflage scheme are all Tamiya acrylics, mixed by eye (with more than a bit of trial and error involved). Drybrushing and weathering with Testors “square bottle” enamels, and artists oils. All decals home-made with the exception of the “dotted line” markings around the main entry and side fuselage door windows, which were borrowed from an old Model Decal modern German AF sheet. Really a fun project, and very satisfying to have it done after so many years. I hope you enjoy the photos. Special thanks to members MarkdipXV711, Rodders154 and andyf117, whose great work on these forums provided major inspiration for this project. Thanks also to all who followed along on the build.
- 52 replies
-
- 83
-

-
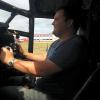
 Hi, Appreciate that there has been a recent group build for the Sea King however I didn't take part as it's taken me 5 months to get to this stage. I'll admit, I've not got that far however my hope is that I will end up with a large model representing this actual aircraft, which coincidentally, was the last aircraft I flew in back on 21st August 1996. Not a particularly interesting flight .. more of an AFCS ( automatic flying control system) check test flight. She passed and was serviceable for future use. The last I heard .. she is sitting down in HMS Sultan, being used as a training aircraft for future WAFU's The link for this is http://www.planepictures.net/netshow.php?id=1036995 Anyway, I started with the excellent ( and only) 1:48 scale kit that I could find and ask Santa for. The har.5 kit from Hasegawa "Ark Royal" ?? edition because this would require the least of all options to convert to the has.6 version. First job was to source a MAD sponson for the stbd side, which I did from fellow member "WAFU" and sent him the regular sponson from my kit. Next came the purchase of some PE, which I have never really used before and was pondering the purchase of PE tools. In the end and after some discussion with other members, I just bought some quality smooth pliers and snips. This was mainly due to the fact that there was no real requirement for bending lots of PE that I'd purchased. And so I began... I decided to leave the front seats as is and I appreciate that the Westland versions do not have the large seat supports shown here. This was to help support and place the PJ production 1:48 Lynx crew which I will add later ... especially the all important aircrewman and then... ..the most frightening job for me was to take a saw to my model and I carefully cut out the main cargo door, which thankfully I can reuse and attach later. This was nerve racking to say the least but after some hints and tips from other members, I purchased the best quality micro saw I could afford ... best investment ever. Dry fitted almost everything that I could, as I wanted to minimise fit issues which would require sanding and as such , loose detail. I haven't tried re scribing and due to the good quality of this kit, hopefully I won't have to. There was a gap above the main cockpit and fuselage and this was addressed later. This picture shows the hole I cut in the cabin floor, in order to fit the sonar and you can just see the first bit of PE fitted, which is the sea anchor storage, fitted behind the P2's seat. Decided not to fit the PE yaw pedals as I actually preferred the plastic kit parts, however I did fit the pedal surrounds and sanded down the instrument console, ready for the attachment of the self adhesive PE parts. PE broom cupboard bent & attached. This is where the hydraulic actuators and other gubbins for the AFCS are housed, behind the P1's seat. The first aid kit, flare pistol and piddle tube ( back up intercom !!?? ) was also attached to this cupboard. Finally , I was ready to start some scratch building for the back of this aircraft as the kit is absolutely bare ... which is a shame. The rear crew seats were made using bits n bobs of plastic, copper wire and cocktail sticks. I cannot take credit for this idea, it was borrowed from the excellent thread below http://www.britmodeller.com/forums/index.php?/topic/234976450-sea-king-crew-seat-detaing-revell-72nd-scale-kit/ The seats I was happy with .. the observers / aircrewmans stations .. eh not so much !.... so I started again .. from scratch. Whilst I was trying to figure out the rear consoles, I decided to fit some soundproofing and cabin flooring. For this I simply used some cut up plastic sheet, cut up jiffy bags and some of the plastic straps that held the polystyrene packaging on my new fridge freezer ... another expense I could have done without. Waste not... want not !! Rear consoles v2 ... made using some of the polystyrene packaging, cut to shape and faced with some plastic card. I also use the jiffy bag to make the cover that surrounded the dipping sonar. This was maily due to the fact , that even with the rear cabin door open, viewing access is minimal through said door and cabin/cockpit windows. As you can see, the dimensions of the consoles are much better second time around. I also took the opportunity to fit soundproofing to the cabin ceiling. .... and after painting and applying the cut up cockpit decals from OOB, I ended up with this. I elected to keep the front personnel door closed, so I simply used some polystyrene block to make the fwd equipment rack and also a representation of the MS10 liferaft.. which you can just see through the cockpit. View from the other side Actually quite liked the self adhesive PE for the cockpit .. but it did require a lit bit of help to stick ie superglue Back to the rear cabin area and shown is my first attempt at rear cargo seats. These have since been removed and v2 fitted. I used the luminous "hamma bead" method to fashion the radar screen. Melt the beads using a warm iron and cut to shape. This worked quite well and when exposed to strong light and viewed in darkened conditions you get the following effect. Excuse the poor quality photo .. but you get the idea This was the dirtied effect I was looking for and so far so good. It was then time to take possession of the following bespoke decals sourced from Roger at www.whirlybirdmodels.com Fantastic and just what I wanted. This guy is a genius and we spent several months conversing by email and phone to get the above just right. These are unique to my model and I am over the moon... but lots to do so they have been safely packed away for now The fit of this kit is the best I've come across yet and I finally joined the two halves and dry fitted the various access panels. The gap above the cockpit and glass were filled with platic card and some detail added using wire. The hull is a snug fit and fits perfectly despite what the picture above suggests. I am not going to glue the boat hull section until I've attached the various antenna and decided what I'm going to fit inside the sonar well. I know it will be the correct dipping sonar but I am thinking of scratch building the full body, which I can remove to display, if so required. So this is where I'm at to date. This has taken me 5 months so far, mainly due to work commitments. I could not commit to the time scales of the group build but the fantastic work of all contributors was borrowed for incorporation into my model. This is going to take me several more months but hopefully the result will be be worth it. By posting on this WIP forum, it should ensure that I don't forget about it and do bits n bobs when I can. Thanks for looking in... best wishes
 -
 AFV Club is to release a 1/144th Sikorky SH-3A Sea King kit - ref. AR14405 Source: https://www.facebook.com/AFVCLUB.TW/photos/a.1512888545423326.1073741955.236926266352900/1512888992089948/?type=3&theater V.P.
 -
 Sea King HAR.3 / Mk.43 Update sets & Masks 1:72 Eduard for Airfix Kit The new tool Sea King was welcome for those who build Helicopters, Eduard are now along with some sets for it. Get what you want for the areas you want to be more of a focal point. As usual with Eduard's Photo-Etch (PE) and Mask sets, they arrive in a flat resealable package, with a white backing card protecting the contents and the instructions that are sandwiched between. Interior Set (73636) This set has one pre-painted fret, and one brass one. You get cockpit details, seat belts (front & rear) , instrument panels, and the overhead panel. The brass spure has cockpit floors and a new rear cockpit bulkhead. Also the rear bulkhead. Zoom! Set (SS636) This set contains a reduced subset of the interior, namely the pre-painted parts that are used to improve on the main aspects of the cockpit, as seen above, with the seat belts. Whatever your motivations for wanting this set, it provides a welcome boost to detail, without being concerned with the structural elements. Exterior Set (72671) This set contains many fuselage and tail access panels. Sponson parts, tail rotor parts, tail fold parts, crew entry steps & door, windscreen wipers, and winch parts. Masks (CX517) Supplied on yellow kabuki tape, these pre-cut masks supply you with a full set of masks for the glazing. In addition you get a set of hub/tyre masks for the main and tail wheels, allowing you to cut the demarcation perfectly with little effort, plus a landing light mask. Review samples courtesy of
 -
This is Sweet's simple but rather nice 1/144 Sea King, in kit-supplied markings for a Belgian AF Westland Mk. 48 of 40th Squadron Heli, working SAR operations out of Koksijde Air Base on the southern Channel coast. The 'hat box' search radar dome and 6-blade tail rotor are options included in the Sweet kits; my own additions to the basic kit include the tail-boom strake, scratch-built rescue hoist, nose-mounted FLIR and assorted sensors, aerials and antennae. I also swapped out the kit's overly-thick (and strangely-segmented) main rotor blades - which were the wrong style, anyway - for scratch-built versions of the later-design composite blades used on these Westland-produced models. For those who may be interested in the WIP build log, the link is here. Last but not least, a 'group shot' of my own tiny Sweet eggbeater squadron, featuring, in addition to the Belgian beauty above, (L) my recently-posted 'Bob and Doug McKenzie' Ch-124; and (C) S-61L conversion, Los Angeles County Sheriff's Dept. I love tiny Sea Kings!
- 2 replies
-
- 13
-
-

-
- Sweet 1/144
- Belgian AF
- (and 1 more)
-
Working on thinning out my stash of Sweet 1/144 Sea Kings. Next up will be a Belgian Mk. 48, as depicted in the kit instructions: More recent online photos of the same aircraft, #RS01 (serial WA 831, now residing in retirement in the Royal Museum of Military History in Brussels), show that it later acquired the larger 'hat box' search radar dome; this is offered as an option in certain of the Sweet releases of the kit, and I had one left over in the spares box, so on it went. The kit also includes options for the six-blade tail rotor as used by most European Sea Kings, and the 'clean' sponsons (without the original sonobuoy pallet and MAD boom used by the early USN models). The kit's pre-molded rescue hoist is a solid vinyl blob, so I cut it off to replace it with something a little more refined. All the 'greebles' which distinguish different models of Sea Kings - aerials and sensor fits, as well as details like pitots and mooring cables - will need to be added with bits of wire and styrene rod & strip. Not completely finished, but here she is nearing the painting stage: More as things develop. Thanks for looking in.
- 17 replies
-
- 13
-
-
- Belgian AF
- Sweet 1/144
- (and 1 more)
-
The latest Airfix releases are in stock now. First up is the re-issued A04015A Martin B-26B Marauder The kit has decal options for "The Big Hairy Bird" of the 599th BS, 397th BG as seen on the box top and "Flak Bait" of the 449th BS, 322nd BG in olive Drab/Neutral grey. Also out now is the A04063 Westland Sea King HAR.3/Mk.43 This kit has marking for XZ586 in 78 Squadron special markings and a Sea King Mk.43 of 330 Squadron, Royal Norwegian Air Force.
-
Hello All, I built the Airfix old mould (1969) Sea King for the Helicopter III GB. It's on a stand measuring 3" by 3 1/2" and there's a picture of the Apollo 11 Command Module on the stand to give it some context: The mission here is to build a vignette of the scene shown in the photo, with the helicopter hovering above. The stand is a 1/4" thick balsa block with plastic card around the sides. So I need a command module, floatation bags and figures, and some ocean! For the command module I have seen some very expensive kits on Ebay, which include the LCM and/or Service Module, which I don't need. So for the capsule itself I thought I might get away with building a plastic card model based on a paper model pattern available freely on the web: It's for a 1/48 model, so I printed it out at 66.7% to get 1/72. Placed on the stand, it looked a bit too big, so I tried making a half-scale copy of the original 1/48 size one to give me 1/96 scale: This looks a lot more manageable and gives a bit of "forced perspective" to the scene. It's also about the same size as the one in the photo, so that works well. For the floats and dinghy I will be using two-part putty I have a choice of two-part advanced wood filler (too fast, no good for modelling), milliput (could do) or a strip of two-part filler in blue and green halves that you knead together until it is a uniform colour. The last one doesn't go entirely rigid and is hard to sand, but I think it would be the easiest to use. I will probably make my own figures for 1/96 scale, and I'd like to put one or two in the helicopter doorway too. Thanks for looking, Adrian
- 52 replies
-
- 13
-
-
Hello All, A while ago I built Sea King "Old 66" for the Helicopter GB. For the Vignette GB I went on to build a base incorporating the Apollo 11 command module to show a moment from the mission recovery. I didn't manage to get any decent pictures of it because of time/weather/travel, but I grabbed some today and thought I'd put them up here. Well it's space AND diorama AND aircraft... I photograph outside, and the moving rotors in the first shot are not a fancy effect, but the wind gusting in my back garden! The Sea King is 1/72 and the command module is 1/96. The scratch build WIP for the command module is described here. Thanks for looking, Adrian
- 70 replies
-
- 106
-
-
I’m chuffed with how the last turned out so thinking on (since I used to live on the West coast of Scotland & rock climb) an 819 squadron Navy Sea King recovering a fallen climber Holding page while I gather my thoughts and bits and pieces https://m.ebay.co.uk/itm/REVELL-04411-1-72-SEA-KING-MK-41-SKUA-MISSILES-MODEL-KIT-15-00-BUY-IT-NOW/311975907089?hash=item48a3368f11:g:ZsUAAOSwF71Z2UiJ https://www.hannants.co.uk/product/MA7267 https://www.hannants.co.uk/product/PJ721126 http://www.gaugemaster.com/item_details.asp?code=FA151084&style=&strType=&Mcode=Faller+151084
- 5 replies
-
- 1
-
-
- 2nd time around
- let’s try make it better
- (and 1 more)
-
Hi Guys & Gals...I present to you, my lastest completion. The New Tool Sea King. It took me 3 attempts to get the camo half decent, the 3rd of which was achieved by 8 hours of masking.
- 38 replies
-
- 56
-
-
Had the chance of a brief tour of the airframes used engineering training at HMS Sultan IMGP7754 by Phillip Wilmshurst, on Flickr IMGP7768 by Phillip Wilmshurst, on Flickr IMGP7763 by Phillip Wilmshurst, on Flickr IMGP7852 by Phillip Wilmshurst, on Flickr IMGP7851 by Phillip Wilmshurst, on Flickr IMGP7837 by Phillip Wilmshurst, on Flickr IMGP7833 by Phillip Wilmshurst, on Flickr IMGP7823 by Phillip Wilmshurst, on Flickr IMGP7806 by Phillip Wilmshurst, on Flickr IMGP7797 by Phillip Wilmshurst, on Flickr IMGP7796 by Phillip Wilmshurst, on Flickr IMGP7770 by Phillip Wilmshurst, on Flickr IMGP7755 by Phillip Wilmshurst, on Flickr Sea King Rotor head IMGP7746 by Phillip Wilmshurst, on Flickr Willy
-
I havent seen this version finished so I thought I would put mine up. I do like the yellow RAF rescue helicopters as the last picture wll testify. This is a superb kit and the interior detail is very good shame a lot cant seen if the doors are shut. I have however opened the aircraft up I did the kit version but have just notice that i missed off the directional spot at the rear of the fusalage. Too late now. I had a spare air filter from a revell kit so I used that instead and when the airfix decals went on and the microset had done its job I was rather pleased with the result. Otherwise all straight out of the box Very good value kit will be buying more. Normal rules view from 5ft Rodders ooops that blade nees bending down A theme is developing here :-)
- 26 replies
-
- 53
-
-
I was thinking about projects for the future and wondered what was the best (cheapest) way to get a 1/48 HC.4 Sea King. I have a Wessex HU.5 kit in stash and a Lynx HMA.8 with the backdate kit to make it an HAS.2. Was thinking a Falklands war Helicopter display would be quite satisfying. Would the Revell boxing of the SH-3H US Navy Sea King be a good starting point? Is there any resin available to make the changes to the landing gear? Has anyone got any plans to bring out a kit in the near future that I'm not aware of saving the whole expensive and messy business of 'making' an HC.4 from bits and bobs. Airfix scaling up their 1/72 Junglie would be awesome! Thanks. :-)
-
This photo is of a Royal Navy recruitment poster I picked up about 10 years ago. It shows a Sea King HC.4 on IFOR detachment to Split-Divulje in Croatia, flying low over the Cetina River gorge at Omiš. The code letter on the nose is 'C' but, other than that, I have no clue as to the identity of the airframe - can anyone tell me what serial and what squadron? And does anyone have any other photos of this aircraft at that time?
-
Hi all, I was given Airfix's new boxing of the Sea King HAR.3 for Christmas so in an effort to hit the ground running in 2017 I've decided to haul 2 older boxings from the stash and build the three together. My intention is to finish the aircraft as follows: XZ586 Sea King HAR.3, 202 Sqn A Flt., RAF Boulmer (from the new Airfix HAR.3boxing) XZ590 Sea King HAR.3, 202 Sqn A Flt., RAF Boulmer (from the old Airfix HAR.3 boxing) XV699 Sea King HU.5, HMS Gannet SAR Flight (from the Airfix HAR.5 boxing) (modified from the new Airfix HAR.3 boxing using decals & possibly some parts from the Airfix HAR.5 boxing) ZA314 Sea King HC.4, 848 NAS, RNAS Yeovilton (from the new Airfix HC.4 boxing) Mystery project (from the old Airfix HAR.5 boxing). What's already becoming incredibly clear is how far the Airfix kits have advanced between old and new boxings. I was originally going to build the old ones OOB as a quick mojo builder but I'm now debating doing some detailing to the interior. I'll stick some pics up once there's something to show Stu
-
Hi all, I think I've set myself a bit of a tester this time! I've got the Airfix Sea King HC4 to have a go at and in a moment of madness I asked Mrs Wasacop which version I should do--all green or the green/white camo? No prizes for guessing which one she went for (and to be fair I agree with her)-- you got it the green/white one! My question to those who know about these things is how much would I have to enlarge a scan of the painting guide to make some masks for this bad boy? Thanking you all in advance for any help on this one, Hilly
-
fairly hot of the press...but the german navy (said this before) require extra sea king for training so they are getting a number of ex RN sk mk5s . Heliops will be operating them out of the former MCA hangar at Portland which of course is on the site of RNAS Portlands hardstanding. Fear god honour the king
-
 I have both the Airfix HAR.3 and HC.4 boxings of their new 1/72 Sea King. As my preference is generally to do combat aircraft, is it possible to backdate either (or both!) of these kits into Falklands War machines? If so, what would that entail?
 -
Finally finished this model, which I started back in May this year.. Full build thread is here - http://www.britmodeller.com/forums/index.php?/topic/234981204-navy-709-flexops-due-sea-king-has-6-xv711-circa-1996-819-nas/ Before the photos, just want to publicly thanks "Wafu" and " daryle-five-zero " for supplying / swopping various parts in order to build this. I also have to thank whirlybird decals for making the bespoke squadron & aircraft decals. Model is Hasegawa mk 5 with added PE and a totally scratch build rear interior. Enjoy .... Many thanks and happy modelling
- 46 replies
-
- 58
-
-
Well you heard it first but standfast the mk7s still very much in service but there may well Be a limited return of a few mk 5s to support well better not say but it's in Europe. This is a gen dit!
-
I have purchased the Sea King mk3 and have found that the decals are not fully"varnished" See picture below. Is mine a one off or is a fault on them all like the canopy was on the 1/24 Typhoon. The areas are marked I dont want to soak them off to find I have problems if anyone has the same kit can they have a look to see if theres has the varnish missing also. No point asking Airfix for new if they are all the same. Area marked is where there in no varnish. That said I have a spare old airfix mk3 set 2 sets of modeldecals with a yellow and a grey falklands A/C and the modelart set so it isnt that big a problem Sorry for the poor quality of picture and on a slant but I know that britmodeller dont like pictures that can be used to make copies Rodders
-
Hello All, I started the Airfix classic Sea King over the Easter weekend. I'm hoping to build it as "Old 66", the helicopter that recovered the Apollo 11 capsule. Ultimately I'd like to do a diorama, but I will settle for finishing the helicopter before the GB ends! First, the kit. There are actually two boxings - 66 has a frogman and a net, and some extra decals for "66" as well as for the original "63": Sprue shot: The decals are well past their sell-by date, so I bought some after market ones from Hannants. These are for the Apollo 13 recovery but it's possible to get a "close enough" Apollo 11 version from them with some judicious trimming (apparently the Apollo 8-11 decals are available again now but this is what I bought): The fit of the parts was excellent when the moulds were new: The pilots are the standard post-war Airfix pilots, with rather unhelpfully crossed legs. The plastic is just about soft enough to cut the limbs apart and bend them into a more useful pose: I've detailed the kit seats, made a more accurate instrument panel and added pedals: Pilot #1 in place. Apparently in a helicopter the left-hand seat is for the co-pilot. Didn't know that! I found it easier to glue the control sticks to the figure, not the floor, so I can paint it all as a cohesive unit rather than having to fiddle with the hand fit later on. As the hatch will be open, I need some interior detail. First I put in a ceiling below the motor section, made from curved plastic card: Then some detail (some taken from photos, some made up) inside: The folding seats were made from plastic rod, stretched sprue and wine bottle foil: And painted: I thought I'd have pilot #2 looking over his shoulder to see how the recovery was going, so this guy got some serious surgery: He was given a uniform made from acrylic putty, and I had to add a new nose because there wasn't one on the figure (although the other, nearly identical, pilot was fine). Anyway, I painted them both up: And we have got to here: I need to detail the instrument panel and centre console, then I can think about installing everything and closing it up. Thanks for looking, Adrian
- 59 replies
-
- 18
-
-
Hi, what scale is a Sea King helicopter from Heller Humbrol Bobcat / Bobkit? Not Airfix tooling but snap fit from Heller mould. Is it 1/72 like their Super Puma Cougar and other Bobkit kits (Transall, OH-6, Harrier T4, F-16 and Phantom) or is out of scale? Thanks