
Search the Community
Showing results for tags 'roden'.
-
 Roden is likely to release a 1/32nd Avro 504K in late 2022 Source: https://forum.ww1aircraftmodels.com/index.php?topic=11367.0 V.P.
 -
Roden is to release a 1/32nd Spad XIII kit - ref. 634 Source: https://forum.ww1aircraftmodels.com/index.php?topic=11367.0 V.P.
-
 My initial thought for this GB was a Spit, everyone loves a Spit particularly an early mark. I have an Eduard Me109E "in the stash"but I didn't fancy modelling the "bad guys" this time. I took a bit of advice and settled on a Gloster Gladiator. 247th Squadron flew the Gladiator in protection of the SW ports from a pretty rough strip near Roborough (also known at one time as Plymouth Airport) (More history of the site here). The strip was unsuited to more modern monoplanes at the time so the Glad was deployed having moved the squadron down from Sumburgh in Shetland where they were tasked with providing cover for Scapa Flow. Since deciding on the subject of my model I have done some internet research and I will add more of this as I add to this thread. So this is the kit (love the pixie boots!) Contents of the box... And these are the add-ons I have chosen I decided against the resin engine and cowl as they almost doubled the cost of the build and I'm not particularly fond of working with resin. So I have the Yahu etched instrument panel a set of turned brass gun barrels (as I more often model armour plastic bun barrels seem, wrong) and then we have the real challenge of this kit... rigging on the recommendation of another Glad builder I have chosen this elastic material. Wish me luck! One thing that does concern me is the decals. I am told to expect these to be a pig to work with. I will try the Finnish swastikas to see how they handle. If they are as bad as people suggest I will be looking for alternates and would welcome pointers as it looks like I will be buying multiple sheets. This is what I hope to model.
 -
Roden is to release a 1/144th Convair B-36B (early) Peacemaker kit - ref. 347 Source: https://www.facebook.com/RodenKits/posts/3667839006565825 Box art V.P.
- 94 replies
-
- 8
-

-

-
- B-36
- Peacemaker
- (and 1 more)
-
 This is the 1/72 Roden Fokker D.VII (OAW Mid) kit, finished in the markings of Ltn. Rudolf Stark when he was commander of Jasta 35b in August 1918. Plenty has been written about Roden's Fokker D.VII kits and much of it is pretty uncomplimentary; most of it is also true. Although it looks very well detailed in the box and significantly more delicate than Eduard's example, very little fits without widening, narrowing, shortening, lengthening, filling, fiddling and fettling. The lozenge decals are brittle and unyielding to Microsol or Mr. Mark Softer, and even after plenty of both was used, along with very warm water, significant pressure was required to get the decals to conform, and that pressure tore and shattered many of the edges necessitating much hand retouching of missing lozenge. Roden's rib tape decals were completely unusable and split into varying lengths on contact with water, even after overcoating with two coats of Future/Kleer on the sheet. Eduard's newly released sheet of rib tapes, while intended for their recent kit, fit the Roden kit quite well, so they were used instead. The remaining Roden decals were variable, with the crosses and personal markings working quite well, and the codes and stencils silvering quite badly. There's around 120 decals on this model and, to be honest, finishing it became a chore about three weeks before actual completion, so the control lines remain unfinished for now and I'll return to them eventually. But the final result is quite pleasing and it looks good in the cabinet alongside Udet's 'Lo' and Berthold's winged sword examples, both of which I made years ago from the Esci kit. I built it alongside Roden's 1/72 Fokker Dr.I, finished in Vzfw Ulrich Neckel's Jasta 12 markings from April 1918. This kit isn't as bad as the D.VII with respect to fit and decals (no lozenge for example) but it's no shining example of state-of-the-art and was less frustrating but not completely trouble-free. Triplane aficionados may note that the upper support struts do not match the location of the lower struts. This was an error of my own making when I failed to increase the length of the cabane struts (they're about 2-3 mm too short out of the box), which threw out the wing geometry. Once again, I'll live with it; it looks OK in the cabinet. There are less frustrating kits of both of these aeroplanes offered by Revell and Eduard; choose one of them if you want a trouble-free build. But with better lozenge, care in building and a bit more planning, both of these can build quite nicely. I have a few more in the stash, especially the D.VII and I'm sure I'll build more down the track. Cheers, Jeff
 -
Douglas DC-7C, JA6301, 'City of San Francisco', operated on the intercontinental routes in the late 1950s by Japan Air Lines. This is the Roden kit in 1/144, built oob. It has lovely box art, and the fit was reasonable in most places. Just remember to use lots of nose weight! The decals take ages to soak and were prone to cracking, but not so bad that I couldn't slide together. I used spray cans for the two main colours and Humbrol 40 for the landing gear and wheel wells. I ran out of e-z line so only one wire done so far! Light weathering with Flory dark dirt wash.
- 12 replies
-
- 27
-
-
-
Hi, here's the latest build using the opportunity afforded by furlough(!) Not an easy kit to put together (but I am just an assembler rather than a proper modeller!) with plenty of superglue and filler used. Decals from Authentic decals which were ok but not as good as other aftermarket decals I've used. Hope it's of interest (yes she's a tail sitter btw) oh and the Krystal Klear is still curing in some of the pics 20200502_173917 by bryn robinson, on Flickr 20200502_173902 by bryn robinson, on Flickr 20200502_173852 by bryn robinson, on Flickr 20200502_173720 by bryn robinson, on Flickr 20200502_173705 by bryn robinson, on Flickr 20200502_173627 by bryn robinson, on Flickr 20200502_173947 by bryn robinson, on Flickr
- 25 replies
-
- 50
-
-
More precisely, here's one I started making around 14-15 years ago. It sat in the stash about a third finished until I pulled it out earlier this year, opened the Windsock Datafile on the Fokker Dr.I and spotted the colour profile of this aeroplane. It represents a Jasta 11 machine at Lechelle airfield in March 1918. The colour of the rear fuselage is speculative and, according to the Datafile, could equally be pale yellow. I liked the simplicity of Fokker turquoise so went with that option. The kit is the Roden 1/32nd Fokker Dr.I, built mainly from the box but with the addition of leading edge stacking pads and rivets around the cowling, both done with a punch and die, under-fuselage stitching made from small pieces of stretched sprue, and lead foil seatbelts with buckles from plastic card and some old etched brass from a Flightpath (I think) generic buckle set. The rigging and control lines are done with INFINI Model 1/32 Aero Black Rigging and Albion Alloys TB2 turnbuckles. Markings are a combination of the kit decals (many of which disintegrated in water and had to be pieced back together on the model) for the data placard, propeller logos and national markings, and masking for the pilot's personal markings on the rear fuselage. The bicycle is from the Tamiya 1/35 German bike riders set, as is the slightly modified figure, with a few uniform changes to make him look a 'little' more World War One. He's far from accurate but works quite well I think. The Alsatian was gifted to me many years ago by a fellow modeller when I originally set out to do this vignette. The barrels are solid resin but I have no idea of the manufacturer. Paints are Tamiya and Gunze Sangyo acrylics for external colours, and Humbrol enamels for details. The groundwork is done with Wilko brown wood filler, kitty litter and some fine railway ballast, all fixed into place with Johnson Kleer then painted, washed and dry-brushed. The grass is Jordan scatter fixed with diluted PVA, and the weeds are Heki moss. The groundwork was then flat-coated once the other fixed elements were glued into place. The vignette itself may not be accurate but it does look good in the case and it saves another model from the shelf of doom. Hope you like it. Cheers, Jeff
-
Hi Guys, due to the lockdown in France, I had to look at the bottom of my stash to find something exotic to build. I had bought the Roden kit of the Rolls-Royce armored car many years ago, but I was always frightened by the number of parts and low quality of the molding of some pieces. I usually build 1/48 scale aicraft, so this was quite a big change for me. I found a build by Andy Moore on this forum of the Meng rendition, which I tried to follow regarding the colors. Since I did not have access to AK real colors because of lockdown, I used custom mixes with Tamiya and Gunze acrylics. I used Mig Ammo premixed washes for the weathering. The small base is done with a sheet of foam board, covered with sand colored tile grout. The rocks and stones are two different grades of cat litter. Just for fun I added a milestone which is most probably incorrect for the place and period, but since this was meant as a relaxing build, I thought I could be forgiven. I hope you will like it, best regards to all, Christian.
- 16 replies
-
- 35
-
-
With two other running GB builds I shouldn’t be doing this, but those two are in the painting stage and since that’s boring, here goes. The kit, Roden’s fabulous little ship’s Camel: As the title suggests, I’ll be building the N6602 of HMS Furious (though the plane seems to also have served on half of the navy’s plane carrying ships) which is on the bottom here with the strange diamond pattern: Some cockades seem out of register Roden says PC10 and linen, but WnW says that maybe, just maybe it instead was PC12 with light blue undersides, and that is quite tempting since all my other British Great war planes are painted PC10. The fuselage has some fine detail, both inside and outside. A bit of flash but I have never seen the big deal with that since it is so easily removeable: You get no less than 3 engines, one Bentley, one Clerget and one le Rhone - N6602 had a Bentley. I wanted to build Joseph Jacob’s Fokker with a captured Camel engine so some spares will come to good use. The engines are provably the nicest and most detailed injection moulded rotary engines I’ve come across: And I bought some goodies. Wicker seats: Plus seat belts from uncle Eduard.
- 27 replies
-
- 11
-
-
Hi Guys This set is now available for the Roden kit, offering great more strength and a little more detail than the kit parts. These are in limited numbers for now as the brass casting company has now closed, due to the current situation. see the link below https://aerocraftmodels.bigcartel.com/product/cessna-l-19-o-1-bird-dog All stay safe and enjoy your modelling, Ali
-
Hello everyone! Set of Ukrainian company RODEN. I liked the set. No flash, weighted or other defects. The abutment of parts is good. The development of details is also on top. I have experience in assembling “sewing machines”. The painfully complex candibober was obtained during the construction process. The biplane box, even frayed, is a very delicate design. I had to drill the ends of the wings, use needles for a more durable dock. And the assembly order did not comply with the instructions. I wanted it to be possible, but I managed to do it. I would also like to dwell on the decals. We lay down easily, without problems on a glossy surface. However, it was surprising that silver appeared around the edges. When trying to bring her to mind, the cockade with the case generally just detached from it. Well, if so, I think I’ll remove the decals, make stencils, spray cockades and numbers. But it was not there. The rooms from the building did not want to be completely removed. I had to polish all my imitation. The wings were not touched, imitation of nervous tissue was applied in order to reduce the effect of applying matte varnish. As a rule, the instructions should include Liberty, but in fact the manufacturer is Rolls-Royce Eagle IV. I had to dodge. The interior of the model, despite the fact that it is quite difficult to see on the model, for stretching, pulling, and other “rigging”, raises concerns once again the brothers in the hands of the model. Plant materials were made of spandex, made of 0.3 mm copper rings, glued into plastic, painted with acrylic and oil paints. Stand - a free installation of a slice of a pear, slats, sifted pebbles, sand. Painted in oil. A model was assembled in the evenings from November last year, much of what was then remained non-embodied. I was satisfied. Photo at the end - construction, if anyone is interested. Paints were used by Mr.Hobby, Valejiio, art oil times of the USSR. Happy viewing. Regards, Mikhail
- 22 replies
-
- 42
-
-
-
Although the "Ole Bill" version of this kit has made an appearance in BM I don't thing anyone has done a WIP on the London General Omnibus version. To start the usual box and sprue shots Should be an interesting build. The decorations are a small waterslide decal sheet and two paper sheets of posters and destinations. The glazing is the small acetate sheet at bottom left.
-
Fokker Dr.1 Triplane 1:32 Roden On hearing the news that Wingnut Wings are going to release 1:32 'Early' and 'Late' versions of the Fokker Triplane in 2020, I thought I'd better get on with my Roden kit or it might never get built. I bought it because Wingnut Wings have a general policy of not producing kits already available from other manufacturers, and I reckoned this was one they might never do. Wrong! It is pretty good but lacks the refinement of a Wingnut Wings kit, and also benefits from a few detail additions and corrections. Having already built one from the Encore boxing of Werner Voss's early F.1 version with Fokker's 'streaky green' camouflage: (it is the Roden kit in an Encore box) I want to do a more colorful one. I intend to do the red and white one operated by Jasta 18 and featured as a bonus on Pheon Decals 1:32 Jasta 18 Fokker Fighters decal sheet. I've already used Pheons sheet to do it in 1:48 on the Eduard kit, so this is what I'll be intending to do here; First up I added the edging for the plywood panels that are missing inside the fuselage halves, using some Evergreen strip. The white discs are where I filled in some ejector pin marks. The forward tank should have a filler either side, so a matching hole needs drilling in the coaming, and scratchbuilt spout adding. While I was working on the coaming section, I test fitted it on the taped together fuselage halves. There is quite a bit of fit interference, cured by trimming excess plastic from the inside at the rear of the opening for the middle wing. Moving on to the cowling, it can be improved by scribing in the semi circular panel line on the front face. I put a block off wood under the prop shaft hole, and centred the compass cutter on it, and scribed. Looking better. I also made a series of rivet marks around the outer edge. Also, there is a raised strap that goes around the rear of the cowling. Roden have moulded it, but it is very faint. I ran a strip of plasticard around, and once it has set I will sand it back a little as it is now too prominent. I find it is easier to do it this way than to try and glue a very thin plastic strip on. For some reason Roden moulded the tailplane as if the middle was part of the fuselage, with 2 separate 'planes' attached to it. It isn't. It's a one piece unit. I sanded the ridges down and also filled the deep channels in it. On the left corrected, on the right as it comes in the kit. The 'Axle wing' needs attention as well. The split panel line and clamps need to come off. They were on the Fokker D.VII, but not the Dr.1 Triplane. I will sand and fill to fix this. Finally, some of the interior elements ready for priming and painting. I show them here as some of them are assembled from more than one piece, such as the rear wall with seat brackets attached. Gluing them together now saves mucking up the paintwork if you try to do it later. If you have a Roden Dr.1 in the stash, why not build it now? Thanks for looking. John
-
This is my contribution, tricky paintwork and lots of rigging otherwise it will be straight OOB!
-
I originally posted this in the Rumourmonger section where there was a thread about the kit but it probably makes more sense to re-post here where more airliner fans are likely to see it. I received my first Roden CV340 today. I don't claim any great expertise in Convair Twins but Roden seem to have given us the narrow rectangular engine exhaust outlets of the 440, not the twin round pipes of the 340. I know that many (most?) 340s were upgraded to 440 standards but unless I'm mistaken it's not possible to build an unmodified 340 from the kit as it comes. Scratch building replacement exhausts shouldn't be difficult but it's a bit of an annoyance. Would anyone who knows more about the prototype than me care to comment? Rumourmonger thread including sprue shots here. Apart from the exhaust issue the kit looks lovely.
-
 Hey everyone, One of the kits i currently have in my little stash is the Wingnut Wings Roland D.VIb. I plan to start on this model soon, when i've finished my current built of the WNW Fokker E.II. I'm slowly starting to gather aftermarket products for this model and one of the things i'm looking for for this kit are alternative decals / markings. I've been searching the web for a while now, but haven't been able to find any suitable 1/32 scale decals for the Roland D.VIb so far. Does anyone of you happen to know if these even exist? Also, i've been looking at several 1/32 scale WWI aircraft models of Roden. I've never actually owned one of their kits, but since they do have some very interesting models, i was wondering how the quality of these kits compare to Wingnut Wings. Are they even comparable? If any of you could share your experiences, that would be much appreciated. Thanks very much indeed! Dolf
 -
 Here's my recently completed Roden Holt tractor with the 8" howitzer. Model Cellar will have the driver available in September with three choices of headgear. The figure was sculpted by Mike Good. Weathering on the tractor with Ammo and MIG products. Ammo Moss Green and Vallejo Bronze Green were my base colors.
 -
After reading so many bad words about Roden’s D.VII I just had to try for myself. Unfortunately I can concur, but although nothing fits the parts are wonderfully detailed and you get a beautiful spare engine and two spare propellors. You might notice the absence of rib bands: I made a firm decision on keeping it OOB, and those bands disintegrated. The machine is that of August Hartmann of Jasta 30, 1918. He was fortunate enough to get wounded very early in his service and thus survive the war. His colleagues later described their planes as orange, while British reports call them brown. I therefore mixed up a colour that you could describe as either without getting your eyesight questioned. One tip regarding construction: I’ve often seen people say about the outboard N-struts, that the front one is too short and the back too long. I found the front one to be correct: put it lying on the drawing (manual is in 1/72) with the frontal lower end in the correct position, then pivot it around that point until the upper two points are somewhat correct. Then just trim the excess. This should righten the otherwise forward-tilted upperwings into the correct alignment (glue the outboard struts first, then the wing, then the remaining struts - some of which will NOt fit). edit: Another free tip. If you plan to build any Roden D.VII with lozenge camoflague, do yourself a favour and buy an aftermarket set! The stuff is extremely brittle and the only way to make it stuck is to drench it in microsol to fuse it into the plastic (and then it gets *really* stuck - trust me, I first put the lower side camo on the upper side: fortunately Roden supplies enough for two and a half aircraft).
- 14 replies
-
- 24
-
-
Time to start another WWI lovely. Pics of the bits and box art. Thanks for looking. Stephen
-
Dear Colleagues Here is my newly completed Roden 1/72 Gotha G.III. Probably the toughest modelling challenge I have completed in the last 20 years! The kit has many refinements but it is not engineered in a way to give it any strength. Each lower wing is made of three parts, with the engine nacelle being one of the parts. Roden offer you tiny nibs to make the join. But I felt safer drilling out and using brass rod. One of the rare examples in which the rigging is critical in holding it together in fact! It has the photo etch set from PART. Given the limited engine power of the time you can see why the designers went for a gigantic wing span. Apparently the most dangerous part of any mission was landing the beast! Note there is no windshield for the pilot and his throttle controls were outside the cockpit on a sill to his right! In January I visited the St Pancras Hotel restaurant in London set in the old station booking hall. I was surprised to hear from our guide that the roof was not original due to it having been destroyed in WWI from a bomb dropped by a Gotha! Regards Andrew
-
 Hello Folks Haven't had much bench time in the last few months but I just managed to get this one done. It is the truly horrible Roden issue of the Skymaster with extra parts to represent an aircraft operated by No. 4 Sqn Rhodesian Air Force during the Bush War. After embargoes were imposed on the regime at the time by the major powers, Rhodesia turned to French company REIMS who modified civilian Cessna 337 Skymasters. The added weapons capabilities in the form of 2 x 303 Browning machine guns mounted above the cabin and strengthened underwing hardpoints gave the Lynx a formidable close air support capacity in a stable and east to operate platform. The aircraft carried no national markings. The kit is pretty average all round but the worst parts are the clear parts and the decals. Despite a lot of polishing and buffing the windows are barely see through and the decals were rubbish. I used aftermarket brass landing gear legs I got from Ebay to help cope with the metric ton of lead in the nose and some Master metal 303 barrels improved the look of the gun pods. The landing lights under the nose are MV lenses. Here's some pics.
- 25 replies
-
- 69
-
-
-
 I've been getting strung out. The Pz IV STGB has finished, as has the Coastal Command and Maritime Patrol (wingie things) build. Not being excited by the Patton STGB (sorry ) and with the Tiger and D-Day builds ages away, I'm scratching around for something to make. 🤔 Shelf of shame? 🤔 , , 🤔 .... .... Stash? Stash? Ah, stash! OK, this was bought for an MTO build that happened at an inconvinient (for me) time. A Roden Rolls-Royce Armoured car. OK, it has it's faults, but, it may get me through the desert of (no) group builds. Faults? A lot of the locating holes are shallow and proud of their mating surfaces. The stand-up nature of the holes can be cured with a couple of swipes with a modelling knife. The lacatinh pins are then too long (but they are anyway). So far, I've taken to lopping them down with side-snips. Stages 1 and 2 in the instructions are ... add stuff to the sides of the engine ... before glueing the engine halves together. Uh-uh, no! This modeller would be breaking the stuff off before the two halves went together. Engine first, then worry about the other bits and pieces. Progress so far ... A few bit of the car's nether regions, all in need of clean-up.
 -
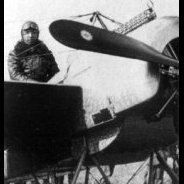
Here is my Roden 1:72 Fokker F.I which I built in 2006. It represents 103/17 flown by Lt Werner Voss, of Jasta 10, from Marcke, in September 1917. Lt Voss was shot down in this plane on 23 September in a lone battle with six S.E. 5as of No 60 Sqn RFC. The Fokker F.I was a pre-production variant of the famous Fokker Dr.I triplane of which there were only two built. It was built OOB and my notes point out it was a bit of a tricky build. The paint scheme came out very well by accident. I followed the suggestion of various sources that the olive streaking was over a light blue base. Humbrol 47 Sea Blue was brushed all over and I then started dry-brushing Humbrol 155 Olive Drab when I put too much and had to rapidly spread the paint. Due to the "slippery" surface of the glossy blue paint, the paint spread out streaking exactly as I wanted so I painted the streaks in this way. A coat of dry-brushed Humbrol 66 followed with another of Humbrol 155 on top to add texture to the streaking. The rest of the kit was also painted by brush and the matt varnish airbrushed. The decals were delicate and needed some trimming, as they were a bit oversize, and then some touching up with paint. Thank you for looking and, as always, all comments are welcome Miguel
-
The 1930s was a hugely interesting decade for a lot of different reasons, not least because of the incredible speed in which aeroplanes developed. Torn between the age of the biplane and the new times, the unfortunate He-51 was basically outdated as soon as the paint dried on its wings, like so many other designs from the early to mid 1930s. Shipped to Spain to prove itself it had a very short period with success against even more outdated planes, but had to be withdrawn as a fighter plane before it embarrassed the Third Reich further and redeployed as a ground attack aircraft. It did find some success there and was eventually produced in a pretty impressive 722 examples, which lingered on as advanced trainers and perhaps factory protection for the first years of the war. As a ground attack plane it got its only nickname, "Caza de Cadena" or "Chain Fighter", after the way they attacked ground targets, coming in one by one to draw fire away from the plane that had just finished its attack. A pretty boring nickname for a fighter I guess few remembered fondly, or even at all. But still, it is from the 1930s interwar period that I enjoy very much, and while in my eyes not as pretty as some people think due to its somewhat bulbous cro-magnon forehead created by the BMW engine, it did appear in some handsome colour schemes. The kit is Rodens He-51 B.1, which is a nicely detailed kit I hope will go together well. It will be built mostly OOTB with after marked decals, a bit of Quickboost resin and other stuff, plus some amateurish scratchbuilding where needed. So not really OOTB at all then.
- 52 replies
-
- 12
-


.thumb.png.6e11fc11af5645499ae76cb59fcfb788.png)


