Search the Community
Showing results for tags 'revell'.
-
Hi folk's not really a car builder(it's all that high gloss finishing stretching my patience) but I love this iconic car and when it was re-released earlier this year I grabbed one,I got off to a good start but it's sat since the summer 95% finished so today I pushed on and completed it,thank's for looking and no bonnet sliding when you take the car out later!
- 16 replies
-
- 18
-

-
Hi All I have just finished my Reell AMG Gt, I used Gravity Colors NSX Blue and Plamoz wheels and detail up photo etch, overall I am happy with the build, Slightly ennoyed on larger screens they seem dusty!!! so make take some more images lol, had a couple of speed bumps at the end, think I have done to many Revell kits for time being and looking to do something different, Im sure my next build will be even better as I seem to progress each build as I am sure we all do, please follow my instagram should you use it instagram.com/lawesscaleauto Thanks Chris
-
Hello one and all, Some people on here who either remember or read some of my previous posts will know that for the last few years I have been supporting a Liberian friend I used to work with at a school. Teaching kids about Remembrance Day and why we will need to respect those who paid the ultimate price even after 100 years. The format usually goes as thus, she gets in contact with the local RBL branch asking for veterans to come into the school to talk to the kids, a postie from my area collects war memorabilia and medals and displays the various things he discovers and my part is very simple. I try to link the whole lot together with models of various subjects so the kids can relate to a Spitfire or a 109, Sherman, Tiger.... you get the point. Anyhow last year, I found out that one of the veterans we had turning up was a member of the Operation Deadstick (aka Pegasus Bridge Attack) on D-Day, to say this chap is a legend is an understatement. I can not remember the chaps name for the life of me, but he had a wicked sense of humour and was great to talk and listen to. Unfortunately I found out too late about this chap so I couldn't get a Horsa out in time for it, I felt kinda embarrassed as he had nothing to represent him there. That will not be the case this year... so I am going to build a Horsa for him to talk about. So follow my many cock ups below... The Revell/Italeri Horsa Mk.I/II to my knowledge you can only really build a MK.I from this kit as the nose needs to be pointed from the top view and the sides need to be flattened abit for a mk.II? At least to my research that is so? Please correct me if I am wrong. I want to build the version that was used in Operation Deadstick, which I understand where Mk.II's? I may just have to make a "best fit" kinda model unless I can find some decent material on the subject. Pictures below... This wont be the fastest build in history as I have a few models on the go that I want to finish and get off the shelf of doom! But I am hoping to get a good start on this during the bank holiday. I can't remember if it was me or the person I bought the kit from that started the tail. However, that's one less job to worry about either away. Any and all comments are welcome. Kind Regards, Dazz
-
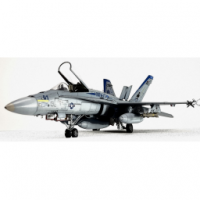
Dassault Rafale M 1/72 - Revell 04892 OOB build with some minor fixes. Vallejo acrylics. This is my first post, hope you like it, feedback and criticism is always welcome!
- 14 replies
-
- 28
-
-
- Dassault Rafale
- 1/72
- (and 1 more)
-
 Hey guys and gals I started with the Fw night fighter. First try for a mottle sheme, so lets go. Started with painting the interior. Revell provides nice detail here and I think it looks pretty nice. Gr TC
 -
Hi all, I originally started this during the 2016 Hunter group build but bit off far more than I could chew and its sat on the shelf of doom for a couple of years - until about a month ago that is. I decided to crack on and get it finished only to come up with serous decal issues. The kit decals had perished, I originally bought this cheap about 10 years ago and the box had suffered some water damage, this had obviously affected the decals. I'd planned on doing this in 79 Squadron markings from Chivenor in the late 60's so already had the xtradecal sheet with the squadron markings, but needed roundels, which is where fellow britmodeller David Womby came up trumps and airmailed some from the states (Thanks David!). So here it is, minus most of the stencils which I will add when I can get my hands on some and the rocket pods which are in the paint shop! 🙂 Cheers Simon
-
This is my reproduction of a Bf-109 G-6 Werknummer 160717, it was flown by Gruppenkommanduer of II/JG 51. Hptm Karl Rammelt. When his unit moved to Romania during the second half of 1943 the white fuselage band was painted over in a lighter version of RLM74. It was at Nisch in Romania when the wooden club was painted on to Hptm Karl Rammelt's aircraft by his ground crew. Not much I can really expand on the with the kit itself, but I built it straight out of the box expect for the seat harnesses. All comments welcome, oh and yes, the sun does come out in Scotland lololol
- 11 replies
-
- 26
-
-
.thumb.png.6e11fc11af5645499ae76cb59fcfb788.png) Hi Guys Another little set that I have been playing with, although it is raised some fairly controversial discussion over on another site I am still thinking of proceeding with it. The controvesy is not with my parts, but the fact that these few parts do not fully make a late model 'D' Mustang. there are changes also required to the cockpit and a few other small items as well as some discussion about a slightly different canopy. I have taken a lot of the points on and for my sake I am not too fussed personally about the cockpit changes (instrumentation variation mainly) and I have studied the canopy carefully, mainly against the three canopies offered in the Tamiya kit. To be honest I think that the Revell canopy and that in the Tamiya kit that is offered to cater for the later 'D' Mustangs is very close, and are almost 100% interchangeable. So before I finalise a few minor tweaks on the pattern and make production moulds I would like to get a an idea if you guys would be interested at all. Prices are estimated as follows 4 parts of resin new tail parts and new elevators £7.50, shipping in UK £2.50, shipping elsewhere in the world £4.50. NOTE as can bee seen these are an exact replica of the kit parts, so are thin shells, and the kit tail wheel assembly fits as per the kit was designed. AND YES I KNOW Revell will release an updated kit at some time so this is not a set for the long term future, but does my needs until then. Here are some pictures parts sprayed silver one on left has a slight wash just to show detail is close to the Revell detail
Hi Guys Another little set that I have been playing with, although it is raised some fairly controversial discussion over on another site I am still thinking of proceeding with it. The controvesy is not with my parts, but the fact that these few parts do not fully make a late model 'D' Mustang. there are changes also required to the cockpit and a few other small items as well as some discussion about a slightly different canopy. I have taken a lot of the points on and for my sake I am not too fussed personally about the cockpit changes (instrumentation variation mainly) and I have studied the canopy carefully, mainly against the three canopies offered in the Tamiya kit. To be honest I think that the Revell canopy and that in the Tamiya kit that is offered to cater for the later 'D' Mustangs is very close, and are almost 100% interchangeable. So before I finalise a few minor tweaks on the pattern and make production moulds I would like to get a an idea if you guys would be interested at all. Prices are estimated as follows 4 parts of resin new tail parts and new elevators £7.50, shipping in UK £2.50, shipping elsewhere in the world £4.50. NOTE as can bee seen these are an exact replica of the kit parts, so are thin shells, and the kit tail wheel assembly fits as per the kit was designed. AND YES I KNOW Revell will release an updated kit at some time so this is not a set for the long term future, but does my needs until then. Here are some pictures parts sprayed silver one on left has a slight wash just to show detail is close to the Revell detail -
I've been hiding in passive mode for a while but had to surface today. I know this is all over the net but I couldn't find it here. Behold the Revell Imperial Star Destroyer! https://www.revell.de/en/products/star-wars/star-wars-episode-iv-vi/id/06052.html?utm_campaign=Revell%2BNewsletter%2B04%25252F2017%2B%252528EN%252529&utm_medium=email&utm_source=Mailingliste-EN Funnily enough it seems to have sold out everywhere, I haven't scraped enough pennies together for it yet anyway I just hope its not a limited run!
- 6 replies
-
- 2
-
-
- Star Wars
- Imperial Star Destroyer
- (and 1 more)
-
'70 Dodge Challenger T/A (2'n1) Streetburner Revell - Nr. 85-2596 - 1:24 https://www.scalemates.com/kits/158534-revell-85-2596-70-dodge-challenger-t-a-2-n1 We will call this one done. It was a pleasure to build. Top quality in every way. Paint used was acrylic and waxed with Pledge Furniture Wax aerosol. Challenger Album google+
-
 This model was purchased, and started, in the summer of 1973 from a model shop in Houston, Texas. I spent 7 months in Texas that year, working as an exchange student. In the latter part of 73 and in early 74 I painted the aircraft, including hand painting the RAF markings. Wind forward to the winter of 2017.. when I "returned" to modelling. It seemed a good idea to finish the kit. Is this a record?? It is a basic, not very well detailed kit and completing this one has caused me more problems than almost anything else I've ever made. You can read about some of my trials and tribulations here: Problems with paint incompatibility and colour changes over time mean that repainted much of the aircraft, all by hand, and added the Typhoon underwing stripes at a late stage. Why? Because the kit decals were not usable...so I had to change the final aircraft! The RAF markings are mine, the serial, squadron codes and other details from the TechMod Sheet. So, here it is for inspection. I'm not really satisfied with it, but enough is enough. I thought of adding weathering, but don't want any more issues. From the front.. Now from above.. The "Erks" eye view... it is a big brute. And finally, with the door open and window half down. I know there are faults and omissions...but waiting in the wings is the big 1/24 Airfix Typhoon. The instructions from that were helpful in identifying areas for improvement, including the inner U/C door retracting jack. Let me know what think!!
- 11 replies
-
- 17
-
-
- Typhoon 1b
- 1/32
- (and 1 more)
-
Hi everyone, Here is my humble attempt at Revell's Northrop Snark cruise missile, manufactured at the weird scale of 1/81 in order to fit in their standard box at the time. Box design was Revell's History Makers series (early 1980's), although the tooling dates back to the late 50's! I had anticipated an horrendous built with warped fuselage halves, flash everywhere and lots of filling and sanding, but I was very pleasantly surprised. The main fuselage went together quite well and although some filling was required it was no more than you get with far more recent kits. And the launch frame and other components were relatively flash-free. I did miss a couple of ejector pins holes on the yellow launching frame (see photo) but what the heck: after multiple coats of yellow paint on the original bright "Post Office Red" plastic, I wasn't going to go back to them. I was a bit concerned that all the decal's white stripes and lines would not come out well on top of the bright red colour of this missile, but things did not turn out too badly. The decals, though, were old and showing their age (1982) starting to yellow slightly and were very fragile. Needles to say, copious quantities of setting solution were employed to get the decals to lay well over all the embossed rivets and other detail that aircraft/missile kits of this age exhibited. This was reasonable successful but less so in some instances. I'll leave it to you to judge. The decal and paint scheme was for the prototype version of this early cruise missile. Production units were painted USAF SAC grey. Comments, both negative and positive, welcome! Cheers Steve
-
A little Luftwaffe '46 for today, the very nice Revell 1/72 Focke Wulf Flitzer. Believe it or not this aircraft actually made it to the wooden mock up stage, but never progressed further. I've equipped mine with a pair of 21cm mortar tubes from a 262 and two X-4 wire guided air to air missiles as a bomber destroyer. The little tractor is from Academy and the base was made from scrap plastic and the base of an old trophy.
- 12 replies
-
- 32
-
-
 Hi all, With a visit to Modelkraft 2018 at Milton Keynes yesterday, I came away from the show with an 'impulse' buy, these things happen and because it's a pretty red, ti will please the better half. I have read the WiP thread from last year by @beefy66 and was very impressed with the build, even with the cricket tease. Anyhow, I fancy doing something a little different to the subject. I understand that the vessel sank in a storm in 1954 and didn't get raised. Their are other images of 'South Goodwin' after this date with a helopad fitted on its stern like others in this period, and another image with the pad fitted and the ships name now displayed on the superstructure sides. So my question is, Can the kit be used to create these later named ships of 'South Goodwin'? Stuart
 -
This is my finished 2CV. I did run into a pretty big problem as you can probably see, the front axle struggled to be in the correct position. Even after open surgery it could not be corrected without causing more major damage. A side note, my Gloss yellow paint never arrived so I had to make do with matt, which I actually have come to like. (The right side mirror is on a slant in some images, which is now rectified). I truly enjoyed this model and the process involved. - Would recommend.
-
Cant say the kits look fantastic, look like glorified kinder toys sadly
-
Tornado GR.4 1:48 Revell The Tornado came to be through the cooperation of a number of European nations, the make-up of which changed throughout the project, but finally settled on Great Britain, Germany and Italy, although early on France took their usual fleeting interest, then went their separate way seemingly unconvinced by variable geometry technology. Panavia was established specifically for the venture that became known as MRCA – Multi-Role Combat Aircraft, initially with the Netherlands involved until it pulled out to seek a simpler and less expensive solution of its own. Although the Germans preferred a single-seat arrangement, it was eventually agreed that a two-seat cockpit would be advantageous, and what became the Tornado finally began to take shape. The first production aircraft reached RAF hands on the cusp of the 1980s, with the Italians receiving theirs in 1981. Because of its "jack of all trades" requirement, it could be argued that it is a master of none, however to a great extent it silenced its critics by becoming a very capable aircraft, although it was never intended to be a dog-fighter. The IDS is operated by the RAF, Italy and the Luftwaffe, and in RAF service it goes by the GR.1 or GR.4 moniker with the GR.1A taking on the reconnaissance role, while the GR.1B was the anti-shipping variant. The GR.4 was a Mid Life Upgrade using lessons learned from the Gulf War, with the GR.4A being an upgraded reconnaissance bird. The ECR is used by Germany and Italy, and is stuffed with electronic countermeasures and AGM-88 HARM missiles to suppress enemy defences. The ADV is the interceptor, with an extended fuselage and nose, with plenty of weapons for taking down aggressors but wouldn't fare well in a dog-fight, sadly. The Tornado is slowing being replaced by Typhoons, with the F.3 (ADV variant) leading the exodus, and in fairness they are starting to wear out, with RAF fleet alone having clocked up over one million flying hours in many theatres, acting as both peacekeepers as well as taking part in plenty of conflicts over the years. The Kit We reviewed the initial IDS boxing of this new tooling from Revell in June of last year here, and this new boxing adds new parts to depict a modern RAF complete with additional fuel tanks and a sizeable quantity of the weapons it will typically carry. The box has a new painting on the front, and the rest of the artwork has been changed to the new more modern and glossy style that Revell have adopted in all their latest releases. The instructions booklet is also in the new style, but with the majority of the original drawings lifted and placed in a new background, however some aspects of the instructions have been re-done to improve clarity, which is nice to see. You will notice also that Revell have finally ditched that boring pale greeny-grey styrene in favour of a more standard mid grey, which meant I had to re-take all the photos! Into every life a little rain must fall, I suppose. The sprues are mostly the same, and you get fifteen sprues in grey, and one in clear. Now we have to address the clear parts, as there has been a lot of talk about this issue on the internet, because it appears that Revell have forgotten to switch-on the part of the sprue that contains the wedge-shaped glazing for the front of the LRMTS fairing under the nose. I understand that this is now in hand, but in the meantime the kit appears to have been withdrawn from sale until the new part is ready. Construction of the kit is almost identical to the IDS apart from a few areas, so I won't go through it from start to finish, but if you didn't read the IDS review, just open the link above in a new window, then report back here to hear about the differences. The first difference is the inclusion of a new forward area of the spine behind the cockpit, which has a few additional access panels from its predecessor, and don't be fooled into gluing the old part in, as it is still included in the box. Cut it off the sprues and hide it down the back of the sofa, just in case. The huge fin that gives rise to one of the Tornado's nicknames is also different, as the sensor fit for the GR.4 results in a dissimilar shaped cowling forward and aft. This is now a single part, where the old kit had two parts that glued together to do the same job. The blade antennae on the fin sides fit into slots in the parts, and should stay in place once glued, but you must remember to open up their slots before gluing the tail halves together – the notification on the instructions is pretty small and gets lost amongst the other parts. The GR.4 has twin sensor fairings under the nose, and these are provided, while the glazing for the LRMTS is missing at time of writing, as detailed above. The under-fuselage pylons are different, and one central pylon can be fitted, or two, depending on which holes you open up. The rest of the build carries on as previously until you get to the weapons fit, which is specific to British aircraft, with the 2250L "Hindenburger" fuel tanks, BOZ 107 pod and the Skyshadow pod, plus the usual smaller 1500L tanks, a pair of AIM-9L Sidewinders that are carried on the side of the inner pylon on the variable sweep wings. Markings Two decal options are included on the substantial sheet, which is printed in Italy and has the suffix C for Cartograf on the sheet code, which is a welcome sight, as the quality of some of Revell's recent decals has been lower than usual, sadly. From the box you can build one of the following options: No.41 Squadron, RAF Coningsby, England July 2011 – all over grey with white tail, red squadron cross, Tornado and DH.2 silhouettes at the top and bottom. No.617 Squadron RAF Lossiemouth, Scotland, July 2008 – overall grey with black fin tip and red lightning flash. Colour density, registration and sharpness are excellent overall, however on my review sample there was a little ghosting beneath the black printing around the silhouettes, resembling fine fibres causing a bit of a drop-shadow, which I initially thought was intentional. Hopefully this was a one-off, but do check your sheet to make sure. These portions can be removed easily enough with a sharp scalpel if they bother you. Conclusion This is a newly tooled Tornado, which we have been waiting for in this scale for some time until last year. It's great to be able to model a GR.4 from the box, and due to the clever design of the kit the detail is excellent on the complex fuselage shape, the gear bays are well-detailed, and the wing-swing mechanism is just gravy. Highly recommended once part 173 is reinstated. Revell model kits are available from all good toy and model retailers. For further information visit
- 18 replies
-
- 10
-
-
This is my first model for 42 years. My son bought it for me and I had to relearn how to model. It is poor by comparison with most of the models on here but I am pleased with it as a first effort. It's important because it has got me back into tis excellent hobby (which might become an obsession) after four decades of doing 'sensible' things. Lots of errors on here the main one being I destroyed the NCC- 1701 decal and had to replace it with NCC - 1017 (really bad news for those Trekkies) :-(
- 6 replies
-
- 12
-
-
- Enterprise
- Star Trek
- (and 1 more)
-
Hi, here's my Heinkel 162. A fun and easy kit to build. Hope you like it Best regards Rune Norway
- 17 replies
-
- 35
-
-
Hi All! I finished the Revell Hawker Tempest in 1/72 - had a bit of a 'mare with the decals, but I feel I did ok. I made a video about it if you'd like to check it out and let me know what you think of the finished kit! Thanks guys
-
Hi guys! I finished this Boeing 747-200 plastic kit from revell and made a video about my experiences with it. It's not a great kit, but I feel it turned out ok - let me know what you think! Thanks
-
Ready for inspection is my 1:72 Hawker Hurricane Mk.IIC. The aircraft is wearing the colours of No.28 (Army Cooperation) Squadron, of RAF south East Asia Command 1944. It is an out of the box build, with the exception of the white stripes which I have airbrushed rather than used decals. The kit went together really well, only a few problems with my airbrush slowed it down a little. That said, I have thoroughly enjoyed the build, and have decided I now need another Hurricane in my stash. Thanks.
-
Whilst spending a cold and snowy day indoors, and waiting for the paint to dry 🙄 on my Short Stirling build, I settled down and watched 2 episodes of Plane Resurrection on Netflix. The first being the rebuild of a beautiful Mustang and the second a Hawker Hurricane (Mk.I). This made me wonder which of these i had in my stash (and I had one of each, although my Hurricane is a Mk.IIC), and which to build next? I have built a Mustang in the past, but was keen for another attempt using my airbrush, and as of yet I haven't attempted a Hurricane. Unable to choose I asked my son, and he chose the Hurricane, so a Hurricane it is. Watching the documentary, has made me appreciate this little fighter more, understand its role in the Battle of Britain, how the fabric covered wing construction made it light, and able to withstand a little more of the onslaught, and how later variants moved on to ground assault, so he's hoping I do my little kit proud. So onto the build, I am planning to build Revell's 1:72 Hawker Hurricane Mk.IIC, in the colours of No.28 Squadron, RAF South East Asia Command from 1944. I picked the kit up cheap on EBay a while ago, and it consists minimal black and white instructions, and a little sheet of decals (I may well airbrush the white stripe to the wings and tail). There are 6 sprues, all with little to no flash but detailing is a little scarce. I plan to make this an out of the box build with landing gear down. Now the fun can begin......😀
-
I have just finished this model. it is Revells issue af the Hasegawa kit. I had to scratch some details to make it look like the a/c in the ref. photo that i used. Making the baloon wire cutter rail on the cockpit was the biggest challenge i used cardboard soaked in whiteglue, that made it possibel to get into the same shape as the canopy, without damaging the clear parts. Also the exhaust flame dampers is home made using plastic tupe in the right diamention. The Torpedoes was also modified, with the plywood attachment at the back, they came from the Zvezda JU 88A-5 kit. Reference was found on my good friend Neil's Blok page. http://falkeeins.blogspot.dk/2015/10/3-kg-26-he-111-torpedo-bomber-salon-de.html Cheers Jes
-
I usually build aircraft but ever since Revell released a model of the early Bronco, I have wanted to build a replica of my 1976 Bronco that I have owned for almost 20 years. Three years ago I had it taken down to the frame and rebuilt. To make an accurate replica, I needed some aftermarket parts just like my 1:1. The list includes a 3.5' lift kit, 2: body lift, soft top, front/rear bumpers, 35" tires w/wheels, off-road lights, and a 1990 Mustang 5.0 engine. I have finally sourced all the parts and began my build! This is my Bronco:


(2).thumb.png.74c5a7b8b16cee2d2508bf6a1f088cfc.png)


.thumb.jpg.26cacba5679a1f28469a0aed010d8293.jpg)