Search the Community
Showing results for tags 'resin'.
-
G'day everyone. The types built at Fishermens Bend continue to fascinate me. However, many of the more esoteric prototypes have never been tooled in a high-quality injection molded kit. Crazy, right? So this has lead me down the path of resin. I try to model the prototypes where possible, so at some point I'll be shortening the tail of a Nomad, grafting a Gypsy Major onto the nose of a Wackett and removing the cowling from a Ceres. However, I had an idea. Maybe I should try a resin kit straight out of the box before I go hacking up some perfectly good (and somewhat expensive) kits. This is where the CA-15 comes in. Every kit's a model of the prototype if they only built 1! I had the option of the CMR or Kora kits. I'd head bad things about the CMR one, but couldn't find any reviews or builds of the Kora. Photos of the parts showd that it had nice surface detail though, so I got myself a copy of it. I'm not completely new to resin (having built a Beaufort Mk.V with the High Planes conversion), so I knew to be careful when cutting and sanding the parts. Lots of slow, careful sawing under a running tap in the laundry, and some sanding in similar circumstances, left me here. Everything needed to build the cockpit and close up the fuselage is separated from the casting blocks. Clean up wasn't too bad, and the surface detail does indeed look nice. The kit also comes with a few photo etch pieces. After a bath in soapy water, I cracked out the super glue and put together the cockpit pieces. These went together without issue, but a test fit suggests I may need to trim the corners of the rear bulkhead. And this is how far I got before the notion of building it without any modifications ended. I looked at the fuselage pieces, and just couldn't make myself be happy with the outlet duct form the radiator....mainly because there isn't one. Just a flat plate, which I was presumably meant to paint black. So, out came the saw again. It actually wasn't too hard to cut along the existing contours to achieve this result. I've since cut out the other side too. Now, on to some paint. I hit the interior of the fuselage, and the assembled cockpit, with some black Mr. Surfacer. Straight from a can, because I can do it outside and not have to ever use laquer thinners in my airbrush indoors. Despite the high volume of paint, it settled into the details well. I also sprayed the photoetch sprue at the time. At this point, I had to stop work on the cockpit. I've got a delivery of modelling goodies arriving tomorrow that includes some paint for the lurid RAAF interior green. I could mix it myself, but I just can't motivate myself to do it when I know I'll have the right stuff arriving tomorrow (which is also going to go inside a CAC Mustang, possibly, pending research of colours of the early kit-built Mustangs). But, I wasn't quite done. I found some clear plastic lying around and glued the paper instruments to it, using Micro Scale Industries Micro Crystal Clear. It looks a bit rudimentary like that, but after attaching it to the photo-etch panel, it looks pretty great! The panel was dry brushed with dark grey and had some entirely fictional splashes of colour added to make it stand out a bit more once the canopy is on. Trust me, it looks a lot better than my phone camera under indoor lighting could convey. The clear plastic worked well, the instruments reflect light at the right angles, and they appear to have depth. So that's where I'm up too. I hope to get the cockpit pretty much done tomorrow. I'm stuck at home with a (thankfully mild) case of covid for the next week. I'm luck in that it's bad enough not to go to work, but not to bad to sit at the workbench. Fingers crossed it stays that way!
-
 RAF Houchin 25K VA Ground Power Unit (229732) 1:32 VideoAviation To some modellers the name of this essential piece of aircraft ground-handling kit might still garner a response such as "A what now?", but without these unassuming boxes that contain diesel or petrol engines to generate ground power for aircraft when their engines are off. Technicians and crews couldn't work on the systems without lighting up the engines so that the aircraft could have electrical power, which is expensive and dangerous if you’re not paying attention. Whenever an aircraft was preparing for flight, or engaged in maintenance, there would always be one of these nearby chugging away and generating the power needed to run the systems, plus a lot less pollution than the gas-guzzling jet engines otherwise would. This particular type of unit was used at the height of the Cold War to power the Lightning, Hunter, Phantom, Buccaneer, Harrier, Jaguar and Sea King to name a few, supplying them with 28v DC and 200v AC on two separate connections. It lapsed into obsolescence which the introduction of the Tornado which needed more power for its advanced systems, and the retirement of the older aircraft from the RAF's fleet. There are still some in service with conservation groups that have suitable aircraft in their hangars. The Kit The resin set is already available in 1:72 and 1:48 and now is out for the large-scale modeller. It arrives in a sturdy cardboard box, with the bright yellowy cream-coloured parts in Ziploc bags swaddled in bubble wrap. The instruction sheet also helps keep the parts safe, and details construction in an isometric format. Because this is larger scale, it comes with more detail than its smaller scale predecessors. This set includes seventeen resin parts, eight 3D Printed parts in grey resin, four clear resin parts, a length of flexible black tubing, plus a small sheet of decals with yellow stripes and data plates. The main body is a large hollow part to which you add the top panel with various circular caps, the bottom surface with the pivoting hole and guide arc, plus the radiator on the front of the device. The two axles are made up on palettes and are supported by leaf-springs, the front axle also having a peg on which it pivots. The front axle slots into the hole in the underside, while the rear slides under the back with a bumper/fender on the reverse. A 3D exhaust/muffler is glued into a hole in the underside, and more 3D parts are attached to the back for the towing hitch and filler tube. At the rear the control panel is inserted into a recess and is either enclosed by the two doors if you don’t want to paint the details, or you can leave them open to show off your hard work. The top of the unit is dotted with clear resin parts on the raised circular areas, and 3D lifting eyes are glued into little holes in the corners. The towing A-frame has a 3D tripod support fixed underneath and another 3D hitch on top, after which it is glued into the brackets on the front of the forward axle, with a narrow cable running to it from under the unit, which you’ll have to find from your own supplies. The thick AC/DC cable is made from the flexible hose, adding a 3D plug to the end. Markings The instructions provide a painting guide to the details, and advise you to look at their site for some painting assistance, which gives a choice of yellow, tan or green for the body, depending on whether you are modelling an early or late unit respectively. The decals include four yellow warning stripes, plus a pair of unit numbers for the top of each end. You can see the reference photos by clicking on the link below. Conclusion A great addition to any ground-handling diorama that won't tax your skills to complete, but will add some interest to your work. Highly recommended. Review sample courtesy of
 -
Hello everyone! Here is my latest kit which has been almost three months in the making. It's Anigrand Craftswork's resin 1:144 Focke-Wulf Fw 200C-4/U2. It represents CE+IC (0138), of the Fliegerstaffel des Führers (F.d.F.), on the Eastern front, in late 1942. The Fliegerstaffel des Führers was a small fleet of transport aircraft for German government officials and high ranking command officers. It was established in the mid-1930s mostly with Ju 52s and later used Fw 200s and at least one Ju 290. Hitler, Himmler and Karl Dönitz each had a personal Fw 200. In fact, Hitler, was the first head of state in the world to have an official personal aircraft. The F.d.F. was not part of the Luftwaffe and was manned mostly by SS personnel as well as some from DHL Lufthansa. The Fw 200C-4/U2 was one of a small number of armed high-speed transport versions made specially for the F.d.F. CE+IC (0138) wasn't assigned to anyone in particular and was more of a backup plane but was indeed used as the only full photo and a profile I found says it was in the Ukraine in 1943. It entered service with the F.d.F. in spring 1942 and later in the war it was transferred to the Luftwaffe and was shot down in 1945. I was disappointed when Anigrand released this kit as I was hoping for the maritime variant. The kit had options to make this unique sub-variant or Hitler's personal machine (the V3). Roden has released a kit of the latter which I decided to get so I went ahead and built this variant. This resin kit measured out quite well with 1:144 SAMI plans that I have except for the wing root being too long (which I ignored) and the shape of the wingtips which I easily corrected with some sanding. There were several things that needed correcting or adding though: The tailwheel was moulded retracted and too far back. I scratchbuilt one from spares and made the bay in the correct position. The underfuselage gondola, although correctly shorter than the standard one used in maritime variants, was still too long and lacked depth. I cut off the second quarter and joined the resulting front and rear sections and blended them together, trying to get the underside with the right slope. I cut off the rear turret and reattached it aligned by the top, filling the resulting gap with CA glue (almost the same opaqueness). The engines where completely plain, with no exhausts and tubes and no dip of the nacelle behind them. I scraped a dip and added all the missing details including making the cutouts that the cowling flaps had. The guns were way too thick so I cut off the barrels and later replaced them with new ones from stretched sprue. I added some missing aerials or probes also from stretched sprue as well as an air scoop on the top starboard side. The main radio mast was moved forward as per photos as it differed from standard variants. I also added the missing forward retraction arms of the undercarriage. Wingtip lights were added from blobs of Kristal Klear. The kit was fully painted and varnished by brush. Despite some suggestions of painting it RLM72/73, I went for RLM70/71 on the top surfaces since this was not a maritime machine but a VIP transport and per RLM regulations would have gone with the latter. If anyone knows otherwise for certain, I would be glad to hear it out of curiosity since I won't be changing the kit! I am very pleased with the extra work I put into the kit as it improved the end result considerably and was also a learning experience as I came up with solutions to some of the problems. It's not one of the machines that scourged the Atlantic but I am pleased I went ahead with this unique variant and with how it came out. I really should have built one before since it's a beautiful design. Thanks for looking and all comments are welcome. Miguel
- 7 replies
-
- 33
-

-

-
- 1:144
- Anigrand Craftswork
- (and 1 more)
-
 Research AP-101C-0601-3A Wasp HAS 1 Illustrated parts manual T. L. Ciastula: The Development of the P.531, The Aeronautical Journal / Volume 68 / Issue 642 / June 1964 D. B. Bathurst: Maritime VSTOL — The Development of Small Ship Helicopter Operations in the Royal Navy, SAE Transactions Vol. 83, Section 3: 740525–740863 (1974) L. B. Bryson, F. E. Heenan, C. A. Johnson: Helicopters in the Royal Navy, The Aeronautical Journal / Volume 76 / Issue 740 / August 1972 J. H. Stevens: Scout and Wasp - Westland's All-British Helicopters, Flight International June 1964 Adrian Balch: Westland Scout & Wasp, Warpaint Series No.110, Guideline Publications. 2017 Larry Jeram-Croft, Terry Martin: The Royal Navy Wasp: An Operational & Retirement History, Pen & Sword Aviation 2018 A placeholder so I can't bottle out of doing this at such a large and (to me) unfamiliar scale once the Sea Vixen builds are completed.... 😁
 -
Dear fellow modellers, I would like to show you my latest finished model. I had been working on it for a long time and was reluctant to do some of the necessary additions, like the stabilizers on the elevator, the triangular part and the strake at the rear of the aircraft and of course ALL the antennas. I also added the windshield wipers, because they are very distinctive on the original. But two days ago I just started doing it and everything went very smooth and quickly. I was surprised to find fotos showing that the Nimrod has a more glossy finish. I used Revell Aqua Colours as usual. Only two were used. RAF Hemp was mixed using 4 parts 371 Light grey and one part or so of Africa brown. The lower side is painted with 371 Light grey. The model is a tailsitter which is unusual for Anigrand. Normally they are constructed so that no weight is necessary. I added chocks at the rear of the main wheels and that did the trick. More chocks on the front side are also needed, I know. The first try to do the dirt and oil traces of the Avon engines was a little overdone. So I resprayed the area and with some oil paint and soft pencil it looks a bit cleaner now. The panel lines are created very deep by Anigrand. I did not like that and tried to fill them but of no avail. Neither super glue nor Mr. surfacer would fill the deep lines. So I just accepted them. They are like you can see them now, I did not emphasize them. I also tried to take some pictures using a background picture, but I think the neutral dark grey background looks the best. I hope you like the model of this iconic airplane. Thanks for looking! Greetings from Germany!
- 11 replies
-
- 42
-
-
Well this will be something very different and an extended WIP... The kit is the latest creation from Flying Start Models, AKA Tim Perry. It truly is a work of art as is reflected in the price😬, but where else are you going to find a 1:32 Mk3?😉 I'm sure this kit will be of interest to anyone who came through the ATC(Air Cadet) system in the 50s-80s and will bring back many memories! I first bumped into Tim at 621 VGS based at Hullavington at the time. I'm a member of the Historic Flight and we have a fleet of ex ATC gliders ranging from a Grasshopper through the Mk3, Sedbergh, Prefect, Swallow and a Clockwork Mouse, the Venture! Tim arrived for a flight on his motorbike and as I was there with mine too we immediately got into conversation. I took some pics of his flight in the Mk3(AKA Slingsby T.31) and things progressed from there via Facebook. Fast forward a few years and he announced he was making a kit of the Mk3, and not just any Mk3, but our aircraft😍. So of course I had to have one... It took until march to come onto the market but it's available now: http://flyingstartmodels.com/Flying-Start-Models-Collection.html Tim is actually improving things all the time and a new tailplane and harness set are now available and the latest version of the instructions/paint schemes are currently being updated as I write. The kit is available with decals to enable you to model ANY of the aircraft that were produced for the ATC, so you can make your very own personalised version😀, with colour charts for the old silver and yellow training scheme and the later red/white/black colours. If you click on the link above you'll find a link in the text to download the instructions including the colour options. The main 'problem' wit this kit is that it's in resin not 'plastic' however Tim has done his absolute best to make everything fit perfectly and look as close to the original as possible. All parts come still attached to the 3D printing webs which resemble the scaffolding for a roller coaster! The amount of work to get all this to work is mind boggling... The instructions include comprehensive hints and tips for those of us who've never built a resin kit before, so don't feel too intimidated. You DO have to be very careful though as the resin is extremely brittle, but Tim assures me that if you break anything he'll replace it. Anyway, enough rambling and to work... The kit comes in a surprisingly small but perfectly packed flip top cardboard box with plenty of bubble wrap. I started with the fuselage which comes as previously described with its own rollercoaster frame which has to be clipped away bit by bit. Very sharp nippers are a must and leaving a little nub on the surface of the model seems to work best rather than cutting right down to the skin so to speak. The frame is 3D unlike a 'normal' sprue which is basically flat so this requires a bit of thinking as to where to start and which bits to cut next, but you'll get the hang of it😉 Actually the first bit of modelling starts with the cockpit. This is basically the same principle as any aircraft model; You start with the cockpit floor and work up. Individual parts for the seat bases, sticks, bulkheads, seat straps, and instrument panels are provided. There are even instrument(such as they are in a Mk3😁) decals and cockpit placards! The decals seem of extremely good quality. I'm still getting the hang of superglue and I suspect I need to invest in some proper modelling stuff rather than the stuff you buy in the DIY shop; It's all a steep learning curve for me! I managed to snap off the joining bar between the front rudder pedals bit got them to stick in the right position anyway🙄
- 6 replies
-
- 2
-
-
- 1:32
- ATC Gliding
- (and 1 more)
-
Hi all, I'll be chipping in with this little 'un, once I've got a couple of other builds off my desk. In addition to the Finnish markings shown, the kit also includes a set of Japanese markings (on an identical silver dope finish). I know little about the Japanese use of this aircraft, but the painting instructions state 1934 and I have previously read somewhere that the Japanese captured a Cirrus Moth in Manchuria. That's the limit of my knowledge... I bought this kit many years ago when you had to go resin, if you wanted a Cirrus Moth. I think I've made 3 or 4 Choroszy kits in the past (all pretty nice), and IIRC every one contained parts that did not appear on the instruction sheet and for which I never managed to find a home! I wonder whether this kit will uphold that tradition? Cheers
- 4 replies
-
- 9
-
-
- 1/72
- Choroszy Modelbud
- (and 1 more)
-

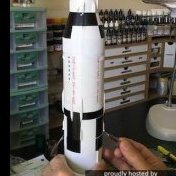
Heinkel He 176 V1 - Rocket-powered prototype
Mig88 posted a topic in Ready for Inspection - Aircraft
Hello everyone! Here is another small kit I managed to finish last month. It's Anigrand Craftswork's resin 1:144 Heinkel He 176 V1 which I built together with the Horten H XIIIa which I have posted before. The Heinkel He 176 was the world's first rocket-powered aircraft using liquid fuel. Previous aircraft had used solid fuels. It was built as a private venture by Heinkel and first flew successfully on 20 June 1939. When demonstrated to the RLM, little interest was shown and further flying was banned due to the dangers of rocket propulsion. The ban was lifted a couple of times but was made definite in September. The prototype ended up in a museum in Berlin where it was destroyed by Allied bombing in 1943 or 1944 (sources differ on the date). This kit was another of the bonus kits of the Anigrand Fw 200 Condor. I was hoping for a quick build but due to some extra work I put in to it and some problems with the painting it took a little longer. I opened up the incorrect bulkhead between the cockpit and the nose, corrected rear taper of the wings which was wrong (the tips were too wide), replaced the overly thick nose wheel struts with new ones from stretched sprue, made proper tailwheel bay doors, and added the underwing handling bars and the wing probe from stretched sprue. I also opened up the exhaust pipe and thinned the main u/c legs a bit. The kit was fully painted and varnished by brush. Thanks for looking and all comments are welcome. Miguel-
- 7
-
-
- Anigrand Craftswork
- 1:144
- (and 1 more)
-
Here is one of my latest kits, a Horten H XIIIa, one of the bonus kits with the Anigrand Craftswork 1:144 resin Fw 200 Condor kit. This unusual glider was a private venture built for research for the Horten H X (later H XIIIb) supersonic jet fighter project. It first flew on 27 November, 1944 from Göttingen, Germany. It flew over 10 times and was destroyed towards the end of the war by liberated Soviet prisoners. This kit was built on impulse while inspecting the Fw 200, which I will start building soon, due to the low part count: two solid and one clear resin parts. Had it not been a bonus kit, I wouldn't have bought it. Gliders are not really my thing but being a Horten design and actually used for research, it ticked a couple of boxes. The only modification I made was to add a spoiler on the top surface as mentioned in what little I have found on this type and as I spotted in one of the few clear photos of the type. Needless to say, this was an educated guess as I didn't find any clear references of it. The colours I used are also guesswork. I painted the upper surfaces RLM82 and 83 with the undersurfaces in RLM76 based on another build I found of this kit and the fact that the tones gave the contrast that you can see on the major photo of the type (although RLM74 and 75, or RLM02 and some other green could have worked too). Although it was a private venture, the photo shows a camouflage pattern which made sense due to the war going on. The pattern is wrong in the kit's instructions and I used the photo and an illustration I found on internet as a guide. Since I depicted the plane as it was on it's first flight, I kept it unweathered. I only highlighted the moving surfaces with thinned black grey paint. As it doesn't stand on its undercarriage and I didn't want it resting on one wing tip, I made a simple narrow base with printed grass and glued the kit to it as if it were starting to be tugged for take off. Thanks for looking Miguel
-
After several long years of working on this off and on I’ve finally finished my resin Sherman V DD. It’s an all resin/PE kit but with panda tracks, resin stowage, and panzerart mantlet and some scratch built bits. I started this for the D Day 80th group build back in 2018. It’s set in the hot and dusty summer of ‘44 3-4 weeks post DDay with the skirts removed, 13/18 hussars, B Squadron. Just noticed I’ve knocked the aerial base over! Will fix that. Also got the commander figure in progress to go in the hatch. Comments and criticisms welcome!
- 16 replies
-
- 40
-
-
-
I love wandering around the smaller stalls at model shows - you know the ones where there are many kits (usually vacforms and limited run offerings) often dropped loosely into boxes or lying around in heaps on tables. Very often they are aircraft types that few have heard of - the products of a once-thriving cottage model production industry. “Roll up, roll up, one kit for a tenner, two kits for fifteen, etc.” Well, one year at Telford I bought a vacform then I saw a nondescript bag with some olive green parts and a cover sheet stuck on proclaiming it to be an ‘Epoxy-resin kit’ of a Blackburn B-37 Firebrand. "Give us a fiver, mate and it's yours..." Not having built a resin kit I proceeded carefully, but ended up shelving the project two or three times. In the meantime I built Rareplane’s vacform of the aircraft - carrying a torpedo, and finishing it in the extra dark sea grey and dark slate grey camouflage with sky undersurfaces. Then I bought the beautiful CMR Firebrand kit, and, intending to build it with the torpedo, I had the idea to use its bombs and rockets to build this kit as an air-to-surface attack version. I managed to buy a set of decals from CMR, which came with all of the placement instructions. It was a good fun build although I had to scratch build the cockpit (not that you can see anything at all!), and use one of the two CMR kit vacform canopies as the bargain bin model’s canopy was almost a tangerine colour! I got around the problem of cutting the underwing serial letters and numbers by placing the landing gear doors in position and decalling over them. 24 hours later I used a razor blade to carefully cut the decals and with a bit of Micro Set and Sol the rest was, as they say, history. So, here is my Blackburn Firebrand TF Mk 5, ‘EK773/CW’ of 738 Naval Air Squadron of the Naval Air Fighter School, Royal Naval Air Station Culdrose, Cornwall, UK, as seen at Royal Air Force North Front, Gibraltar in July 1950. It is armed with two 500 lb Semi Armour Piercing bombs and eight 60 lb practice rocket projectiles. Of note is the use of a camouflaged engine cover, and the replacement cowling panel with the incoming predominantly Sky finish for Fleet Air Arm aircraft. Which points me nicely towards the scheme I will use on the CMR kit when I build it with a torpedo! Thanks for stopping by. Mike
-
Hi All. Here is my first completed model for the year 2022. Over 20 years after finishing Dynavector's 1/48 Vacformed Gannet AS1 we finally have a kit of the AEW3 and I have managed to build it. Like many others, I expected Dynavector to release one of these as many of the bits in the ASW Gannet could have been reused but alas it was not to be. I built the Dynavector ASW Gannet in about 2002 and waited for the AEW but nothing has been heard from Dynavector for a few years. Special Hobby announced an AEW3 about 10 years ago but still nothing in plastic so when I heard about a resin kit made by Alan Wilson here on BM I decided to fill the gap and ordered one. I've had it about 18 months so here it is finished. The Radar operators doors are open as I scratch built a complete interior. See the WIP thread (link and the Bottom) for whats inside! Arestor hook replaced by an old white metal hook from Aeroclub lengthened with a sewing needle. The kit cockpit canopy was clear resin which presented a few issues as expected. Quite a bit of material needed to be taken off the inside of the windscreen and coaming to allow a good fit without having to repolish the clear parts. Having the rear section of the canopy open was driven by the 3 supplied in the kit all being very thick and having air bubbles. I figured the air bubbles would be less noticable with the canopy open. However the thickness of the resin left it perched unrealistically on top of the fuselage. I decided to plunge mould a new one and got it right on the 4th attempt. This is paper thin and very fragile. The kit decals are useful only as a template. The roundels came from Xtradec, the serials were home printed and the bee was drawn from scratch then home printed. Sitting on Ark Royal's waist catapult August 1978? The aerial fit is dated for August 1978, lines are EZ line. The 1/48 Gannet collection is now looking like this. Thansk for looking More pictures at the WIP in the link below.
- 10 replies
-
- 40
-
-
- resin
- Gannet AEW3
- (and 1 more)
-
Hello model builders, A while ago, a guy went ahead and purchased a 1/25/24 scale Mack tractor from AITM. I am not a big Mack truck enthusiast, but when I saw this kit, it reminded me very much of an experience I had with my dad and brother, likely more than 40 years ago. Across town from where we lived was Hitchings Lumber - as the name suggests, it was lumber yard, but, not anything like the big-box mega stores we see today. Instead, located in a rural part of the west side of town, a throwback from the past (even then!). The yard seemed (as a youth) to be a big, overgrown place, with a gravel drive, lumber storage sheds, and a main office packed full of odds and ends, photos and wood burning stove. In the yard and surroundings, were numerous Mack trucks in various states of repair. But, there were always a few good looking, even shiny, vintage Mack trucks - which were their main service rigs. So, when I found the kit, I decided I'd build a version of one of Mary Hitchings' lumber haulers. I found the images below on-line: Yes, that's Mary Hitchings on the upper left. As a boy, it was something of an adventure to visit the yard with my dad and brother, on what inevitably were cold and wet Saturday mornings - which we always enjoyed! This is the AITM kit: It is something of a mixed bag, as many small shop kits tend to be. On one hand, they seem to have accurately captured the distinctive look and proportion of the somewhat iconic fenders - which is great. On the other, some of the castings are a bit clunky, and have required some carving, filing and sanding, but, are for the most part true, and thankfully, not warped! First up, I needed 😄 to make posable steering: Mercifully, the material they used is fairly tough, but not so tough that it can't be worked with, so, off came the steering from the axle, and the knuckles. Some clean up, and reassembled with a metal pin - I would have used a small bolt and but don't have any here right now. Next will be to glue the steering control arms back on and make up a tie rod. I'm going to try and make a drag link from the steering gear to the knuckle - not something to worry about just yet. Then, I noticed in the photos, that the wheels on the front axle of the prototype are not spoked, so several months ago I ordered a set (incorrect version it turns out - too many small holes) from Auslowe (very nice BTW). But, they were a bit too wide and either the tire or rim, or both wasn't round - so, fixed that (inside of wheeel): Maybe odd to do this so early but, a guy likes to have generally functional tires/wheels early on, as there always seem to be many test fits etc as we go. The tires really don't look much like they are meant for the highway, so I'm going to do the right thing, and use them anyway - not in the mood to search for and buy another set of resin tires! Then, on to some resin carving: The frame, leaf springs, and shocks, front and rear, were cast as one piece, so, I went ahead and cut out the necessary gaps - you can just see I did this for the shocks, while the frame/spring opening is obvious enough. Less obvious is what's going on with the fenders. The kit provides a stout block for mounting the fenders, which works well, but, doesn't match the fender outer contour, so it was cut and carved to match. The kit doesn't come with instructions, which is more or less OK, as fortunately I've built a few models. It seems the kit would have you mount the cab interior to the frame, and then rest the cab on top of it. I went ahead and changed that. It seems the one piece interior might not actually be for this kit? I don't know - but, I didn't care for the fit. I cut about 1/8" (3 or 4mm?) out of the vertical part, and glued the shortened version back together. Then, build a base and floor that would be attached directly to the cab, then to the frame - sort of like how you might with the real thing. Then, while taking these photos - I found a bigger problem: Well this isn't too good - something is amiss here. The frame provides a distinct body locating point for the inside of the radiator. These pics are of the cab lined up on that mark, and well - not so good. Tho, you can see the outside of those modified wheels! 😄 What to do? As I was looking at what I was taking photos of (all just taped together), tried relocating the body until it looked about right: That looks better - but, strangely, to look correct, the cab need to be mounted just inside the raised lip? - what's that all about??? well....I guess a guy will have to get after that and figure out how to make it work! OK, thanks for having a look, Cheers Nick
-
 The BAe-146 is the RAF’s current Command Staff Air Transport aircraft, with 32(TR) Sqn at RAF Northolt. The 4 aircraft in service are due to be retired by Spring 2022, the replacement being undecided at this time. As a bit of a KUTA, to take part in a speed challenge build and as I’m kinda involved, I’ve dug this kit out of the stash and will be looking to complete it by the middle of February. The package… The instructions (this kit is not for beginners; you’re on your own, Kid!!)…. Markings guide is better…. The contents… …and an idea of the scope of the task…. The quality of the moulds is good and as to be expected, a bit unrefined in places. Some flash to clean up and clear that this is a kit for modellers, not assemblers. The clock is running….
 -
Good morning all, hope everyone is well. Season's greetings. I am hoping someone might be able to help me with the world of 1/72nd scale Westland Wessex helicopters. I'm totally unfamiliar with what's available in this area but I know there are many knowledgeable folk on here. I recently spotted an ideal candidate for a little diorama and since I have an old Frog 1/72nd scale Wessex hidden in the depths of my stash thought it might re-kindle some modelling mojo. I think the area that is likely to require most work would be the rotor heads, main and tail. Are there any manufacturers on the market who offer resin/photoetch upgrades for a 72nd scale Wessex? The cockpit isn't a huge concern as the photos I've taken show the glazing covered by condensation so much of the visibility into the cockpit will be obscured. Likewise the rear deck and cabin interior. The full sized aircraft has a tarp conveniently draped over those areas. I have searched t'interweb and seen some upgraded resin wheels so may treat myself to a set of those. Also, the aircraft I would like to depict is in a bit of a sorry state at present which is exactly what appeals to me. Recreating the aged appearance of the markings would be easier with masks so if anyone knows of suitable Royal Navy marking masks that could help create the roundels and numbers I'd be interested in those too. Here's a snap of the candidate in all her patinated glory😍 Thanks for any help you're able to offer. Cheers.🎄
-
I built this from the old RugRatResins HS Andover kit and finished it with home made decals for an ETPS aircraft in the high-visibility Raspberry Ripple scheme. The nose boom was scratchbuilt from brass rod and getting the angles and lengths right took some working out. Thanks for looking. Steve
- 34 replies
-
- 77
-
-
-
- RugRatResins
- 1/72
- (and 1 more)
-
Despite the small size the Short SC1 had 5 engines, 4 to provide vertical lift and 1 for forward flight. Painted with Alclad and finished with home made decals. With the early single engine version. Thanks for looking. Steve
- 3 replies
-
- 15
-
-
-
- Project-X/Maintrack
- 1/72
- (and 1 more)
-
Designed for vertical take-off using four lift engines in the centre fuselage, the SC1 originally flew with just the single propulsion engine to check the airframe first. A very small model so saves some display space! Painted with Alclad and finished with home printed decals. With the later version fitted with the lift engines. Thanks for looking. Steve
- 5 replies
-
- 19
-
-
- Project-X/Maintrack
- 1/72
- (and 1 more)
-
This started as the RugRatResins Viscount 700 and the fuselage had to be shortened in the wing root area and the wingspan reduced at the wing root. I made a master for the engine nacelles and vacformed the left and right halves. New main undercarriage was scratchbuilt and consists of two legs either side of each jetpipe. Painted with Alclad and dulled down a bit with a clear coat, the decals were drawn in CorelDraw and printed at home. 9 Thanks for looking. Steve
- 21 replies
-
- 60
-
-
-
- RugRatResins
- 1/72
- (and 1 more)
-
Here is my latest kit, finished earlier this week. It's Kami de Korokoro's 1:144 Brewster F2A-3P Buffalo finished as "MF-17", BuNo 01521, flown by 2nd Lt Charles M. Kunz, of VMF-221, USMC, on June 4th, 1942, during the Battle of Midway. He shot down two Japanese aircraft and was one of only three F2A-3s to return to base, despite being wounded and with the aircraft damaged from enemy fire. This was a poorly-moulded resin kit. I opened up the cockpit and corrected the rear shelf, adding scratchbuilt details. I removed the framing from the middle of the main canopy as this variant didn't have it. The engine cowling, propeller and tail wheel were lost causes and I replaced them with spare parts from a Mark I Buffalo kit. I had to modify the propeller since this variant didn't use a spinner. The radio masts and wires and the wing pitot were made from stretched sprue. The kit was fully painted and varnished with brush. The kit's decals were useless and anyhow I wanted a Midway machine so I used the markings from a Warbird Decals sheet and the code, minus the "M" which was painted, from one of the Mark I Buffalo boxings. Although far from perfect, I am pleased I managed to make something rather decent from what came in the bag. Thanks for looking and all comments are welcome. Miguel
- 9 replies
-
- 23
-
-
- 1:144
- Kami de Korokoro
- (and 1 more)
-
I’m calling this finished! The yellow was difficult to work with, but the kit itself was a decent fit, especially considering it’s resin. I was surprised to read that over 1,000 of these were built between 1940 and 1943, mostly for use in the paratroop training role. Towed to a height of 6,000 metres, the glider had a range of around 140 miles. This example was based at RAF Weston on the Green in Oxfordshire in the early 1940s.
- 10 replies
-
- 20
-
-
- 1/48
- Planet Models
- (and 1 more)
-
Hi to all of you.I had great trouble building this one.Such a challenging kit to work on.But it is to be expected from a resin kit.Otherwise I really like this airframe.reminds me of james bond goldfinger.
- 12 replies
-
- 48
-
-
HI viewers, Here is my latest after languishing on the shelf for 9 months, an AEC Matador (early) by Milicast in /76. Built mainly OOB, doors wee reworked as I wanted them to be posed open and glazing was also added. Painted using Tamiya and AK paints, decals from spares as Milicast kits don't come with any, go figure. Weathered slightly with a couple of washes. Conjured up a simple base and a couple of figures et voila. WiP here: Thanks for looking. Stuart
- 18 replies
-
- 26
-
-
-
Here is my latest kit, finished this past weekend after just over 2 months. It's Anigrand Craftswork's 1:144 Blohm & Voss Bv 222 V7 Wiking. This was the seventh prototype but the first of the C-series with diesel-powered Jumo 207C inline engines. It's first flight was on 1 April, 1943 and it was scuttled by its crew at the end of the war. This resin kit was built mostly OOB. I opened up the porthole-type windows which were represented as panel lines and filled them with Kristal Klear. I strengthened the join at the wing roots making a spar through the fuselage in front of the tab and using screws as rods behind. I also added some details in the cockpit, correcting the seats and making the steering wheels, although little can be seen! Other details added were the wingtip lights (Kristal Klear drops) and the radio wires (stretched sprue). The base/cradle was made from bits and rods of wood I had. The kit was fully painted and varnished with brush. Thanks for looking and, as usual, all comments are welcome. Miguel
- 25 replies
-
- 56
-
-
- 1:144
- Anigrand Craftswork
- (and 1 more)
-
I have set sail on a themed collection of 1/32 Hawker single engined piston fighters, started because I enjoyed Special Hobby's Tempest V so much, and because of Lukgraph, Fly, Paul Fisher and Special Hobby (again) providing the raw materials. The Typhoon is a lovely piece of casting. Here it is. It is an entirely fictional representation of a 1B equipped with rockets wearing the early 1A identification stripes, ie *not* the invasion stripes we all know and love. The windscreen and canopy are Special Hobby spares that I acquired after borking several vacforms. Ham fisted? Moi? The very few decals I used (most of the major stuff is masked) silvered. Grr. And I did gloss it up first, too. General overview... Plan view... The tummy. The apparently kinky stripe on the starboard flap is an optical illusion. It's straight, really... Cockpit detail showing virtually nothing! But the SH windscreen blended in well... Nicely cast bits of undercarriage... Hope you like. I am currently working on Fly's Hurricane. The cockpit frame is tortuous, but I'll get there! Mike
- 10 replies
-
- 28
-
-

a.thumb.jpg.58d92d116b0315dc55d352fd191d65e4.jpg)