Search the Community
Showing results for tags 'mustang'.
-
 This is the Tamiya 1/48 P-51D Mustang, marked as John C. Meyer's "Petie 2nd". Typical of Tamiya, easy assembly and a nice fit. The only weak points are the wheel well not going back to the spar, and a prop that is too wide and tapered at the cuff (easy to correct). I used an Ultracast seat, and the sliding canopy is a spare from an Airfix kit (suitably reshaped). Wheel well was opened to the aft spar, brake lines added, and the radio, battery and drop tanks wired, and plumbed. Decals are the kits (works well with VERY hot water), and the paints are all Tamiya acrylic. Thanks for looking, Colin
 -
This is the early ICM (Tamiya knockoff) 1/48 P-51D Mustang, marked as "Miss Marilyn II". As and early ICM kit, there were a number of challenges, HUGE sink marks, short shots, incorrect detail parts copied from other kits, and a canopy that looked like it had been removed from the mold with a shovel! I used an Ultracast seat, and the sliding canopy is a spare from an Airfix kit (suitably reshaped). The front windscreen is from a scrapped Monogram P-51, that had to be reshaped, shortened, and polished to fit. Wheel well was opened to the aft spar, brake lines added, and the radio, battery and drop tanks wired, and plumbed. Decals are ancient Superscale (that tried to shatter on contact with water - to the point that some codes were masked and sprayed), and the paints are all Tamiya acrylic. Thanks for looking, Colin
-
This is P-51B Mustang registration 43-27460 as she appeared when owned by Colonel Jacqueline Cochran. It was her first Mustang and was registered NX28388 and was used to set 4 air speed world records and appeared at multiple air races in the late 1940s. The combat record, if any is unknown but the serial number both before and after saw combat with the 361st Fighter Group and both were lost in action. Cochran bought the aircraft in August 1946 for 10 points and other considerations. Following her third place in the 1948 Bendix Air Race, she asked her friend and test pilot Sampson Held to ferry NX28388 back to California, however on route it suffered a catastrophic wing spar failure and crashed, killing Held. The model is the duel boxing from Hasegawa in 1/72, you get a second kit and decals for 'Thunderbird', also owned and flown by Cochran at one stage. The model is showing it's age a bit, with very shallow wheel wells and the landing gear seems a bit short. That said, it goes together well and the decals are excellent. For the air racer, they give you some extra sprues for what they call an Aeroproduct's propeller, however looking at pictures I think the Mustang was using an uncuffed Hamilton Standard, which unfortunately you don't get in the kit. I decided to use the kit supplied cuffed Hamilton Standard, because I know at one point it did use this prop and in one race she had propeller issues so it might have been changed after that. It's also worth noting that they do give you both slogans that were painted under the exhaust stacks and this is not mentioned in the instructions. I am unsure of when the motto was changed. Cochran mounted P-38 drop tanks under the wings to ferry the aircraft, but these are not supplied in the kit. Leave off the kit supplied hard points. Apart from this, the guns and ejector ports were filled over and the resin fin fillet was glued in place and sanded down to fit. I painted her overall Gunze gloss bright green straight from the bottle and applied 3 coats of future, 2 before and 1 after decals. I decided to weather her as she appear after a race with big black and white exhaust stains that extended down the fuselage. Now I have to get to building 'Thunderbird' in the blue.
-
 The P-47M I have started same days ago still needs time for the paint to harden. So I'm starting a new model, after my accident at home I have a lot of time for myself. The old Hasegawa model from 1992 has been with me for a long time. I simply can't dispose of old models and prefer to build these for the second row. This kit has been deprecated for Germany, but no problem for a model builder. I created the swastikas on the fuselage myself on clear decals.
 -
 ThreeD-Wild Miniatures (link) is to release a (1/48th ?) 3D printed aircraft kit in 2024. Obviously a single engine fighter aircraft with a propeller. But what ? Source: https://www.facebook.com/groups/906471069393540/posts/24651795694434411/ V.P.
 -
 KP will release different versions of P-51D/K in 1/72. https://www.modelarovo.cz/kovozavody-prostejov-azmodel-co-noveho-v-roce-2024/ It seems that everyone wants a piece of the Mustang pie. I doubt I will get any KP Mustangs, this year or any year.
 -
Hello everyone again. Mustang P-51B, pilot - Donald Beerbower What has been improved in the Academy set: Firstly, these are the landing gear bays. All manufacturers offer them in the wrong shape, because... plastic does not allow them to be cast in the required volume. The niches were completely cut out and built from scratch. The machine gun ports have been redesigned, arranged in a cascade and equipped with barrels made of syringe needles and metal tubes. The rear support was dismembered and also completely rebuilt using metal components. The rear support niche is also somewhat filled with parts. Oil and cooling radiators were made and filled with radiator niche parts. The main landing gear struts were also modified on our own - the shock absorber rods were replaced, and the two-link links were cut out. The cockpit was partially redone on our own, complemented by etching from Eduard. Mounted landing light, manufacturer - Elf, Navigation lights - pins made of drawn transparent sprue, painted with a mixture of futura and acrylic. Other additions include True Detail wheels, QuickBoost exhaust tips, and a Squadron vacuum canopy. The main identification marks are decals from KitsWorld, technical inscriptions are from Techmod. *Sorry for the automatic translation and thanks for watching.
- 29 replies
-
- 83
-

-

-
’66 Shelby GT 350R (07716) 1:24 Carrera Revell Ford’s Pony Car was first introduced in 1964, and immediately struck a chord with the American car-buying public, claiming a place in motoring history as it did so. By 1966, not much had changed yet, including the size and weight of the car, making it one of the lightest from the whole lineage. The Shelby 350 was a modified Mustang, with more powerful engine, stiffer suspension and distinctive styling in any colour as long as it was white, making it a track-style car before that name was fashionable, also changing the name to capitalise on the reputation of the Shelby company. The first batch of the ’66 350s were based upon the Fastback chassis, and colours other than white were available, and over 1,300 were made, plus around 1,000 in the standard bodyshell. A small number of ‘special’ cars were given the R suffix to differentiate, as they were race-prepared, and not suitable for picking up a carton of milk and a pack of Lucky Strikes from the local 7-Eleven. These cars raced in the SCCA (Sports Car Club of America) Pro Racing series, including races at Laguna Seca and Riverside tracks. The Kit This is a reboxing with new decals of the 1985 tooling by Revell under the Monogram branding, which is backed up by the raised lettering on the underside of the interior tub of the model. The kit arrives in a shallow end-opening box, and inside are four sprues and the bodyshell in white styrene, another sprue that has been chrome-plated over white styrene, a small clear sprue, decal sheet, and instruction booklet that is printed in colour with profiles for the decal option to the rear. This is a special boxing that depicts a single car as it raced on two tracks with Walt Hane at the wheel on both occasions. This is an old kit, but has good detail, and time has been kind to the moulds, including a full engine, underside details and the spartan interior that had been stripped down in anticipation of racing. Construction begins with the engine, two parts for the block and transmission halves, adding multi-part detail inserts top and bottom, then fitting two cylinder-blocks and their rocker-covers, which have decals for the top, then accessorising it with alternator, serpentine belt, fan and manifolds, exhausting four cylinders per bank. The under-tray of the vehicle is then outfitted with the front axle with suspension moulded-in, twin sports exhausts that exit at the sides in front of the rear wheels, and the rear axle, which has ‘hi-tech’ leaf-springs and the drive-shaft moulded-in, then has a pair of dampers fixed between them and the chassis to reduce rebound, installing the engine between the chassis rails at the front, joining the down-pipes from the manifolds to the exhausts. The interior is begun by applying six dial decals to the instrument binnacle, and a further two to the smaller central binnacle, taking the time to remove the standard equipment details in the centre of the main dashboard, as no-one listens to music while they’re racing. The two binnacles are glued into position, fitting the steering column with stalks, and spacing the lightened steering wheel with a tapering extension, then the instructions have you switching to the other wheels, inserting the two hub sides from each side of the flexible black tyres, applying gold or white Firestone logos to them depending on which race you are modelling. After that diversion, the dash is inserted into the front of the interior tub on a pair of notches, and the angled gear shifter is fixed to the transmission tunnel before the rear seats are covered over by a blanking plate and two flashed-over holes are drilled in the flat area at the rear of the doors for later use. The solitary driver’s seat and a covered spare tyre are put in place behind the wheel and on the blanking plate at the rear respectively, and a three-part roll-cage is located on the two holes, and that has a fire-extinguisher moulded into one of the cross bars. The bodyshell is prepared by painting the roof liner dark grey and sanding away the logo moulded into the front arches, then the front and rear screens are popped in from within, adding a chromed rear-view mirror into a hole in the top of the windscreen, before the rear quarter-light cut-outs are covered over with blanking panels that are painted red. Another small moulded-in logo is removed from in front of the arch, although that would have been better done at the same time as the other, then the interior tub is glued into the shell, painting portions of the underside red, as some of it will be seen through the floor pan once the assemblies are joined. Before that however, the rear light clusters are painted as per the instructions and fitted on pegs into the rear of the car, then the chassis and bodywork are brought together, adding a pair of coil-over shocks in the front turrets, which you can paint red if you have steady hands. The wheels are snapped onto the axles in each corner, then the engine bay is painted black around the engine, so it is probably a good idea to paint that before you have the engine in the way, for the sake of your sanity. A dash pot is glued to the firewall, and a strut brace is fixed to the suspension turrets, then the interior front bulkhead with separate radiator is slotted into the front of the bay, jumping back (literally) to add the rear bumper and opener/badge in the centre of the boot. We’re back at the front to install the bumper and chromed radiator, adding chromed reflectors with clear lenses in front that have a fine mesh texture engraved on the rear. Two circular chrome side-lights are painted orange and inserted into the corners of the bumpers to complete the car’s distinctive ‘face’. The bonnet has some detail moulded into the underside, but you’ll need to remove the ejector-pin marks in between them, applying the two go-faster stripes after painting, and another decal that depicts a circular mesh vent over the stripes toward the rear. The air-box and radiator feeder-pipe are glued into the engine bay, and the bonnet can be slipped into position without glue to leave it mobile, adding a chromed stay that is supplied to prop it open, or you can lay it across the bay, dropping into two recesses in the bonnet sides. There are some additional decals applied in the bay, some to bulkheads, others for the ancillary parts that gives the area a little extra realism. Markings This is a special edition in all but name, as it has decals for two particular races that this car took part in, one at Riverside, the other at the world-famous Laguna Seca circuit, and while you’d expect the car to be almost identical for each race, you’d be mistaken, as there are some subtle differences, such as the colour of the Firestone logos and the colour of the driver names. There are also two styles of pony logo on the front grille, one with silver trim, the other with just the coloured stripes and the outline of the horse. Decals are by Cartograf, which is a guarantee of good registration, sharpness and colour density, with a thin gloss carrier film cut close to the printed areas. Although the decal numbers are called out for the seatbelts on the instructions, they aren’t represented in the drawings, so in case you missed it, there is a full set of seatbelt decals to add extra detail. Conclusion This is an old kit, but other than the lack of outer runners and the copyright details giving it away, it’s not what you’d expect. There’s plenty of detail, and the body is well shaped. The instructions are a little odd in places the way they flit around, but taking some time to look them over should help avoid mistakes. Highly recommended. Carrera Revell model kits are available from all good toy and model retailers. For further information visit or
-
 North American P-51D Mustang, 411622 C-G4 'Nooky Booky IV', 357th Fighter Group, 362nd Fighter Squadron, RAF Leiston, 1944. Leonard K. Carson Subject; North-American P-51D (K specification), x6 .50 cals, long-range drop tanks. Manufacturer; Tamiya Kit number; 61040 Scale; 1/48 Aftermarket; Eduard Zoom P.E set and mask set. Paints; Exterior, AK Xtreme Metal Aluminium, Matt Aluminium, Dark Aluminium and Duraluminium. Tamiya LP11 Silver, AK Real Colour RC259 Olive Drab for the anti-glare, LP5 Semi-Gloss Black, RC267 RLM04 Gelb and LP7 Red on the spinner. Interior, RC262 US Interior Green, various Tamiya X and XF and Posca pens for detailing. Primer; Mr Finishing Surfacer 1500 Grey and XF1 Gloss Black for the metals. Varnish; AK Gauzy Shine Agent. Weathering; Flory Dark Dirt and Abteilung oils. Tamiya weathering palettes.
 -
On holiday in North Yorkshire. NONE of my tools or paints etc. with me. Bought a Revell P51D Mustang model that comes with the brush, three paints, and cement. Had to get a craft knife, and also bought a pot of thinners. Let's see what I can do with so little!
- 14 replies
-
- 3
-
-
- Holiday Build
- Revell
- (and 1 more)
-
Hi, I've been a long-time lurker and liker on here, occasional commenter and epically rare poster. However, I thought it was time to put something back in to the forum and I'm just embarking on the build of a project that I hope you lot find interesting, so I thought I'd start my very first build thread. 😬 I have a long history of making models (50+ years) and have done my stint on the usual polystyrene affairs. I think I must've made 95% of the Airfix range during my youth. However, in the last few years I've found myself drifting toward larger scale multimedia kits and scratch building. Building Hasegawa's Museum Series 1:8 Camel and Fokker DR.I got me into 1:8 scale, and engines in particular. Having scratch-built a couple of Hispano-Suizas (specifically the ones fitted to the SE5a) and a Le Rhone 9C (which I really must finish) I felt it was time to build a 1:8 Merlin. I originally wanted build a Merlin III as I consider this to be the first 'true' Merlin. However, quite a few hours of web research culminated in discovering that those lovely people at the Air Corps Library ( https://app.aircorpslibrary.com/ ) have put almost the complete Packard Merlin drawing set online which you can access for a few pounds each month. There are also quite a few North American P-51C/D drawings there too. I simply couldn't pass up the opportunity to scratch build a model using the original manufacturer's drawings and the Merlin III idea was upgraded to a Packard Merlin V1650-7 from the P-51C/D. This engine is very similar to the Rolls-Royce Merlin 68 and 69, and those are regularly referenced on the Packard's General Assembly drawings and Illustrated Parts Manual. In addition to the Packard drawing set, The Smithsonian Museum's website has some excellent pictures of the Packard engine which really clinched the deal as I'm housebound and not able to get out and photograph the things myself. https://airandspace.si.edu/collection-objects/packard-rolls-royce-merlin-v-1650-7-v-12-engine/nasm_A19520106000 As a result of my deficiencies in fashioning plasticard and putty to a level I'm satisfied with I use CAD and 3D printing for a lot of my modelling work, either to produce the parts directly, or to produce mould masters for resin casting activities. Therefore the first thing required to produce the Merlin will be a detailed CAD model. This an activity likely to take quite a few months and I have doubts about the level of interest such a thread would attract, though I've been enjoying the Westland Scout thread on here quite a lot, so maybe I'm wrong. Whatever, in true Blue Peter fashion, here's one I prepared earlier. The model has been drawn as the engine might look if it'd not long been removed from an aircraft. It's not strictly how Packard would've delivered it. The original engines came without exhausts fitted, no generator and the coolant inlet pipe missing for a start. These were all furnished by North American when building the aircraft and I wanted them on for the full Merlin look. I can go into the process of how the CAD files are converted into bits of hard plastic if people are interested. Explaining how I produced the CAD model isn't going to happen. I don't know how to explain it succinctly. The short form is that the CAD program (AutoCAD and Fusion 360) throws out an STL 3D file which then goes into a 'slicer' program. That converts the STL file into a form acceptable to your particular 3D printer and adds the various supports required to hold the model while it prints. I use the freebie version of Chitubox for this because: a) I'm a tightwad. b) It does everything I want, and the whizzy features of the paid-up version aren't enough to prise the hard earned pennies from my grasping fingers. This is what the preview of the print looks like on the Chitubox screen. I shall be running this print over night tonight as it'll take about 14 hours to complete*. There will be 8 more print runs required to finish all the parts required for the model. I hate to think how many hours that will take, I'll let you know how it goes... * For those interested in 3D printing, I'm printing it on a Phrozen Sonic Mighty 12k with 20um layer height and using Phrozen's Aqua Grey 8k resin. The lateral resolution of the 12k is 19um x 24um IIRC.
- 108 replies
-
- 26
-
-
 The first Swedish Mustang is a P-51B-7 du 354th FG interned on 13 may 1944. He is followed by another one in august, then by two D-5 this same month. These aircraft arrives at a time where Swedish AF is struggling to get some high performances fighters, and the government is in the process to make a deal US and/or UK authorities on the tune of fighters for internees, as there are more than 1000 Allied Airmen stranded in Sweden An agreement is finaly reached for a number of P-47, that would be designated J26, but in march 1945, last minute change for Mustangs for 50 ex-USAAF machines (4 already « delivered »!), bound to equip Flottilj 16 (F16) at Uppsala, deliveries starting from 10 april. They will still be J26. In 1946, 90 more are bought from USAAF, plus a further 30 for spare parts the next year. The last Sweedish Mustang will leave active service with the air force in 1954. 93 will be sold to Israel, Republican Dominique and Nicaragua. So here's my interpretation of Swedish J26 serial 26031 (ex-USAAF 44-72220), from Flottilj (escadre) F16, 2. Division (Escadron, casserole bleue) at Uppsala, The aircraft must have suffered an accident in june 47, as it was then used as a ground instruction airframe. It was one of only three J26 painted in camo. Tamiya kit looks good to me, very simple and easy to build. No difficulties, I had some, but they're of my own make . A quick note about the decals : The instruction sheet show clearly roundels in six positions, standard with J26 and other Swedish fighhters at the time. BUT... Xtradecal gives you only four ! By chance, a friend of mine stepped in, and gave me the last two I needed. Thanks Stéphane ! Hope you'll like it. And if by the way you've gott a better understanding of Swedish AF than me (not difficult at all!), feel free to add or correct.
 -
As promised over on the build thread HERE Some more pictures of the finished beast: Glad to have finally added an A-36A to the fleet! Ed
-
Academy is to release a new tool 1/48th North American F-51D Mustang - Korean War - ref. 12354 Source: https://www.britmodeller.com/forums/index.php?/topic/235117457-academy-2023-releases-newsletters-1/&do=findComment&comment=4622755 Top prize Creativity & Originality for this type choice... V.P.
-
 Hi all. There's not much to say about this kit other than it was an enjoyable build. I've read a few articles and seen a few build/review videos and I don't know what the issues were that folks found. This thing fell together with the only care being taken on the clean-up of the sprue points. A few additional items in the way of Eduard exhausts and SBS Model block tread tires. An included set of resin tires for the RAAF option from Arma Hobby would have been a welcome addition as the build was held up for a week while waiting for them. Paints are Mr Color lacquers along with a stack of others including oils, pigments and a few acrylics for the interior. I'd build another one for sure. Bancroft the bench mascot for scale. Cheers, Mick
- 12 replies
-
- 27
-
-
- RAAF
- Arma Hobby
- (and 1 more)
-
I rarely stick to plans, so don't hold your breath, but @Vesa Jussila's thread about plans for 2023 led me to think about dealing with some stalled projects. This thread will cover the models I'd started for the Mustang GB in 2021. 1. '69 Boss 429 Mustang. Based on the recent Revell 1969 Boss 302, which has its origins in the old Monogram 1/24 1970 Boss 429 tooling. Unfortunately, that means the body is rather dumpy, the rear quarter light window is the wrong shape and the whole front end is off, if an improvement over the previous Revell 428CJ. I sectioned the body and reshaped the side windows, using 1:1 photos and an AMT '69 Mustang annual kit as references. The engine is a Boss 429 from a JoHan Torino stock car. ] 2. '67 390 GT Mustamg This one has the best chance of a quick completion. It's the AMT '67 GT, mostly OOB with the 390 FE engine from an AMT '67 Mercury Cyclone. I 3. '65 Shelby GT350 The '80s Monogram kit... not terrible, but the proportions are a bit off, especially the front end which is somewhat blunt. I've started to reshape it and substituted some Revell tyres for the wholly inappropriate Michelin TRX (metric! 🤢) tyres that came with it. 4. '68 Shelby GT500 I originally built this one in the late '80s, replacing the engine bay and turret braces. I dug it out for the GB, intending to correct the grille and headlights, which AMT didn't really get right. This one probably needs the most work. 😐 So, now I have a place holder, I'll creep up on these when time allows.
-
 Here we have the Me 262 & P-51B Combat Set by Revell (1:72 03711). I have (re)learnt a lot for my 2nd and 3rd builds after many many years away from the hobby. Lessons such as nose weights, how small decals are and how bloody fragile the gears/pros are! Next builds, I'll paint before assembly and attach the fragile bits and touch up AFTER main body is built, painted and decals applied! Unless I get impatient :) Anyway, hope you enjoyed reading my 2 threads while these were in progress and laughed or a had a chuckle at my 'oh bugger' moments of these 2 (Links below). "What's next?" I hear you say? Well, I have cracked open my DHC Beaver Vintage Classics Airfix 1:72 A03017V ... But I do also want to build my tank a King Tiger II Production Turret (Tamiya 1:35 3516)... Choices! Feel free to follow me, for some laughs :)
- 3 replies
-
- 13
-
-
-
- Messerscmitt
- Mustang
- (and 1 more)
-
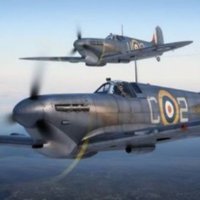
 I'm pleased to present my most recent build, Eduard's 1/48 Mustang Mk. IV in a natural metal scheme depicting KH716 as flown by Squadron Leader Murray P. Nash of No. 3 Squadron, Royal Australian Air Force, in Fano, Italy, January, 1945. The model is presented on a pre-made base by Zoukei-Mura, which remains the best $20 I ever spent in this hobby. The build overall was smooth, with only a couple difficult areas, all of my own doing. The Mk. IV version requires a few features to be removed from the base P-51 fuselage, and I made a right hash of excising an extraneous hatch under the air scoop, resulting in several rounds of filling (with putty and super glue) and some haphazard re-scribing. Please respect the rivets that were lost forever in the process and avoid too a close examination of the area. The propeller, spinner, and various flappy bits (elevators, ailerons, etc.) can all be added at the end of the build with no issues, making the painting easier. I used some, but not all, of the included PE parts, and after taking pictures I realized that the starboard gear bay landing light is still stuck to a piece of blue-tac atop a toothpick in my spray booth. The finish is a combination of Mr. Color C-8 Silver for the puttied/painted wings and fabric covered elevators and Mr. Color Super Metallic SM-201 Super Fine Silver 2 for the natural metal. Mr. Color lacquers are my go-to paints, so I opted this time for their metallics as opposed to the Alclad I used for my prior NMF build. I started with a primer base of Mr. Finishing Surfacer 1500 Grey, and then taped off a few fuselage panels to get some tonal variation on the cheap before covering the aircraft overall with Mr. Color GX-2 Ueno Black, a very durable and glossy base coat for the metallics to come. Since I view every new build as an opportunity to buy new stuff, I picked up Mr. Rapid Thinner, which Gunze recommends for their metallics. The C-8 Silver sprayed neat and true, and I thought the SM-201 Super Fine Silver did the same . . . until I masked over it to pick out the exhaust panels with dark iron paint. Sheets of the Super Fine Silver came off with the tape, down to the gloss black undercoat, as frightening display of paint lifting as you're likely to see. I sanded down the Super Fine Silver, which required distressingly little encouragement, and then resprayed and prayed, using my standard Mr. Levelling Thinner instead of the rapid thinner. I then sprayed a gloss coat -- Alclad Aqua Gloss -- on top as soon as it dried to protect it, which pretty much did the trick. A few areas still chipped on me with further handling, but they've been hidden as artfully as possible in the pictures. I'm not sure if the lifting came from not completely degreasing the black gloss undercoat after handling (I know, I know!), the rapid thinner, the paint/thinner ratio, the ambient temperature (on the cold side), or my just failing to properly propitiate the gremlins who live in my airbrush. I'm assuming it's a combination of all of those factors. The final colors look metal enough, but I think I might go back to Alclad for my NMF needs in the future. This build saw my first experience with Eduard's "removable film" decals. They were hit and miss for me. I wound up with some tearing/chipping on a few of the decals, including the "CV" code on the port fuselage and the red/blue flash on both sides of the stabilizer. The tears at least look sort of like organic paint chipping/wear. I'm an inveterate decal wiggler, trying to get them just right, and I think I didn't get the problem decals bedded down sufficiently. When they worked, though, they worked a treat. For the most part, I found that a nice dollop of MicroSol left overnight did the trick, and I just worried around the edges of the film with a toothpick until I peeled up enough to grab the film with tweezers. But it was nerve-racking. Can't argue with the results, though -- the decals with the removed film look sharp and almost painted on, both the main decals and the stencils, the latter of which I applied perhaps 80%. I covered over the decals with a further coat of Aqua Gloss, as I was uncertain how the exposed decals would react to the white spirit and oil paints in the next step. I wanted a fairly dirty finish, to reflect the wear and hard living of a plane in-theater, so I doused it with a wash of thinned Payne's Grey and Black oils. I tried to leave some build-up in panel corners, and I think the overall effect helped give some dimension and staining to the natural metal finish. Pencils and pigments rounded out the weather process. On the whole, I'm pleased enough with the final result. It should look good on a shelf with the striking red spinner and sky blue rudder adorned with the Southern Cross. I certainly learned a few things about working with a natural metal finish, and while it's nowhere near my best build -- the faults being my own rather than with the kit -- I'm no longer apprehensive about NMF schemes. (Though I still think I'll reward myself with an overall grey USAF bird next just to recover . . .) Thank you for reading and for taking a look.
 -
More progress today. I did some chipping and put guns in the holes. Regards
-
HI everyone!🙂 this is my 1/25 AMT '67 shelby GT-350 this kit got some issues..I try to build it as good as I could.. not perfect...but I am happy with this result.. hope you guys like it!🙂
- 24 replies
-
- 35
-
-
P-51B Mustang (70041) 1:72 ARMA Hobby Originally developed to fulfil a British requirement for new fighter aircraft, the unmistakable North American P-51 Mustang famously went from drawing board to first flight in just 178 days. It went on to become one of the most famous and successful aircraft of the Second World War. Transformed by the addition of Rolls Royce’s legendary Merlin engine, the Mustang went from strength to strength and was eventually developed into several variants. Even though the D model is the most recognised the earlier models were still great aircraft. The B & C were the first to use the Merlin engine which gave better performance over 15000 ft. They were known in RAF service as the Mustang III. The B models were built at Inglewood and the C models which were identical were built in Dallas. The RAF decided that the original hinged canopy did not offer enough visibility for operations and the British corporation R Malcolm & Co designed a sliding bulged canopy for the aircraft which then became known as the Malcom Hood. The search for better all round visibility would lead to the later P-51D, however some pilots are said to have preferred the Malcom hooded P-51B/D than the later P-51D as it was lighter and had better handling, one of the downsides was only 4 guns as opposed to the D's six. Exiting the B/C in an emergency was also said to be easier than the D. The Kit This is a new tool kit from ARMA Hobby which seems to have garnered good reviews. It really also was time we had a new tool B/C in 1/72. The kit is a rebox of the P-51B/C which we reviewed here but here comes without the PE of the earlier kit; however tape masks are included here (but now pictured in the review). The kit arrives on two main sprues, a clear sprue, and sheet of decals. The quality of the parts is first rate, all surfaces feature fine engraved panel lines, there is a great deal of moulded in detail in the fuselage and main wheel wells. Bombs and two types of drop tanks are provided for the wings. Due to the different options being provided from the kit its worth while checking the instructions for these before starting work. Construction starts in the cockpit. The frame for the seat is built up and added to the floor with the seat then being fitted. Belts here are provided as decals. The fuel tank is installed behind the seat with the radios going on top. The control column is added in front of the seat. Next up the instrument panel and its coaming are built up. with instruments being provided as decals. Work then moves to the inside of the fuselage with side parts going in, again here decals are provided for more details. The main radiator is assembled, following this it can be installed in the right fuselage half, along with additional controls and the tail wheel compartment parts. More parts and details are added to the left fuselage half. Once all of this is complete the tail wheel and cockpit can be installed, and the fuselage closed up. Moving onto the wings, the wing spar part is installed along with the parts for the main wheel well. These are installed into upper wing, and the two wing parts can be assembled. The separate flaps can then be added. The wings can then be mated to the fuselage. Following this at the rear of the fuselage the tail and tailplanes can be added. The main landing gear can then be made up and fitted. At the front of the fuselage the chin intake, propeller; and exhaust are added., with two different styles of exhaust stacks being included. Different canopies are provided for the model, though for the main decal options in this kit only the Malcom Hood will be used. The normal canopy being used for the bonus decal option. There are parts for this canopy to be open or closed as needed. A slightly larger Malcom hood is supplied for the slid back option. Then if needed bombs or drop tanks can be fitted to the wings as needed. Markings There are printed by Techmod so should pose no problems. 4 marking option are provided for the kit (plus a bonus option); "Old Crow" 43-248423 B6-S, Cpt Clarence "Bud" Anderson, 363rd Fighter Sqn, 357th Fighter Group June/July 1944 "The Mighty Midget" 43-6964 C3-G, Lt James H Clark, 382nd Fighter Sqn, 363rd Fighter Group, Maupertus, France July 1944 "Geronimo" 42-106473 G4-N, Cpt John Pugh, 362nd Fighter Sqn, 357th Fighter Group, July 1944 "Patty Ann II" 42-106872, John F Thornell Jr. 328th Fighter Sqn, 352nd Fighter Group, Bodney 1944 The Bonus option for the kit is "Geronimo" in its early 1944 fit with the original canopy and red/yellow nose. Conclusion It is great to see this important aircraft being kitted by a new manufacturer. The kit seems to have been very well received by modellers. Very Highly recommended. Review sample courtesy of
-
Just for fun, I thought I'd do something really beat-up, so, I'm taking a stab at 'Tex" Hills P-51b in China, 1945. It's ICM's P-51b, with some scratch building in the cockpit, a homemade vac canopy, and some parts from the spares box. I might tone down the chipping on the nose, I just haven't decided yet, On the real aircraft, the paint appears to have been coming off in sheets! Thanks for looking, Colin
-
I started this 1:48 Tamiya build as "Berlin Express". Unfortunately I cut the anti-glare demarcation slightly low and artwork would have been noticeably misaligned. It was easier to lower the demarcation than raise it so I'm building either "Geranimo" or "U've Had It!". Both planes have similar markings to my original choice. I'm waiting for U've Had It!" decals to arrive from Bob in Canada. THANKS BOB! Here it is to date. The only decal is the port wing because I couldn't figure out how to make the vinyl mask fit over the aileron actuator fairing. Suggestion on how to weather a half camo half NM aircraft would be welcome. Thanks for looking Ron
-
After the P-51D/K Eduard is to release 1/48th North American P-51B/C Mustang kits Source: https://www.eduard.com/out/media/InfoEduard/archive/2022/info-eduard-2022-10-special.pdf V.P.
- 182 replies
-
- 15
-