Search the Community
Showing results for tags 'mosquito'.
-
 Hello folks. Only my second model post, so being brave and going for it. The kit is new, and mostly goes together well, with little need for sanding or filler. There are some nice touches in the kit, such as direction arrows put on parts that could be accidentally put in upside down or back to front, and a pair of wheelbay masks. The instructions are of good standard, as are the transfers. My only real fiddle was putting the assembled undercarriage in its bay once I had finished spraying, it took a bit of help from a cocktail stick to get the forward legs to pop into the locating holes. The model is built completely out of the box, and finished in one of the two schemes offered. It represents a September 1944 Mosquito of 571 Squadron. I finished it as per the Airfix instructions, which included spinners that are in PRU blue (I handmixed this paint so sorry if it's not spot on.) The radiator covers were not painted in the overall camo scheme, but in dark grey, and don't have the usual red crossed 'don't walk' legend on them (this is handy as it gives me a couple of spare transfers to stockpile if I mess up on another build.) The port wing also has an inspection/maintenance hatch finished in underside light grey - again, I like this inclusion of non-standard features. The downsides: only one crew figure, and appallingly moulded at that. no provision of a 4,000 HC bomb or mounts for the same. (You do get four x 500lb MC bombs though to be fair). I think I could use mounts from the current B.II or B.III Lancaster plus a cookie from the RAF ground vehicles set if I wanted to model this, but as you can see I went for doors shut on this build. The cockpit canopy is ok, but the front frames seem much thicker than the Tamiya product, and look a bit bulky. It might be my painting making it like that though. The biggy - this model is apparently built from a scan of the TT.35 Mosquito at Cosford, and the bomb bay doors and rear fairing replicate the target tug version. The bulged bomb bay doors that should have been fitted are noticeably different. Whoops a daisy Airfix. Now the funny bit - as I was looking forward to this kit so much, every time Airfix e-mailed me about it, I preordered the kit, then forgot I had preordered. Therefore when the postie brought a gigantic box I was puzzled until I saw there were three kits in it. The missus thought it was funny, and it gives me two more kits to make. I won't be making them straight away; I will make one in the second scheme provided in the box (black undersides, green/grey upper surfaces), but I'm going to wait a bit to see if Airfix or someone else comes up with the proper bomb bay doors and rear fairing. I might make the third one as a TT.35 in fact as there is a second cockpit canopy provided that has the dome over the navigator's position. Summary - a good kit, but if you want it totally authentic as a B.XVI you're going to be doing some rebuilding and possibly sourcing of custom parts. Bad show from Airfix there. I've been as brutal as I can with the photographs, so you can see where I've buggered things up, also I seem to have acquired quite a few white specks of dust in the matt varnish finish which is annoying but they are barely visible to my old eyes. The last image is with the Tamiya model on the right; the Airfix kit sits lower, and you can see it's down the the undercarriage legs seeming longer on the Tamiya... again this could well be my lack of skill with building.
 -
Hi Guys! A second RAF build in a row this time. The previous one was the Eduard's Spitfire with Brassin Engine which gave me much headache. So this time I decided to build this Tamiya's Mossie or Wooden Wonder I should call straight out of the box. Building a Tamiya kit is a pure pleasure and enjoyable though I encountered some minor imperfections due to the old age of the kit. In this case, decals have much to criticize as the adhesion was weak and the carrier film was thicker than it should be. A few scratch details like the seatbelts made from tin foil and masking tape, brake hoses and hydraulic hoses in the wheel well are added. I concluded the build by applying moderate weathering and sealed with Mr Hobby's Super Smooth Clear Flat(GX-114)60%+ Semi Gloss Super Clear(181)40%. Hope you guys enjoy this. What should I build next? Hmmm... Sorry. Not WW2 and I should go for cold war or modern jets. The following is the link to my Facebook page: https://www.facebook.com/myanmarairmodeller/
- 17 replies
-
- 59
-

-

-
Well after putting forward some possibilities for my build in the chat section I revisited the stash and came upon a possibility which instantly went to the top of the pile as its one of my favourite aircraft of all time, the DeHavilland Mosquito. Not the more modern Tamiya tooling (if I found them for £10 or less I would need a wheelbarrow to carry the ones I wold "need") but the old Airfix 1/48 FB.VI in 1/48 scale one which I picked up a couple of years ago from the Kit Swap at Telford for the bargain price of £5. Now this may be an older tooling but there is nothing wrong with it as it is dimensionally accurate and actually quite nicely detailed for it's age. Here are the usual box and contents shots including one of the very handy price sticker proving the bargain price and the fact that it is eligible for the GB; The box top may have seen better days but the contents are still good; And the price sticker; Now the sharp eyed amongst you may have noticed the lack of something that is very important, decals! This had me rummaging through my decal stash for a part used Eagle Strike set which I know I have that has a nice SEAC example on it that I picked up for a couple of pounds as the set is incomplete. Now I know I have the sheet but can I find it? No is the answer. I have a sheet by Xtradecal but that would take the overall cost to around £13 so that won't do, but then I remembered my mini stash of Lift Here decals sent to me by my very good friend Sasha in Serbia over the years and all sent for free and in there is a set with a couple of Mossie's on it as well as a couple of P-47's, and as they didn't cost me a penny it keeps the cost of the package at £5!! Here are a couple of pics of the decal sheet and instructions; I shall be building the FB.VI at the bottom for this build, though I would very much like to do the T.3 at some point when I can work out what to do in the cockpit to convert it from an FB.VI. One very helpful point is the fact that according to the instructions there were no stencils visible! Which is excellent as I don't have any! A slightly deeper dive into the stash found a later stablemate from Airfix which I picked up from an airshow at RAF Waddington probably 15 years ago; Lets have a closer look at the price sticker on this one; £4.50! Even bigger bargain!! I could actually build them both in one thread and it still come in at less than £10!! I will see how I get on with my FB.VI before I make any commitment to building the NF.30 at the same time, though I will probably spray the interior at the same time as I do the FB.VI as it makes sense. For those of you unfamiliar with the Airfix NF.30 you actually get the full FB.VI kit with a new sprue to enable you to build the nightfighter from it with new upper wings, nacelles and radar nose. I am really keen to get started on this/these as I haven't built a Mossie in a long time. Thanks for looking in and as usual all comments and criticisms are gratefully received. Craig.
- 76 replies
-
- 21
-

-
-
This is a cast and machined solid brass Mosquito, which I believe was made by RAF apprentices at either Northolt or the Uxbridge School of Education where my dad was CO around 1950. It's 205x163mm and weighs 560g. IMGP9449a by Sandeha Lynch, on Flickr What's your considered opinion - is it a generic Mossie model, or are there any indications to suggest it's most likely to be 'x' version rather than 'y'? IMGP9448a by Sandeha Lynch, on Flickr
-
 AZ model is to release a new tool family of 1/72nd de Havilland DH.98 Mosquito. Among others the NF.30 variant. Source: http://www.britmodeller.com/forums/index.php?/topic/235010228-kpaz-central-discussion-questions-answers/&do=findComment&comment=2686107 First announcement was made with a NF.19 picture V.P.
- 22 replies
-
- 3
-
-
- Mosquito
- De Havilland
- (and 1 more)
-
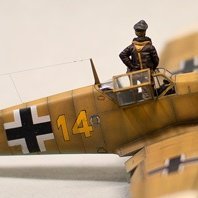
The Beast is done - for a long time now. The slender two engine is racing gracefully to completion. Work-from-home is was fun, then it was gone and now back again. Bench time was ample, then gone, and maybe coming back. It time for the next one: This one comes with a whole lot of plastic: So, frets cleaned up, transparencies soaked in future and drying, workbench is being organized. Hope building will start soon. Ran
-
 I bought this 1:48 Tamiya Kit some time ago. I was inspired by another users essay with this kit. I acknowledge their inspiration and for providing some details about the model. Thank You Wellsprop! I am indebted to Wellsprop for the following aircraft 'Bio' also ! "MM417 served with 487 New Zealeand Squadron, the squadron famous for raids such as Jericho as well as low level attacks on Gestapo headquarters in Aarhus and Copenhagen. I decided to build this kit with the bomb bays open and a full weapon payload. Painted with Hataka paints and lightly weathered to represent a machine that didn't see a huge amount of use before it was hit by flak and force landed at RAF Hunsdon on 26th March 1944" As they say in Monty Python's Life of Brian.. " Come and see the stoning, should be good.. Local boy! " This aircraft was based at RAF Hunsdon which is an aifrfield very local to me! Seems no contenst then which of the 3 options i'd complete this model as.. A Lovely kit to build. I elected to portray it with the bomb bay doors closed but with the 250lb bombs on the pylons.. Imagining it fully ready for an 'Op' and taxying out to the runway along the peri track! Hataka Red Line RAF Set colours used on the underside and the ocean grey. Tamiya RAF Green 2 for the top! Here's some pics of the parts as they are now .. dry fitting stage! Really enjoyed this kit.. and have some actual mud from Hunsdon on my bike.. might grind it down and use it as weathering on the wheels.!
- 27 replies
-
- 10
-
-
- Mosquito
- EG-T mm417 RNZAF
- (and 1 more)
-
 Was gifted this kit by a mate some months ago and after chancing upon " 633 Squadron " on the telly a couple of weeks ago, I decided to look it out and give it a go. An old kit and not much detail but enjoyable all the same. Spent some time trying to get the various parts to fit together cleanly but this took some trial and error and plenty of filler... Happy that the kit still included some crew and had fun giving them a bit of character ... which is what modelling is all about at the moment ... " fun " Not a lot of detail inside the cockpit and no decals for the IP so artistic licence and various paint effect used to give some interest. Along with the kit was some resin parts, including various flaps, interior canon detail and the front nose guns. I decided to only use the front guns but they are quite flimsy so may not last my ham fisted build process. Sourced a canopy mask online as well as some better decals. Such an iconic looking airframe ... I plan either to make my own stand or hang the model from the ceiling so its wheels up and using prop blur... its not everyone's favourite but I like the effect. All together now, canopy fitted using Krystal Klear ( 1st time ) and used some recently acquired Vallejo Plastic Putty, which in my opinion is brilliant stuff. Airframe all primed and pre shaded... The white bits of plastic sticking out of each engine nacelle are just to have something to attach the prop blur to. I had the 3 prop versions and single blade versions so opted for the easier 3 blade version with a central hub. That's it for now , was going to paint the model in standard camouflage but quite like the Coastal Command colours of late 44-45, with the dark sea grey upper and sky underside but most of these aircraft had the rockets attached under the outer wings and I've already gone and attached the basic bomb racks on. The kit has decals for both, so I'll decide later at my next bench time. An old kit but satisfying. Cheerio ps - as expected, I snapped the resin front guns, so will fit the standard kit ones... just need a bit of paint trickery to get them looking better !!
- 16 replies
-
- 12
-
-
- Mosquito
- Airfix Mosquito
- (and 1 more)
-
Not strictly a new build as it has been in my display cabinet 95% finished for at least two decades. You all have said to yourself, “I’ll add that bit later”. In my case it was the serials and nose art. I thought I would add a new skill and paint the nose art on some clear decal paper and order some serials. Time passed, much time, then I discovered a sheet with “Lonesome Polecat” on it. Some cash changed hands and she finally got her nose art. Build wise, the nose was bulged out a bit, not enough, but oh well. Wing tip aerials were added. A full etched brass interior was added, of course you can’t see any of it. Falcon canopy was also used. So here it is, finally done. Looking at the photo’s, it could use some weathering. I’ll add that later! Also just noticed the port wheel has rotated off it’s flat. Oh well.
-
Photos of this aircraft from April 1945 show a strike camera/gun camera in a nonstandard fairing on the midline of the nose just above the machine guns. I have some questions about this fitting. Are there any drawings or detail photos available that show the size and shape of the fairing, and how it was fitted to the nose piece? Is it known whether this camera arrangement was first fitted as part of the trials with the tiered rocket launchers and drop tanks, or was it fitted to this aircraft for use in documenting the Strike Wings' attacks? Thanks for any information you can share. David
-
163 Squadron RAF was re-formed at RAF Wyton in Jan 45, between then and the wars ends they flew 500 sorties. Mosquito's of the squadron visited Berlin 24 times in March 45. Mosquito Squadrons Of The RAF by Chaz Bowyer lists 16 serial number/code letter combinations, however even the RAF's own website under its Bomber Command history section lists Squadron Codes as 'unknown'! I have seen photographs of 163 aircraft (including RAF Wyton's excellent Pathfinder Collection brochure) but always frontal views with no codes visible. I find it amazing that even the RAF apparently don't know what codes were issued for the squadron. Has anyone ever come up with a possible answer? Did they even use codes or simply individual aircraft letters? Does the assembled expertise of the forum have any ideas?
-
 Airfix’s 1980 kit of the 1/48 Mosquito FB VI converted to a Molins’ 57mm Mk XVIII ‘TseTse' sub-hunter. The main gun was a standard British Army 6 pounder anti-tank gun, fitted with an auto loader and could fire 25 rounds in 20 seconds! The .303 machine guns were reduced to 2 (for sighting purposes) and an additional 900 pounds of armour were added. 26 were so modified. The kit was rescribed, the small scoops and the carb intakes on the engine nacelles were opened up, and a scratch built gunsight, details and wiring were added to the cockpit. The propeller blades were reshaped and the spinner openings reduced. The mods required were adding the late style bulged canopy, removing the 20mm cannons and shell chutes, and replacing with brass tubing for the 57mm cannon, breech fairing from spare pieces of bombs and missiles, breech hatch and shell eject chute from plastic sheet, reinforced inboard flaps with strip, and adding additional armour plate to nose I used Eduard brass seatbelts, a Squadron vacuform late style bulged canopy, Griffon etch carb intake screens, and a lot of plastic sheet, strip, brass tubing, and assorted bomb/missile parts for the breech fairing. Paints are Tamiya Acrylic and markings are a mix of Aeromaster nationality, Barracudacal stencils, Aviaeology serials, and masking and painting for the “O”. Weathering is with oil paints and pastels. Hope you like.
- 33 replies
-
- 92
-
-
Stransky Kits has shown Havilland DH..98 Moquito 3D renders. A future 1/144th or 1/72nd kit ? Time will tell. Source: https://www.facebook.com/stransky.kits/posts/1740414832774327 Anyway: https://www.facebook.com/stransky.kits/posts/1740414832774327 V.P.
-
 Hi, here goes another bird in 1/72. This time the beautiful Mosquito. Not the best kit from Tamiya, in particular the fit at the back of the engines with the wings and the connection between wings and fuselage, but at the end it looks OK. I've spent sometime with the paint job and trying to do some subtle weathering. At the end I've enjoined the built so much that decided to get the amazing 1/32 scale version from Tamiya that I'm planning to build in the near future. Cheers, Jorge
- 31 replies
-
- 61
-
-
Any Mosquito experts out there? I'm trying to build a couple of Mosquitos, post 1950 to fit my collection. I have the Freightdog decals for a NF36 with a bull nose and the PR34. The decals say use the Tamiya Mk XIII/XVII and B Mk IV kits with Freightdog conversions. Looking at the pictures it looks like I need the slipper tanks and possibly the tropical intakes? Is this correct? Is there anything else needed? Would appreciate if anyone confirm/advise please?
-
Hi all, hope you all are ok and safe... This is my first completed model during my quarantine here in Spain (started several months ago). I bought this one because of the color scheme, without knowing anything about the sprues or reviews, etc. so it was a surprise when I opened the box. Airfix did a strange thing with this product, I don't mean it's a bad thing, but at least strange. Half of the sprues are from the '70s and half are modern ones, designed for this D-Day edition... I think it had been better to design completely a new one model, if you plan to design the half of the sprues (the fuselage, and the top part of the wings, mainly). I must say that the old moulds almost haves a more crisp and fin details, except for the outside panel lines. The new parts haves modern negative panel lines, but a bit oversized. There had been some serious fitting problems, specially with the wings, and a lot of putty and sanding, and again sanding. But I think at the end it turn out nice. I must say that it had been in some points a bit painful, but in the other hand is a nice project to test my skills... I completed the model with a set of PE from Eduard designed for a Tamiya kit, and a bit of scratch, specially in the cockpit. The bad part is that behind the glass and the fuselage it will be all this work hidden. May be the thing I like more of my build is the cockpit, with all that wiring and scratch added to de PE, it had been very pleasant to do. I had follow some points on the page Scalespot.com and his beautiful Mossie in 1/32 from HKM for the references specially in the cockpit parts. Also added some scratch to the wheel bay and landing hear, because out of the box is very simple. Also rivet works by me, and I split the back control surfaces to have a more dynamic form. The decals are very hard to work with Mr Mark Setter/Softer and they are very thick... Well, I hope you like it. Thanks for take a look... Ricardo.
- 11 replies
-
- 19
-
-
-
Brengun has just released a 1/48th de Havilland DH.98 Mosquito two-stage merlin resin conversion set (ex -Attack Squadron ? ) - ref. BRL48124 - for the Tamiya keit. Source: http://www.hauler.cz/e-shop/1-48-accessories-22/dh98-mosquito-two-stage-merlin-(tamiya)-1672 V.P.
-
I'm talking 1/72 and kit #03019. I'm trying to make a start at clearing the stash and this kit came up on the production line. Straightforward I thought. 1970's Airfix. Accurate outline, fit a bit mediocre but nothing a bit of filler can't sort out. Cursory look at reviews on this site and others flagged up the undercarraige was a bit fiddly, the guns fragile and, aside from 1 review, no other issues came up. So we start: Cockpit rudimentary but otherwise as expected. Sure enough, 1 gun barrel disappeared so Mastercast replacement ordered from the big H. Surprised to find a Mk.XVIII is an option but then looked at the gun Airfix provide and it bears little resemblance to any gun I've ever seen. Resolve to leave til end and maybe see if Mastercast have a replacement. In the meantime fuselage & wings glued, puttied and sanded. Paint goes on. Rudimentary decals put on and glossed over and we're ready for the nacelles with the fiddly undercarraige. Well its not fiddly, its impossible. You cannot build this kit OOB. To get that undercarraige done you have to butcher the nacelles to allow the struts to fit and the cross struts to be applied. Add to that said struts are very small and fragile and before long no matter how careful I tried to be they snapped. I knew that trying to model it with gear up, kits from this era required a lot of filler so thinking that I wouldn't really see it when on display, superglue was deployed and the assembly was left overnight. Starting this morning I put the nacelles up to the wing for attachment. Plenty of serious polystyrene glue applied. Neither would fit, not even close. Huge gaps between wing and nacelle wall. Even then a bit (well a lot) of filling and sanding and all would be well I thought but I still couldn't get the nacelle to line up properly. Took a closer look. One of the nacelles is dimensionally different to the other. Its shorter at the wing attachment such that it looks to be the same nacelle but a different scale! The nacelles themselves are full of oversize rivets and are so poor that I wonder whether a different moulder was given the job who was barely on talking terms with accuracy, competence and scale affinity let alone the rest of the team responsible for the kit. Even the instruction sheet when it came to the nacelles had the part numbers wrong. I said at the top that this is unbuildable. Its not but it does require a lot more work than I am prepared to give it. Life's too short and if I have an urge to build a Mosquito I'll buy a Tamiya. This is the first kit for a veeeeery long time I've ditched without completing and I am so cross that I needed to rant! So apologies to all but I'm glad I got that off my chest
-
 I thought I would paste up one of my latest finished models - de Havilland Mosquito Mk XIII HK422/RO*Z 29 Squadron RAF. During the period Oct 1943 to Oct 1944 Lieutenant DRO Price RNVR with his Observer Sub. Lieutenant B Armitage RNVR were seconded to 29 Sqn RAF to learn the art of AI and Night Fighting. During that period Price and Armitage made three claims. 09/10. 06.44 Ju188 Destroyed 21/22.04.44 Me110 Destroyed 17/18.09.44 Me110 Destroyed Unfortunately 29 Sqn RAF only recorded in the Operations Record Book that, on each occasion, they were flying a MkXIII Mosquito rather than aircraft codes or serials. HK422/RO*Z is a representative aircraft of 29 Sqn through the period rather than one definitely flown by Price & Armitage. The model itself has been converted from the bulk standard Tamiya 1/48 MkVI/NFII boxing but with the addition of the Blackbird Nose, which I had a bit of trouble fitting (measure twice, cut once). I also scratch built the new junction boxes in the rear cockpit and scratched a GEE set (and aerial) plus Harnesses to Pilot & Observer. Paints are Xtracrylic over Halfords Grey Primer (honestly not much different to Med Sea Grey). Roundels were Tamiya Squadron codes I printed up myself. I need to thank both @Seahawk & @Graham Boak for their help and guidance during the research for this aircraft..
 -
The postie delivered Revell's 1:32 Mosquito IV in the post today and I have been thinking about how to build it. In particular, the SEAC silver and blue scheme caught my eye. What aftermarket bits and bobs would I need to save up for build up an accurate Mossie, since there are few kits in this scale?
-
Hello friends, another model from the old school is over. I am pleased that it eventually turned out. Not in rank Tamiya, but on the shelf it seems satisfactory. Here's the picture, enjoy it.
-
 Dear fellow Britmodellers, this is my 1/72 Tamiya Mosquito FB Mk.VI, built with Master metal gun barrels, CMK weapon bay and Eagle Cal decals. Markings represent an aircraft of 418. Squadron in October 1944. Painted with Gunze/Mr.Hobby acrylics. All photographs by Wolfgang Rabel. CMK weapon bay wasn't a good fit at all, being too short for the cut-out of the lower fuselage. Thanks for your interest in this topic. With best greetings from Vienna, Roman
- 18 replies
-
- 56
-
-
-
Hi people, My second WIP post (other is FW16 F1 car) and first plane. I suspect this model has had a lot of WIP, as it is so new - so I hope another one is ok! Best way to get advice on techniques etc...the skill level on these forums is incrediable... Same story as many on here I am sure - used to make models as a kid, getting back into it 35 years later! Less likely to throw the result out of a window, set on fire - and I have an airbrush now! I love this plane, and once I saw a few reviews and pictures of the kit, I thought I'd give it a go...splashed out and give it a go! Going for the Operation Jericho version - incrediable story. So far I have worked on the cockpit, so I'll start there... It's a lovely kit - with a LOT of parts!! Some nice historical booklets included, different paint schemes etc... Small number of PE details. Everything goes together very accurately. Fit is superb. Love the ease that this green goes on - test fit of sub-assemblies (seats, instrument panel etc) I've worked on all the 'interior' elements of the main fusalage, again test fitting elements...
-
 It's to my shame that it's taken me so long, but we are now very pleased to announce that we have, exclusive to Sovereign Hobbies, a healthy supply of 2 stage engine nacelle resin conversion sets for your 1/48 scale Tamiya de Havilland Mosquito kits by Pangolin Models (JasonC, as you may know him). https://www.sovereignhobbies.co.uk/collections/1-48/products/pangolin-two-stage-mosquito-nacelles-1-48 Everything is now ready except for the little cardboard folder-over thingimabobs with the label to go on the packaging, which we'll have ready within a week. These are available to order now and dispatches will begin by the 9th June 2017. These sets are professionally cast in high quality resin, and come complete with separate cast resin 6-stack exhausts and optional photo etched brass grilles evident on the sides of some carburettor intakes. They are designed to be simple to fit and to remove the anxiety in cutting up perfectly good injection moulded kits by utilising existing panel lines on the Tamiya kit parts to locate the straight saw cuts.
 -
 Not everyone's cup of tea but I do like my toys and so when I started building this I thought I'd try livening it up when I stumbled upon the Magic Scale Modelling site, specifically this kit: https://www.magicscalemodeling.com/shop/DH-98-Mosquito-Motors-%26-Lights-set-1-32-%26-1-24-p81830358 6 months elapsed, and I had a lot of help along the way from Richard at Magic Scale Modelling, a lot of it down to my incompetence, and along the way he sent me the prototype of the new control board with the twin sound speakers, and I'm informed this is the first build using it. In hindsight I should have practiced this on an easier kit like the Revell one first, and realising the vandalism and fettling I needed to do on those beautiful Tamiya engines made me want to cry. I made lots of mistakes along the way which meant that a few aspects of the kit itself haven't been fully done justice! One key example is I ended up with the belly doors closed in order to accommodate the control board, but in retrospect doing it again I'd find room in the rear fuse... but then again it's ready for takeoff isn't it, so the doors would be closed anyway! I'm not happy with the fir of the cowl panels and the props aren't quite true either but by and large I'm happy with it. I've linked the videos to my Youtube page as I can't seem to share videos from Flickr. (I know i need to tidy up those wires but I'm waiting for some extensions to hide them underneath my eventual wooden base). I hope you like it.
- 18 replies
-
- 48
-
-