Search the Community
Showing results for tags 'mosquito'.
-
This is a cast and machined solid brass Mosquito, which I believe was made by RAF apprentices at either Northolt or the Uxbridge School of Education where my dad was CO around 1950. It's 205x163mm and weighs 560g. IMGP9449a by Sandeha Lynch, on Flickr What's your considered opinion - is it a generic Mossie model, or are there any indications to suggest it's most likely to be 'x' version rather than 'y'? IMGP9448a by Sandeha Lynch, on Flickr
-
 I bought this 1:48 Tamiya Kit some time ago. I was inspired by another users essay with this kit. I acknowledge their inspiration and for providing some details about the model. Thank You Wellsprop! I am indebted to Wellsprop for the following aircraft 'Bio' also ! "MM417 served with 487 New Zealeand Squadron, the squadron famous for raids such as Jericho as well as low level attacks on Gestapo headquarters in Aarhus and Copenhagen. I decided to build this kit with the bomb bays open and a full weapon payload. Painted with Hataka paints and lightly weathered to represent a machine that didn't see a huge amount of use before it was hit by flak and force landed at RAF Hunsdon on 26th March 1944" As they say in Monty Python's Life of Brian.. " Come and see the stoning, should be good.. Local boy! " This aircraft was based at RAF Hunsdon which is an aifrfield very local to me! Seems no contenst then which of the 3 options i'd complete this model as.. A Lovely kit to build. I elected to portray it with the bomb bay doors closed but with the 250lb bombs on the pylons.. Imagining it fully ready for an 'Op' and taxying out to the runway along the peri track! Hataka Red Line RAF Set colours used on the underside and the ocean grey. Tamiya RAF Green 2 for the top! Here's some pics of the parts as they are now .. dry fitting stage! Really enjoyed this kit.. and have some actual mud from Hunsdon on my bike.. might grind it down and use it as weathering on the wheels.!
- 27 replies
-
- 10
-

-
- Mosquito
- EG-T mm417 RNZAF
- (and 1 more)
-
Not strictly a new build as it has been in my display cabinet 95% finished for at least two decades. You all have said to yourself, “I’ll add that bit later”. In my case it was the serials and nose art. I thought I would add a new skill and paint the nose art on some clear decal paper and order some serials. Time passed, much time, then I discovered a sheet with “Lonesome Polecat” on it. Some cash changed hands and she finally got her nose art. Build wise, the nose was bulged out a bit, not enough, but oh well. Wing tip aerials were added. A full etched brass interior was added, of course you can’t see any of it. Falcon canopy was also used. So here it is, finally done. Looking at the photo’s, it could use some weathering. I’ll add that later! Also just noticed the port wheel has rotated off it’s flat. Oh well.
-
 Was gifted this kit by a mate some months ago and after chancing upon " 633 Squadron " on the telly a couple of weeks ago, I decided to look it out and give it a go. An old kit and not much detail but enjoyable all the same. Spent some time trying to get the various parts to fit together cleanly but this took some trial and error and plenty of filler... Happy that the kit still included some crew and had fun giving them a bit of character ... which is what modelling is all about at the moment ... " fun " Not a lot of detail inside the cockpit and no decals for the IP so artistic licence and various paint effect used to give some interest. Along with the kit was some resin parts, including various flaps, interior canon detail and the front nose guns. I decided to only use the front guns but they are quite flimsy so may not last my ham fisted build process. Sourced a canopy mask online as well as some better decals. Such an iconic looking airframe ... I plan either to make my own stand or hang the model from the ceiling so its wheels up and using prop blur... its not everyone's favourite but I like the effect. All together now, canopy fitted using Krystal Klear ( 1st time ) and used some recently acquired Vallejo Plastic Putty, which in my opinion is brilliant stuff. Airframe all primed and pre shaded... The white bits of plastic sticking out of each engine nacelle are just to have something to attach the prop blur to. I had the 3 prop versions and single blade versions so opted for the easier 3 blade version with a central hub. That's it for now , was going to paint the model in standard camouflage but quite like the Coastal Command colours of late 44-45, with the dark sea grey upper and sky underside but most of these aircraft had the rockets attached under the outer wings and I've already gone and attached the basic bomb racks on. The kit has decals for both, so I'll decide later at my next bench time. An old kit but satisfying. Cheerio ps - as expected, I snapped the resin front guns, so will fit the standard kit ones... just need a bit of paint trickery to get them looking better !!
- 16 replies
-
- 12
-
-
- Mosquito
- Airfix Mosquito
- (and 1 more)
-
Hello folks, May I pick everyone’s collective brains please? I am thinking out loud really but wondered whether the two RR Merlins included with the Mosquito kit are much better than the ones in the older Spitfire or Hurricane kits? For those who have both kits, what would you say? Also, if as I expect, they are better could one be swapped into a Hurricane or Spitfire to jazz the old kits up a bit? I imagine that they aren’t the same mark of engine but do they differ enormously? A plan formed in my tiny mind and I’m wondering how feasible it might be? What are everyone’s thoughts on the matter? *Edit: Perhaps it’s already been done and if so there might be a build thread that you know of? Please could you share a link if you have one? Thanks. Cheers
-
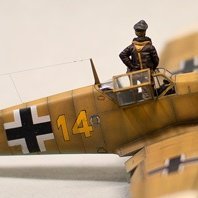
Photos of this aircraft from April 1945 show a strike camera/gun camera in a nonstandard fairing on the midline of the nose just above the machine guns. I have some questions about this fitting. Are there any drawings or detail photos available that show the size and shape of the fairing, and how it was fitted to the nose piece? Is it known whether this camera arrangement was first fitted as part of the trials with the tiered rocket launchers and drop tanks, or was it fitted to this aircraft for use in documenting the Strike Wings' attacks? Thanks for any information you can share. David
-
The Beast is done - for a long time now. The slender two engine is racing gracefully to completion. Work-from-home is was fun, then it was gone and now back again. Bench time was ample, then gone, and maybe coming back. It time for the next one: This one comes with a whole lot of plastic: So, frets cleaned up, transparencies soaked in future and drying, workbench is being organized. Hope building will start soon. Ran
-
 Stransky Kits has shown Havilland DH..98 Moquito 3D renders. A future 1/144th or 1/72nd kit ? Time will tell. Source: https://www.facebook.com/stransky.kits/posts/1740414832774327 Anyway: https://www.facebook.com/stransky.kits/posts/1740414832774327 V.P.
 -
 Hi, here goes another bird in 1/72. This time the beautiful Mosquito. Not the best kit from Tamiya, in particular the fit at the back of the engines with the wings and the connection between wings and fuselage, but at the end it looks OK. I've spent sometime with the paint job and trying to do some subtle weathering. At the end I've enjoined the built so much that decided to get the amazing 1/32 scale version from Tamiya that I'm planning to build in the near future. Cheers, Jorge
- 31 replies
-
- 61
-
-
Any Mosquito experts out there? I'm trying to build a couple of Mosquitos, post 1950 to fit my collection. I have the Freightdog decals for a NF36 with a bull nose and the PR34. The decals say use the Tamiya Mk XIII/XVII and B Mk IV kits with Freightdog conversions. Looking at the pictures it looks like I need the slipper tanks and possibly the tropical intakes? Is this correct? Is there anything else needed? Would appreciate if anyone confirm/advise please?
-
Hi all, hope you all are ok and safe... This is my first completed model during my quarantine here in Spain (started several months ago). I bought this one because of the color scheme, without knowing anything about the sprues or reviews, etc. so it was a surprise when I opened the box. Airfix did a strange thing with this product, I don't mean it's a bad thing, but at least strange. Half of the sprues are from the '70s and half are modern ones, designed for this D-Day edition... I think it had been better to design completely a new one model, if you plan to design the half of the sprues (the fuselage, and the top part of the wings, mainly). I must say that the old moulds almost haves a more crisp and fin details, except for the outside panel lines. The new parts haves modern negative panel lines, but a bit oversized. There had been some serious fitting problems, specially with the wings, and a lot of putty and sanding, and again sanding. But I think at the end it turn out nice. I must say that it had been in some points a bit painful, but in the other hand is a nice project to test my skills... I completed the model with a set of PE from Eduard designed for a Tamiya kit, and a bit of scratch, specially in the cockpit. The bad part is that behind the glass and the fuselage it will be all this work hidden. May be the thing I like more of my build is the cockpit, with all that wiring and scratch added to de PE, it had been very pleasant to do. I had follow some points on the page Scalespot.com and his beautiful Mossie in 1/32 from HKM for the references specially in the cockpit parts. Also added some scratch to the wheel bay and landing hear, because out of the box is very simple. Also rivet works by me, and I split the back control surfaces to have a more dynamic form. The decals are very hard to work with Mr Mark Setter/Softer and they are very thick... Well, I hope you like it. Thanks for take a look... Ricardo.
- 11 replies
-
- 19
-
-

-
I'm talking 1/72 and kit #03019. I'm trying to make a start at clearing the stash and this kit came up on the production line. Straightforward I thought. 1970's Airfix. Accurate outline, fit a bit mediocre but nothing a bit of filler can't sort out. Cursory look at reviews on this site and others flagged up the undercarraige was a bit fiddly, the guns fragile and, aside from 1 review, no other issues came up. So we start: Cockpit rudimentary but otherwise as expected. Sure enough, 1 gun barrel disappeared so Mastercast replacement ordered from the big H. Surprised to find a Mk.XVIII is an option but then looked at the gun Airfix provide and it bears little resemblance to any gun I've ever seen. Resolve to leave til end and maybe see if Mastercast have a replacement. In the meantime fuselage & wings glued, puttied and sanded. Paint goes on. Rudimentary decals put on and glossed over and we're ready for the nacelles with the fiddly undercarraige. Well its not fiddly, its impossible. You cannot build this kit OOB. To get that undercarraige done you have to butcher the nacelles to allow the struts to fit and the cross struts to be applied. Add to that said struts are very small and fragile and before long no matter how careful I tried to be they snapped. I knew that trying to model it with gear up, kits from this era required a lot of filler so thinking that I wouldn't really see it when on display, superglue was deployed and the assembly was left overnight. Starting this morning I put the nacelles up to the wing for attachment. Plenty of serious polystyrene glue applied. Neither would fit, not even close. Huge gaps between wing and nacelle wall. Even then a bit (well a lot) of filling and sanding and all would be well I thought but I still couldn't get the nacelle to line up properly. Took a closer look. One of the nacelles is dimensionally different to the other. Its shorter at the wing attachment such that it looks to be the same nacelle but a different scale! The nacelles themselves are full of oversize rivets and are so poor that I wonder whether a different moulder was given the job who was barely on talking terms with accuracy, competence and scale affinity let alone the rest of the team responsible for the kit. Even the instruction sheet when it came to the nacelles had the part numbers wrong. I said at the top that this is unbuildable. Its not but it does require a lot more work than I am prepared to give it. Life's too short and if I have an urge to build a Mosquito I'll buy a Tamiya. This is the first kit for a veeeeery long time I've ditched without completing and I am so cross that I needed to rant! So apologies to all but I'm glad I got that off my chest
-
Brengun has just released a 1/48th de Havilland DH.98 Mosquito two-stage merlin resin conversion set (ex -Attack Squadron ? ) - ref. BRL48124 - for the Tamiya keit. Source: http://www.hauler.cz/e-shop/1-48-accessories-22/dh98-mosquito-two-stage-merlin-(tamiya)-1672 V.P.
-
 I thought I would paste up one of my latest finished models - de Havilland Mosquito Mk XIII HK422/RO*Z 29 Squadron RAF. During the period Oct 1943 to Oct 1944 Lieutenant DRO Price RNVR with his Observer Sub. Lieutenant B Armitage RNVR were seconded to 29 Sqn RAF to learn the art of AI and Night Fighting. During that period Price and Armitage made three claims. 09/10. 06.44 Ju188 Destroyed 21/22.04.44 Me110 Destroyed 17/18.09.44 Me110 Destroyed Unfortunately 29 Sqn RAF only recorded in the Operations Record Book that, on each occasion, they were flying a MkXIII Mosquito rather than aircraft codes or serials. HK422/RO*Z is a representative aircraft of 29 Sqn through the period rather than one definitely flown by Price & Armitage. The model itself has been converted from the bulk standard Tamiya 1/48 MkVI/NFII boxing but with the addition of the Blackbird Nose, which I had a bit of trouble fitting (measure twice, cut once). I also scratch built the new junction boxes in the rear cockpit and scratched a GEE set (and aerial) plus Harnesses to Pilot & Observer. Paints are Xtracrylic over Halfords Grey Primer (honestly not much different to Med Sea Grey). Roundels were Tamiya Squadron codes I printed up myself. I need to thank both @Seahawk & @Graham Boak for their help and guidance during the research for this aircraft..
 -
The postie delivered Revell's 1:32 Mosquito IV in the post today and I have been thinking about how to build it. In particular, the SEAC silver and blue scheme caught my eye. What aftermarket bits and bobs would I need to save up for build up an accurate Mossie, since there are few kits in this scale?
-
Hello friends, another model from the old school is over. I am pleased that it eventually turned out. Not in rank Tamiya, but on the shelf it seems satisfactory. Here's the picture, enjoy it.
-
 Dear fellow Britmodellers, this is my 1/72 Tamiya Mosquito FB Mk.VI, built with Master metal gun barrels, CMK weapon bay and Eagle Cal decals. Markings represent an aircraft of 418. Squadron in October 1944. Painted with Gunze/Mr.Hobby acrylics. All photographs by Wolfgang Rabel. CMK weapon bay wasn't a good fit at all, being too short for the cut-out of the lower fuselage. Thanks for your interest in this topic. With best greetings from Vienna, Roman
- 18 replies
-
- 56
-
-
-
 Not everyone's cup of tea but I do like my toys and so when I started building this I thought I'd try livening it up when I stumbled upon the Magic Scale Modelling site, specifically this kit: https://www.magicscalemodeling.com/shop/DH-98-Mosquito-Motors-%26-Lights-set-1-32-%26-1-24-p81830358 6 months elapsed, and I had a lot of help along the way from Richard at Magic Scale Modelling, a lot of it down to my incompetence, and along the way he sent me the prototype of the new control board with the twin sound speakers, and I'm informed this is the first build using it. In hindsight I should have practiced this on an easier kit like the Revell one first, and realising the vandalism and fettling I needed to do on those beautiful Tamiya engines made me want to cry. I made lots of mistakes along the way which meant that a few aspects of the kit itself haven't been fully done justice! One key example is I ended up with the belly doors closed in order to accommodate the control board, but in retrospect doing it again I'd find room in the rear fuse... but then again it's ready for takeoff isn't it, so the doors would be closed anyway! I'm not happy with the fir of the cowl panels and the props aren't quite true either but by and large I'm happy with it. I've linked the videos to my Youtube page as I can't seem to share videos from Flickr. (I know i need to tidy up those wires but I'm waiting for some extensions to hide them underneath my eventual wooden base). I hope you like it.
- 18 replies
-
- 48
-
-
-
Hello you, and a belated welcome to 2019. Here is a quicky I did in the post Christmas blues, a Mozzie carved from wood and camouflaged with wood stain. Its a bit of a mishmash, its supposed to be the cannon armed fighter, but the cockpit and exhaust blisters are from the MkIV bomber and the Brownings are too high in the nose. Still, it kept me out of the wife's way for a couple of weeks so it's all good. Enjoy.
- 15 replies
-
- 38
-
-
Just finished this one today. Not a bad kit considering it's 40 year age!! All that was required was a quick rescribe. Not much filler either which was a pleasant surprise! Paint used was Hataka in the main with Alclad Kleer Kote Flat to finish. Hope you like it!
- 13 replies
-
- 34
-
-
I hope its ok to join this party a little late? Being inspired by Enzo Matrix’s Buffalo Mosquito thread in this group build and a bunch of exciting images on the interweb: I would like to build a coastal command Mozzy. I have this Tamiya 1:48 FB VI in my small stash which will fit perfectly for such a build. I have been lurking on the forum for a while now but am an inexperienced modeller, having done it a lot as a kid (a loooooong time ago) and have recently returned to the hobby now with a couple of builds under my belt (with varying degrees of finesse shall we say) so this is my first WIP so be gentle with me and excuse my lack of terminology and experience but i figure i’d like to contribute and have a lot of fun with the build. It’s not going to be a rivet counting exercise but i hope it turns out ok with a little luck. A canopy mask set i purchased with the kit a while ago. i have also ordered a photoetch set and a coastal command squadron 333 decal set from hannants which i’m awaiting to arrive. maybe rf 769 (KK · P) could fit the bill (the kit has relevant decals already but i think it would be cool to customize the scheme a little) (i dont own the copyright to the image above it is posted while i'm asking permission) (i dont own the copyright to the image above it is posted while i'm asking permission) so here we go! I started the kit this evening labelling the sprues for ease of use. I then joined the forward sections of the fuselage to the aft sections with some extra thin, (adding the cockpit door and tail wheel mudguard, after taking the photo) (i intend to have the undercarriage down and door and bomb-bays closed). and I gave everything that needed it, a good coat of tamiya XF-71 airbrushed without primer. so thats where we are. no muck ups so far! 🤗 wish me luck! 🤪
-
DH Mosquito PR.IV/B.IV 'Special Liveries' 1:144 Mark I Models The de Havilland Mosquito was conceived as a high-powered, high-speed bomber. Unlike other aircraft of the day, it was depended on its speed, rather than defensive gun turrets, for survival. It was also noteworthy for being constructed of wood composite, a technique pioneered by de Havilland in the sleek de Havilland Albatross airliner. This helped to save weight, but also reduced reliance on the scarce alloys used in the construction of other aircraft. Overcoming the skepticism of the Air Ministry, during early trials the Mosquito proved to be comfortably faster than the Spitfire Mk.II. In the end, almost 8,000 examples were completed, with the type serving well beyond the end of the War. The B Mk IV was the original bomber version of the Mosquito, while the PR Mk IV was simply a photo reconnaissance conversion of the former. Mark I Models have produced quite a range of 1:144 scale kits, including many British WWII and Cold War types. This kit is part of a range of Mosquito kits released by the Czech manufacturer. The kit is limited run in nature, but the plastic parts are nicely moulded, , with crisp detail throughout. There is no flash present and the sprue attachment points are pretty fine for the scale. Being one of the larger kits in the line up, you only get one Mossie in the box instead of the pair of kits you find in their Spitfires or Vampires. As you might expect, construction is fairly straightforward. The cockpit is basic, but structurally complete, with a separate moulded seat for the pilot and a control column and instrument panel. Detail for the latter is provided courtesy of a very small decal. Once the cockpit is complete and the small fuselage windows have been fitted, the fuselage halves can be joined. The wings are simply split vertically and they are designed to fit inside the recesses on the fuselage sides. Each engine pod is moulded in vertical halves, with bulkheads to close the landing gear bays off at either end. The landing gear itself is nicely detailed and a choice of wheels are included depending on which of the painting schemes you choose to build. A choice of engine exhausts are also included. Despite its diminutive size, the canopy is pretty good. Mark I have included decals for four different schemes: de Havilland Mosquito PR Mk IV DK310, LY-G, No.1 PRU, Royal Air Force Benson, summer 1941. This aircraft is finished in Dark Slate Grey and Sky Grey over PRU Blue; de Havilland Mosquito PR Mk IV DZ473, No.540 Squadron, Royal Air Force Leuchars, June 1943. This aircraft is finished in overall PRU Blue and was used to photograph the V-2 rocket facility at Peenemunde; de Havilland Mosquito PR Mk IV G-AGFV, BOAC, Royal Air Force Leuchars, early 1943. This aircraft is finished in Dark Earth and Dark Green over Sky. It was used for high-speed diplomatic courier operations to Sweden; and de Havilland Mosquito B Mk IV G-AGFV, T9+XB, 2./VVB OKL Trials and Research Unit of the Luftwaffe High Command, Konigsberg-Neumark Airfield, Summer 1944. Conclusion Small and simple it may be, but this mini Mossie is no less appealing for it. The quality of manufacture looks to be pretty good and although there are no luxuries such as locating pins, it doesn't look as though it will be particularly challenging to build. Reccomended. Review sample courtesy of
-
Currently building the 1/48 Airfix Mosquito PR XVI. There is no radio antenna included in the kit, yet most profiles and photos I have seen of this aircraft show an antenna installed. Is this an oversight by Airfix or did some PR XVIs carry radio equipment that did not require an antenna? Thanks, Adrian
-
Hi Chaps. Firstly, just wanted to say hi, I'm new to the forum and just back in the modelling game after a rather lengthy break of 35 years, one build in and loving it. So here is my question, I pushed the boat out and purchased the Airfix 1/24 Mosquito in the black friday sales. Really looking forward to getting started. Doing a little research on schemes and I have fixed upon The dark grey scheme with yellow spinners from the original 1/24 release (sorry I can't find a reference to which squadron etc) Does anyone know where I can purchase decals for this? Looking forward to your responses. Thanks again Simon
-
Trying to make my cabinet more colourful I've decided to built my Mosquito FB.VI as the intruder operating from the UK in the D-day period of 1944. There are several pictures known of such black-bellied planes from the RAF squadrons No.23 (PZ170), 605 (NS838) and RCAF No.418 (HJ719, HJ722). There's even a FB.VI used for night recce flights over Italy by No.60 Sq. SAAF, but it doesn't sport code letters - just the serial in red. But no one of them feature AEAF stripes on the wings. My question is whether the abovementioned units were the only ones using the FB.VIs in such (black-bellied) camouflage? EG the Polish No.305 and No.307 Squadrons were also flying the FB.VI (including night intruder sorties), but all photos known to me show their Mossies in standard NF scheme with SGM undersurfaces. And the main question appears, whether any black-bellied Mossies were flown with AEAF invasion stripes on the wings? The ones I've found have them only on the fuselage underside. Cheers Michael