Search the Community
Showing results for tags 'heller'.
-
 Hi everyone, I'm building a 1/72 replica of VH-SNJ, a former RNZAF Harvard III currently owned by the Zuccoli family and living at their Aerotec facility in Toowoomba. My starting point is the Heller T6-G kit, with some extras to be added to make this a very special Harvard... Starting point is the Heller kit... here are the wings For this "Hot Rod Harvard" we need some surgery, first step is to remove the outer wings: Next, we need some surgery for the "donor" outer wings. Starting with wings from a Special Hobby CA-12 Boomerang kit, once again we separate the outer wings from the centre-section... What on earth is going on here? Well, this Harvard was (for a short period) fitted and flown with CAC Boomerang outer wings! Yes, really! Back in the late 1980s Guido Zuccoli commissioned Saunders Aircraft of Chino, California to build up an airworthy CAC Boomerang for him. No Boomerang wings had survived intact and so Saunders constructed a pair of outer wings from scratch. The complete Boomerang arrived back in Australia in October 1992 and was the first airworthy restoration of a Boomerang. At the same time, Matt Denning had been reverse engineering authentic Boomerang wings (based on wreck parts) and began constructing wings for his project and for Greg Batts. Guido also obtained a set of Matt's more correct wings and fitted them to his restored Boomerang, leaving him with a spare pair of Boomerang outer wings. He decided it would be fun to fit them to his Harvard and see how it performed! As an accomplished aerobatic pilot, he was thrilled with the dramatically increased roll rate of 6 foot shorter wing, as well as 10% higher cruise speed and increased rate of climb. Back to the model... more updates coming soon...
 -
 Normally if something goes wrong with a model I give up. If a decal breaks, I'll try and buy new parts. But int this instance it just wasn't viable for me to do so right now...so I decided to finish it. This is the first time I've done a paint scheme like this (tricolor) and I was really proud with how the wings turned out. In fact, before the decals I was really proud of the entire model. Sadly, however, the decals all broke...and my shaky inexperianced hands are awful for doing a straight line and I just ended up with a mess. The photo you'll see below has me filling in the gap with the same colour on Paint.net but I haven't edited anything else on the model bar bluring the background. Ultimately I'm still happy with what I made, just a bit saddened by the results. As usual with any of mine more information and images can be found in the article here.
 -
Joining you with this Heller Humbrol 1/72 Texan. A kit which I built in 2017, during Radial Engine GB. Just acquired from @Seahawk thanks Nick. To be finished as this Mexican Air Force Texan, named U-Boat Killer. To include a Dauntless type rear machine gun, leftover from a recent Airfix build.
-
My second entry for this GB will be an old friend. The Heller kit, which I first built in the mid-1980s. This Revell boxing is (as it says on the box) made in Mexico, presumably by Lodela, from whom Airfix also sourced this kit. My intention is to build the Luftwaffe subject on the cover. However, that kit is molded in yellow plastic. It's difficult enough to hand-paint a kit all yellow, but onto yellow plastic? No thanks. So I'm using the silver plastic from the current Revell release of a US "warbird". I need to work out the precise shade of yellow, and the finish, but I can press ahead with building the kit in the meantime.
-
I have this in the stash for the last 30 years, but it's in the remote part of the stash. I wasn't sure I'd be able to access it in time, so I bought the re-release with shiny new decals! As a very first step, I mated the upper wings to the fuselage halves. The fit was very good for a kit from 1967, which is older than me! Dry-fitting these sub-assemblies was encouraging: These depressions on the ailerons will need correcting at some point: Work on the interior: I decided to paint those areas of the outer fuselage around the windows, before attaching them. I even painted the inner edges of the frames, as almost all windows attach to the inside of the fuselage. More "progress" tomorrow.
-
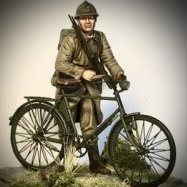
Hi all, here we go again, this is another old kit I picked up last year. It should be a very accurate and hopefully an enjoyable build, Heller makes some great bike kits. I am going to paint it in the factory pearl candy orange and airbrush the tank stripes on, as the decals are not in the correct colours. So, let's get started!
-
To run alongside the Miniart tram build (and give me a break from the intensity) I’ve started this 1955 Paris police car (99 parts compared to 810 in the tram😳) Ive made a start with the engine So far I’ve added a few additional details to the kit offering - it’s almost ready for some paint before adding the final kit parts and a bit more detailing ive also made a start on the bodywork by cleaning the shell up and rectifying the the glaring error with the rear window (way to small on the kit for the police version) Think I’ll finish the engine then back to the tram for a bit
-
Heller 1/24 Renault TN6C2 I’d wanted to build this kit since seeing it in Beatties Birmingham when i was 13 and 40 years later I picked it up as my get me back into modelling project however not long after I got distracted and it was consigned to the shelf of doom where it sat for 5 months before being sent to the floor by the cat ☹️ - it then spent the next 15 months in bits ……waiting. I took pity in March and resurrected it and finally finished it this weekend - it’s not a competition winner more of a “3 footer” but I’m happy with it now it’s done
-
I've fancied a 1/72 Puma HC.1/2 for ages - my brother had the Airfix one as a kid - but that was about the last time anyone produced a Puma kit in 1/72! Picked this Heller one up off eBay a little while back, but only then started researching in earnest. Sounds like lots of accuracy and fit issues lie ahead of me. I don't mind a bit of tweaking; I'm not a competition-standard builder, and I know my scratch-building limits, so as long as I can tweak it enough to look quite a lot like an HC.2, that'll do for me. Initial look in the box doesn't seem too off-putting...cockpit detail a bit simplistic, but the fuselage halves look ok with loads of raised rivets, which as it turns out, seems quite realistic! Initial build stages and everything fits together pretty well so far - nice to have locator pins/slots, unlike the last build (Sword Harrier T.10)! I read somewhere that the Airfix/Heller moulding has the undercarriage leg oleos at full extension... this is correct for a flying helicopter, but will look wrong on the ground when they should be compressed. Sure enough they're extended on the model. A quick calculation and I reckon about 15cm oleo extension on the real one isn't too far off, which equates to about 2mm in 1/72. So 2mm was duly removed from the front leg and a bit of Eduard etch (linkage) added. Turns out the plastic is pretty brittle after all this time - just about managed to do the nosewheel here but am a bit nervous about the main gear legs in the future. Before and after:
-
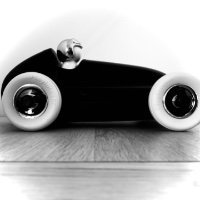
Here's my first WIP. I say in progress, it's only taken approx 2 years to get to this stage, and probably 2 more to actually finish it, so don't wait with baited breath... In all honesty - it's been a bitch. The tyres/wheels aren't correct. The cockpit is not quite right (particularly where the roll hoop emerges). The engine is most certainly 'under' molded. The Heller kit decals... don't get me started (I used BestBalsaKits). The parts, not connected Re-made windshield from thin acetate sheet, sprayed with Tamiya TS smoke All riveting has been replaced, mostly with PLUSmodels. Brake reservoirs and slave cylinders are scratched. Seat, according to my research, appears to be loosely covered in a cloth material which is 'baggy' in areas. I make my seatbelts out of inkjet printed paper through a 'Photoshop' like software and, in this instance, Replicas & Miniatures Company of Maryland hardware. Quite a lot of work here I'm still not sure it's worth spending a whole load on after market accessories on this model so the gorgeous and true wheel sets for this car from www.iconautomotiveminiatures.com will have to wait, maybe for the Protar/Italeri Alfa 179 I'm fully aware that the Heller wheels are considered to be incorrect (wrong sizes?) and they are plastic (!!!) but I found they were quite easy to 'weather' with pick up and wear. Where to start? I used an EJan Ford DFV multi media detail set on the DFV. The exhaust pipes proved particularly challenging. At some point I cut them at the point they meet at the outlet and, as you can see, they haven't yet gone back to their final position... YET! Loosely put together
- 10 replies
-
- 14
-

-
Resurrection time...... I had coveted this since first seeing it in Beatties Birmingham when I was 13 - 40 years later I brought one on eBay as my get back into modelling project spent 2 months building then got distracted and shelved it - 5 months later and the cat decided he didn’t like it on the shelf so sent it to the floor ☹️ - it’s sat there now for 15 more months dejected and unloved - it’s time has come though and it’s now back on the workbench first job was to repair the cat damage which got me back to this Over the last couple of weeks I’ve now finished the passenger compartment interior and cab added the wheels etc and started getting it ready for paint hopefully I’ll finish it this time
-

Renault Turbo 5 Gr. 4/Gr.B Tour de Course
Vesa Jussila posted a topic in Work In Progress - Vehicles
I have managed to buy some poor kits lately. And one of those is Heller Turbo 5 rally car. Somehow I have liked always this small car. One of these was also in Finland and was at one stage driven by Jarmo Kytölehto. Of course this was not best tool in Finland forest stages. Originally car was done for Group 4, but was transferred to Group B when this became major class in rallying. During season 1982 factory called these Gr.4 cars even there was Gr.B homologation existing. 400 cars were built in Dieppe factory to meet original homologation need. More cars were later built and for this kind of homologation special car was quite common. Factory was competing in selected events and there was never full commitment for full series. Car was able win some races anyhow. 1 49ème Rallye Automobile de Monte-Carlo1981 Jean Ragnotti Jean-Marc Andrié Renault 5 Turbo 2 26éme Tour de Corse1982 Jean Ragnotti Jean-Marc Andrié Renault 5 Turbo 3 29ème Tour De Corse1985 Jean Ragnotti Jean-Marc Andrié Renault R5 Maxi Turbo 4 20º Rallye de Portugal Vinho do Porto1986 Joaquim Moutinho Edgar Fortes Renault 5 Turbo Of course last win was after factory cars were withdrawn after accident and this was private car. So I will build car presenting -82 Tour de Course winner. This project will take a time because there will be some work related issues that need time. In Tour de Course factory prepared four cars and these had 1397cc engine that produced 265hp and car weighted only 915kg. So it was very handy for this kind of event. Also Tour de Course was first event where factory participated in world championship level that year. And competition from other manufactures was also serious. Factory teams were from Audi, Lancia and Opel. Also fast private Porsches were in entry list as well BMW M1. Also Ferrari 308's were there and these were surprisingly fast. Route was 1600km and 27 special stages. So this was real rallying in those days. Moulding of the parts is quite ok no flash and little mould seams. But parts are mix of something from rally car and civil version and there is no full roll cage. Dash just don't look right so this must be rebuilt too. Also doors are opening ones, but what is inside of the doors doesen't look realistic. So these will need some work. In this period door panels were still in place so what is inside the doors is really not accurate. And most of parts in under bonnet is also missing. Like parts for steering and brakes. Also radiator in front is missing. Detail level of suspension is nicely said rude. And these need to be rebuilt. I just haven't managed find good photos so far. Mainly what is needed are new dampers and springs. Also new drive shafts are needed. Those just don't exist in this kit. Seats are clearly meant for civil car and I need to find some replacement and fill holes in floor. Basic parts for Engine are somehow usable. In photos it's clearly visible heat shield between engine and exhaust/turbo installation, but this so much out of scale. But this is hobby and making these corrections is part of this. I am happy that I have at least starting point for this build. I want get also get Maxi version to my collection, but need to search some of those resin kits. And those cost some serious money. -
This is another placeholder. I figure I need to build at least one really old kit of a French aircraft, and this will do for starters. This is one of the Smer reboxes that were issued c. 2000, to my great delight, as the original Heller kit eluded me. The original catalogue number was L093 (?), the "black box" reissue was 213: These SMER box scans are my own:
- 31 replies
-
- 6
-
-
- Morane Saulnier
- Heller
- (and 1 more)
-
In graciously accepting Col's @Col. invitation to complete my LeO I am continuing my post here. There is actually little more to do. I was concerned about the rules but I have agreed not to post in the Gallery once finished. I hope everyone agrees with this. If not I will withdraw her so as not to offend. The full detail of the build is below. It is my attempt at building something a little different from the norm. as is my way :). I didn't manage to get her done by the GB deadline because of my slow progress and then I was tripped up near the end by my incorrect measurement of some decals. These are now being re-printed. So, here goes ..... The Heller GB thread: Today I am left with the following to clean, prime, paint and assemble, plus the code decals of course. You can see in the bottom right that I have had to cut out some new tail wheel doors. I lost the first ones! The rest of the bits are: resin wheels (Renaissance Models), DC-3/C-47 props (Airfix), and the spinner, pitot, an aerial, undercart doors, tailwheel (all from the kit). I will get them all clean and primed. The tailwheel doors need to be curved uner heat before that, though. In addition to this I will be adding more aerials from styrene rod and stringing them with EZ line. All work for next week Martin
-
I'm calling a finish to this one now as I think I have managed the best I can, so stopping before I spoil it. This is the 1/72 Heller E-3, with Combat Decals markings for an E-3D in the special markings for the 100th Anniversary of 8 Sqn. This kit has sat unloved in my loft for over 10 years (mainly because of its really poor Heller French AF decals), but I was inspired by the recent Combat Decals release to bring it down and make a start. The RAF-specific parts are those supplied as part of the Heller kit (along with the CFM-56 engines in my release) and the only corrections I have made were to add a fillet in the joint between wing tip and ESM pods. As I suspected, taking completion photographs was "difficult" due to its size, but a sunny day here, a shiny garden table and a large paving stone seem to have worked. Rather depressingly, the wheels were already beginning to splay out of position by the end of this photo shoot. Some solid props will be needed if they are to survive. This is, I believe, the largest model I have ever made. I still have no idea where I will keep it, but the entire wing assembly remains detachable, which helps. For now though, its on display on a coffee table in my modelling room! I started this 3 weeks ago, with a detailed (if not entirely accurate) cockpit, none of which can now be seen: It is entirely brush painted, using Humbrol enamels, with an oil wash and W&N Acrylic matt varnish to finish. Klear was used to bed the decals down. The Combat Decals are nicely printed but VERY difficult to remove from the VERY crowded sheet. My inner engines are nicely clear of the ground despite the wings only being clipped in place. Alternative background. I photoshopped the paving stone joints out of the picture: ...and that was February's lockdown build. Pleased with that
- 18 replies
-
- 48
-
-

-
 I first built this kit back in the mists of time, as my own scan of the boxart proves: The kit is currently being sold by both Mistercraft and Heller. The Mistercraft boxing is cheaper, and has 14 (!!!!) subject options. For once with Mistercraft, the contents of the decal sheet and the instructions line up, more or less: I will be building this is a Yugoslavian aircraft, with a distinctive 3-tone upper camouflage schemes. The exact colours are uncertain. The instructions for the Eduard 1:32 and 1:48 kits are a good reference. Eduard has covered the Yugoslavian option in two releases some years apart, but with markedly different shades. I will use my skill and judgement (and translation tables) to work something out.
- 14 replies
-
- 3
-
-
- Heller
- messerschmitt bf 108
- (and 1 more)
-
This is a placeholder, as I might not be able to start this for some time. The original catalogue number was 277. This could easily qualify as a "kit you never built as a kid", and so on. I am building the Heller-Humbrol boxing, which includes the Norwegian markings that were dropped from later Heller releases: There's a school of thought that says this is really a Canadair-specific version, and as such the USAF subject (John Glenn) is not kosher. At any rate, I plan on building the JG 71 aircraft.
-
A step into the unknown here, my first ever Heller kit build but it looks like a beauty - the Prinz Eugen. As you all know, this is the German heavy cruiser which accompanied the battleship Bismarck on the ill-fated Operation Rheinübung in 1941. The Prinz Eugen then participated in 'The Channel Dash' in 1942 and survived the war to enter the US Navy for a very brief period. Fantastic art on this big box. Actually, plenty of room in the box and the parts are still in the sealed bag, apart from the hull halves. The hull is very long and slim - just checking, Prinz Eugen was 212.5 m (697 ft 2 in) overall with a beam of 21.7 m (71 ft 2 in). Very slim compared to the Bismarck which was 251 m (823 ft 6 in) overall with a beam of 36 m (118 ft 1 in). Lovely big sheet of decals, tooo, which look in good condition. This boxing of the kit was released in 1998 (according to Scalemates). My big issue with modelling at the moment is attempting to keep it under the radar of Mrs V, although I have put my foot down and declared 1hr on a Sunday afternoon to be 'Craft Hour'. I was wondering how I was going to hide this large hull as even the dog will notice that it's not the usual 1/72 aircraft! However, looking t the Instructions, Heller have you making up all the small sub-assemblies first and the hull only goes together in step 26 - this will be doable!. Also, I'm impressed with the internal jointing/bracing that Heller have included to prevent the hull imploding while you try to glue the halves together. You can see how it all comes together in the final assembly. I'm looking forward to this one - the last time I made up a warship kit it was for floating in the bath!
- 32 replies
-
- 11
-
-
- Heller
- Prinz Eugen
- (and 1 more)
-
Hi guys and girls, I am entering a second kit into this Heller GB. This means that I have lost my marbles: 2 kits!!! The lucky winner is the Nieuport Delage NiD 622 in 1/72. porting the kit number 80224, this is a 1993 rebox of a 1979 kit. Here are some photos: My priority build will be the Etendard IVM, but I reckon that this Nieuport will come together fairly quickly. So, it is worth the try. Cheers everybody! JR
-
Hi All The result of stash diving this T-6 . Marking yet to be chosen as the kit ones are suspect. Maybe a finisher to redeem 2020's shocker. Anyhow here it is . All parts accounted for Thanks for looking Martin H
-
Hi all, after those months of waiting, this keenly expected GB has finally arrived! I shall enter it with one of my favorite French Navy aircraft: the Etendard IV M. This beautiful kit is a Christmas present (with a few other gems) from our Scottish Father Christmas Pat, aka @JOCKNEY Here are a few photos of the box and sprues: All in all, it looks like a lovely kit! I have to finish my Me 109 for the BoB GB first and then try and make some serious progress on the Huey. But I am looking forward to this kit. It has been a long time since I last built a plane with a hook. Have fun! JR
- 43 replies
-
- 16
-
-
- Etendard IV M
- 1/72
- (and 1 more)
-
I'll be up front: I don't think this will be my best build, and that's OK. It started as a father/son build with my 6-year-old until I discovered the terrible fit of the fuselage: When I held the tail and the tip of the nose together, the two halves of the fuselage bowed so badly that there was about a 1/8" gap in the seam in the middle (above the wings)!! No Kidding!!! I had a hard time holding it together just dry-fitting it and I wasn't even sure if I'd be able to glue it. At that point, my son decided he was more interested in starting his 1/48 Bf-109. I decided it would be a good model to try out some new Alclad techniques on. I've been using the wings for testing different Alclad finish ideas for my CF-104 build documented here: I was able to glue it after all, but I had to start at one end and exert a lot of force with my fingers while I used my "instant set" super glue. Usually I use a "glue looper", which is a photo etched loop to apply small amounts of super glue and have capillary action pull it into the seam. This was so bad, I had to just use the super glue bottle to apply enough to keep things together. I was able to clean up the super glue that ran, and then sanded the seams: The dark gap along the spine is a very wide gap in the seam filled with super-glue. Here's the bottom: I was able to sand it pretty smooth, but the raised detail was sanded off in the process. If I was serious about this model, I would re-scribe the panel lines, and sand the whole body smooth. But, the detail in this kit is terrible and the fuselage is warped, so it's not worth the effort. Here's how the fuselage lines up, which illustrates how badly the plastic was warped: I can't say whether this was a defective kit, or if it was age or what. I bought the kit in 1997, and never dry fit it until now, so I don't know if it was always like this. It's been kept indoors in a closet, so I don't think environment has anything to do with it. I discovered as I was sanding it that the strain on the plastic from forcing it into shape caused some stress cracks, which I filled with super glue: I wasn't really impressed with this kit because of its low detail and heavy-handed raised panel lines. The warped fuselage makes it even worse. Still though, with a good coat of alclad and the really great after-market decals I got, I think it will look pretty good, and certainly good enough to join my son's squadron of models hanging from his ceiling!
-
.thumb.JPG.0e1a2f56a9882625878393563b548edd.JPG) I've not attempted to build a model kit for decades, since the 1980s actually. Now I'm getting on a bit I decided I best proceed with doing some of the kits in my stash. My main interest is UK based RAF/USAF stuff from about 1970 to 2000, but I've ended up with a few other things in the stash that I can practice on first... And as it's the 50th anniversary of the first Tomcat flight later this month I figured I may as well start there! It's a wheel up OOB build, of a kit I bought second hand, which turned out to have a couple of bits missing... Not done a huge amount to it so far as I was waiting for paints and glue etc. (I tried to buy locally but to no avail... mail order from the big H in Londonshire) Hmmm I set up a Flickr account but the forum isn't allowing me to embed the links. Back in a bit!
I've not attempted to build a model kit for decades, since the 1980s actually. Now I'm getting on a bit I decided I best proceed with doing some of the kits in my stash. My main interest is UK based RAF/USAF stuff from about 1970 to 2000, but I've ended up with a few other things in the stash that I can practice on first... And as it's the 50th anniversary of the first Tomcat flight later this month I figured I may as well start there! It's a wheel up OOB build, of a kit I bought second hand, which turned out to have a couple of bits missing... Not done a huge amount to it so far as I was waiting for paints and glue etc. (I tried to buy locally but to no avail... mail order from the big H in Londonshire) Hmmm I set up a Flickr account but the forum isn't allowing me to embed the links. Back in a bit! -
My second entry is Thornier Armour, a tuna fishing boat originally released in 1978. Didn't plan this built, saw it on eBay a couple of weeks ago, thought it looked interesting but didn't press the button. Price was later reduced to £5, couldn't resist that, so here it is. Not many parts and a sheet of vacform sails. Need to a bit of research, my sailing knowledge is limited, it has been over 30yrs since I got my RYA competent crew certificate, which was also the last time I set foot on a sailing boat.
-
A bit late, but I hope this 1999 re-issue of the 1972 Heller original tooling is OK. I'd like to build it as she was with No. 1426 Enemy Aircraft Flight, Collyweston, 12 April 1943 – January 1945. It seems that the aircraft was kept until a serviceable engine or cylinder block could be acquired from a downed aircraft in the Middle East. In August of 1943 the aircraft was delivered to No. 1426 (Enemy Aircraft Flight). A F/Lt R.F. Forbes flew the aircraft at RAF Collyweston on 24 October, while it was still in Luftwaffe markings. Shortly after that, it was painted in RAF colours and given the serial NN644, keeping the white 11 and bomb markings. RAF pilots had similar ground handling problems with the 109 as did Luftwaffe pilots. In July of 1944, the port wing and aileron where damaged when an RAF pilot ground looped it on landing at RAF Thurleigh, Bedfordshire. The Messerschmitt passed to the Enemy Aircraft Flight at Tangmere in January of 1945 and went into storage at No. 47 MU at RAF Sealand in November of that year.