Search the Community
Showing results for tags 'airliner'.
-
 What is a thing that looks like a Lockheed Model 12 Electra and a Beech 18, but is neither? A 1937-born Barkley-Grow T8P-1, of course! Continuing with the vacuum-formed building trend, here is a product from Execuform, that gives you the basic shapes as a sort of base onto which you have to add the detail you want. Only the main shapes come in the kit with some leaflets containing a plan, images and information. The decals and accessories (engine, wheels, cockpit and cabin detail) are to be provided by the modeler. I have built products from this brand before and they should be considered a white canvas onto which you can express your modeling artistry, on subjects most of the time nowhere to be found as injected or resin kits. If do some scratch-building, Execuform saves you a lot of time by producing the masters and pulling the styrene shells, but they are not meant as complete kits. The Barkley-Grow was not a particularly successful design, although it managed to operate with a number of airlines and private owners. Three airframes seem to be still today being exhibited at museums. The Barkley-Grow was operated on wheels, skis and floats, making it especially useful as a bush plane in Canada, where it saw a bit of recognition, negated to it in the US. The seaplane version had an additional, smaller, central vertical stabilizer. The land version had a fixed landing gear with characteristic pants. Of pleasant lines and uncomplicated design, especially on wheels, it makes a good candidate to try your skills at this somewhat neglected media. It teaches you in the process quite a bit. Notable operators were Canadian Pacific, the US Antarctic Service, Yukon Southern Air Transport, Pacific Western, Northland, Prairie Airways, Associated Airlines, a private individual: Alexander Papana (YR-AHA, Trăiască Regele "Long Live the King", same exact registration by the way wore by Papana's Bellanca 28-92 trimotor), and the Peruvian government (OB-GGK, Cruz de Chalpón). This is what you get in the Execuform package. The basic shapes and reference material: Outlines with a permanent marker to easily located the edge of the parts: Parts off the backing sheet (keep the scraps. they will be used later): Parts sanded up to the line previously traced: Excursion to the spares bin and aftermarket parts drawers to find engines, props, wheels, etc.: Separating the future cowls: Gluing the cowl and float halves (not sure yet if I will present the model on floats are panted wheels): Floats and cowls with a cursory tide-up (notice the roundish stern on the floor, that has to be sawed off: Stern sawed off to real shape (the floats are a few millimeters longer to allow you to do this): Float noses also come with the kit, in case you feel you need them to achieve a better shape -or mess-up): The kit provides cowl fronts: Carburetor intakes from unknown donor. As they are hollowed and firm in the drill bit, the mold edges are cleaned up: Just in case the struttery for the floats is being prepared (I WANT MORE CONTRAIL AEROFOIL MATERIAL!!!!): Inner "N" float struts assembled. Passenger seats scratched, pilot-copilot seats and control wheel from spares box: Remember I said do not discard the scraps? here a cockpit/cabin floor is made of from a piece: Dry run of the setup: To deal with the roundish (inaccurate) finish of the float step, a cut is made: A styrene sheet piece is inserted in the cut with glue: So the blobby area can be later on removed: After the glue has set, then you can cap the stern: The float bottom flutes will have to be "sharpened" a bit using sandpaper wrapped on a dowel of appropriate diameter.
- 118 replies
-
- 8
-

-
- Barkley-Grow
- Civil
- (and 1 more)
-
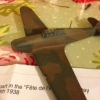
Continuing with the saga of civil Japanese planes from the Golden Age, here is a rather stocky plane that briefly flew for a Japanese airline (Tokyo Koku K.K.) As J-BABG (not the kit's version). I immediately liked the ungainly stance and the sumo wrestler proportions. I have seen this kit time ago, at a somewhat stiff price, so I waited a bit until it became (just) more reasonable. Still, being this a short run technology kit, and for what it is, it is not a bargain. The box announces resin parts (actually one part inside) and super decals. We'll see about the decals. Contents. Short run, so thick gates, some thick parts, not a lot of refinement: An itsy-bitsy of flash: Tail feathers a bit thick: Exterior detail: A view of some of the parts: Thick exhausts. This was true for the collector, but not for the connecting bits to the cylinders, which are represented too thick: Restrained wing surface: Film for the windows and windshield, resin engine that is rather simple: The "super-decals" (did Superman make them?): Some psychedelic perspectives in the instructions: Color and decal instructions on the box back: Interior detail (remove the ejector marks): Off the sprues: For being a resin engine, and considering the products that are out there as aftermarket options, I am not particularly thrilled by this one, which by the way doesn't quite match the photos I can see on the Net -that show a lot of pushrods at the front: The window areas are recessed, quite a bit inside and a little outside. The instructions tell you to fix the film from inside, I guess to render a thinner wall appearance: The kit, although sold as the civil version, has the military parts still in it, and there is no provision to close the round opening for the top fuselage machine gun. I seriously doubt the passengers of the civil version flew with a hole on the fuselage top, as depicted in the kit instructions and color views. In any case, there was J-BABG that flew on floats, and requires other engine (Jupiter with front "Y" exhaust), had no Townend ring and needs different windows, plus didn't have the hinomaru. I will go for that one. Here it is in the Arawasi blog: http://arawasi-wildeagles.blogspot.com/2014/10/mitsubishi-ms-1.html You better sand those wing halves before gluing them together, or you will end up with blunt leading edges and thick trailing edges: Floats are cut from a very old Aeroclub generic floats vacuformed sheet: Fit tested: New windows for the airliner marked, floats need center section removed to get proper length: Kit's windows blanked: The styrene sheet needs to be thicker inside: Once the glue is dry, the new windows will be carved.
-
The mysterious but fascinating realm of vacuum-formed kits (abbreviatedly called "vacuformed" or "vacs") provides us, off the beaten path modelers, with subjects that tend not to be favored by their injected or resin geographical neighbors. I am fond of them, and through the years I have built a somewhat large number. As with other media, quality varies, and you have samples of all levels in the trade. The subject that today occupies our attention is from Classic Plane, somewhat down in the quality spectrum (examples of good quality are, to mention just two, the late Gordon Stevens' Rare Planes range and Khee-Kha Art Products from Alaska). Here are some of the vacs I have built: This kit is a rendition of a much beloved plane that had a very important role in aviation history, providing early passenger transport and starting a family of well-known designs, the Fokker F.II. To call this kit simple would be an understatement. There are no resin or metal parts that many times accompany the molded styrene sheet, nor decals and somewhat succinct instructions. The detail parts, provided in the sheet, are better discarded, since their worth is highly questionable to say the least. This nice Fokker was gifted to me by fellow modeler Luis Santos, the friend that long ago also gifted his vac kit rendition of an Argentinian plane, the Bombi (that in spite its name ended up as a cropduster). Thanks to Luis for his kindness. Work begins patching things up a bit, since this kit has seen some years of handling, and some areas were a bit squashed and had cracked. Nothing that a piece of styrene won't cure. Next, replacement accessories need to be found, not a problem for a scratchbuilder or a modeller of some vintage: props, wheels, cockpit items, engine and struts are needed. I have gathered -and many friends contributed to (thanks Armando Gil and Jim Schubert) a now sadly diminishing stock of aftermarket items, mainly from the -now apparently in stasis- Aercoclub range. I can -and I many times do- carve my own laminated wood props, though. The cabin interior (not provided with this kit) is easy to scratch, and the decals...well, depending on the complexity of your chosen marks, you may somehow scrounge them or cobble together from defunct kits, print them yourself, or commission them. The struts will be coming from Strutz airfolied brass stock (thanks, Andrew Nickeas!). Why, ask somke of my friends, I launch myself into fixing a somewhat not very enticing kit prospect instead of scratchbuilding the desired subject? well, firstly, to honor the gift, and secondly to redeem an object that otherwise will slowly drift into oblivion. And thirdly, needless to say, because of the challenge. You get two half wheels. With like you could glue them together and get one whole wheel: Small bits better left for the erosion of eons.... The detail is there...somewhat: Kit had surely went thorough some stressful situations: Parts come easily off (not a science): Cracked areas are reinforced internally: All major parts out, the rest better leave it where it is:
- 87 replies
-
- 15
-
-
- Fokker F.II
- golden age
- (and 1 more)
-
Here is the model completed in its National Parks Airways livery, not at all a casual choice. National Parks are not real estate for sale. The model was modified as you can see in the building post here: http://www.britmodeller.com/forums/index.php?/topic/235026972-modified-boeing-247-williams-bros-172nd/& by the addition of a restroom, cargo area and door, more bulkheads, nose cargo area and hatch, pilots hatch, some cabin detail, and other details, plus of course commissioning a special set of marks from Arctic Decals. I am really fond of the 30´s appearance that the forward-raked windshield provides, so I went for that variant. Many hours were spent searching the Net, reading references, sorting out details and looking at photographs. Modelers should be a bit more skeptic and proactive if they want a more accurate model. The venerable Williams Bros issue is still a workable platform -if of course showing its age-, and again I thank good friend, fellow modeler and ebil genius Sönke Schulz from Volkania* for gifting the kit. *His address: Ze Lair Volcanic Region German Transsylvania Since Sönke gifted the kit, he insisted in having an official "model completed" ceremony with the attendance of the Volkania Sturm und Drang band:
- 35 replies
-
- 45
-
-

-

-
- Boeing 247
- airliner
- (and 1 more)
-
Here is the ongoing project, a Williams Bros. in National Parks Airways livery. The well-known, old, venerable kit is the base for some upgrades, further detailing the interior adding the nose hatch and mail compartment, opening the hatch for the aft cargo compartment, creating the much needed restroom for the relief of those poor 1/72 passengers -with toilet and paper roll, made of actual paper-, adding the luggage nets and so on. The kit is actually, for its age, quite workable, with refinements missing many times from much modern kits
-
 Douglas DC-4 - 1:144 Minicraft Aer Turas decals - classic-airlines.com This is the lovely Minicraft DC-4 kit, with decals from classic-airlines,com. The decals are laser printed on constant film, so need individually cutting out.They do some wonderful schems from the 60's and 70's, I just can't resist buying them! I'm deveoping a real liking for Irish aviation, as well as the smaller independant airlines of the 60's, so this one scores on both counts. Having seen Ian Turbofans beautiful British Eagle Brittannia, which he photographed using a hairdryer to spin the props, I thought I'd do a couple of photos like that myself! 'With something else' - its' close relative the ATL Carvair, in real life actually converted from a DC-4. Also has classic-airlines.com decals. Thanks for looking John
- 35 replies
-
- 58
-
-
It is years since I have touched a model. I had to do something to calm the itch! But this thread might drag on and on: I have forgotten much! The aeroplane The docile Airbus A300B does not enthuse me as a modeller. But it has an easy shape and plenty of livery options. From a modelling viewpoint, it has two main iterations. The A300B was made from 1974 until the mid-80s. The rather different A300-600 was made between 1983 and the Noughties. The kits Airfix launched the first 1/144 scale kit of the A300 in 1974. Some 35 years ago, Revell launched a kit of the A310, a type quite close to the A300. A decade later, Revell kitted the A330 and A340, which also share the family nose. Later, Revell also launched a fine kit of the Airbus Beluga. The Beluga is an A300-600 'in drag' and covers some of the same ground as the Airfix A300B. A few years ago, Authentic Airliners kitted the A300B and A300-600. Last year, F-RSIN kitted the A300-600 with Revell Beluga wings, engines, and tailplanes. I find comparing different kits of similar/identical subjects lots of fun. There are also kits of the A300 in 1/200 and 1/125 scales (Hasegawa and Heller). The kit The Airfix kit represents the early A300B with the General Electric CF6-50 engine. It remains widely available at low prices. Crude by current standards, it captures the shape and geometry of the A300B superbly well. I do not want anyone else to do my modelling for me. Doing-up cruder kits can be a therapeutic pleasure! The Airfix A300B kit: My copy of the kit is a Daco Skyline repack. It has a good workmanlike box, a tiny set of instructions, and no decals The fuselage: critique Overall fit: I often start with the fuselage, since it -- and especially the nose with its 'facial features' -- is decisive to a model's appearance. (Sorry about the faux onyx table! I have no 'den,' so when I saw it languishing down the road, I couldn't resist dragging it home. It looks disgusting but has a wonderful, flat and forgiving rubbery top, and nice big castors.) Fidelity: Overlaid on a set of dimensionally correct but crude drawing, the fuselage stands up to scrutiny. The fin shows divergence, but the fault is with my 1970s Japanese drawing Windows debate: Airliner modellers are split on whether to endeavour with clear windows or fill them and cover them with decals. I am out of practice and the latter option ought to appeal. Morevoer, most aftermarket airliner decals feature printed windows (sometimes very lurid!), depriving 'clear-windowers' of choice. Even so, I cannot bring myself to like decal windows. I shall attempt to keep them clear on my A300B, with the filler-and-decal option as a reserve. The photo shows someting rare: windows whose size, shape, pitch, and elevation along the fuselage sides are all correct. Fore-and-aft location is wrong, however Facial features: There is some pleasurable sculpting to do before the A300 emerges from what is a fairly anodyne nose Planform fidelity: I sometimes cut out a planview template to check how true the shape is in that aspect. (Such templates are a mixed blessing: the line of maximum protrusion drops towards the nose, and drawings tend to be wrong as far as the rarely-sighted planform aspect is concerned.) The Airfix fuselage nosecone is a tad thick and does not fit the template. The nose gear well: Too shallow, as usual with Airfix. The angled aft end is wrong. Slight mismatches in length -- and flash -- indicate sloppy manufacturing discipline The tailcone: Airfix offers us a rather nice tailcone, but some sculpting is needed to bring out the real shape. In particular, the tailplane roots need to be subtly emphasised. The rear pressure dome area needs to be made circular in section (it is oblong on the kit). The tail bumper is in the wrong place for the particular machine I have in mind, though some of the very early A300s had it in the place Airfix indicates (a few even had two tail bumpers!) The fin: Airfix has represented the fin as a rather angular and crude structure with a stubby leading edge. The radius at the foot of the fin trailing edge needs to be deleted. The extreme tailcone and APU are rather sketchy and angular. They repay plenty of sanding The fuselage: work commences The face emerges: I sanded the nose until I was happy with the appearance. Two very large flattish surfaces extend aft between the side flightdeck windows and the forward cabin door on the real A300 (and A310, '330 and '340). A tiny and thin (under 0.25mm/10 thou) sliver of plastic card needs to be added to the small flat areas above the two windscreen panes to attain full fidelity with the original. But I am still at the material removal stage -- addition is yet to follow In plan?: After sanding, the nosecone fits the template like a glove. These checks, though a bit of a fetish of mine, can show up "handedness" issues that may arise through uneven sanding on both sides The tailcone: I chopped-off the tail bumper. More sanding brings out the roundness of the rear pressure dome area and emphasises the "muscle" at the tailplane root. Sight along a real A300's fuselage, and you cannot fail to see the bulge covering the tailplane's variable incidence mechanisms: see Airliners.net Aviation Photo #2201871 and #2191442 The fin: Sanding gives the slabby sides an aerofoil section. I use pencil lines to sight along the fin and check the emerging shape as I sand. The top of the extreme tailcone is sanded-through and will need filler... Please excuse the photo quality. (I use a supposedly super-duper smartphone camera which turns out to have a wideangle lens that distorts quite profusely. Trembly hands don't help, either!) The window 'belt': I have marked fore-and-aft adjustments. The foremost window is set at a closer pitch. In addition, I shall reduce the slope of the aftmost (angled) part of the window belt. The top of the three photos shows a pencil mark indicating where the wing-fuselage fairing has to be extended aft Just half an hour into the job, and the siren call of SWMBO interrupts the session... See you all anon! (Note: Can't seem to get rid of this underlining... Help!)
-
 After seeing this aircraft fly low overhead while out with the family and then again give a great display at Farnborough last year i really wanted to try and build her in plastic! Never done anything other than an OOB build before so its also a good chance to learn some new skills and most likely give myself some headaches! The Aircraft in question is the Oil Spill Response Boeing 727-2S2F G-OSRA Untitled by andrewbudd2, on Flickr Photo not taken by me but sourced online She has a couple of interesting features that i will try to capture including a spraying boom mounted beneath the engines and tanks mounted inboard which hold the oil dispersant. Untitled by andrewbudd2, on Flickr Photo not taken by me but sourced online I am using the Minicraft 727-200 F kit as the base and have also got some aftermarket Resin Wheels and Aerials (Which are not moulded into the kit) Untitled by andrewbudd2, on Flickr Untitled by andrewbudd2, on Flickr I know this kit has plenty of issues but im just going to live with them for this one and not run before i can walk!Thanks to Skodadriver for some initial advice on kits!! So my first job was to mark out the location of the cargo door (which i am going to try and display open to see the tanks inside). I scaled up some photos of other 727-2S2F's and had a look at what ive got! Untitled by andrewbudd2, on Flickr I roughly marked out the paint stipes with some masking tape just to check the rough positioning. Untitled by andrewbudd2, on Flickr The first issue i have found with the kit as that the wings appear to be mounted about 5mm to far forward! Untitled by andrewbudd2, on Flickr Everything forward of this seems to measure up fine and also the measurements to the centre engine tally up so bit of a strange one for minicraft to get wrong! Anyway small steps for a first hour or so of the build but looking forward to it! BTW dont expect a quick build i make a snail look quick Cheers Andy
 -
Vickers Viscount 800 S&M Models I've got a few of these kits in the stash and decided to have a go at building one. It has been criticised for being 'clunky' with heavy trailing edges and too blunt a nose among other things, so some improvements are in order. It actaully fits together quite well, and so for I've concluded that it isn't as a bad a little kit as has sometimes been made out. Starting point was Skippies valauable post on this site, for which I acknowledge his useful contribution and all round knowldge of airliners of this period. First thing to do was sand down the wing halves of their inner surfaces to get finer trailing edges. It took about 20 minutes per part and was very easy to do, likewise the trailing edge of the rudder and fin on the fuselage halves. The tailpalnes are single mouldings per side, and have to be scraped with a blade and sanded.Basic and standard modelling skilss really. Next up was the nose, which is too blunt. It would be awkward to just slap Milliput on and expect it to stay, so I razor sawed a cross cut into it, and glued in some strips of plasticard to give the milliput something to grab on to. Left for 24 hours, I then very approximately shaped the strips. I'm afraid I only have very poor photos, but you can see what I mean. It was then packed with Milliput and sanded to a better shape, using the reference photos linked in Skippies post. Unmodified kit on top, modified on lower. The cockpit 'bulge' is also too square and was rehaped to a more rounded profile by sanding. Props were also scraped thinner and reshaped . And now in primer. I'll stop posting now because photobucket is running at a snails pace and getting very frustrarting Thanks for looking John
- 34 replies
-
- 12
-
-
Revell 1:144 Boeing 737-800 Helios Airways This one fits into my collection of aircraft 'seen at Manchester', mainly because I love the colour scheme. Decals are from BOA, and it features the 737-800 of the ill fated Helios airline. They suffered a dreadful accident with one of their 737-300 series machines, and unfortunately they are no more. The kit was an early edition of Revells 737 in the Hapag Lloyd boxing without the winglets, which was just as well because this aircraft didn't have them. I hope you like, it is a belter of a livery! 'With something else' another 737-800 this one with the winglets, in another of my favourite schemes. For anyone who has this decals sheet, there is something to beware of, the tail decal was slightly undersized. Ok, there is a silver leading edge to go on the fin, but it was still a little small and I had to touch in with paint on the trailing edge. Great to see so many nice 737 posted on RFI recently, keep them coming! Cheers John
- 19 replies
-
- 20
-
-
Hi all, So this is a couple of firsts for me, I've never done an airliner before and I've never took part in a group build. So I'm going to keep this as simple as possible and do the kit straight out of the box. If anyone has some wisdom for a newbie please please share it with me!
- 32 replies
-
- 3
-
-
- OOB
- first time
- (and 2 more)
-
Airbus A319 - Frontier 'Mickey The Moose' Revell 1:144 with Draw Decals Another Revell A319 finished in the attractive Frontier scheme. Each of their fleet features a different animal on the tail fin and is named after it. These are another set of the superd Draw Decals and my fourth in Frontier. This one is slightly different as it features the modified 'Fly Frontier.com' billboard. And with something else, else, and else! A319's 'Perry the Puffin' and 'Chloe the Fawn' and converted A318 'Stu the Rabbit' Thanks for looking, John
- 24 replies
-
- 24
-
-
 Hi Guys, This isn't completely done yet, but i've been itching to share it. A320 Easyjet 250th Airbus livery, made from the 1/144 Revell kit. Proved a little less cooperative than the 3 x A319's i've built, but generally not bad! Decals from Draw decal, can't remember for the life of me the site I ordered the winglets from. Chris
- 16 replies
-
- 16
-
-
In short, I've started building an airliner (Eastern Express 737-300, to be precise). Both fuselage halves are slightly warped, but just enough to not fit together properly. I've tried heating them in hot water, then holding firmly in the 'straight' position, and cooling them in cold water to lock the shape, as was recommended on another site. It seems the plastic is too firm/resilient, as precisely nothing has changed. Any suggestions on how to fix the problem?
-
Airfoil 1/144 BE Red Square Vanguard 1/144
lomasca posted a topic in Ready for Inspection - Aircraft
I finished it! Dog of a kit, but very satisfying to complete such a beautiful aircraft. I made this as a father's ay gift for my dad. I wanted to make it in flying jack (my favourite BEA livery) but it turns out my dad hated it! (though it clearly looked better on the Trident) Some of my earliest memories are of us going round the Vanguard at Brooklands. Stand arrived a week after this was completed too thanks to Humbrol digging through their warehouse. They don't make them like this anymore! -
Airbus A320 Etihad Revell 1:144. Review Build The Airbus A320 is one of the most widely used airliners today, and is the middle sized version, with the A318 & A319 being shorter, and the A321 longer. All share the same basic wing, with the most noticeable difference being the fuselage length. Go to any civil airport in the world, and chances are you will see one of these, if not several. The Revell kit has been around for about 20 years now, and was recently released with a new decal sheet for the latest Etihad livery. Review Here To get the slightly pearlescent look, I used womens nail varnish thinned and sprayed via airbrush, which worked well. Were I to do it again, I would use a slightly lighter base coat as I feel that the final shade is a touch darker that I was aiming for. There are issues with the engines in this kit which are discussed in detail in the Work in Progress thread. 99% of purchasers of this kit will not be bothered by these issues, but for those who like to pursue accuracy, you will need to consider these points. The kit only has CFM 56 engines, only 1 of Etihads A320's has these (Reg A6-EIZ). Thanks to member 'Lesthegringo' for first pointing this out. It does not look like A6-EIZ has been painted in this scheme yet. It is still in service with Etihad, so may be repainted in the future. All the rest of Etihad's fleet use the V2500 engine. You can get these from Revells other A319 or A320 kits. As these other kits also have the CFM 56 engines, you can still build them. If building a V2500 powered machine, most of Etihads in this new livery have the new curved up 'Sharklets' on the wingtips, rather than the small endplates. Foe sure, A6-EIC has the end plates supplied in the kit, and has been painted in this livery. At the moment this is probably the best bet for finishing this model. In a further twist, all the engine decals in the kit are for V2500 engines, despite them not being in the box. Despite these minor problems I thoroughly enjoyed building this kit, the decals are beautiful and behave perfectly. You'd pay almost as much for it as an aftermarket sheet, as you would for the whole kit. The livery is really unusual and to my eye, quite attractive. So on with the photos. And finally, with the my recently completed Boeing 777 in the previous Etihad livery. It also shows that the A320 is a touch darker than I would have liked, due to the base coat i used. Both were painted with the same nail varnish as a top coat, (And despite what it says on airlinercafe, the cheat line on the triple 7 is straight . I accept that in some photos in can look like there is a wiggle in it, but that is due to compound curvature towards the front end. In real life it is fine. ) Thanks for looking, John
- 20 replies
-
- 24
-
-
De Havilland Comet 4c - 1:144 Airfix (Updated pictures) Dan Air - 26 decals [Edit] New pictures as I had forgotten a few final details on the model. Added this morning are nav lights, aerials, aerial line from fin tip, taiplane black tips, and some panel lining/weathering. [/edit] The Comet is one of the most beautiful airliners ever. In the 4c version with extended wings and pinion tanks it looked at its very best. To further emphasise its beauty and pure shape I wanted to model it in flight without the clutter of undercarriage. The idea of doing a 4c was inspired by Phil 'Vulcanicity's lovely model in BOAC colours. Phil used 1:72 drop tanks from the Airfix Vampire for the pinion tanks, so I nicked his idea! It's appropriate too, from one DH aircraft to another! Decals are from Two-six, and as usual are top quality, settling down beautifully. I used the cockpit decal here, although I normally prefer to kit the kits clear glazing, but there was no hope with the tiny, ill fitting part supplied with this old kit. I used one from my stash, remember this bit of nostalgia from the 1980's? The decals were yellowed and curled though, so I'm glad that Ray at two-six sells a far superior set for the 4b and 4c. This is the major part of the conversion. Extended wing tips, and slots cut for the pinion tanks which were also shortened by cutting a section from the middle. Starboard side mostly complete, port side in rough format. Thanks for looking, John
- 36 replies
-
- 41
-
-
Hi All, I'm working on the re-released Airfix Vanguard (144) in the BEA red square scheme. Im conscious how those plastic strip windows (which I think it comes with) always look a bit cack. Can anyone offer ideas of how to fill in windows a different way? I'd like it to look as pro as possible, as it's going to be a father's day gift. Ideas welcome. Chris
-
Nerded out and built a Revell A319 kit I had lying around in a personalised livery (imaginary airline I had when I was a kid). Clearly I was a complex child. Anyway, here it is. A 'Lomasair' A319. still a bit scratchy here and there, but i'm learning. ...and here it is on the shelf next to my BA 319. See that here.
-
Hello everyone! This is my first post in this 'Ready for Inspection' forum and is of a Jet2 Boeing 737-800 in 1/144 scale using the Revell model kit plus the Authentic Airliners 737NG Improvement Kit for the engines and winglets. Using advice from the BM forum regarding the Jet2 silver, I have painted the fuselage Tamiya TS-76 Mica Silver and then oversprayed with Tamiya TS-65 Pearl Clear which seems to work pretty well. For the tail, engines and winglets I have used Testers 1103 Gloss Red which seems pretty close to the Jet2 red. As they aren't available in the market as screen printed decals, I have created the Jet2 decal artwork sheet myself from scratch and had them professionally screen printed. Thanks and I hope you like it. Richard
- 22 replies
-
- 30
-
-
- Airliner
- Airline Model
- (and 7 more)
-
Boeing 777, Draw decals 'Etihad' livery. Zvezda 1:144 This was an eagerly awaited kit of the Boeing 777-300ER, which made it to the shops just at the end of last year. I bought one immediately, and set to work on building it straight away. I already had Draw Decals 'Etihad' decals in stock, ready for the moment the kit was released. It is well up to the standard of previous Zvezda airliners, that is to say it is a real beauty, with excellent fit and surface detail. I did have trouble fitting the 2 small heat exchanger units in the underbelly, but aside from that it went together faultlessly. The jet engine fans are real works of art, and actually rotate in the nacelles if you blow on them! The Draw Decal sheet is the new 'Digital Silk' type on continuous carrier film, once you cut each item from the sheet they go on beautifully, and match the quality of the kit itself. Be sure to read the instructions, and press them down with a hot cloth after application, and the carrier film will all but disappear. Unusually this model was painted with ladies nail varnish! As suggested in Draw decals instructions, I used 2 bottles of NYC 'Mulberry street' thinned with laquer (obtained on ebay in the uk), and airbrushed on for the main colour.It gives just the right pearlescent finish needed. A tip is to spray an undercoat of a very pale sand first, (I mixed a shade from Tamiya Acrylics), as when I did it over white, it needed a lot of spraying. On with the photos. It is big and difficult to photograph! And 'With something else'. A smaller brother, the Boeing 737-300 with Draw Decals 'Jet 2' livery. ~(It shows what a monster size the 777 model is!) Both these aircraft are frequently seen at Manchester Airport; And a final 'something else'. I spent 2 weeks out of every 6 in Thailand with my day job in 2015, necessitating a lot of flying to and fro from Manchester via Abu Dhabi on Etihad, hence the inspiration for this build. Mostly it was on 777's (and more often than not A6-ETC seemed to be doing the Manchester-Abu Dhabi sector), but sometimes A300-200's were used. I snapped a few shots on my phone over the course of the year, a few of which follow; Taxying in at Manchester; It's one of those! 6 AM disembarking at Abu Dhabi. No terminal gate, so out by bus to the transfer lounge to wait for the next flight. Shame about the bus window reflection. It was TC again. Taking off from Abu Dhabi headed for Bangkok Ahh, Thailand! And who could forget the restaurant opening on the the beach, with the warm breeze and setting sun. Maybe I will do an A330 next. Cheers John
- 32 replies
-
- 37
-
-
- Draw decals
- Etihad
- (and 1 more)
-
Airbus A319 British Airways (Revell 1/144)
lomasca posted a topic in Ready for Inspection - Aircraft
Airbus A319 I completed a month ago. Not perfect, but getting better. I'm currently building the same kit again in a personalised livery (will post on here when done, if it succeeds) Goes together relatively easily. On my second time round i'll be paying more attention to the join lines on the engines. If you go for the CM56 option, i've noticed the starboard engine on both kits didn't fit together. The IVAE engines (pictured) seem to fit consistently. Chris- 14 replies
-
- 16
-
-
Hello guys. That´s my last for 2015, a 737-800w in a special Gol scheme, celebrating 10 years of the airline. Kit Revell, almost out of the box, except the winglets. Decal Gio Decals.
-
1:144 Boeing 737-200 Busy Bee. Lima November decals. I saw this humourously liveried Boeing 737-200C parked on the ramp at Oslo Fornebu airport back in 1986, and thought 'I would like to make a model of that', so 30 years on, I have! I started with the old Airfix kit of 1969, and decided to see what improvements to could be made to it. These came down to: - Replace the cockpit glazing with the part provided in Daco's 737 kits. - Scratchbuild some interior detail for the cockpit - Open up the main and nosewheel bays, which are just shallow opening on the kit - Improve the engines. They are too short in the kit, and have the early 'skinny' pylons only applicable to the first 100 or so machines produced. - The passenger cabin windows are just little square shapes. I filed the all top and botton to open them up to oval shape. 2 were filled in and re-done further apart to allow for the cargo door. - This aircraft was equipped withe the 'Gravel kit' for operation off rough fields and gravel runways. Basically this is a large deflector plate fitted behind the nose wheels, and some pipes feeding compressed air forwards from the engine nacelles to blast any FOD away from the intakes. The nose plate stays horizontal all through the retraction cycle as the leg retracts forward, and ends up in its own housing grafted onto the lower nose. There is a great youtube of one landing and taking off on Youtube here Just look at all the crud kicked up! This is actually the second 737 that I have applied these mods too, the fiirst (in Air Europe livery) is complete but I have not posted it yet as I am making a diorama, and painting the little passengers walking out to it is taking ages! Some of the scratchbuilt parts Cockpit and crew painted up Nosebay on an unmodified kit, and the modified/scratched parts Noseleg additions. Done by eye from internet photos, as I could not find drawings Main gear bay. Just a blank on the standard kit, looks so much better opened up; Engines after accurising/improving. Lengthened with a section from a 1:48 bomb (covered with a band of white filler), and pylons fattened with plastic sheet & Milliput; And finally 'with something else' - the other 737 waiting to be finished. I did even more on this one, opening up the front & rear galleys, and luggage bay, and integral front airstairs. It also has all the mods I did on 'Busy Bee' apart from the gravel kit. Special thanks to Skodadriver Dave who very kindly sent me the Daco clear cockpit sections & the frame decals for them, and enabled this project to go ahead. Happy new year to all, and thanks for looking. John
- 21 replies
-
- 33
-
-
-
 Recently completed this one - my last civvie of the year. This is the Revell 1/144 A320 kit built oob except for using Classic-Airlines decals to depict Aer Lingus retro-jet EI-DVM, which I bought at SMW. I like this kit, though I still have to build one of the newer Zvezda examples, and the laser-printed decals went on really well, my only criticisms being that there is no decal placement guide, just a colour diagram from one aspect, and there are one or two things missing, most prominently the 'Airbus A320' script above the cheatline at the rear of the fuselage. Constructive critiques welcome
- 21 replies
-
- 24
-