Search the Community
Showing results for tags 'airliner'.
-
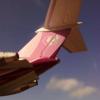
 Afternoon all, Here is the Mach 2 1/72nd DC-8-50 that rolled off the production line this very afternoon. Released at the end of last year, I was really keen to get my hands on one of these kits as I love the DC-8 and this is the first injection-moulded kit in 1/72nd scale of an important piece of civil aviation history. Unfortunately Mach 2 kits don't come with the best reputation, but I'd never built one before so threw caution to the wind. I'm used to dealing with 'difficult' kits and I'm pleased to say this one didn't pose too many problems at all - it is just like you'd expect from a short-run injection moulded kit. I thought it might be useful for fellow builders to have a quick summary of my findings below: Cons: Typical short-run kit with no locating tabs and plenty of flash on the smaller parts; I found that the right stabiliser was 3mm too high on the starboard side and needed lowering - a quick an easy fix; The engine pylons were too deep on my example and the inboard engines almost touched the ground - 3mm was removed from each pylon and now the nacelles sit at the correct height; Transparencies needed a lot of work to get them clear; Fit was a bit dodgy in places, and don't expect to build this kit without the use of fillers. Pros: Panel detail appears accurate and well moulded; Shapes seem pretty good to my eye; Nicely detailed landing gear; Overall the build was fairly painless and it went together well; Nicely detailed flightdeck area; Engines are nicely done and look the part once assembled; Plastic is nice and thick and there's no need to additional interior bracing or the like; It's a 1/72nd scale injection-moulded DC-8! I used Halfords' automotive paints and has a custom set of decals printed by 8A decals to complete the build. All in all I really enjoyed this model and am pleased to finally have a decent DC-8 in my civvie collection. All the best, Tom
- 13 replies
-
- 47
-

-

-
 Hello everybody. First, many thanks to Brad for organizing this GB . Also, my thanks to TonyW, rob Lyttle and JOCKNEY whose enthusiasm for the Connie "helped" (you know what I mean, guys) me choose between two subjects I'm really fond of. So my entry is Revell's 1/144 Lockheed L.1049G Super Constellation in TWA markings. The most elegant airliner of all times IMHO (the Concorde ranking second). I decided on the TWA markings because they're intended for the "long nose" version I prefer and I will put the plane on a stand, gear up, to emphasize it's sleek silhouette. If I could rename this aircraft, I wouldn't call it Connie but Gal Gadot, that's for sure gentlemen (with all due respect to Mrs. Gadot). It's a time of firsts, as it's my first participation in a GB, first airliner ever and first 1/144 kit. Let's be honest, I chose a simple kit as I intend it to be a mojo restorer. Also, as usual, it shall be done OOB and as per instructions. Now let's have a look at the box and its contents. Side-opening box. One part off the sprues but no damage. I wish every manufacturer would do as Zvezda (recently?) does, meaning a really sturdy cardboard box that slides into a sleeve with the boxart on it. Small parts count, so really not much if the gear isn't attached. Plastic seems quite hard compared to let's say Airfix. No flaws - flash, sink marks - noted until now (moulds dating back to 2006/2007). Fine and consistently engraved panel lines. Clear parts are, well, .. clear. The decals are a bit thick. I told before there was too much carrier film but at second glance, that's not the case. I hope to give it a start as soon as tomorrow. Lots of folk and varied subjects in this GB, so I wish everyone lots of fun whether it be building or watching.
- 63 replies
-
- 19
-
-
 Hello Everyone; For those of you already follow construction stages on my Instagram account, as of today, I finally finished 1/144 Revell Boeing 767-300 Asiana. Construction adventure took more than 20 weeks but happy with the result. Some scratch built details added like anti collision s, engine vortex generators. For the paints, Xtracolor X309 Asiana buff (which is by far the worst paint ever used in terms of pigmentation) used for upper section. Lower section of the fuselage painted with Mr. Color C316 white, wings and horizontal stabilizers painted with MRP Boeing Grey, coroguard panels painted with Alclad dark aluminium. Model clear coted 4 layers of GX112. Decals from Liveries Unlimited are excellent considering they are 25 years old! Thank you for looking. Any comments and feedback are greatly appreciated. Greetings from Frankfurt Prost!
 -
Here is my first build, the Dassault Mercure. It will be finished in Air Inter colours, who were the only operator of the type. The kit decals don't look to be that good, but I have a new set currently en route from F-DCAL. Dave
-
Maybe I am blind but I don't seem to be able to find any information on making winglets for airliners. I know that I have to start by cutting a triangle of plasticard and filing it into shape but the part evading me is getting the bend in the base of the winglet where it joins the end of the wing. Any ideas, tips, or secrets gratefully received.
-
 Fokker F.32 The Mighty Behemoths (Image from the SDASM photostream) Once in a while, to commemorate the Sanding Festival that was celebrated at the Shaolin Modeling Temple every time someone would complete a model, I build a Vacuformed Gentle Giant. Here you may see the Zeppelin Staaken: The HP42/45: The Blackburn Kangaroo: And the Sikorsky S.43, among others: Execuform subject choices are very exciting, and the Fokker F.32 is no exception. Execuform vacufomed kits are just a starting point for a modeling project. They do not provide details in the form or resin, metal parts or decals, although earlier issues did have white metal parts. They do provide the very basic parts you will need to build a model as clean slate. You may then add surface detail and accessories as much as you please or like. For me, and for many others like me, they provide the opportunity to build a model not represented by mainstream companies, and in doing so Execuform allows you to have in your case or on your shelf a replica of an out of the ordinary plane. I do build from time to time vacuformed kits, and I truly enjoy them. They give you the opportunity to learn, improvise and generally improve your modeling skills, besides the satisfaction of a more involving participation, beyond just gluing parts together. Since when I want a model of an out-of-the-ordinary plane it is more likely that I will have to scratchbuild it, I am grateful I have vacuformed kits around that reduce the building time considerably if the subject coincides with what I am looking for. I also in the process learn a lot about the plane, its history and details, since I have to fabricate many interior parts and exterior details, which I do with satisfaction and pleasure. And even in the case when there is an injected model of the subject, I may go vac, since for me it is far more exciting. Information on the Fokker F.32 is fortunately abundant, but you have to invest the time to find it. As a starting point have a look on the AAHS Journal of Spring 2012 article, the one on the Summer 1966 issue, and the online Flight Magazine archives. But always, always, always, cross-reference: the said AAHS Summer article has a photo of the interior of "Anthony Fokker cabin Air Yacht", that is actually the interior of an HP42, a very serious research blunder. There are photos and even drawings of that specific plane, NC342N. Beware that there were, as it is usually the case, differences between the seven machines built. The first one had only two vertical tails, and the elevator was balanced, plus the wheel pants were much clunkier than on later machines of the series. Following airframes had three vertical tails and an unbalanced elevator, and as said more kindly streamlined wheel pants. Details in the engine gondolas also varied, having different exhaust arrangements and in some cases a sort of Townend ring on the front engines. Back engines also seem to show in some photos some kind of cowling, although unusual and tighter. The Beast had four Pratt & Whitney R-1340 Wasp originally, later P&W R-1690 Hornet. The props of the four engines (two blades in front, three blades pushing in the back) rotated anticlockwise, if you were standing at the front of the respective engines, which means that standing in front of the airplane the back props will be seen rotating clockwise. The windows on top of the cabin were tinted green (according to a Flight magazine article). Wheel pants exhibit slightly different designs and surface patterns, besides the difference stated above. Interior arrangements also varied, depending upon company and service schedule (day or night, the latter offering sleeping bunks). One notorious Fokker F.32, the one used by Tony himself, had a very luxurious, unconventional interior. Wing was plywood-covered. Front tip of fuselage, cockpit sides and roof, engine nacelles and wheel pants were aluminum-covered. Most of the fuselage and tail were fabric-covered. Doors were located on both sides of the fuselage. Landing lights also varied. One was located in the chin of the nose, and two on the wings, although in some planes they are on the leading edges and in some others they are flat under the wing and deploy before landing, as they do nowadays. Why the F. 32 didn’t quite make it? It was born during the depression, had problems with overheating rear engines –a common situation on similar tandem arrangements, like the Farman F3X Jabiru and Farman F.220/2/3- and later suffered the “no wood wings” syndrome catalyzed by the publicized crash of the F.10 where famous coach Knute Rockne and others perished. It was also reportedly a bit tail heavy. But for sure it had other remarkable qualities: the number of passengers it could carry (32) and the comfort of its installations (ventilation, a galley, supple seats, lighting, two restrooms, wardroom, luggage compartment, and more). It was no doubt a precursor, a pioneer in its own right. They served basically for four years, from 1929 to 1932 and one ended up on Wilshire Blvd., Los Angeles, as a gas station, but no doubt this 99’ span behemoth was a sight to behold. The F.32 was surely noisy and exposed to the whims of the weather, and yet I would travel on it any time, instead on the intolerably uncomfortable sardine cans of nowadays. In one way or another, the F.32 left its mark on aviation history, being one of the earlier giants of its time. Here are some newsreel clips that would give a good idea of the portly design: https://www.gettyimages.com/detail/video/men-push-airplane-away-from-hangar-pan-row-of-men-news-footage/1130782236 https://www.gettyimages.com/detail/video/fokker-f-32-passenger-plane-is-christened-as-several-news-footage/893312492 https://www.criticalpast.com/video/65675027465_men_F-32-Fokker-airplane_Men-stand_men-watch-the-plane https://www.criticalpast.com/video/65675027464_men_Fokker-stands-at-airport_men-gather_plane-takes-off A PDF in Spanish http://bibliotecavirtualdefensa.es/BVMDefensa/i18n/catalogo_imagenes/grupo.cmd?path=68203 Of the seven machines built, and in order to study my potential choices for a specific scheme, I started to group references for the prototype, NC124M, and the machine furnished in luxury for Fokker, NC342N. A very interesting detail found during research is that one of the prototype's characteristics was a twin vertical tail, whilst the series machines had three. Photos of the prototype show it bare, then with a Universal Air Lines scheme, then with an earlier Western Air Express one, and as it happens, I found an image of the prototype with three vertical tails in a completely different scheme, of which unfortunately not all the lettering can be read, but it states "Inauguration of the N.Y.N.H.& H Through Havan...", "The Everglades" and some obscured additional text. The acronym seems to belong to New York & New Haven & Hartford Railroad Co., perhaps one of those plane-railroad joint ventures. Link to image: https://www.ebay.com/itm/8x10-Print-Fokker-F32-Airliner-1930-Boston-Airport-2203/201080125367?hash=item2ed14f37b7:g:Ec4AAOSwtC1dt2Xy Not sure I would call the F.32 a beauty, as this publicity suggest, but I could call it "interesting": Here is what you get: I would perhaps scratch the vertical stabilizers, as it may take less time than sanding and shaping them: The plastic is thick, something you need for this specific model: Again, you only get the very basic shapes:
- 250 replies
-
- 19
-
-
- a lot of freaking work
- vac
- (and 1 more)
-
 Bristol Britannia/Canadair CP-107/Argus & CC-106 Yukon – Warpaint #125 Guideline Publications The Britannia began development during the final days of WWII in an attempt by the British aero-industry to regain some of the lost experience in building civilian and cargo aircraft, having specialised in fighting aircraft for over 5 years. It was to use Turboprop engine that were in their early days, leading to some delays, but it was also affected by the problems occurring with the De Havilland Comet, that led to the requirement for thorough and lengthy testing of the design to avoid similar issues that otherwise might not show themselves until after entry into service. The end result was the delay of the type reaching service until 1957, by which time the aircraft’s formerly impressive speed and range advantages had been lost to overseas competition. Only 85 Britannias were made, with Canadair adding to the total with the maritime reconnaissance Argus using the wings and some of the other parts, but with a substantial Americanising of the inner workings to facilitate easy maintenance and fulfil their role. The Yukon was also based on the Britannia with lengthened fuselage, cargo doors and hinged tail for easy access for larger loads, and Rolls-Royce engines. This book is by author Charles Starfrace and covers the birth and development of the airframe in much more detail, as well as providing tons of excellent pictures of many airframes both in military and civilian service, some of which are in colour due to their being contemporary shots, plus 1:144 plans of the 300 series and profiles in the centre, penned by John S Fox. There are also profiles showing the Yukon, Argus and Guppy, which was a one-off conversion to increase the cargo load in the same manner as the Super Guppy and Beluga. The book is in the usual Warpaint format of portrait A4(ish) with a soft card cover and 60 pages plus additional content printed on the four glossy pages of the covers. A short introduction details the birth of the type and its subsequent variants and Canadair types. RAF Britannia Tribute Britain and transport aircraft from 1939 The Bristol Aeroplane Company Bristol Type 175 and Proteus Problems at Filton Building the Britannia The Britannia enters service with airlines Britannias for the Royal Air Force Britannias kept busy Post-RAF service The Canadair models Canadair CP-107 Argus RCAF Lancasters and Neptune P2V7s The “All Seeing” Argus Argus Electronics Argus enters service Profiles x 3 Britannia Series 300 1:144 Plans Profiles x 3 Was the Argus nuclear-capable? Operational history of the CP-107 Argus The Argus’s tasks expand Arctic patrols and Exercises The 1970s – the Argus’’s swan song Canadair CC-106 Yukon The civilian “Swingtail” CL-44D-4 Not on Canadian Air Force markings Profiles x 3 The civilian Britannia gallery Bristol Britannia in Detail Profiles x 9 CP-107 Argus detail page The pages include a lot of useful pictures with informative captions of aircraft on the apron, on the runway and even with the tail folded in the middle of swallowing a stripped-down F-104 Starfighter, with appropriate photos and drawings dotted around. In the short "In Detail" section there are many close-up photos with some items numbered that will be a boon to modellers as well as people that like to know what everything does. There are several kits of the Britannia available in the smaller scales due to the overall size of the type, including Roden, 26 Models and F-Resin in 1:144, and Mach 2 in 1:72 for those who dare. Sadly, there are no kits for the Yukon or Argus, so you'd be left to scratchbuild or convert a Britannia, which would be fun! Conclusion The Warpaint series always gets a thumbs-up due to their inability to produce a bad one. This is an excellent book that will see plenty of use by anyone interest in, or building on of these early post-war airliner/cargo aircraft. Very highly recommended. Review sample courtesy of
 -
 This is my first serious build. Prior to this I'd glued a few kitset models together as a child & did build a 1:200 A320. The kit is a 1:144 scale F-RSIN ATR72, sourced here in New Zealand through OldModelDecals with my choice of decals - https://www.oldmodelsdecals.com/ATR72-DHC7-8-Saab340-CV580.html Originally I wanted to do the Pacific Wave livery, but ended up settling on the Trade Mark White livery.
- 67 replies
-
- 9
-
-
- Air New Zealand
- ATR
- (and 1 more)
-
 I'm not sure if this can fall under the category of scale modelling in the forum since technically this wasn't built from a kit, but I figure it uses the same subset of skills to do. The Airbus A330-300 is a twin-aisle airliner designed and built by Airbus. Having first flown in 1992 and developed in parallel with the longer-range Airbus A340, the A330 is a prominent aircraft model in the widebody short-to-long-haul market, and has recently been updated with a successor model, the A330neo. This model depicts an A330-300 of Cathay Pacific Airways, registration B-HLV, in the older Brushwing livery. It's a snap-fit model by Hogan Wings in 1/200 that used to be in the livery of Saudi Arabian Airlines. Here are the photos: For comparison, here's a Before/After: I detailed some of the processes in making it in the thread here, although I wasn't really able to update it all the way through: This was painted with mostly Tamiya acrylics and MRP lacquers, with Alclad Aqua gloss being the final clearcoat. I designed the decals myself although some of them came from images of decals available online. Various modifications were made like the corrected tail fairing and added antennas and domes. I decided to keep the weathering very light this time around because in my experience it's very easy to overdo it in 1/200 scale. In terms of this kind of restripping work the model itself made the work very straightforward and easy. The breakdown of parts meant that I could easily paint components separately and leave fragile parts off until the end of the build, much like with actual model kits. And because the model is for the most part pre-built and designed to have a snug fit rather than needing glue, there was little to no body work or sanding and filling involved. The most difficult part of the project was mostly the painstaking work involved with sizing and optimizing the decals over and over again to make sure it fit on this specific model, and so I would definitely recommend this kind of work as an in-between in scale model kit assembly and buying a pre-made kit model, and the possibilities are many with the large quantity of available snap-fit models in 1/200 scale. Although not as finely detailed as injection-molded scale model kits, the detail is sufficient in my opinion to fit in a collection of Hasegawa kits, for example. And with the relative rarity of cheap A330 kits available, Hogan Wings' plastic snap-fits are a very reasonable compromise. And another interesting detail to note with Hogan Wings models in particular is that parts are included to display the model with the wheels up or with landing gear. This means that they can be left off from the model until the end of the build or entirely and it makes painting a lot easier. Thanks for reading!
 -
Hello all, Just finished this latest build. the Minicraft MD-80 kit with Swiftair Real Madrid EC-JQV decals by TwoSix. EC-JQV was painted up in the Real Madrid livery in 2007 to carry the football team and VIP's around until 2009 when they stopped using the plane for political reasons. EC-JQV was scrapped in 2012 but it lives on in 1/144 scale! For a Minicraft build this wasn't as bad as I thought it would be, certainly better than the 737-400 kit, but that's not to say it's a doddle, still needed a fair bit of filler for the fuselage join, but the wings weren't actually too bad considering it's the fiddly interlocking system. I did a few 'dry' fits to find the 'spot' where it would lock in before putting glue on. The last few dry fits worked perfect so having nailed that, I put the glue on and then it didn't lock in as it just did the past few attempts 😆 but I got it in soon after. The stabilzers and engines went on very well, the wheel doors were the most fiddly things of all! Instructions could have been a little bit clearer but wasn't that bad. The decals are excellent and well recommended, they are designed for the Minicraft kit, the blue around the nose was a tad fiddly and required a little bit of blue paint to fill in a gap around the cockpit window as it doesn't quite fit, but that was no problem. I hope you like it and thanks for looking! James.
- 11 replies
-
- 26
-
-
I feel like this skirts the definition of scale modelling that this forum pertains to, but I suppose this project uses many of the same skills involved. Please delete or move if this doesn't belong here. I've had an itch to build a 1/144 A330 for a while, but given the high price and shipping of the Authentic Airliners A330, and the rarity of the Revell kit, I decided to just repaint one into the colors I wanted. This is the Hogan 1/200 Saudia A330-300 that I'll be repainting into the old Cathay Pacific colors with registration B-HLV. Hogan provides a relatively detailed model to start with, and the snap-fit nature of it means that it's easy to work on different components separately. This is what the model looked like before stripping: In the time before the physical work of stripping and repainting started, I went to work on the decals for the model, all of which will be printed at home. After sizing and resizing over and over to fit the model, the decals were all finished recently, probably the most difficult aspect of the entire job: (It's low-res because this was just a screenshot off of Photoshop) And the fuselage and tail were recently stripped completely of paint after a decal test that ensured all of them lined up: I think the rest of this half-build will blow by fast. I've been thinking of adding the antennas and other detail along the top of the fuselage, but the issue would be where to get the measurements for those. I'm not sure if those modifications are worth making in 1/200, to be honest.
-
This build started as a "rescue" kit that came to me partially built, as explained in the step-by-step posting: It is a companion of the recently-completed Lan Chile Junkers: My thanks once more to friend, fellow modeler and Ornithopters' member Sönke for kindly donating the rescue kit. My gratitude also to those who helped providing useful information during the build, especially Günther Ott of ADL in Germany. Any inaccuracies in the model are entirely my fault. Last but no least thanks to Mika Jernfors of Arctic Decals, who warned me about the stagger of the seat rows and windows on the original plane, and made a wonderful decal set for it. At the beginning I planned to use it to try some tricks to be applied to a new model (finished as a LAN Chile airliner), but I grew fond of it in spite of the challenges it presented. To start with, Italeri made very little effort to adapt the military boxing into the civil one, leaving many grey areas and some serious mistakes to be fixed by the modeler. I ended up correcting some of the inaccuracies of this old kit and providing some additional interior, and commissioning a decal set for it to be finished as VH-UYA, a machine that saw some limited service in Australia. The most blatant mistake of the kit is that in the original plane the two sets of windows were staggered, the right side being ahead of the left, a fact ignored by Italeri that takes a lot of time and some skill to correct. I drew immense pleasure from the conversion of a machine of sinister origins and use, into an airliner that is not wearing despicable symbols, but instead had a good use, at least for a time, transporting civilians and being useful for peace, not war. VH-UYA presented some color challenges, as it the case when assumptions have to be made based on available black & white photos and/or vague, or generic descriptions. The color choices, which involved some degree of speculation, were adopted after much consultation and study. Unfortunately, for several reasons, it did not have a long career in Australia. Many sources repeatedly state engine issues for all Jumo 205-equipped planes. This diesel engine apparently gave more than one headache to its pilots, mechanics and users. There is some anecdotal information on the Net about this plane, so if you feel curious, do a search for the type and registration, instead of me parroting here what is already out there. This old kit as said is not very accurate and it is devoid of cabin detail, having also raised panel lines, but the fit is quite good, and the engineering uncomplicated, which is appreciated. As many other old vintage kits, it can be converted into a fair representation of the original with some love and time. I would say that skill required for this conversion is within the reach of committed modelers that had already ventured into some kit-improving and detailing. Provided you invest some research and effort, you can obtain a large number of civil airliners from this kit. As stated in the building article, Kora Models has some sets that cover a few of the possible choices (not sure how accurate they are), but combining different releases of the Italeri kit (radial, inline, short tailcone, long tailcone), and doing or commissioning your own decals, you are also set for a nice ride if you are so inclined.
- 66 replies
-
- 45
-
-
-
- Conversion
- Airliner
- (and 1 more)
-
Here is at last finally completed the model of the Chilean airliner that journeyed the long distances of its South American adoptive country. And a long building journey this was too, given the fact that the Italeri kit is just a hasty and half-way effort to provide the features of the real civil version. All the mishaps and necessary corrections/additions can be visited in the step-by-step building article: The companion Airlines of Australia plane is here: A full interior was provided, and the original short tail had to be modified into a long tailcone. The box art of this kit will completely mislead you into believing that you are acquiring a long tailcone version. Bummer. The most blatant mistake of this old kit is that the two sets of windows were staggered in the original plane, a fact ignored by Italeri that takes a lot of time and some skill to correct. Other many modifications were needed, and of course the addition of the aftermarket Kora set that provides resin radial engines and nacelles plus the decals for this version. On that, I can comment that the fit of the Kora nacelles is not, let's say, comfortable, and if you don't need the decal sheet it provides or the other bits, you are better off buying the radial engines and long tail version offered in one of Italeri's releases (4260). If I had noticed that before, I would have done exactly that. On a secondary note on the decals, the ones provided for the prop blades seem inaccurate, since all photos of the radial versions show invariably a Junkers triangular logo on those blades. Photos show at least two different liveries, the one provided by Kora and another that has a more stylized lettering for "Línea Aérea Nacional" above the windows, instead of on the aft fuselage. Other features can be glimpsed in photos: a LAN big lettering under the right wing, and at least in one machine an anti-glare panel on the nose. I drew immense pleasure from the conversion of a machine of sinister origins and use, into an airliner that happily is not wearing despicable symbols, but instead had a good use transporting civilians and goods, and being useful for peace, not war. LAN (Línea Aérea Nacional) had four of these Junkers, starting flying them in 1937-8 (depending on the source), they were capable of carrying 10 passengers in relative comfort with the necessary sturdiness for the rough conditions that many times the airline industry of the time had to operate in. This old kit as said is not very accurate and it is devoid of cabin detail, having also raised panel lines, but the fit is quite good, and the engineering uncomplicated, which is appreciated. As many other old vintage kits, it can be converted into a fair representation of the original withy some love and time. I would say that the skill required for this conversion is within the reach of committed modelers that had already ventured into some kit-improving and detailing. Provided you invest some time and effort, you can obtain a large number of civil airliners from this kit. As stated in the building article, Kora Models has some sets that cover a few of the choices (not sure how accurate they are, mine had some glitches), but combining different issues of the Italeri kit (radial, inline, short tailcone, long tailcone) and doing your decals you are also set for a nice ride. Since there is so little material about this Chilean machines (I have all what is to be found online, by the way), I am eager to know if fellow aviation enthusiast from Chile could come forth with more photos. For what I can tell, no registrations or logos were painted on the upper surfaces of the wings,. and only one photo hints at "LAN" painted underneath the right wing.
- 73 replies
-
- 55
-
-
-
- Airliner
- South America
- (and 1 more)
-
Revell A330-200 "Aerolineas Argentinas"
cristianxb1983 posted a topic in Work in Progress - Aircraft
Hi everyone, I decided to stop lurking and become more participative with my very first WIP build... It was started 5 years ago but work, time and space didnt allow me to continue. Now with more time and proper space I decided to give it a try. The base model is the Thai Revell 330-300 which was cut to measure in order to convert it to a 330-200 The tail was also modified for the new rudder and actuator. The nose remains the same with minor reshaping as ordering the Braz replacement would take ages to arrive. The aircraft will be displayed in the landing configuration, Flaps, Slats, Spoilers deployed as well as Thrust Reversers. I am trying to add as much detail as my workmanship and available materials permit. Any suggestions and Critiques are MOST WELCOMED Cristian ENGINES Reversers cut Reversers grill scratch made Extensions of the turbine cowling were scratched for better detail from behind and also for support of the reverser grills The grills with the support and some basic reverser flaps where scribed on the back This is the finished semi engine. I am planning on gluing everything like this and then join both halves MAIN AND NOSE LANDING GEAR Main gear with some minor detailing Major Hydraulic lines were added , some retraction brace springs and the covers for the gear bolts and brake fan exhaust to be added at the end after painting Nose Gear wit minor improvements. Some lines and some extra components. The springs are oversized. Taxi lights to be painted and properly fitted at the end as well as turn off lights added at the end VERTICAL STABILIZER and ACTUATOR FAIRING Tail modification and rescribing. There are 2 methods around the internet, but this was the easiest if you are willing to re scribe everything after. Major panels rescribed The new big fairings for the rudder actuator. Some people use miliput or epoxy putty but I was more comfortable with a mix of plastic and miliput APU, APU INTAKE and EXHAUST Some panel lines as guides ALWAYS check your decals first.... I spend a good amount of times researching photos and factory drawings and after I finished all the scribing I found out that the decals for the APU doors and intake are provided.... Apu Intake The tail of most Airliners are the only heavy riveted areas that would still be highlighted so I tried to show it. The riveting was a Rosie the riveter 0.65, wish I had at least 0.55 to make it more realistic. The APU exhaust was completely scratch as the one in the model is not very accurate. Tubing added for the interior. The navigation light will be added at the end. NOSE GEAR DOOR I added some thin black styrene to fill the gap. The revell instructions request to finish the nose gear with all items in the first steps of the build, due to its fragility I added some support and the gear will be added at the end after painting. Also more weight has to be added to compensate for the shortened fuselage. WINGS All flight control surfaces cut from each semi wing half. On the left wing I glued both halves and then proceeded to cut the surfaces but I found it a lot easier to do each half before gluing, which I did on the right wing Thinning of the trailing edges for what comes next Since all the surfaces are going to be deployed, all the area under the spoilers will be visible...so I had to fill it up somehow. I glued support beams to the upper half and all the hydraulic lines, flap lines, seals will be on the lower half for ease of painting. Wish I had the knowledge and materials to do photoetching... this could have been a lot easier than working with plastic. Basic spoilers. The actuator attachment is very complicated for the scale so I came up with a basic one. New wing navigation lights The wing root area has to be cut for the flaps to fit. FUSELAGE The seams were filled with a mix of CA glue and Rust pigment for easier visualization. Black pigments were used to find out which panel lines needed re scribing Panel liner from Tamiya was a great help to help position the nose and center fuselage, pigments would do the work as well Round styrene tubing helps with the positioning as it easily rotates until finding the perfect fit. And the fuselage is all glued. Center part was left open for easier access for reinforcing the joints with a mix of CA Glue and Polymers powder. HOPE YOU ENJOYED SO FAR -
Hello all, Been some time since my last 727 model, but having passed my coach driving test I've been rather busy! But having been recently furloughed I've had some time to finish my Zvezda 737-800 I started some time ago, complete with 26 Decals Caribbean Airlines decals for 9Y-TAB. One of my favourite builds, and my first Zvezda build though a bit more fiddly than I thought, some over engineered bit's (the TINY bit needed to go on the wingtip for example could have been part of the mould, I ended up loosing that part so had to use a plasticard replacement) For the flying option I went for to use the stand, putting the main wheels in the body wasn't easy, nor was putting the front doors for the front wheel easy either, and the idea of having just two very tiny holes to hold the horizontal stabilizers isn't great, especially when a decal goes over it as well, so having to be careful with glue with not much of a fitting. So a fiddly kit but really does pay off in the end, happy with this and looking forward to my Minicraft build next, thanks for looking! James.
-
After much research, head-scratching, scratch-building, and a lot of exercise looking for missed small parts on the carpet and diverse places in the general vicinity of the building board, the model is completed. The model portrays the plane as it was while located in the USA in 1923 at Curtiss Field, being displayed and flown for the general public, during events and demonstrations. The plane was originally exported to create an airline, but the USA school of doing business/trade (for those unfamiliar: "we will push our stuff into your market and will not be very happy to allow your products to compete with ours in our own market") prevented that, and the plane was confiscated, the project torpedoed, and much later the plane was released to Curtiss, where it became little more than a curious prop. Changes are noticeable during this plane's life, in its marks, details and color. You may find photos of it (earlier in its life) as G-5414 with radio masts on nose an tail (reputedly one of the first planes to carry a Marconi radio), and as -an also early- G-EAAF with different placement and size for the regs and some color changes on the extended cabin and nose area. I had to commission a special set from Arctic Decals, which turned as usual wonderful. This is a conversion of an O/400 into a O/700, for both, the original plane, and the model, which started as a rather not very enticing, outdated, Airfix effort of many decades ago, and nothing like the fine products Airfix cranks out nowadays. The represented plane itself as said was a converted O/400 that was upgraded to a O/700 standard. For those -understandably- remiss to read the very long building post, this conversion implies having to delete all military-related detail, produce a full-length passenger cabin interior with bathroom included, all the windows and door, noticeably extended engine gondolas, a new fuselage front and nose, and several minor adjustments and changes. You have, needles to say, to commit to extensive research and a long build. I can state, very frankly, that this was a much more protracted and complicated voyage that I ever thought, and my dreams of doing at least one more in civil guise are absolutely dismissed. At least until a better kit appears, something I am not inclined to believe in the least that will ever happen. The WiP is where many details and clarifications con be found, so perhaps will be a good read if you have an interest in using the old and very dated Airfix kit for a civil conversion (of which there were very many, some that need just little changes on the kit, by the way): There were also minimally modified machines that were used for civil transport during the armistice, another bunch for the European routes, and even some that were sold to India and China. So you are not condemned anymore to build a "bloody paralyzer", and instead can explore the glamorous dawn of civil passenger transport and airliner industry.
- 73 replies
-
- 36
-
-
-
- Airliner
- conversion
- (and 1 more)
-
Contemplating the harmonious lines of a well-designed classic twin is always a pleasure, and for those privileged to have seen them in person, a sight to remember. In its attractive American Airlines livery the plane seems to invite its ten passengers to ply the skies above serene landscapes, in comfort and relaxation, including a restroom. Not for nothing this era of aviation is called "golden". This endeavor started as a comparative build -of the same airplane type- against a Rareplane vacuformed kit. The building process of both kits can be visited here: The model is based -as explained in the building article- on a revamp by Encore of the original -and frankly poor- PM kit. This new boxing included -to no exceptional advantage to me- some resin bits that were supposed to be an upgrade, and a very bad new transparency, that in my sample only deserved the trash can, with apologies to the trash can. A few of the resin parts are identical to those of the original kit, or worse, and only the cabin door, exhausts, cowls and engines are of use (if you are not too picky, especially regarding the cowls). The kit's alternate civil decals that tempted me to buy the boxing are a total fiasco, since the real scheme was applied to a highly modified plane of later date, that has very little to do with the kit, having, among other changes, squared wing tip additions, and three-blade props. So it's either kit surgery or trashing those nice -but useless- decals. Thus I went a different path, adding interior and exterior detail and commissioning a decal sheet from Arctic Decals for a plane used by American Airlines. I know that there were other Beech 18 kits issued by Hobbycraft, and having such variety of nice civil liveries, I am surprised that a better injected kit doesn't exists, or at least an upgrade set -that makes sense, that is. In any case these old platforms can be turned into fair models with some work (and research, something many manufacturers don't bother with). Many of you have one or other of these incarnations (RarePlane, Encore, PM; Hobbycraft) in the stash. I think they make for a good skill-honing project, without pretending to obtain the ultimate model. Personally, I find the venerable RarePlane vac superior to these much modern alternatives so far in the market; you may have a look here: Knowing the limitations of this kit (which are various) I may venture -some day- into another conversion, since there are things that I could do better after having dealt now with this kit. Even though it took some time and no little work, here is the result obtained with the Encore kit, with which I am fairly pleased, all things considered.
- 57 replies
-
- 31
-
-
-
- Airliner
- conversion
- (and 1 more)
-
The BFW M.20 (Or Messerschmitt M.20) was a passenger plane of the 30's built in several versions and used extensively by Lufthansa and subsidiaries. The version here (M.20b2) was able to carry 10 passengers in comfort, even providing a restroom with toilet and sink, necessities always appreciated on board. A monoplane of metallic construction and elegant lines, it was a truly modern plane, considering its contemporaries.
- 130 replies
-
- 8
-
-
- Golden Age
- airliner
- (and 1 more)
-
a.thumb.jpg.58d92d116b0315dc55d352fd191d65e4.jpg) I had this old Minicraft kit lying in my stash of doom, started, in fact already painted White and I was reluctant throwing it away´even after the much better Skyline kit was available. Going through my collection of decals, I found the BOA Easy Jet sheet and gave it a try. I won´t show you the gear wells, as there are none, I mentioned Minicraft, didn't I? The Right engine is tilted a Little bit, don't know why, oh yes, Minicraft... I tried to use some printed Pictures as Background, but still have Problems with reflections, but some are ok, just to create an Airport atmosphere. Easy Jet used this type until 2006, I think, now they are using Airbusses. So, enjoy the Pictures! Comments are Always welcome, I can live with critique…. cheers, Norbert
I had this old Minicraft kit lying in my stash of doom, started, in fact already painted White and I was reluctant throwing it away´even after the much better Skyline kit was available. Going through my collection of decals, I found the BOA Easy Jet sheet and gave it a try. I won´t show you the gear wells, as there are none, I mentioned Minicraft, didn't I? The Right engine is tilted a Little bit, don't know why, oh yes, Minicraft... I tried to use some printed Pictures as Background, but still have Problems with reflections, but some are ok, just to create an Airport atmosphere. Easy Jet used this type until 2006, I think, now they are using Airbusses. So, enjoy the Pictures! Comments are Always welcome, I can live with critique…. cheers, Norbert -
Time is 00:29 on Saturday/Sunday night/morning and five of the top seven topics in the RFI are airliners! Who'd have thought that would happen!
-
(notice that the drawing has the American Airlines legend on the nose, which no photo I have shows for this plane. The instructions and decals have it right, though) The stocky and rather ungainly appearance of the Vultee V-1A is balanced by the impression of power and compactness it gives. Fast and rugged, with a characteristic forward-slanting windshield, its general lines having a portly look. One of the Vultees was modified as a seaplane, and sold to Russia, and I have modeled that plane using the Execuform vacuformed kit, some time ago: The Vultee lines are vaguely similar to other comparable planes of the time, like the Lockheed Orion, Clark GA-43 and Northrop Delta. Capable of carrying two crew members and eight passengers in relative comfort, it was used by airlines as well as private owners, among the latter William Randolph Hearst, the newspaper tycoon, reputedly depicted in Orson Welles' "Citizen Kane". The Special Hobby kit has been in the market for a while, laudably also in a civil guise, which is the one I purchased. The kit decal options are nice: American Airlines, Lady Peace (more like an afterthought since it's not depicted in the instructions) flown by Merrill and Richman over the Atlantic, an oil company executive transport, and one of the American Airlines machines in which Jimmy Doolittle established a record (sponsored by Shell, whose logo was added to the plane). Some of them need a different interior, a fact not contemplated by the kit makers. Lady Peace needs long-range tanks and exterior modifications (window arrangement, RDF antenna, engine, etc.), and others had an executive interior (the oil company hack). Pay attention to the exhaust plumbing which is different in some planes -most likely tied to the type of engine used) and at least one machine had different L.G. doors (Vultee NO A-181). For the adventurous modelers, other possible civil schemes are Alaska Airways, Frank Fuller's plane, one that went to México (only a couple of not very satisfying photos on the Net), United Gas System, Spirit of Pueblo, Sierra Aviation, Canadian Colonial Airways (CF-AWC) (This should be CF-AWQ, as correctly pointed out by Roger Holden below), and some others. All the kit options were considered but discarded since I decided to represent the Hearst machine, which was overall gold with stylized elements in red, plus the logos of the San Francisco and Los Angeles Examiners, owned by him. I became curious about Hearst after watching, more than once, that remarkable movie -cited above- that is Citizen Kane. A few years ago I visited Hearst Castle in the California coast, a perfect example of all the taste money can't buy, a monument to cultural pillage and appropriation rendering a remarkable kitsch result. In any case, the plane landed in Hearst's private airstrip at his property, as well as other of his planes and the planes of notable and famous guests. Do not be tricked by the Lady Peace that is in a museum, which is not the original machine but actually Hearst's. If you are representing Lady Peace, there are contemporary drawings of the different interior, and rather base your model on photos than on the reworked, repainted museum example that is, like some museums examples, an absolutely meritorious effort, but not necessarily accurate. The kit, as many kits, needs some details added, which will be dealt with during the construction stages. Since parts of the kit are shared with the militarized version, unfortunately you have to close with a lid a hole on the spine of the fuselage, that will keep you busy trying that the seam doesn't show on the finished model. Being a luxury model, Hearst's plane had six reclining seats (instead of eight) and a full bathroom (instead of the standard one), as well as better radio and navigation systems. The engine was more powerful too. One Vultee V-1A even participated in the 1936 Transcontinental Air Race (decals in the kit) with number "B3", obtaining a third place, whereas the first and second were obtained by women. Here is the roster, juts for the sake of detail: 1. Thaden and Noyes -Beech C-17R NR-15835 2. Laura Ingalls -Lockheed Orion NR-14222 3. William Gulick -Vultee V-1A NR-14255 The prototype X12293, of smaller airframe, is distinguishable because of its different landing gear covers, rounded rudder where it meets the fuselage tailcone, different exhausts and in most photos a three-blade prop. It went to American Airlines. Many long but fruitful hours of research led me to an article in Air Magazine #18, an old Aero Digest April 1933 article, Aviation April 1933, Popular Aviation August 1934, Air Classics, Paul Matt Scale Airplane Drawing Volume 2, pages on Flight Magazine, and other sources. I would like to commend Special Hobby/Azur/etc. on the release of refreshing civil planes. The kit moldings, though, were meant to cover a number of variants, not all civil. This, we know, helps with the manufacturer's costs and revenue, and provides modelers with more options, but at the cost of a burden put on the modeler to deal with some fixes. As mentioned above, there is an opening on the fuselage spine that doesn't apply to any of the civil versions presented in this boxing. There is a cover to deal with it, and the surrounded area has to be sanded and re-engraved to delete any traces of the paneling of the military version from it. The pesky ejector towers should be removed from wings and fuselage interior. There is some minor thin flash in many parts, mostly easily cleaned, though. As it is the rule with this type of kit there are no locating pins, and the ridges molded to indicate where parts go inside the fuselage are a bit vague. There are some butt-joints that will need securing. The fit of assemblies that come in halves (fuselage, engine cowl) is again imprecise and will need some adjusting and a little persuasion (one half is a tad smaller than the other, creating a ridge). A full interior is provided, although somewhat basic and as said above, not accurate for some of the versions. The drawings in the instructions are not bad, but they sin -yet once again as it is common with this type of kit- of imprecision. Where, exactly, goes the floor? above that faint ridge? below it? against it? and the bulkhead? On that ridge molded on the fuselage sides? behind it? before it? and the cockpit floor? and so forth for other parts. "More or less there" "Try and you will find out" "Oops, may be not there" could be the calls for the drawings. The sprues: Some details: Nice surface detail, more consistent than the general short-run kit: Bagged decals, resin bits, canopy: I was elated that for a change the resin parts did not come pre-broken. I noticed this difference between exhausts:
-
The 30's. From the Golden Age of Aviation, its four engines lazily droning in the sky, comes this luxurious lumbering giant, arguably the epitome of traveling in style to mysterious and remote lands. Vast landscapes: arable land, coastlines, deserts, intricate cities of labyrinthine design, proud mountain ranges, all slowly slide by below, in changing colors and textures. By sunset the bright tints of the sky and the billowing clouds are reflected upon the surface of a sea. Passengers sedately recline on their ample seats, their legs comfortably extended, or are pensively sipping a cocktail in the plane's bar, or even enjoying a sophisticated full meal on a removable table, pampered by a staff of courteous attendants. The quality of the inlaid wood paneling, the exquisitely weaved upholstery, the tasteful curtains, the porcelain, the crystals, all glows with the aura of England at its highest. Romance, mystery, luxury, comfort, sophistication, are all just the visible flesh of a well-thought machine, that rendered an incredible number of years and miles of reliable service, with an unimpeachable safety record. The construction thread can be visited here: Not all, as we know, was rosy, since the "Empire" (and the other empires) were creating their own share of very serious issues. The pinnacle of England as a world power would be challenged, and soon, unbeknownst to most of those passengers, in a few years the country would have to face the storm that will set Europe, and the world, ablaze. Humanity has a peculiar talent for ignoring the consequences of choosing bloodshed, misery, death, hunger and suffering, over adventure, discovery, and peace. But the H.P.42 is not only a symbol of luxury, it's also a symbol of peacetime, progress, romance, and ultimately of humanity's better angels, of what we would like our world to be. My thanks again to John Eaton, who facilitated the acquisition of the kit, and to Arctic Decals for producing the set that greatly enhances the model and solved the issue of the window frames and the ruined decal sheet in the kit. Thanks also to the fellow modelers that made comments and gave "emotional support" 😉 during the long build, and last but not least to the Hidden Ones that maintain this place of encounter and sharing: BM. I hope this model operates a bit like a time machine, and takes you to an era of shimmering glamour -the Golden Age of Aviation- that has so much to offer, so much to say, so much beauty to share, so much charm to explore. Not in vain it's called "Golden".
- 165 replies
-
- 129
-
-
-
- Imperial Airways
- Vacuformed
- (and 1 more)
-
Here I would like to show you this classic airliner before the wide bodies were available. The kit is from Nitto and has also been on the market under the Doyusha label (afaik). The kit's decals were quite ok, but I did not like the liveries (KLM and JAL). So Draw decals came to the rescue with this colourful livery. The specialists among the audience may have noticed, that Aeromexico did not use the -61, but the -63 with slightly different engines. But I hope nobody else will notice... The Cockpit glazing was not usable. So I had to use filler and had to sand it. The decals from Draw were also useful here. I hope you like this sleek airliner. Any comment is welcome. cheers, Norbert
- 14 replies
-
- 13
-
-
Here I present my Airbus A321. Austrian Airlines painted this Aircraft in 1996 with a lot of famous Austrians to celebrate the nation's Millennium, 1000 years Birthday. The model is OoB. I built this model a couple of years ago. At that time I didn't bother about the Winglets being too small and now I am too busy Building new models to alter the old ones. I was very proud having managed to get the very large decals aligned without accident. The Quality of the Revell decals helped a lot with that. Before one of you mentions it....I didn't know then that Authentic Airliner or Authentic decals existed….;-) The 321 requires less work than building a Revell 319 or 320 because the wing can be used as is. The other variants need some alteration on the small flaps. Mozart is on the tail. A friend of mine succeeded in finding out all the other names, too, but I can't find the note any more. So, ist your turn! I hope You like it! Cheers, Norbert PS: Any comment is appreciated, also if you native Speakers notice something with my english that sounds unusual to you. I still wanna learn. (I know…"wanna" is an Americanism…)
- 12 replies
-
- 14
-
-
Oh no...not another Airliner! Yes, and there is more to come. Here is a very colourful addition to my collection. In the early Noughties (2002-2006...) JAS painted there Aircraft in a very colourful manner. When I saw this kit, I just had to have it. Well, as usual, older Hasegawa decals tend to be brittle and this one was no exception. The decals reacted to softening fluid in a very unusual way. they wrinkled, but stayed that way even after drying. So I had to do some repair work with a lot of Colour mixing and painting at some Areas. It took some trials until I was satisfied with the results. I added an APU inlet just aft of the side tail, which will open when the APU is started. I got some MD-80s by Hasegawa in a similar livery and I am Looking Forward to Building them hoping for less difficulties... I like this scale especially for the big airliners. They are a lot easier to handle. cheers, Norbert
- 14 replies
-
- 16
-